Page 159 of 268

Navigation
Entertainment
Driving tips
157Reference
At a glance
Controls
Communications
Mobility
Adjusting volume
Turn knob1 on the CD player until the desired
volume is obtained.
You can also adjust the volume with buttons on
the steering wheel, refer to page11.
With the ignition key in radio-ready position or
higher, the setting is stored for the remote con-
trol currently in use.
Tone control
You can alter various tone settings, e.g. treble
and bass or the speed-dependent volume
increase.
The tone settings are applied to all audio
sources.
With the ignition key in radio-ready position or
higher, the settings are stored for the remote
control currently in use.
Changing tone settings
1.Press the button.
This opens the start menu.
2.Press the controller to open the menu.
3.Turn the controller until "Settings" is
selected and press the controller.
4.Select "Audio" and press the controller.
The tone settings can also be selected if you
have called up "Entertainment" in the start
menu:
Select "Set" and then "Tone", and press the
controller.
Treble and bass
1.Select "Treble / Bass" and press the con-
troller.
2.Move the controller to the left or right to
select "Treble" or "Bass".
3.Turn the controller until the desired setting
is selected.
Balance and fader
You can adjust the volume distribution in the
same manner as "Treble / Bass".
>"Balance": left/right volume distribution
>"Fader": front/rear volume distribution
Speed-dependent volume control
The speed-dependent volume control auto-
matically increases the volume with increasing
driving speed. You can set various stages for
the increase in volume.
Page 161 of 268
Navigation
Entertainment
Driving tips
159Reference
At a glance
Controls
Communications
Mobility
Resetting tone settings
You can reset all tone settings to the default
setting.
1.Open the start menu.
2.Press the controller to open the menu.
3.Turn the controller until "Settings" is
selected and press the controller.
4.Select "Audio" and press the controller.
5.If necessary, move the highlight marker to
the uppermost field. Turn the controller
until "Reset" is selected and press the con-
troller.
6.In vehicles equipped with two drives:
Select "Yes" and press the controller.
Page 163 of 268

Navigation
Entertainment
Driving tips
161Reference
At a glance
Controls
Communications
Mobility
1.Move the highlight marker to the second
field from the top.
2.Choose a selection criterion and press the
controller.
Sampling stations, scan
The stations on the current waveband are auto-
matically sampled in succession.
1.Select "FM" or "AM" and press the control-
ler.
"Set" is selected.
2.Press the controller.
Other menu items are displayed.
3.Select "Scan" and press the controller.
The stations are sampled.
Stop sampling:
1.Press the controller.
2.Select "Scan" and press the controller.
Station sampling is interrupted and the
selected station stays on.
Buttons on the CD player
To sample stations, press the but-
ton for the corresponding direction for an
extended time.
To stop scanning, press the button again.
Selecting the frequency manually
With "Manual" you can select stations that are
received in addition to those displayed.
1.Select "FM" or "AM" and press the control-
ler.
2.Move the highlight marker to the second
field from the top.
3.Select "Manual" and press the controller.
4.Turn the controller to set a certain fre-
quency.
Updating stations with best reception
If on a longer journey you move out of the
reception range of the stations originally
received, you can update the list of stations
received with the strongest signals in the AM
waveband.
1.Select "AM" and press the controller.
2.Move the highlight marker to the second
field from the top.
3.Select "Autostore" and press the controller.
"Set" is selected.
4.Press the controller.
Other menu items are displayed.
Page 165 of 268

Navigation
Entertainment
Driving tips
163Reference
At a glance
Controls
Communications
Mobility
4.Select "Store" and press the controller.
5.Turn the controller until the desired mem-
ory position is selected.
The number of the memory position
appears beside the name or frequency of
the station.
6.Press the controller.
The station is stored.
RDS Radio Data System
RDS transmits additional information in the FM
frequency range. If the reception conditions are
good, the station names are shown on the Con-
trol Display. Where reception is poor or in the
event of interference, it may take some time
before the station names will appear in the dis-
play.
Switching RDS on/off*
1.Select "FM" and press the controller.
"Set" is selected.
2.Press the controller.
Other menu items are displayed.
3.Select "RDS" and press the controller.
RDS is activated.
Satellite radio*
You can receive over 100 different channels
with high sound quality.
The channels are offered to you in predefined
packages. To receive the channels of your
choice, you must have this package enabled.
With this new technology, signal losses
can occur from time to time and result in
audio interruptions.<
Enabling or disabling channels
iDrive, for operating principle refer to page16.
1.Press the button.
This opens the start menu.
2.Move the controller backwards to call up
"Entertainment".
3.Select "SAT".
4.Press the controller.
The channels are displayed.
These channels are enabled.
Enabling
1.Select a channel that has not yet been
enabled and press the controller.
Page 167 of 268

Navigation
Entertainment
Driving tips
165Reference
At a glance
Controls
Communications
Mobility
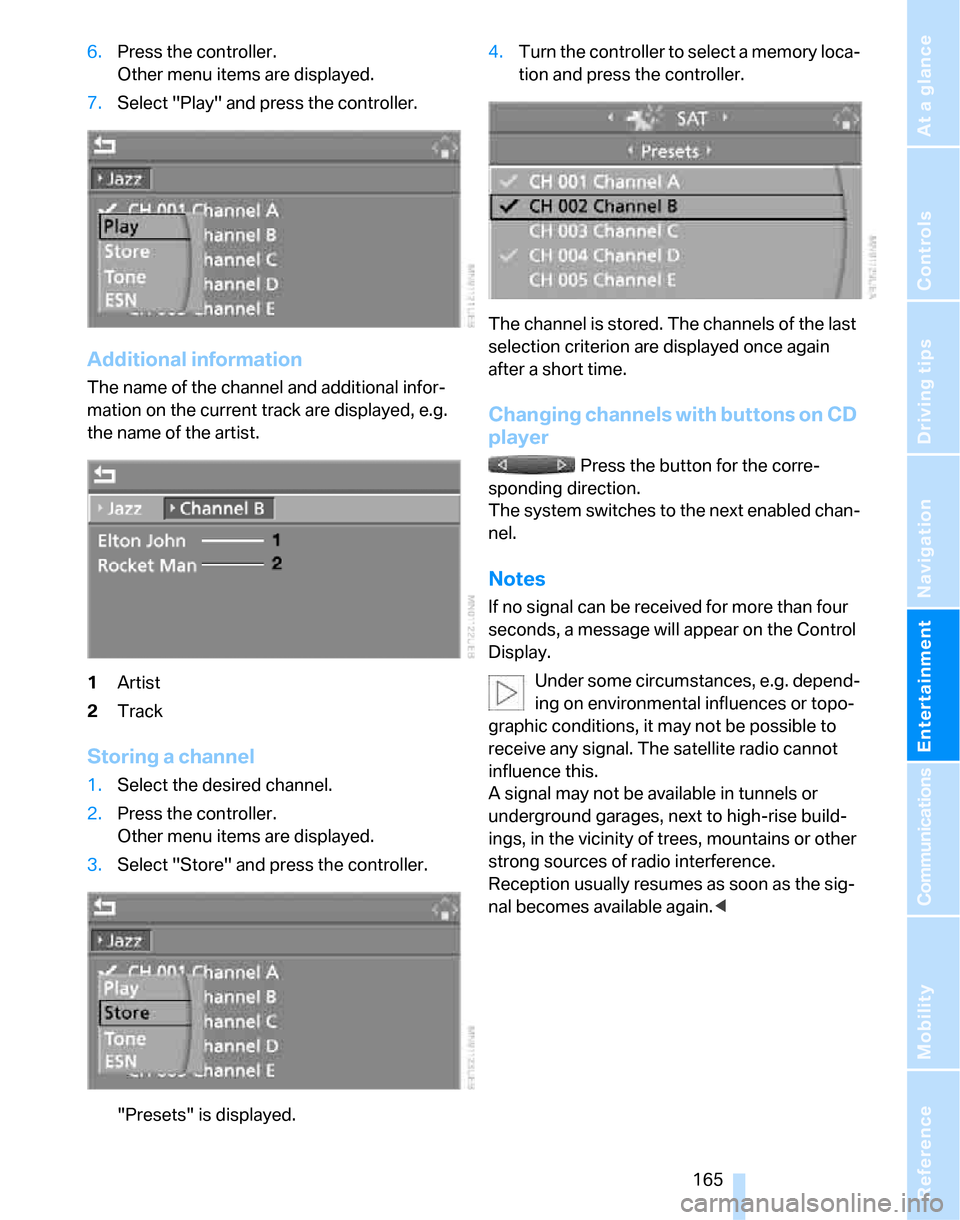
6.Press the controller.
Other menu items are displayed.
7.Select "Play" and press the controller.
Additional information
The name of the channel and additional infor-
mation on the current track are displayed, e.g.
the name of the artist.
1Artist
2Track
Storing a channel
1.Select the desired channel.
2.Press the controller.
Other menu items are displayed.
3.Select "Store" and press the controller.
"Presets" is displayed.4.Turn the controller to select a memory loca-
tion and press the controller.
The channel is stored. The channels of the last
selection criterion are displayed once again
after a short time.
Changing channels with buttons on CD
player
Press the button for the corre-
sponding direction.
The system switches to the next enabled chan-
nel.
Notes
If no signal can be received for more than four
seconds, a message will appear on the Control
Display.
Under some circumstances, e.g. depend-
ing on environmental influences or topo-
graphic conditions, it may not be possible to
receive any signal. The satellite radio cannot
influence this.
A signal may not be available in tunnels or
underground garages, next to high-rise build-
ings, in the vicinity of trees, mountains or other
strong sources of radio interference.
Reception usually resumes as soon as the sig-
nal becomes available again.<
Page 169 of 268

Navigation
Entertainment
Driving tips
167Reference
At a glance
Controls
Communications
Mobility
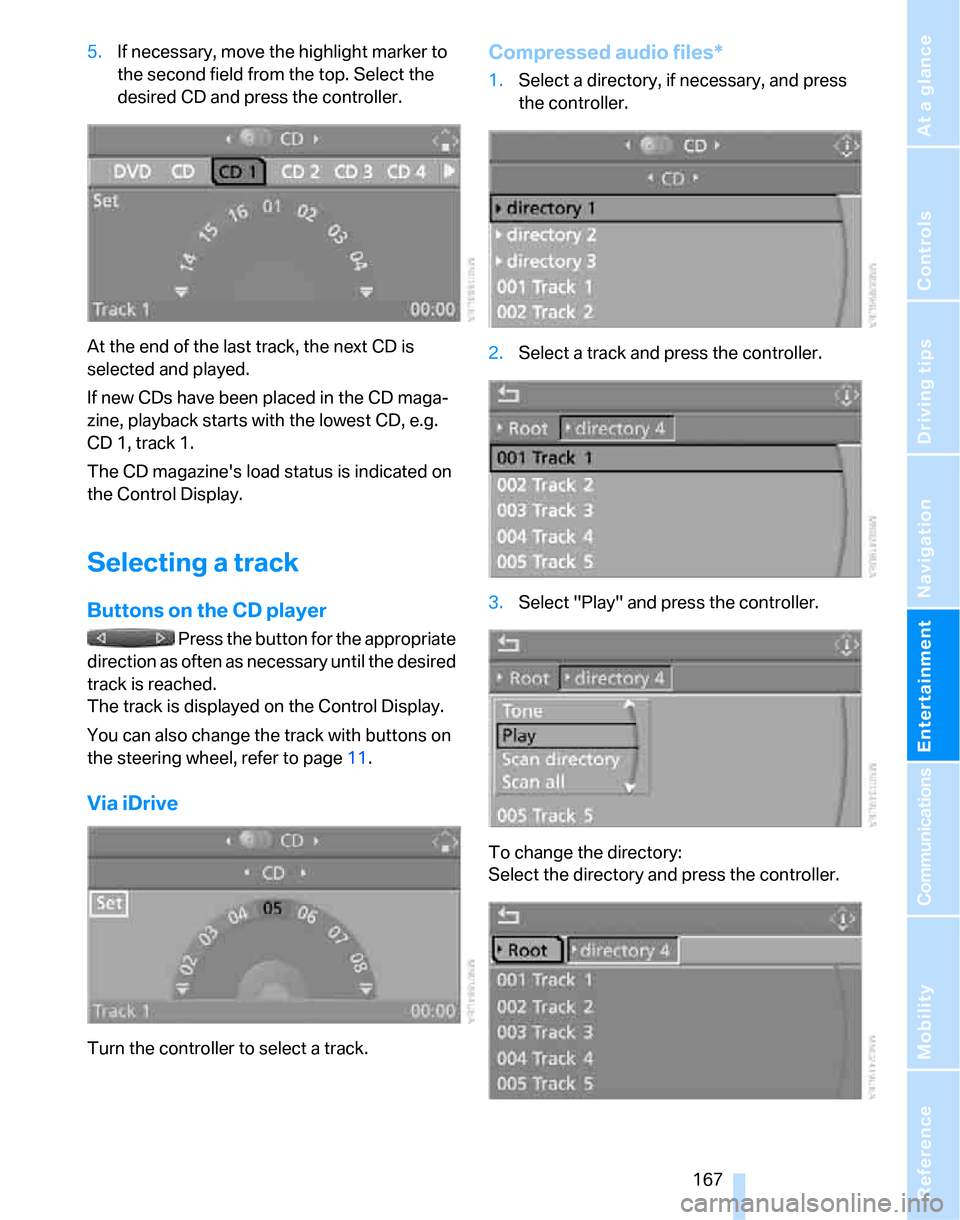
5.If necessary, move the highlight marker to
the second field from the top. Select the
desired CD and press the controller.
At the end of the last track, the next CD is
selected and played.
If new CDs have been placed in the CD maga-
zine, playback starts with the lowest CD, e.g.
CD 1, track 1.
The CD magazine's load status is indicated on
the Control Display.
Selecting a track
Buttons on the CD player
Press the button for the appropriate
direction as often as necessary until the desired
track is reached.
The track is displayed on the Control Display.
You can also change the track with buttons on
the steering wheel, refer to page11.
Via iDrive
Turn the controller to select a track.
Compressed audio files*
1.Select a directory, if necessary, and press
the controller.
2.Select a track and press the controller.
3.Select "Play" and press the controller.
To change the directory:
Select the directory and press the controller.
Page 171 of 268

Navigation
Entertainment
Driving tips
169Reference
At a glance
Controls
Communications
Mobility
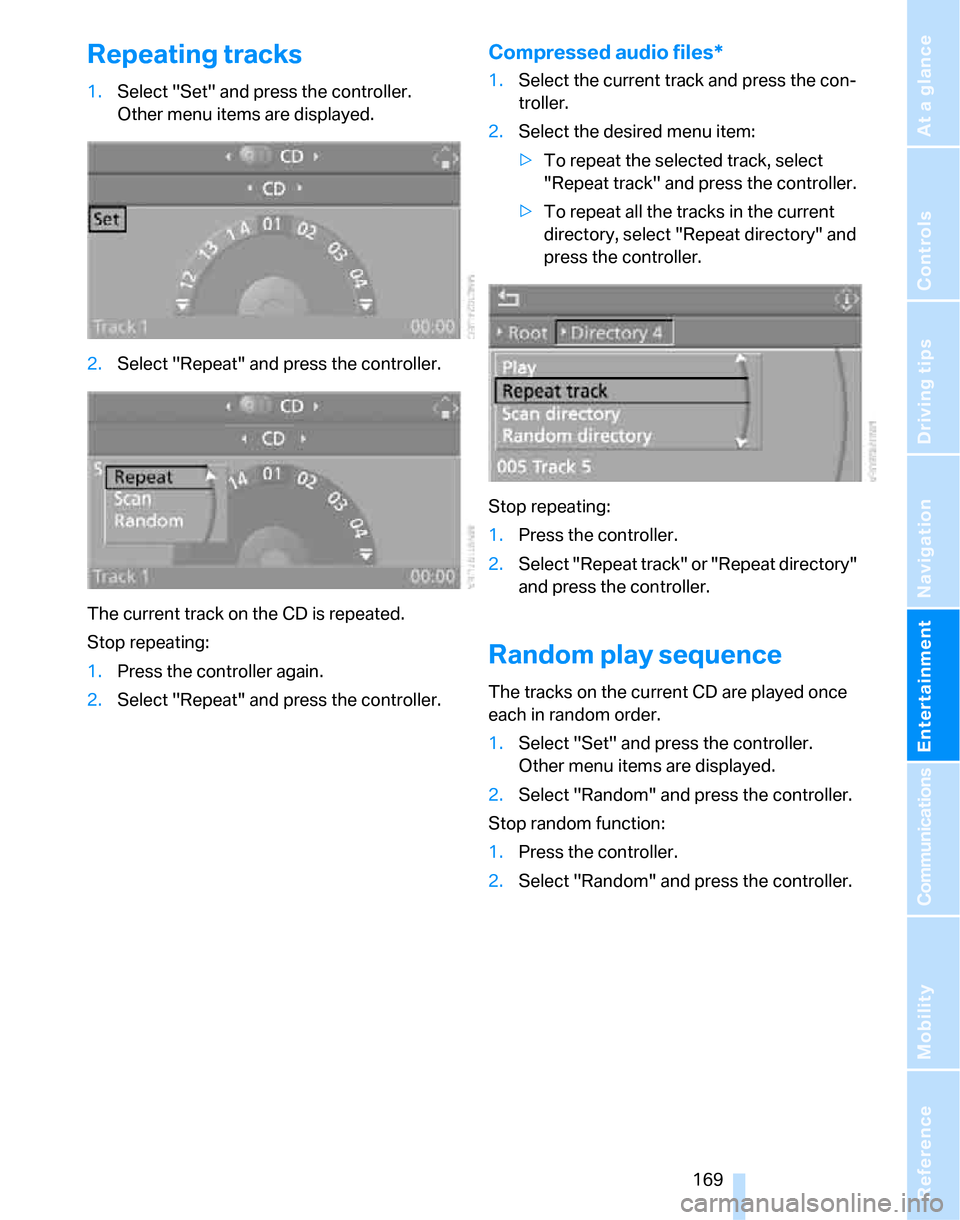
Repeating tracks
1.Select "Set" and press the controller.
Other menu items are displayed.
2.Select "Repeat" and press the controller.
The current track on the CD is repeated.
Stop repeating:
1.Press the controller again.
2.Select "Repeat" and press the controller.
Compressed audio files*
1.Select the current track and press the con-
troller.
2.Select the desired menu item:
>To repeat the selected track, select
"Repeat track" and press the controller.
>To repeat all the tracks in the current
directory, select "Repeat directory" and
press the controller.
Stop repeating:
1.Press the controller.
2.Select "Repeat track" or "Repeat directory"
and press the controller.
Random play sequence
The tracks on the current CD are played once
each in random order.
1.Select "Set" and press the controller.
Other menu items are displayed.
2.Select "Random" and press the controller.
Stop random function:
1.Press the controller.
2.Select "Random" and press the controller.
Page 173 of 268

Navigation
Entertainment
Driving tips
171Reference
At a glance
Controls
Communications
Mobility
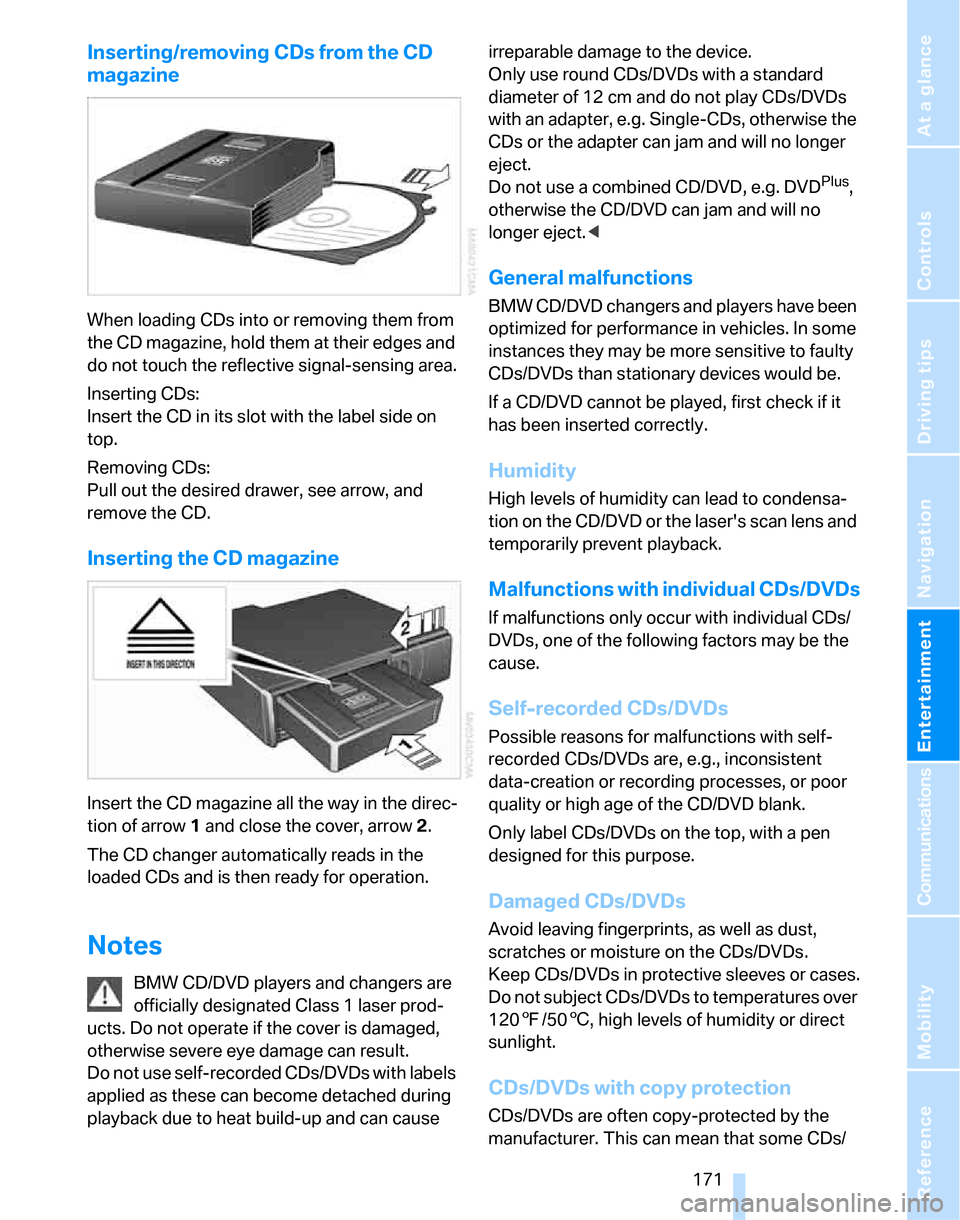
Inserting/removing CDs from the CD
magazine
When loading CDs into or removing them from
the CD magazine, hold them at their edges and
do not touch the reflective signal-sensing area.
Inserting CDs:
Insert the CD in its slot with the label side on
top.
Removing CDs:
Pull out the desired drawer, see arrow, and
remove the CD.
Inserting the CD magazine
Insert the CD magazine all the way in the direc-
tion of arrow 1 and close the cover, arrow 2.
The CD changer automatically reads in the
loaded CDs and is then ready for operation.
Notes
BMW CD/DVD players and changers are
officially designated Class 1 laser prod-
ucts. Do not operate if the cover is damaged,
otherwise severe eye damage can result.
Do not use self-recorded CDs/DVDs with labels
applied as these can become detached during
playback due to heat build-up and can cause irreparable damage to the device.
Only use round CDs/DVDs with a standard
diameter of 12 cm and do not play CDs/DVDs
with an adapter, e.g. Single-CDs, otherwise the
CDs or the adapter can jam and will no longer
eject.
Do not use a combined CD/DVD, e.g. DVD
Plus,
otherwise the CD/DVD can jam and will no
longer eject.<
General malfunctions
BMW CD/DVD changers and players have been
optimized for performance in vehicles. In some
instances they may be more sensitive to faulty
CDs/DVDs than stationary devices would be.
If a CD/DVD cannot be played, first check if it
has been inserted correctly.
Humidity
High levels of humidity can lead to condensa-
tion on the CD/DVD or the laser's scan lens and
temporarily prevent playback.
Malfunctions with individual CDs/DVDs
If malfunctions only occur with individual CDs/
DVDs, one of the following factors may be the
cause.
Self-recorded CDs/DVDs
Possible reasons for malfunctions with self-
recorded CDs/DVDs are, e.g., inconsistent
data-creation or recording processes, or poor
quality or high age of the CD/DVD blank.
Only label CDs/DVDs on the top, with a pen
designed for this purpose.
Damaged CDs/DVDs
Avoid leaving fingerprints, as well as dust,
scratches or moisture on the CDs/DVDs.
Keep CDs/DVDs in protective sleeves or cases.
Do not subject CDs/DVDs to temperatures over
1207/506, high levels of humidity or direct
sunlight.
CDs/DVDs with copy protection
CDs/DVDs are often copy-protected by the
manufacturer. This can mean that some CDs/