2007 BMW 323i length
[x] Cancel search: lengthPage 92 of 268

Technology for driving comfort and safety
90
Flat Tire Monitor FTM*
The concept
The Flat Tire Monitor monitors tire pressures
while the car is being driven. The system
reports any significant loss of pressure in one
tire in relation to another.
If a tire loses pressure, its rolling radius
changes, and this in turn alters the speed of
rotation. This change is detected and is
reported as a flat tire.
Functional requirement
In order to assure the reliable reporting of a flat
tire, the system must be initialized for the cor-
rect tire inflation pressure.
The system must be reinitialized each
time a tire inflation pressure has been cor-
rected or a wheel or tire has been changed.<
System limitations
The Flat Tire Monitor is unable to warn
the driver of sudden, severe tire damage
caused by external factors, nor can it identify
the gradual loss of pressure that will inevitably
occur in all four tires over a lengthy period of
time.<
In the following situations, the system could be
delayed or malfunction:
>System has not been initialized
>Driving on snowy or slippery road surface
>Performance-oriented style of driving: slip
in the drive wheels, high lateral acceleration
>Snow chains are attached
Initializing the system
The initialization is completed during driv-
ing, which can be interrupted at any time.
When driving resumes, the initialization is con-
tinued automatically.
Do not initialize the system while snow chains
are attached.<
iDrive, for operating principle refer to page16.1.Press the button.
This opens the start menu.
2.Press the controller to open the menu.
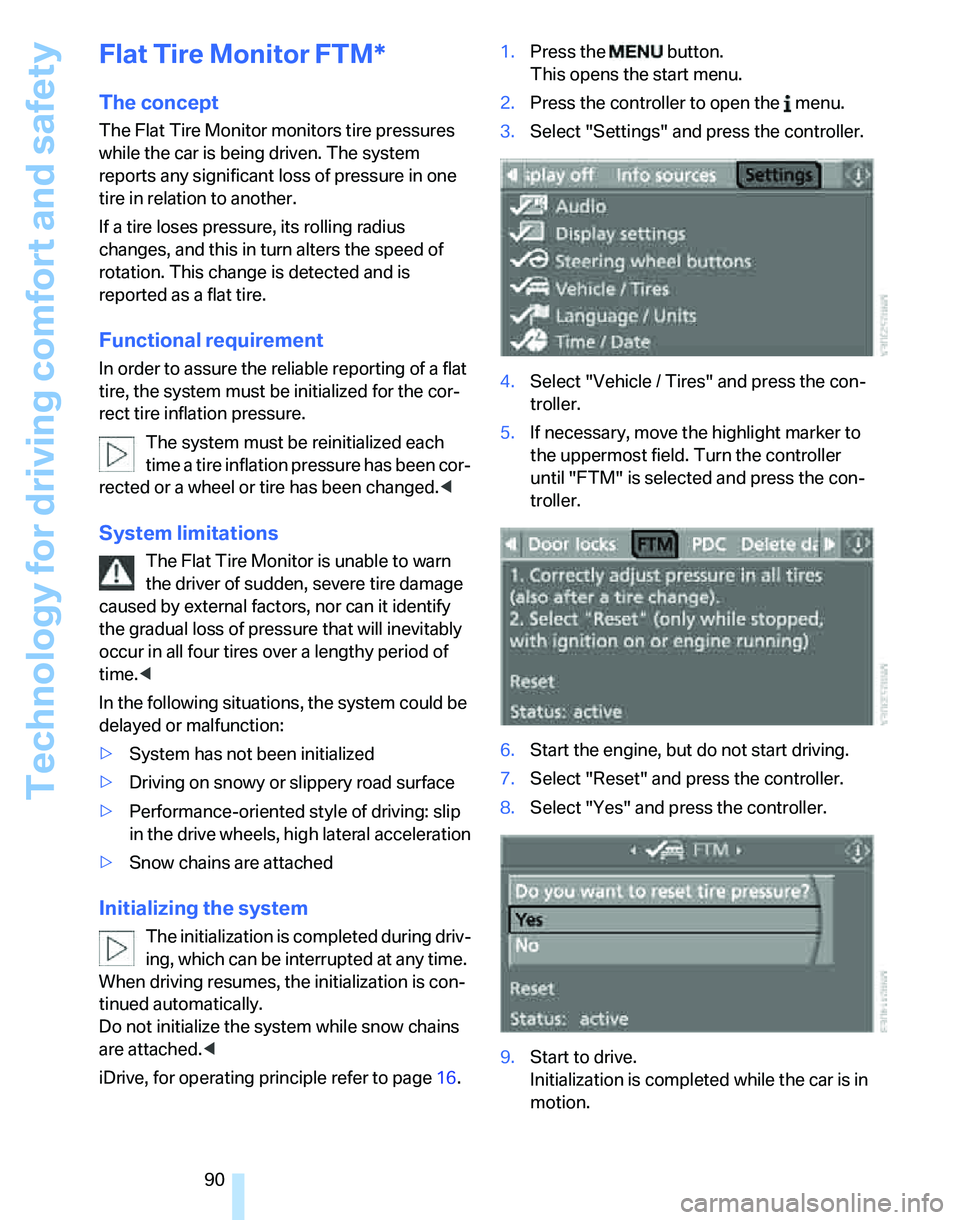
3.Select "Settings" and press the controller.
4.Select "Vehicle / Tires" and press the con-
troller.
5.If necessary, move the highlight marker to
the uppermost field. Turn the controller
until "FTM" is selected and press the con-
troller.
6.Start the engine, but do not start driving.
7.Select "Reset" and press the controller.
8.Select "Yes" and press the controller.
9.Start to drive.
Initialization is completed while the car is in
motion.
Page 119 of 268

Controls
117Reference
At a glance
Driving tips
Communications
Navigation
Entertainment
Mobility
>Hooks for hanging up shopping bags or tote
bags, for example, on the left and right-hand
sides of the cargo bay
>Net for small objects on the right trim panel
of the cargo bay
>Storage compartment under the floor panel
Depending on your vehicle's equipment, other
storage spaces can be found in the cargo bay:
>Net
* for securing smaller objects, to be
attached to the fixtures on the floor panel
>Net
* on the left side trim of the cargo bay
instead of the rubber strap
>Reversible cargo area floor panel with inte-
grated plastic cover
* for cargo bay or
bumper
>Folding, removable box
* under the floor
panel, e.g. for wet or dirty items
>Insertable dividers
* and removable storage
tray for the storage compartment under the
floor panel
Folding up the floor panel
Do not exceed the maximum permissible
load of 55 lbs/25 kg for the storage com-
partment under the floor panel, otherwise dam-
age could result.<
Sedan
Press the floor panel against the ceiling of the
cargo bay; a locking device holds the floor panel
in place. To detach the floor panel, pull it out of
the locking device.
Equipment version with drawer:
Take the retaining strap on the right-hand side
of the drawer out of the bracket and use it to fix
the floor panel in place.
Sports Wagon
Fold up the floor panel and take it out or lean it
forward.
Lashing eyes
You will find lashing eyelets in the cargo bay for
securing luggage items with nets or tensioning
straps, refer to page125.
Ski bag*
Designed for safe, clean transport of up to
4 pairs of standard skis or up to 2 snowboards.
With the ski bag you can stow skis with a length
of up to 6ft 10in/2.10m. When skis of 6ft 10in/
2.10 m length are loaded, the overall capacity of
the ski bag is reduced due to its tapered design.
Loading
1.Fold down the center armrest.
2.Press the button, reach into the recess and
fold down the cover.
3.Open the Velcro fastener, spread the ski
bag between the front seats and insert the
skis or snowboards.
Page 144 of 268

Destination entry
142 5.If necessary, select an additional route cri-
terion and then press the controller:
>"Dynamic route"
Automatic rerouting due to traffic
obstructions. Depending on the type of
road as well as the type and length of
traffic obstruction, the route can also be
calculated in a way that passes through
the traffic obstruction.
>"Avoid tollroads"
Toll roads are avoided as far as possible.
>"Avoid ferries"
Ferries are avoided as far as possible.
To exit from the menu:
Select the arrow and press the controller.
The route criteria can also be changed in the
arrow or map display.
1.Select the symbol for the route criterion and
press the controller.
2.Select a route criterion and press the con-
troller.
Word-matching principle
The system's word-matching principle makes it
easier for you to enter the names of streets or
towns. The system runs ongoing checks, com-
paring your destination entries with the data
stored on the navigation DVD as the basis for
instant response. The benefits for you include:
>Names of specific locations can also vary
from the official versions if you are using a
spelling that is customary in another coun-
try.
Example:
Instead of the German spelling "München"
you can also enter the English spelling
"Munich" or the Italian spelling "Monaco".
>When you are entering the names of towns
and streets the system will complete them
automatically as soon as enough letters are
available to ensure unambiguous identifica-
tion.
>The system only accepts name entries
beginning with letters that are stored on the navigation DVD. The system will not accept
non-existent names and addresses.
Page 151 of 268

Navigation
Driving tips
149Reference
At a glance
Controls
Communications
Entertainment
Mobility
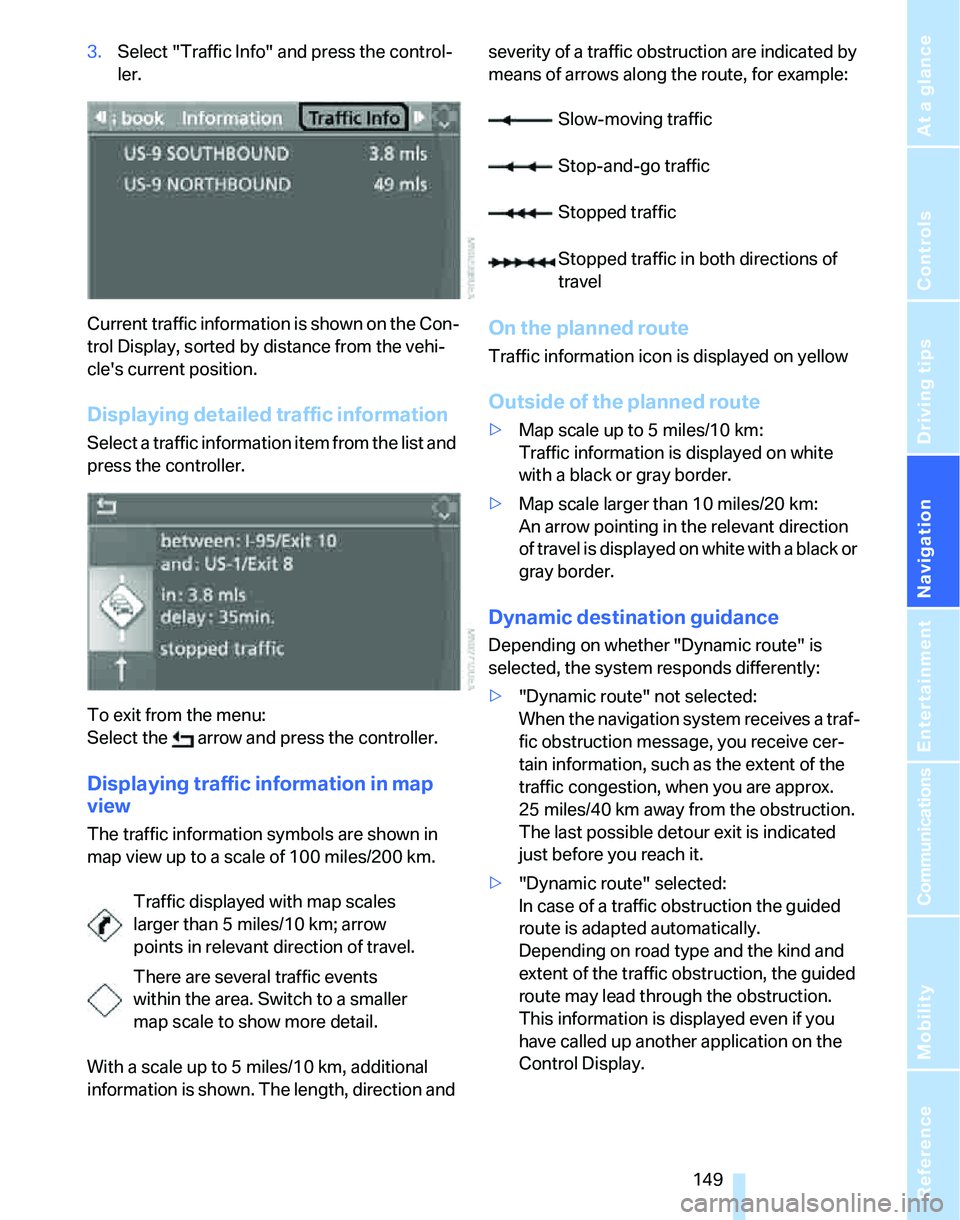
3.Select "Traffic Info" and press the control-
ler.
Current traffic information is shown on the Con-
trol Display, sorted by distance from the vehi-
cle's current position.
Displaying detailed traffic information
Select a traffic information item from the list and
press the controller.
To exit from the menu:
Select the arrow and press the controller.
Displaying traffic information in map
view
The traffic information symbols are shown in
map view up to a scale of 100 miles/200 km.
With a scale up to 5 miles/10 km, additional
information is shown. The length, direction and severity of a traffic obstruction are indicated by
means of arrows along the route, for example:
On the planned route
Traffic information icon is displayed on yellow
Outside of the planned route
>Map scale up to 5 miles/10 km:
Traffic information is displayed on white
with a black or gray border.
>Map scale larger than 10 miles/20 km:
An arrow pointing in the relevant direction
of travel is displayed on white with a black or
gray border.
Dynamic destination guidance
Depending on whether "Dynamic route" is
selected, the system responds differently:
>"Dynamic route" not selected:
When the navigation system receives a traf-
fic obstruction message, you receive cer-
tain information, such as the extent of the
traffic congestion, when you are approx.
25 miles/40 km away from the obstruction.
The last possible detour exit is indicated
just before you reach it.
>"Dynamic route" selected:
In case of a traffic obstruction the guided
route is adapted automatically.
Depending on road type and the kind and
extent of the traffic obstruction, the guided
route may lead through the obstruction.
This information is displayed even if you
have called up another application on the
Control Display. Traffic displayed with map scales
larger than 5 miles/10 km; arrow
points in relevant direction of travel.
There are several traffic events
within the area. Switch to a smaller
map scale to show more detail.
Slow-moving traffic
Stop-and-go traffic
Stopped traffic
Stopped traffic in both directions of
travel
Page 256 of 268

Everything from A - Z
254 Individually programmable
buttons on steering
wheel51
Inflation pressure, refer to Tire
inflation pressure202
Inflation pressure monitoring,
refer to Tire Pressure
Monitor TPM91
Information
– on another location137
– on country137
– on current position137
– on destination location137
Information menu, refer to
i menu18
"Information on
destination"138
"Info sources"78
Initializing
– active steering94
– after power failure227
– compass, refer to
Calibrating109
– Flat Tire Monitor FTM90
– glass sunroof40
– panorama glass roof42
"Input map"136
Installation location
– CD changer170
– drive for navigation DVD and
audio CD130
– telephone110
Instructions for navigation
system, refer to Voice
instructions146
Instrument cluster12
Instrument lighting100
Instrument panel, refer to
Cockpit10
Integrated key28
Integrated universal remote
control107
Interesting destination for
navigation137
"Interim time"85
Interior lamps100
– remote control30
Interior motion sensor36Interior rearview mirror51
– automatic dimming
feature51
– compass108
Interlock, refer to Disengaging
the remote control59
Intermittent mode of the
wipers62
J
Jacking points227
Joystick, refer to iDrive16
Jumpering, refer to Jump
starting230
Jump starting230
K
Key, refer to Integrated key/
remote control28
Keyless go, refer to
Convenient access36
Keyless opening and closing,
refer to Convenient
access36
Key Memory, refer to Personal
Profile28
Kick-down60
– automatic transmission with
Steptronic60
Knock control201
L
Lamps
– automatic headlamp
control97
– parking lamps/low beams97
Lamps and bulbs, replacing
bulbs222
"Language / Units"77
"Language / Units" in
navigation146
"Languages" in
navigation146
"Languages"on the control
display85Lap-and-shoulder belt, refer
to Safety belts49
Lashing eyes, refer to
Securing cargo125
Last destinations, refer to
Destination list138
"Last seat pos."49
LATCH child-restraint fixing
system55
LED Light-emitting
diodes222
Length, refer to
Dimensions237
License plate lamp, replacing
bulbs226
Light-emitting diodes
LED222
Lighter112
– connecting electrical
appliances112
"Lighting"62,98
Lighting
– instruments100
– lamps and bulbs222
– vehicle, refer to Lamps97
Light-metal alloy wheels, care,
refer to Caring for your
vehicle brochure
Light switch97
"Limit"84
Limit, refer to Speed limit84
Load securing equipment,
refer to Securing cargo125
Lock buttons, doors, refer to
Locking32
Locking
– adjusting confirmation
signal30
– from inside32
– from outside30
– without remote control, refer
to Convenient access36
Locking and unlocking doors
– confirmation signals30
– from inside32
– from outside29
Low beams97
– automatic97
– replacing bulbs222