2007 BMW 3 SEDAN rear entertainment
[x] Cancel search: rear entertainmentPage 107 of 268
Controls
105Reference
At a glance
Driving tips
Communications
Navigation
Entertainment
Mobility
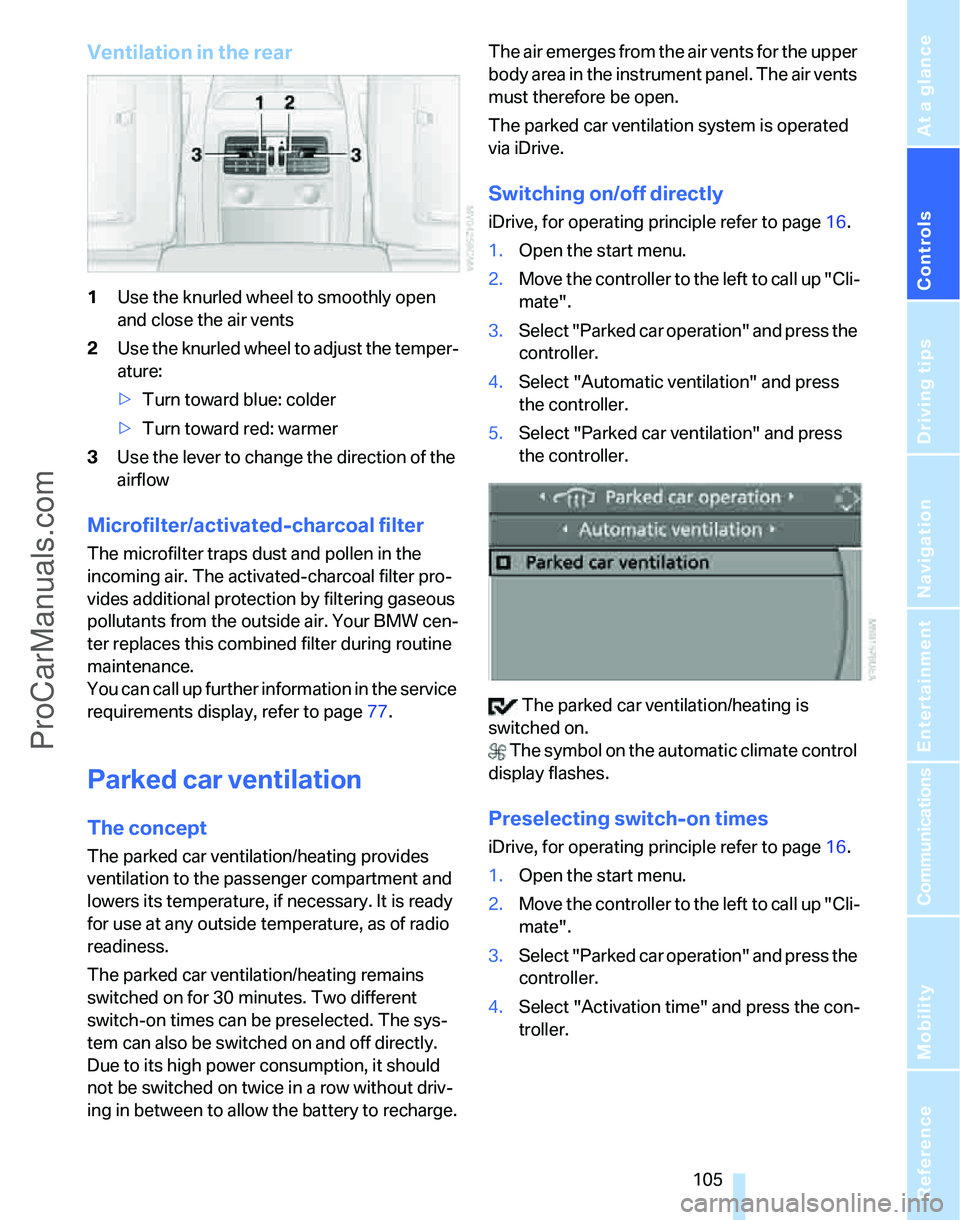
Ventilation in the rear
1Use the knurled wheel to smoothly open
and close the air vents
2Use the knurled wheel to adjust the temper-
ature:
>Turn toward blue: colder
>Turn toward red: warmer
3Use the lever to change the direction of the
airflow
Microfilter/activated-charcoal filter
The microfilter traps dust and pollen in the
incoming air. The activated-charcoal filter pro-
vides additional protection by filtering gaseous
pollutants from the outside air. Your BMW cen-
ter replaces this combined filter during routine
maintenance.
You can call up further information in the service
requirements display, refer to page77.
Parked car ventilation
The concept
The parked car ventilation/heating provides
ventilation to the passenger compartment and
lowers its temperature, if necessary. It is ready
for use at any outside temperature, as of radio
readiness.
The parked car ventilation/heating remains
switched on for 30 minutes. Two different
switch-on times can be preselected. The sys-
tem can also be switched on and off directly.
Due to its high power consumption, it should
not be switched on twice in a row without driv-
ing in between to allow the battery to recharge.The air emerges from the air vents for the upper
body area in the instrument panel. The air vents
must therefore be open.
The parked car ventilation system is operated
via iDrive.
Switching on/off directly
iDrive, for operating principle refer to page16.
1.Open the start menu.
2.Move the controller to the left to call up "Cli-
mate".
3.Select "Parked car operation" and press the
controller.
4.Select "Automatic ventilation" and press
the controller.
5.Select "Parked car ventilation" and press
the controller.
The parked car ventilation/heating is
switched on.
The symbol on the automatic climate control
display flashes.
Preselecting switch-on times
iDrive, for operating principle refer to page16.
1.Open the start menu.
2.Move the controller to the left to call up "Cli-
mate".
3.Select "Parked car operation" and press the
controller.
4.Select "Activation time" and press the con-
troller.
ProCarManuals.com
Page 113 of 268
Controls
111Reference
At a glance
Driving tips
Communications
Navigation
Entertainment
Mobility
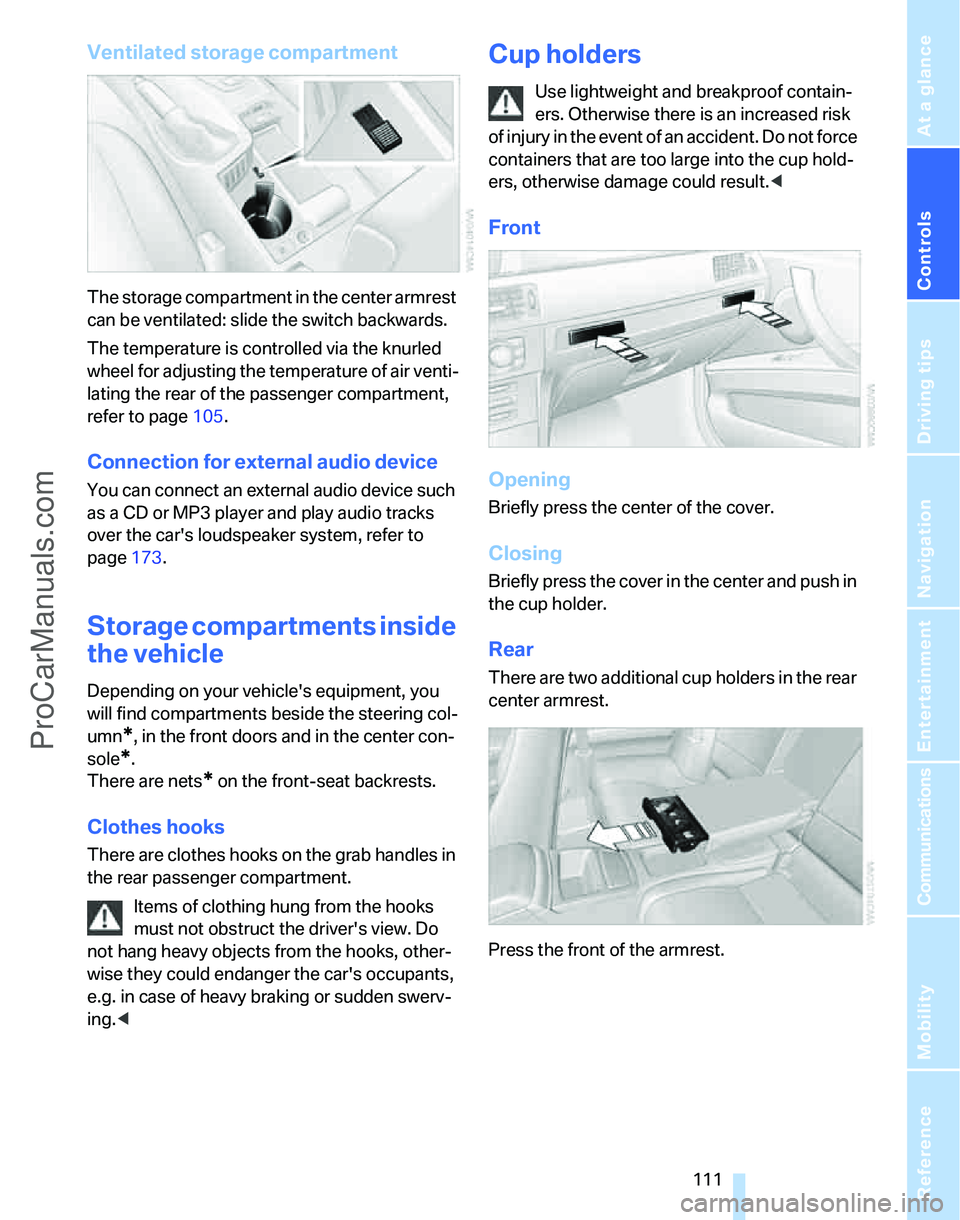
Ventilated storage compartment
The storage compartment in the center armrest
can be ventilated: slide the switch backwards.
The temperature is controlled via the knurled
wheel for adjusting the temperature of air venti-
lating the rear of the passenger compartment,
refer to page105.
Connection for external audio device
You can connect an external audio device such
as a CD or MP3 player and play audio tracks
over the car's loudspeaker system, refer to
page173.
Storage compartments inside
the vehicle
Depending on your vehicle's equipment, you
will find compartments beside the steering col-
umn
*, in the front doors and in the center con-
sole
*.
There are nets
* on the front-seat backrests.
Clothes hooks
There are clothes hooks on the grab handles in
the rear passenger compartment.
Items of clothing hung from the hooks
must not obstruct the driver's view. Do
not hang heavy objects from the hooks, other-
wise they could endanger the car's occupants,
e.g. in case of heavy braking or sudden swerv-
ing.<
Cup holders
Use lightweight and breakproof contain-
ers. Otherwise there is an increased risk
of injury in the event of an accident. Do not force
containers that are too large into the cup hold-
ers, otherwise damage could result.<
Front
Opening
Briefly press the center of the cover.
Closing
Briefly press the cover in the center and push in
the cup holder.
Rear
There are two additional cup holders in the rear
center armrest.
Press the front of the armrest.
ProCarManuals.com
Page 115 of 268

Controls
113Reference
At a glance
Driving tips
Communications
Navigation
Entertainment
Mobility
Sockets in the rear center console*
Remove corresponding cover.
Socket in the cargo bay*
Sedan
Sports Wagon
Open the cap.
Sedan:
Through-loading system*
Opening
1.Open the belt lock of the rear center safety
belt. To do so, press the button, see arrow,
and release the latch plate.
2.Insert the latch plate at the end of the belt
into the specially designated fixture on the
rear window shelf.
3.Push the corresponding head restraint
down as far as it will go, refer to page47.
4.To release the rear seat backrest, pull the
corresponding lever in the cargo bay.
ProCarManuals.com
Page 117 of 268
Controls
115Reference
At a glance
Driving tips
Communications
Navigation
Entertainment
Mobility
Expanding the cargo bay
The rear seat backrest is divided. You can fold
down either division in order to expand the
cargo bay.
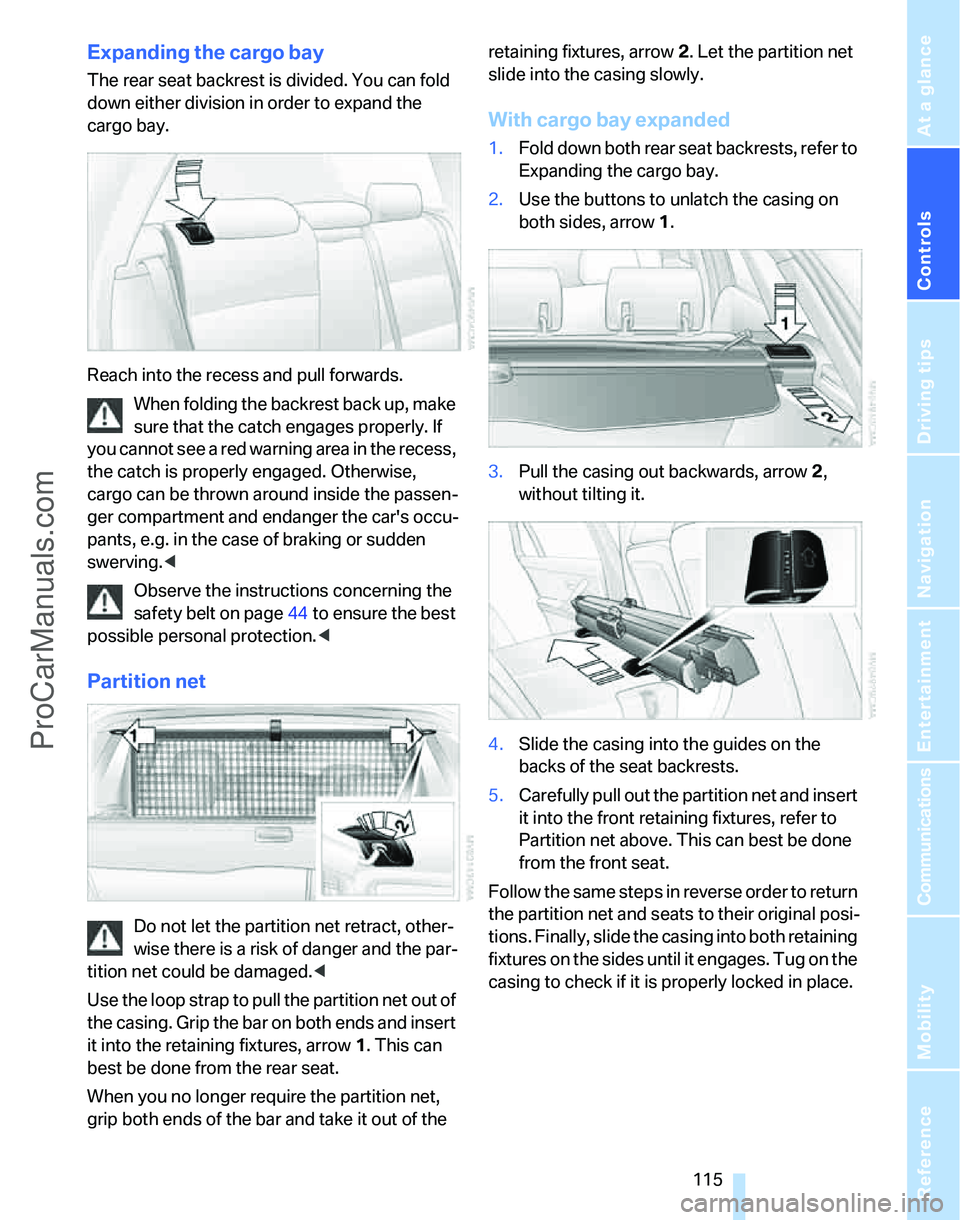
Reach into the recess and pull forwards.
When folding the backrest back up, make
sure that the catch engages properly. If
you cannot see a red warning area in the recess,
the catch is properly engaged. Otherwise,
cargo can be thrown around inside the passen-
ger compartment and endanger the car's occu-
pants, e.g. in the case of braking or sudden
swerving.<
Observe the instructions concerning the
safety belt on page44 to ensure the best
possible personal protection.<
Partition net
Do not let the partition net retract, other-
wise there is a risk of danger and the par-
tition net could be damaged.<
Use the loop strap to pull the partition net out of
the casing. Grip the bar on both ends and insert
it into the retaining fixtures, arrow 1. This can
best be done from the rear seat.
When you no longer require the partition net,
grip both ends of the bar and take it out of the retaining fixtures, arrow 2. Let the partition net
slide into the casing slowly.
With cargo bay expanded
1.Fold down both rear seat backrests, refer to
Expanding the cargo bay.
2.Use the buttons to unlatch the casing on
both sides, arrow 1.
3.Pull the casing out backwards, arrow 2,
without tilting it.
4.Slide the casing into the guides on the
backs of the seat backrests.
5.Carefully pull out the partition net and insert
it into the front retaining fixtures, refer to
Partition net above. This can best be done
from the front seat.
Follow the same steps in reverse order to return
the partition net and seats to their original posi-
tions. Finally, slide the casing into both retaining
fixtures on the sides until it engages. Tug on the
casing to check if it is properly locked in place.
ProCarManuals.com
Page 127 of 268
Driving tips
125Reference
At a glance
Controls
Communications
Navigation
Entertainment
Mobility
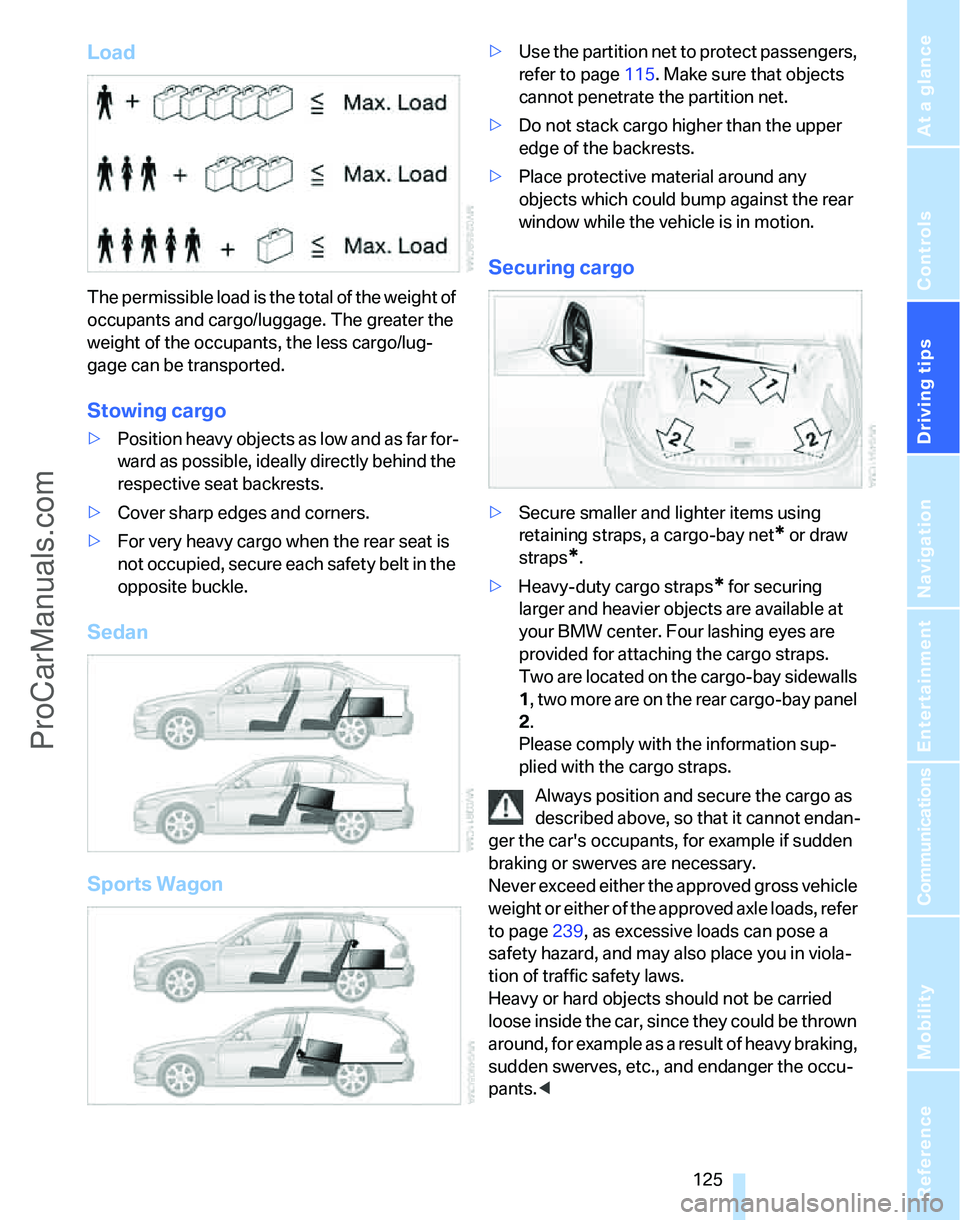
Load
The permissible load is the total of the weight of
occupants and cargo/luggage. The greater the
weight of the occupants, the less cargo/lug-
gage can be transported.
Stowing cargo
>Position heavy objects as low and as far for-
ward as possible, ideally directly behind the
respective seat backrests.
>Cover sharp edges and corners.
>For very heavy cargo when the rear seat is
not occupied, secure each safety belt in the
opposite buckle.
Sedan
Sports Wagon
>Use the partition net to protect passengers,
refer to page115. Make sure that objects
cannot penetrate the partition net.
>Do not stack cargo higher than the upper
edge of the backrests.
>Place protective material around any
objects which could bump against the rear
window while the vehicle is in motion.
Securing cargo
>Secure smaller and lighter items using
retaining straps, a cargo-bay net
* or draw
straps
*.
>Heavy-duty cargo straps
* for securing
larger and heavier objects are available at
your BMW center. Four lashing eyes are
provided for attaching the cargo straps.
Two are located on the cargo-bay sidewalls
1, two more are on the rear cargo-bay panel
2.
Please comply with the information sup-
plied with the cargo straps.
Always position and secure the cargo as
described above, so that it cannot endan-
ger the car's occupants, for example if sudden
braking or swerves are necessary.
Never exceed either the approved gross vehicle
weight or either of the approved axle loads, refer
to page239, as excessive loads can pose a
safety hazard, and may also place you in viola-
tion of traffic safety laws.
Heavy or hard objects should not be carried
loose inside the car, since they could be thrown
around, for example as a result of heavy braking,
sudden swerves, etc., and endanger the occu-
pants.<
ProCarManuals.com
Page 159 of 268
Navigation
Entertainment
Driving tips
157Reference
At a glance
Controls
Communications
Mobility
Adjusting volume
Turn knob1 on the CD player until the desired
volume is obtained.
You can also adjust the volume with buttons on
the steering wheel, refer to page11.
With the ignition key in radio-ready position or
higher, the setting is stored for the remote con-
trol currently in use.
Tone control
You can alter various tone settings, e.g. treble
and bass or the speed-dependent volume
increase.
The tone settings are applied to all audio
sources.
With the ignition key in radio-ready position or
higher, the settings are stored for the remote
control currently in use.
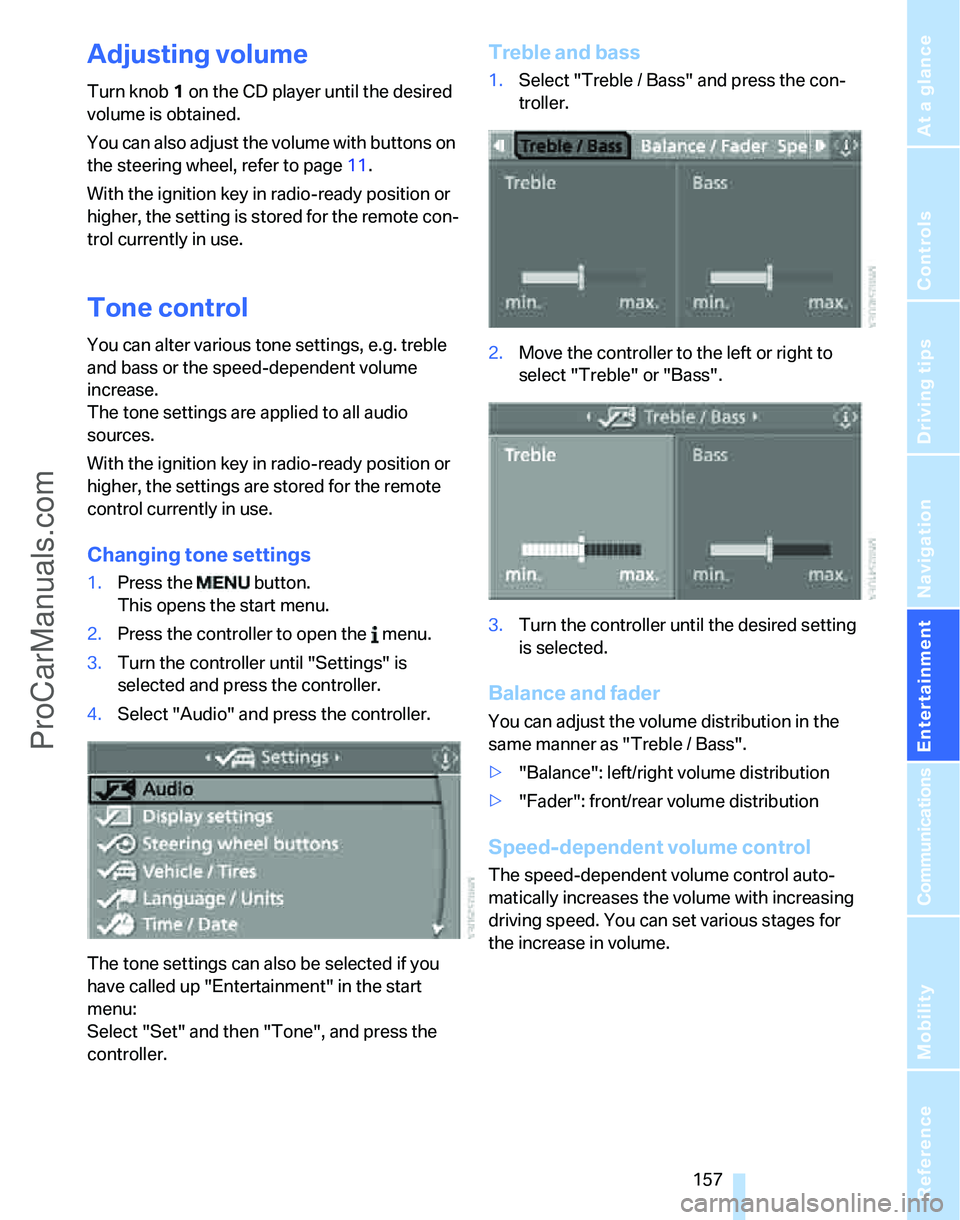
Changing tone settings
1.Press the button.
This opens the start menu.
2.Press the controller to open the menu.
3.Turn the controller until "Settings" is
selected and press the controller.
4.Select "Audio" and press the controller.
The tone settings can also be selected if you
have called up "Entertainment" in the start
menu:
Select "Set" and then "Tone", and press the
controller.
Treble and bass
1.Select "Treble / Bass" and press the con-
troller.
2.Move the controller to the left or right to
select "Treble" or "Bass".
3.Turn the controller until the desired setting
is selected.
Balance and fader
You can adjust the volume distribution in the
same manner as "Treble / Bass".
>"Balance": left/right volume distribution
>"Fader": front/rear volume distribution
Speed-dependent volume control
The speed-dependent volume control auto-
matically increases the volume with increasing
driving speed. You can set various stages for
the increase in volume.
ProCarManuals.com
Page 205 of 268
Mobility
203Reference
At a glance
Controls
Driving tips
Communications
Navigation
Entertainment
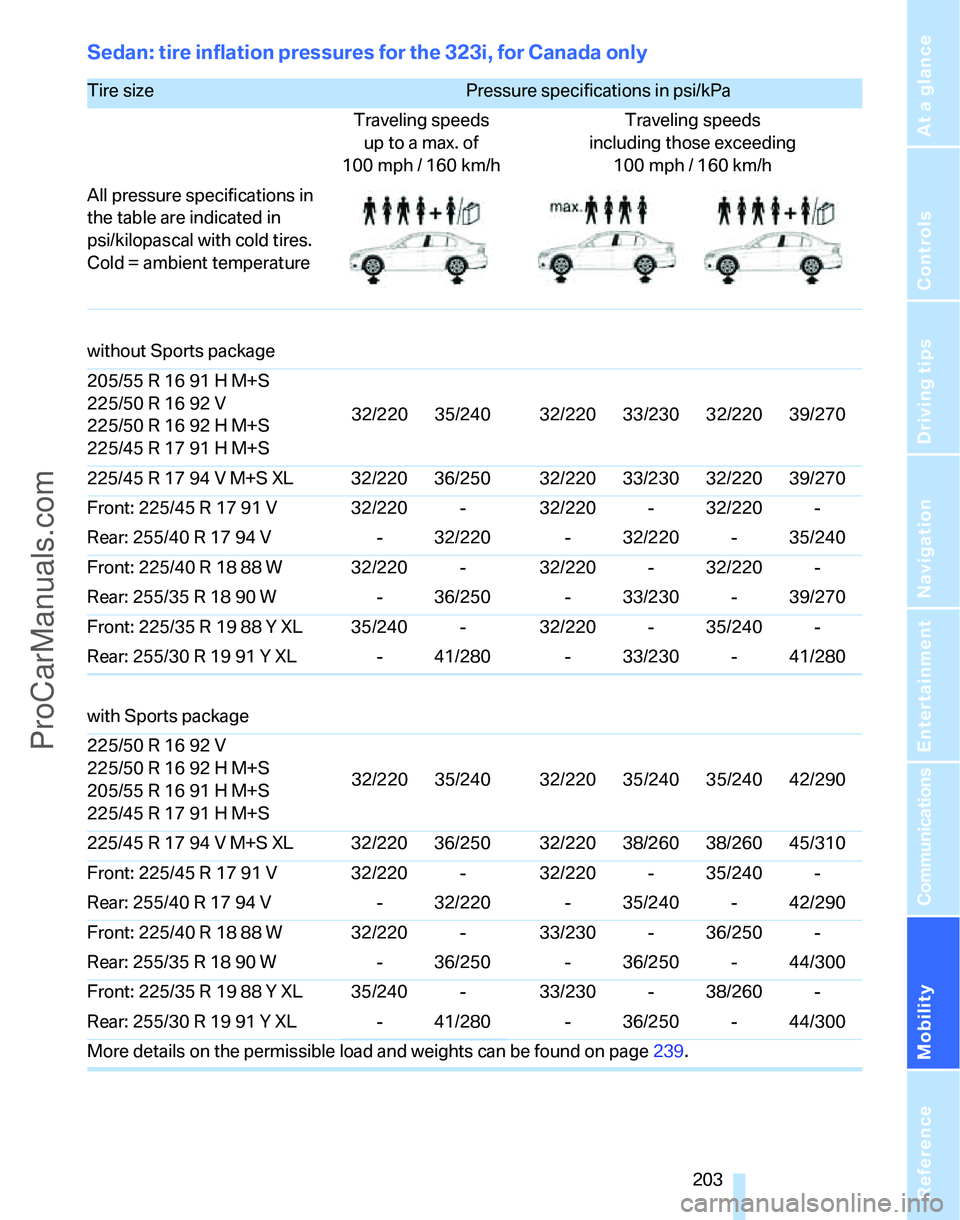
Sedan: tire inflation pressures for the 323i, for Canada only
Tire size Pressure specifications in psi/kPa
Traveling speeds
up to a max. of
100 mph / 160 km/hTraveling speeds
including those exceeding
100mph / 160km/h
All pressure specifications in
the table are indicated in
psi/kilopascal with cold tires.
Cold = ambient temperature
without Sports package
205/55 R 16 91 H M+S
225/50 R 16 92 V
225/50 R 16 92 H M+S
225/45 R 17 91 H M+S32/220 35/240 32/220 33/230 32/220 39/270
225/45 R 17 94 V M+S XL 32/220 36/250 32/220 33/230 32/220 39/270
Front: 225/45 R 17 91 V 32/220 - 32/220 - 32/220 -
Rear: 255/40 R 17 94 V - 32/220 - 32/220 - 35/240
Front: 225/40 R 18 88 W 32/220 - 32/220 - 32/220 -
Rear: 255/35 R 18 90 W - 36/250 - 33/230 - 39/270
Front: 225/35 R 19 88 Y XL 35/240 - 32/220 - 35/240 -
Rear: 255/30 R 19 91 Y XL - 41/280 - 33/230 - 41/280
with Sports package
225/50 R 16 92 V
225/50 R 16 92 H M+S
205/55 R 16 91 H M+S
225/45 R 17 91 H M+S32/220 35/240 32/220 35/240 35/240 42/290
225/45 R 17 94 V M+S XL 32/220 36/250 32/220 38/260 38/260 45/310
Front: 225/45 R 17 91 V 32/220 - 32/220 - 35/240 -
Rear: 255/40 R 17 94 V - 32/220 - 35/240 - 42/290
Front: 225/40 R 18 88 W 32/220 - 33/230 - 36/250 -
Rear: 255/35 R 18 90 W - 36/250 - 36/250 - 44/300
Front: 225/35 R 19 88 Y XL 35/240 - 33/230 - 38/260 -
Rear: 255/30 R 19 91 Y XL - 41/280 - 36/250 - 44/300
More details on the permissible load and weights can be found on page239.
ProCarManuals.com
Page 207 of 268
Mobility
205Reference
At a glance
Controls
Driving tips
Communications
Navigation
Entertainment
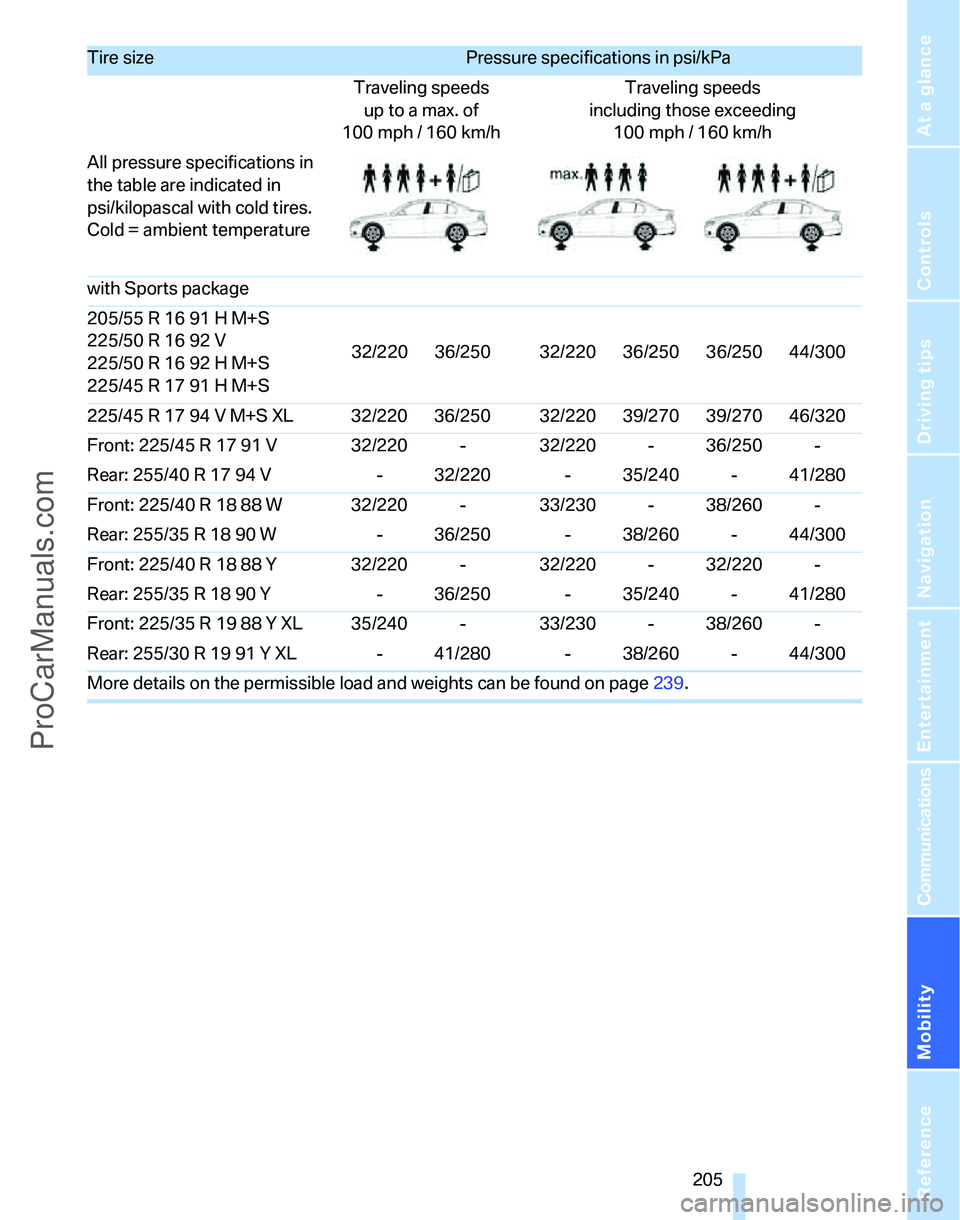
with Sports package
205/55 R 16 91 H M+S
225/50 R 16 92 V
225/50 R 16 92 H M+S
225/45 R 17 91 H M+S32/220 36/250 32/220 36/250 36/250 44/300
225/45 R 17 94 V M+S XL 32/220 36/250 32/220 39/270 39/270 46/320
Front: 225/45 R 17 91 V 32/220 - 32/220 - 36/250 -
Rear: 255/40 R 17 94 V - 32/220 - 35/240 - 41/280
Front: 225/40 R 18 88 W 32/220 - 33/230 - 38/260 -
Rear: 255/35 R 18 90 W - 36/250 - 38/260 - 44/300
Front: 225/40 R 18 88 Y 32/220 - 32/220 - 32/220 -
Rear: 255/35 R 18 90 Y - 36/250 - 35/240 - 41/280
Front: 225/35 R 19 88 Y XL 35/240 - 33/230 - 38/260 -
Rear: 255/30 R 19 91 Y XL - 41/280 - 38/260 - 44/300
More details on the permissible load and weights can be found on page239.
Tire size Pressure specifications in psi/kPa
Traveling speeds
up to a max. of
100 mph / 160 km/hTraveling speeds
including those exceeding
100mph / 160km/h
All pressure specifications in
the table are indicated in
psi/kilopascal with cold tires.
Cold = ambient temperature
ProCarManuals.com