2007 BMW 3 SEDAN instrument cluster
[x] Cancel search: instrument clusterPage 88 of 268

Technology for driving comfort and safety
86
Technology for driving comfort and safety
PDC Park Distance Control*
The concept
The PDC assists you with maneuvering in tight
parking spaces. Acoustic signals and a visual
indicator
warn you of the presence of an object
behind your vehicle. To measure the distance,
there are four ultrasonic sensors in either
bumper.
These sensors have a range of approx. 6.5 ft/
2 m. However, an acoustic warning does not
sound until an object is approx. 24 in/60 cm
from the corner sensors, or approx. 5 ft/1.50 m
from the center sensors.
PDC is a parking aid that can indicate
objects when they are approached
slowly, as is usually the case when parking.
Avoid approaching an object at high speed, oth-
erwise physical circumstances may lead to the
system warning being issued too late.<
Switching on automatically
With the engine running or the ignition switched
on, the system is activated automatically after
approx. 1 second when you engage reverse
gear or move the automatic transmission selec-
tor lever to position R. Wait this short period
before driving.
Signal tones
When nearing an object, its position is indicated
correspondingly by an interval tone. As the dis-
tance between vehicle and object decreases,
the intervals between the tones become
shorter. If the distance to the nearest object
falls to below roughly 1 ft/30 cm, then a contin-
uous tone sounds.
An interval tone is interrupted after approx.
3seconds
>if you remain in front of an object that has
been detected by only one of the corner
sensors
>if you are driving parallel to a wall.
Malfunction
The indicator lamp in the instrument
cluster comes on. PDC is malfunc-
tioning. A message appears on the
Control Display. Have the system checked.
To avoid this problem, keep the sensors clean
and free of ice or snow in order to ensure that
they will continue to operate effectively. When
using a high-pressure cleaner, do not spray the
sensors for extended periods of time and only
from a distance of at least 4 in/10 cm.
PDC with visual warning
You can also have the system show distances
to objects on the Control Display. The contours
of distant objects are shown on the Control Dis-
play even before the acoustic signal sounds.
The setting is stored for the remote control cur-
rently in use.
iDrive, for operating principle refer to page16.
1.Open the start menu.
2.Press the controller to open the menu.
3.Select "Settings" and press the controller.
4.Select "Vehicle / Tires" and press the con-
troller.
5.If necessary, move the highlight marker to
the uppermost field. Turn the controller
ProCarManuals.com
Page 90 of 268
Technology for driving comfort and safety
88
Deactivating DSC
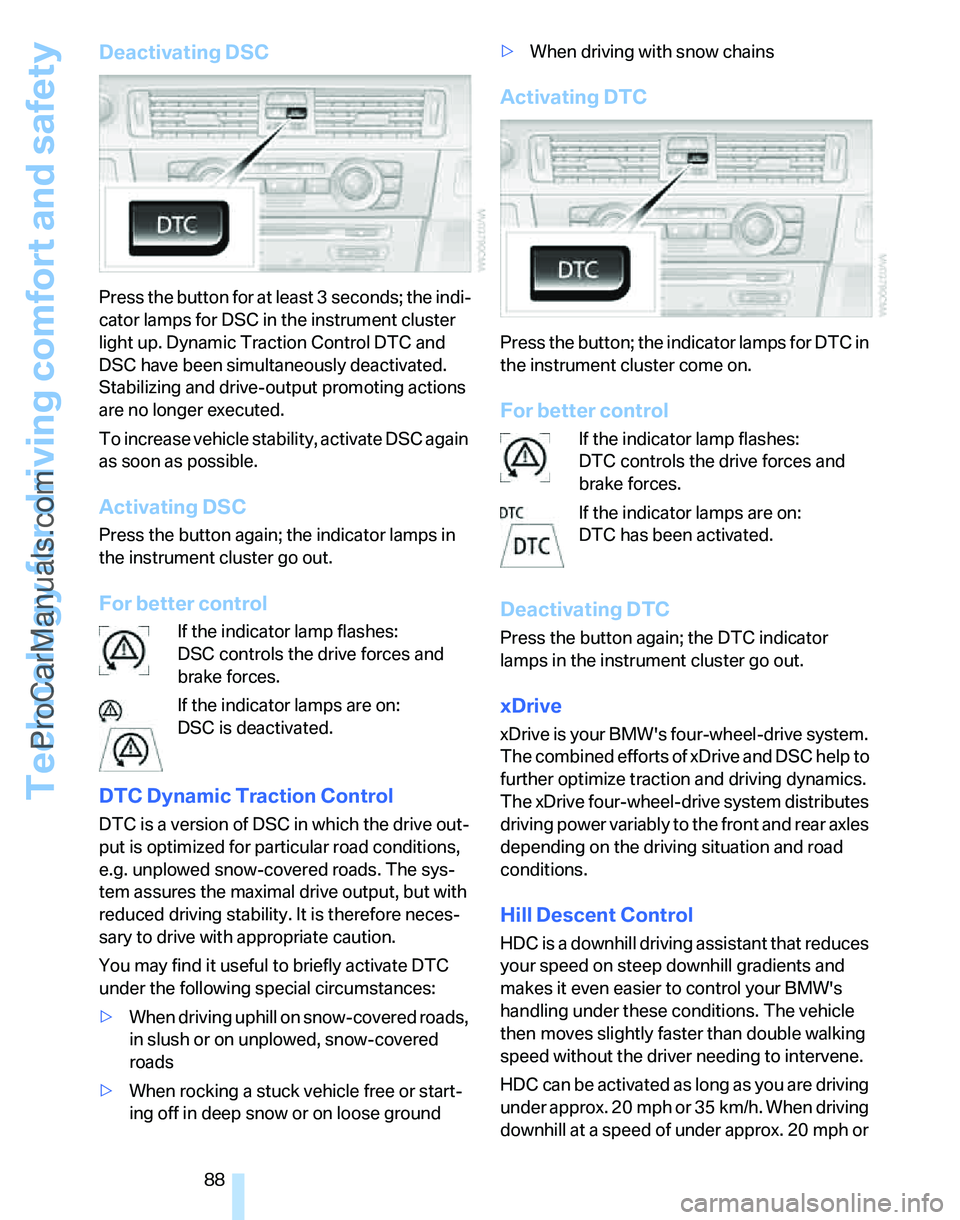
Press the button for at least 3 seconds; the indi-
cator lamps for DSC in the instrument cluster
light up. Dynamic Traction Control DTC and
DSC have been simultaneously deactivated.
Stabilizing and drive-output promoting actions
are no longer executed.
To increase vehicle stability, activate DSC again
as soon as possible.
Activating DSC
Press the button again; the indicator lamps in
the instrument cluster go out.
For better control
If the indicator lamp flashes:
DSC controls the drive forces and
brake forces.
If the indicator lamps are on:
DSC is deactivated.
DTC Dynamic Traction Control
DTC is a version of DSC in which the drive out-
put is optimized for particular road conditions,
e.g. unplowed snow-covered roads. The sys-
tem assures the maximal drive output, but with
reduced driving stability. It is therefore neces-
sary to drive with appropriate caution.
You may find it useful to briefly activate DTC
under the following special circumstances:
>When driving uphill on snow-covered roads,
in slush or on unplowed, snow-covered
roads
>When rocking a stuck vehicle free or start-
ing off in deep snow or on loose ground>When driving with snow chains
Activating DTC
Press the button; the indicator lamps for DTC in
the instrument cluster come on.
For better control
If the indicator lamp flashes:
DTC controls the drive forces and
brake forces.
If the indicator lamps are on:
DTC has been activated.
Deactivating DTC
Press the button again; the DTC indicator
lamps in the instrument cluster go out.
xDrive
xDrive is your BMW's four-wheel-drive system.
The combined efforts of xDrive and DSC help to
further optimize traction and driving dynamics.
The xDrive four-wheel-drive system distributes
driving power variably to the front and rear axles
depending on the driving situation and road
conditions.
Hill Descent Control
HDC is a downhill driving assistant that reduces
your speed on steep downhill gradients and
makes it even easier to control your BMW's
handling under these conditions. The vehicle
then moves slightly faster than double walking
speed without the driver needing to intervene.
HDC can be activated as long as you are driving
under approx. 20 mph or 35 km/h. When driving
downhill at a speed of under approx. 20 mph or
ProCarManuals.com
Page 91 of 268
Controls
89Reference
At a glance
Driving tips
Communications
Navigation
Entertainment
Mobility
35 km/h, the vehicle's speed is automatically
reduced to slightly more than double walking
speed and maintained.
Increasing or decreasing speed
By accelerating or braking you can change the
speed within a range from approx. 3 to 15 mph,
approx. 5 to 25 km/h.
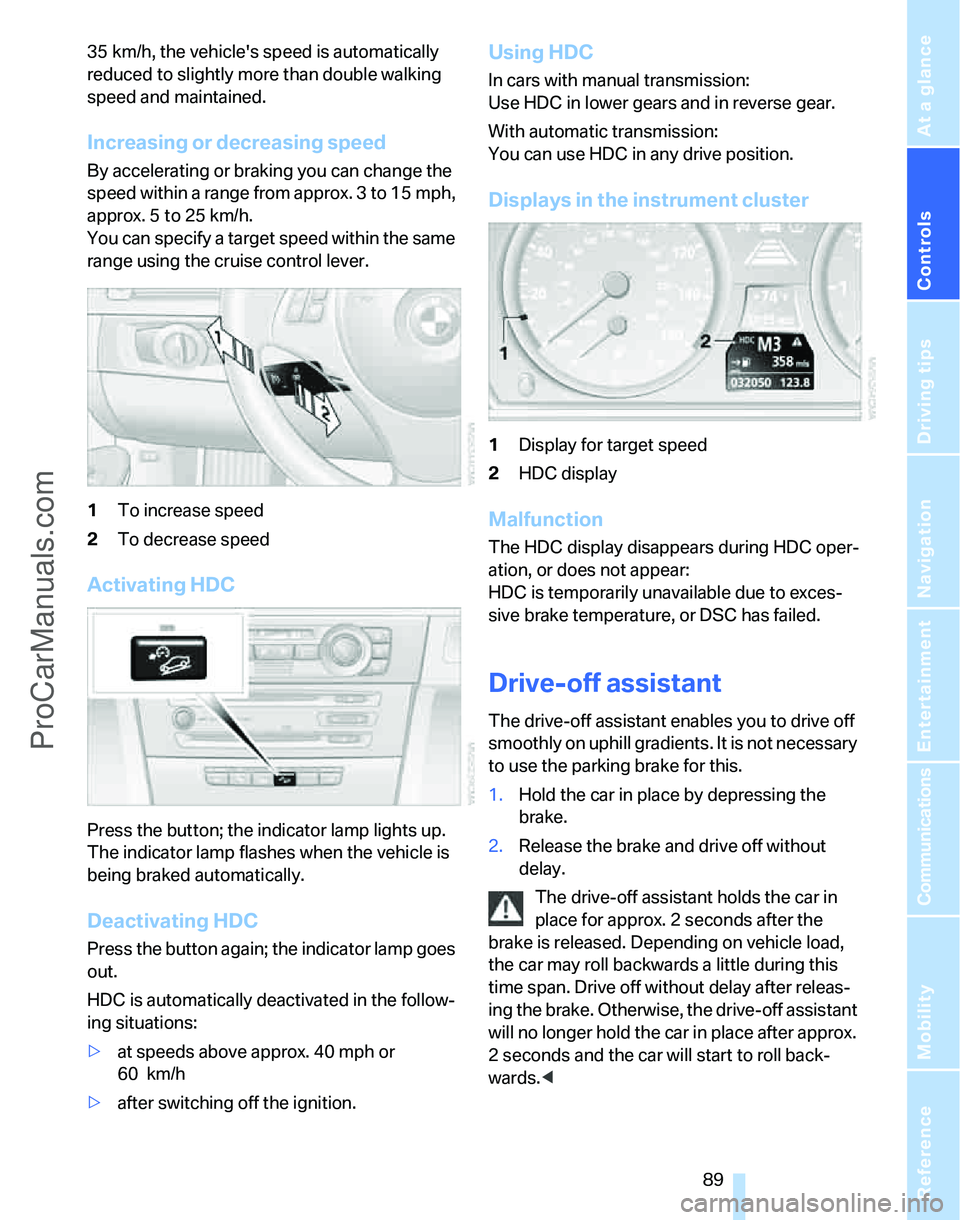
You can specify a target speed within the same
range using the cruise control lever.
1To increase speed
2To decrease speed
Activating HDC
Press the button; the indicator lamp lights up.
The indicator lamp flashes when the vehicle is
being braked automatically.
Deactivating HDC
Press the button again; the indicator lamp goes
out.
HDC is automatically deactivated in the follow-
ing situations:
>at speeds above approx. 40 mph or
60 km/h
>after switching off the ignition.
Using HDC
In cars with manual transmission:
Use HDC in lower gears and in reverse gear.
With automatic transmission:
You can use HDC in any drive position.
Displays in the instrument cluster
1Display for target speed
2HDC display
Malfunction
The HDC display disappears during HDC oper-
ation, or does not appear:
HDC is temporarily unavailable due to exces-
sive brake temperature, or DSC has failed.
Drive-off assistant
The drive-off assistant enables you to drive off
smoothly on uphill gradients. It is not necessary
to use the parking brake for this.
1.Hold the car in place by depressing the
brake.
2.Release the brake and drive off without
delay.
The drive-off assistant holds the car in
place for approx. 2 seconds after the
brake is released. Depending on vehicle load,
the car may roll backwards a little during this
time span. Drive off without delay after releas-
ing the brake. Otherwise, the drive-off assistant
will no longer hold the car in place after approx.
2 seconds and the car will start to roll back-
wards.<
ProCarManuals.com
Page 101 of 268
Controls
99Reference
At a glance
Driving tips
Communications
Navigation
Entertainment
Mobility
The daytime running lamps are
switched on.
Adaptive Head Light*
The concept
Adaptive Head Light is a variable headlamp
control system that enables better illumination
of the road surface. Depending on the steering
angle and other parameters, the light from the
headlamp follows the course of the road.
Activating Adaptive Head Light
With the ignition switched on, turn the light
switch to the automatic headlamp control posi-
tion, refer to page97.
To avoid dazzling the drivers of oncoming vehi-
cles, Adaptive Head Light is not active when the
car is driven in reverse, and directs the light to
the front passenger's side when the vehicle is at
a standstill.
Malfunction
The LED next to the symbol for automatic head-
lamp control flashes. Adaptive Head Light is
malfunctioning or has failed. Have the system
checked as soon as possible.
High beams/roadside parking
lamps
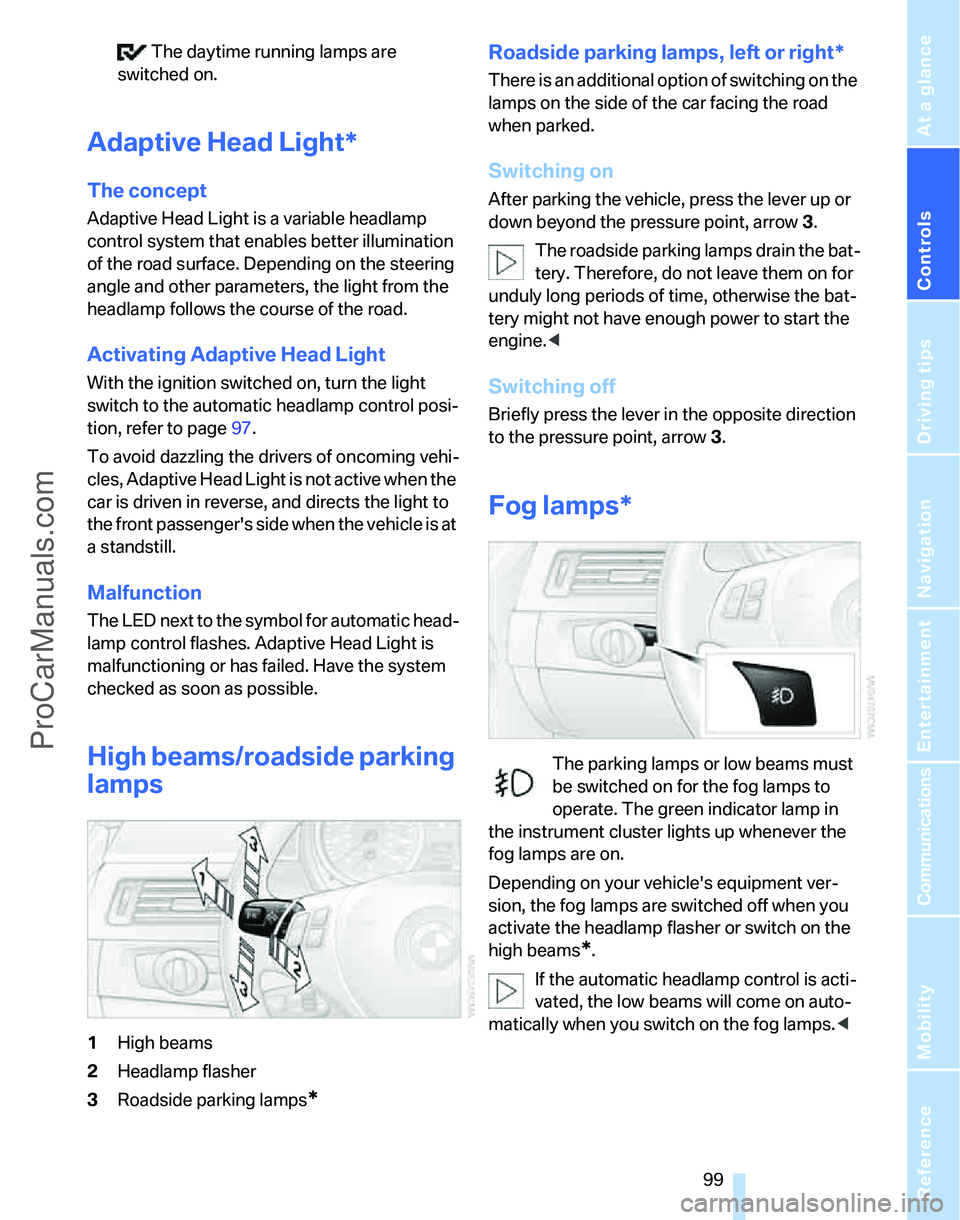
1High beams
2Headlamp flasher
3Roadside parking lamps
*
Roadside parking lamps, left or right*
There is an additional option of switching on the
lamps on the side of the car facing the road
when parked.
Switching on
After parking the vehicle, press the lever up or
down beyond the pressure point, arrow 3.
The roadside parking lamps drain the bat-
tery. Therefore, do not leave them on for
unduly long periods of time, otherwise the bat-
tery might not have enough power to start the
engine.<
Switching off
Briefly press the lever in the opposite direction
to the pressure point, arrow 3.
Fog lamps*
The parking lamps or low beams must
be switched on for the fog lamps to
operate. The green indicator lamp in
the instrument cluster lights up whenever the
fog lamps are on.
Depending on your vehicle's equipment ver-
sion, the fog lamps are switched off when you
activate the headlamp flasher or switch on the
high beams
*.
If the automatic headlamp control is acti-
vated, the low beams will come on auto-
matically when you switch on the fog lamps.<
ProCarManuals.com
Page 217 of 268
Mobility
215Reference
At a glance
Controls
Driving tips
Communications
Navigation
Entertainment
Important parts of the engine compartment
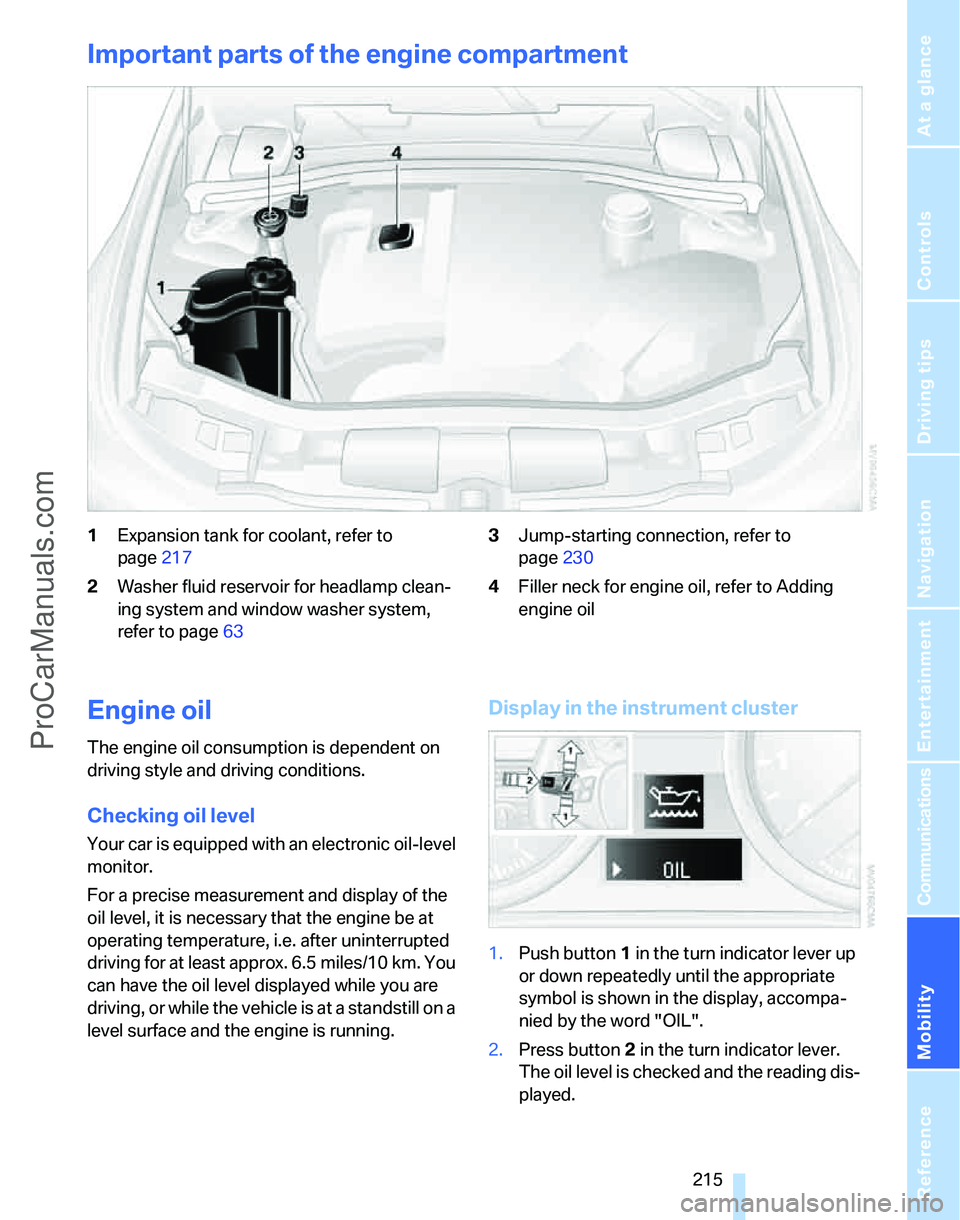
1Expansion tank for coolant, refer to
page217
2Washer fluid reservoir for headlamp clean-
ing system and window washer system,
refer to page633Jump-starting connection, refer to
page230
4Filler neck for engine oil, refer to Adding
engine oil
Engine oil
The engine oil consumption is dependent on
driving style and driving conditions.
Checking oil level
Your car is equipped with an electronic oil-level
monitor.
For a precise measurement and display of the
oil level, it is necessary that the engine be at
operating temperature, i.e. after uninterrupted
driving for at least approx. 6.5 miles/10 km. You
can have the oil level displayed while you are
driving, or while the vehicle is at a standstill on a
level surface and the engine is running.
Display in the instrument cluster
1.Push button 1 in the turn indicator lever up
or down repeatedly until the appropriate
symbol is shown in the display, accompa-
nied by the word "OIL".
2.Press button 2 in the turn indicator lever.
The oil level is checked and the reading dis-
played.
ProCarManuals.com
Page 251 of 268

Reference 249
At a glance
Controls
Driving tips
Communications
Navigation
Entertainment
Mobility
CD player166
– compressed audio files166
– controls156
– fast forward/reverse170
– playing a track168
– random order169
– repeating a track169
– selecting a track167
– switching on/off156
– tone control157
– volume157
Center armrest110
Center brake lamp
– replacing bulbs226
Center console, refer to
Around the center
console14
"Central locking"30
Central locking
– from inside32
– from outside29
Central locking system29
– convenient access36
– hotel function34
Changes, technical, refer to
For your own safety5
Changing bulbs, refer to
Lamps and bulbs222
Changing the language on the
Control Display85
Changing the measurement
units on the Control
Display77
Changing wheels227
Chassis number, refer to
Engine compartment215
Check Control82
"Check Control
messages"84
Check Gas Cap200
Child-restraint fixing system
LATCH55
Child-restraint systems53
Child-safety lock56
Child seats, refer to
Transporting children
safely53Chrome parts, care, refer to
Caring for your vehicle
brochure
Cigarette lighter, refer to
Lighter112
Cleaning, refer to Caring for
your vehicle brochure
Cleaning headlamps63
– washer fluid64
"Climate"102
Clock72
– 12h/24h mode81
– setting time80
Closing
– from inside32
– from outside
29
Clothes hooks111
Cockpit10
Cold start, refer to Starting the
engine58
Combined instrument, refer to
Instrument cluster12
Comfort access, refer to
Convenient access36
Comfort area, refer to Around
the center console14
"Communication"181,191,
192,193
Compact disc, refer to
– CD changer166
– CD player166
Compartment for remote
control, refer to Ignition
lock57
Compass108
Computer74
– displays on Control
Display74
– hour signal81
Computer, refer to iDrive16
"Concert hall" for Tone
control158
"Concierge"193
Concierge service193
Condensation, refer to When
the vehicle is parked124
Condition Based Service
CBS219Configuring settings, refer to
Personal Profile28
Confirmation signals for
locking/unlocking the
vehicle30
Connecting vacuum cleaner,
refer to Connecting
electrical appliances112
Consumption, refer to
Average consumption74
Consumption display
– average consumption74
Consumption indicator
– Energy Control73
"Continue guidance to
destination?"144
Control Center, refer to
iDrive16
Control Display
– brightness85
– changing the language85
– switching off/on21
Control Display, refer to
iDrive16
Controller, refer to iDrive16
Controls and displays10
Control unit, refer to iDrive16
Convenient access36
– replacing the battery
38
– what to observe before
entering a car wash38
Convenient operation
– glass sunroof30
– glass sunroof with
convenient access37
– windows30
– windows with convenient
access37
Coolant217
– checking level218
Coolant temperature73
Cooling, maximum103
Cooling fluid, refer to
Coolant217
Cooling system, refer to
Coolant217
Cornering lamps, refer to
Adaptive Head Light99
Correct tires212
ProCarManuals.com
Page 252 of 268

Everything from A - Z
250 Courtesy lamps, refer to
Interior lamps100
Cross-hairs in navigation136
Cruise control64
– active66
– malfunction65
Cruising range74
Cup holders111
Curb weight, refer to
Weights239
Current fuel consumption,
refer to Energy Control73
"Current position"150
Current position
– displaying150
– entering139
– storing139
"Customer
Relations"184,193
D
Dashboard, refer to
Cockpit10
Dashboard, refer to
Instrument cluster12
Dashboard lighting, refer to
Instrument lighting100
Data, technical236
– dimensions237
– engine236
– weights239
"Date"82
Date
– setting81
– setting format82
"Date format"82
"Daytime running lamps"98
Daytime running lamps98
DBC Dynamic Brake
Control87
DCC, refer to Cruise
control64
"Deactivated"49
Deactivating front passenger
airbags95
Deadlocking, refer to
Locking30Decommissioning the vehicle
– refer to Caring for your
vehicle brochure
Defect
– door lock31
– fuel filler door200
– glass sunroof40
– panorama glass roof42
Defogging windows104
Defrost, windows104
Defrosting windows104
Defrosting windows and
removing condensation
– automatic climate
control104
Defrosting windshield, refer to
Defrosting windows104
Defrost position, refer to
Defrosting windows104
"Delete address book" in
navigation140
"Delete all numbers" on the
mobile phone184
"Delete data" in
navigation140
"Delete" for mobile
phone183
Destination address
– deleting140
– entering131,134
Destination for navigation
– entry131
– navigation list138
– selecting from address
book139
– selecting using
information137
– storing139Destination guidance143
– canceling voice
instructions52
– changing specified
route141
– displaying route144
– displaying routes144
– distance and arrival143
– starting143
– terminating/continuing143
– voice instructions146
– volume of voice
instructions147
Destination list for navigation
system138
Destinations recently driven
to138
Detour, refer to Driving around
a traffic jam150
Detour during navigation150
"Detour" in navigation150
"Dial" for mobile phone181
"Dial number"182
Digital clock72
Digital compass108
Dimensions237
Directional indicators, refer to
Turn signals61
Direction instructions, refer to
Voice instructions146
Directory for navigation, refer
to Address book138
Displacement, refer to Engine
data236
Display, refer to iDrive
controls16
Display lighting, refer to
Instrument lighting100
"Display off"21
Displays
– on the Control Display16
Displays, refer to Instrument
cluster12
Displays and controls10
Disposal
– coolant217
– remote control battery38
– vehicle battery227
ProCarManuals.com
Page 256 of 268
Everything from A - Z
254 Individually programmable
buttons on steering
wheel51
Inflation pressure, refer to Tire
inflation pressure202
Inflation pressure monitoring,
refer to Tire Pressure
Monitor TPM91
Information
– on another location137
– on country137
– on current position137
– on destination location137
Information menu, refer to
i menu18
"Information on
destination"138
"Info sources"78
Initializing
– active steering94
– after power failure227
– compass, refer to
Calibrating109
– Flat Tire Monitor FTM90
– glass sunroof40
– panorama glass roof42
"Input map"136
Installation location
– CD changer170
– drive for navigation DVD and
audio CD130
– telephone110
Instructions for navigation
system, refer to Voice
instructions146
Instrument cluster12
Instrument lighting100
Instrument panel, refer to
Cockpit10
Integrated key28
Integrated universal remote
control107
Interesting destination for
navigation137
"Interim time"85
Interior lamps100
– remote control30
Interior motion sensor36Interior rearview mirror51
– automatic dimming
feature51
– compass108
Interlock, refer to Disengaging
the remote control59
Intermittent mode of the
wipers62
J
Jacking points227
Joystick, refer to iDrive16
Jumpering, refer to Jump
starting230
Jump starting230
K
Key, refer to Integrated key/
remote control28
Keyless go, refer to
Convenient access36
Keyless opening and closing,
refer to Convenient
access36
Key Memory, refer to Personal
Profile28
Kick-down60
– automatic transmission with
Steptronic60
Knock control201
L
Lamps
– automatic headlamp
control97
– parking lamps/low beams97
Lamps and bulbs, replacing
bulbs222
"Language / Units"77
"Language / Units" in
navigation146
"Languages" in
navigation146
"Languages"on the control
display85Lap-and-shoulder belt, refer
to Safety belts49
Lashing eyes, refer to
Securing cargo125
Last destinations, refer to
Destination list138
"Last seat pos."49
LATCH child-restraint fixing
system55
LED Light-emitting
diodes222
Length, refer to
Dimensions237
License plate lamp, replacing
bulbs226
Light-emitting diodes
LED222
Lighter112
– connecting electrical
appliances112
"Lighting"62,98
Lighting
– instruments100
– lamps and bulbs222
– vehicle, refer to Lamps97
Light-metal alloy wheels, care,
refer to Caring for your
vehicle brochure
Light switch97
"Limit"84
Limit, refer to Speed limit84
Load securing equipment,
refer to Securing cargo125
Lock buttons, doors, refer to
Locking32
Locking
– adjusting confirmation
signal30
– from inside32
– from outside30
– without remote control, refer
to Convenient access36
Locking and unlocking doors
– confirmation signals30
– from inside32
– from outside29
Low beams97
– automatic97
– replacing bulbs222
ProCarManuals.com