Page 166 of 194
Navigation (NAV)161
General operation
RADIO, CD
NAME, TEL
NAV, INFO
CAR, SETUP
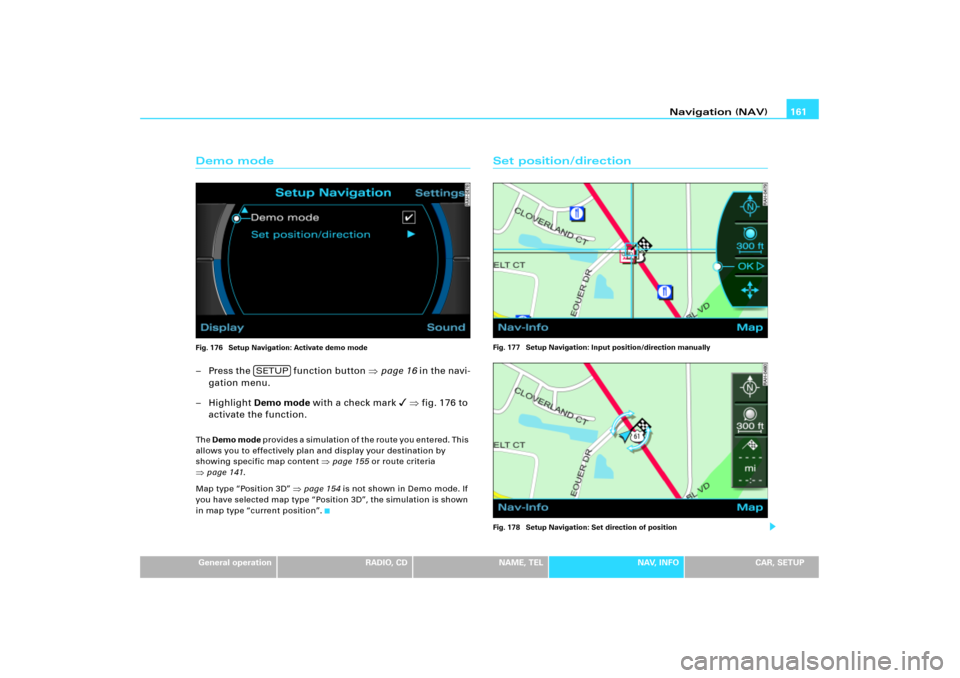
Demo modeFig. 176 Setup Navigation: Activate demo mode– Press the function button �page 16 in the navi-
gation menu.
– Highlight Demo mode with a check mark
� �fig.176 to
activate the function.
The Demo mode provides a simulation of the route you entered. This
allows you to effectively plan and display your destination by
showing specific map content
�page 155 or route criteria
�page 141.
Map type “Position 3D”
�page 154 is not shown in Demo mode. If
you have selected map type “Position 3D”, the simulation is shown
in map type “current position”.
Set position/directionFig. 177 Setup Navigation: Input position/direction manually
Fig. 178 Setup Navigation: Set direction of position
SETUP
Page 168 of 194
Information (INFO)163
General operation
RADIO, CD
NAME, TEL
NAV, INFO
CAR, SETUP
Information (INFO)IntroductionSelecting information function
Navigation information can be selected using the
button.– Pr e s s t h e f u n c t i o n b u t t o n �page 16 t o d i s p l a y t h e
main information menu �fig.179.Th e m a i n i n f o r m a t i o n m e n u d i s p l a y s t h e s a m e i n fo r m a t i o n a s i n t h e
main function once the control button for the Nav-Info is
pressed.
Main information menuInformation data
Location and destination information can both be
displayed.Fig. 179 Info: Displaying the destination– Press the function button to display the main
information menu �fig.179. You are shown the destina-
tion or next stopover with address, estimated time of
arrival and distance.
– Rotate the control knob to the left. The data for the next
stopovers to the destination are displayed.
INFO
INFONAV
INFO
Page 169 of 194
Information (INFO) 164
– Rotate the control knob to the right. The data for your
current location with its geographical data and the
number of receivable satellites is displayed.The main information menu provides a display of your destination
with the following data:�
Destination
�
Stopovers
�
Estimated time of arrival
�
Distance to destination
�
Location of your vehicle
�
Geographic location of your vehicle (latitude, longitude)
�
Received satellites
The last navigation announcement will also be repeated.Tips
If you press the button within the Info function, you can
program sound and tuning settings using the control buttons and
adjust the brightness for the display
�page 169.
SETUP
Page 170 of 194
Information (INFO)165
General operation
RADIO, CD
NAME, TEL
NAV, INFO
CAR, SETUP
Page 174 of 194

SETUP169
General operation
RADIO, CD
NAME, TEL
NAV, INFO
CAR, SETUP
SETUPIntroductionGeneral safety precautionsEnter vehicle settings only when the vehicle is stationary. The
procedures described below would distract your attention from
traffic if you performed them while driving. Please note
�page 9,
“Notes on Traffic Safety”.
Selecting Setup functionFig. 180 Display: Setup Radio
– Press the button in addition to a button already
pressed. The main Setup menu �fig.180 which is part
of the main function (e.g. radio) is displayed.
– Press one of the control buttons in a Setup main menu
�page 17 to go to the submenus for the Setup function
(in the example Radio to �fig.180).The Setup menu operates in conjunction with a function button
already pressed
�page 16 a n d o p e n s a d d i t i o n a l m e n u i t e m s f o r t h e
main function Radio, CD, MP3 and Navigation. By pressing the
control buttons, the Setup submenus Settings, Sound and Display
can be opened
�fig.180. These Setup submenus are always the
same, regardless of which Setup main function you are in.
SETUP
A1
A3
Page 176 of 194
SETUP171
General operation
RADIO, CD
NAME, TEL
NAV, INFO
CAR, SETUP
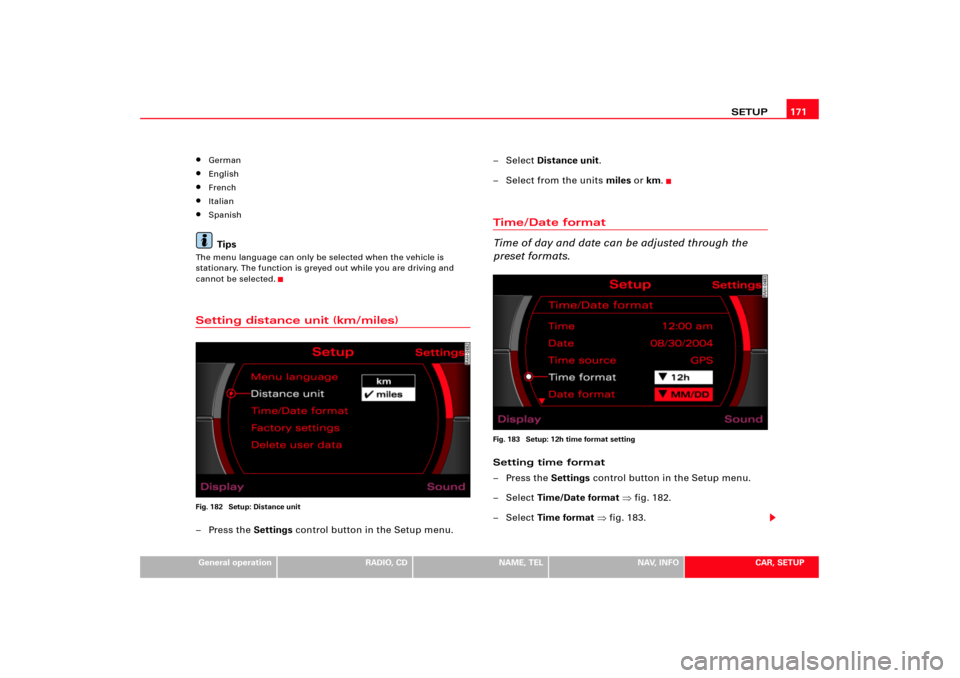
�
German
�
English
�
French
�
Italian
�
SpanishTips
The menu language can only be selected when the vehicle is
stationary. The function is greyed out while you are driving and
cannot be selected.Setting distance unit (km/miles)Fig. 182 Setup: Distance unit–Press the Settings control button in the Setup menu.– Select Distance unit.
– Select from the units miles or km.
Time/Date format
Time of day and date can be adjusted through the
preset formats.Fig. 183 Setup: 12h time format settingSetting time format
–Press the Settings control button in the Setup menu.
– Select Time/Date format �fig.182.
– Select Time format �fig.183.
Page 178 of 194
SETUP173
General operation
RADIO, CD
NAME, TEL
NAV, INFO
CAR, SETUP
Delete user data
User data in the Navigation System can be deleted.–Press the Settings control button in the Setup menu.
–Select Delete user data �page 172, fig.184.
–Confirm Are you sure you want to delete all user data??
with Ye s. User data (e.g. directory data, previous destina-
tions, radio memory list) are deleted.Sound control buttonSound settingsThe explanations for the sound settings start with section �page 92.
Display control buttonSwitch off displayFig. 185 Setup: Switch off displaySwitch off display
–Press the Display control button in the Setup menu.
– Select Switch off display �fig.185. The display is
switched off, the systems for navigation remain active.
Switch on display
– Press or rotate the control knob �page 17, or
–Press a �page 16 function button, or
Page 180 of 194
175
General operation
RADIO, CD
NAME, TEL
NAV, INFO
CAR, SETUP
Frequently Asked Questions (FAQ)Self-helpCategorie
Whats wrong if...
Abhilfe
General
operation
the syst")
Frequently Asked Questions (FAQ)175
General operation
RADIO, CD
NAME, TEL
NAV, INFO
CAR, SETUP
Frequently Asked Questions (FAQ)Self-helpCategorie
What's wrong if...
Abhilfe
General
operation
the system does not react to entries?
A system reset-start provides easy immediate help when the Navigation System
has crashed
�page 20.
you change the main function, but the
main menu is not displayed?
If you press the function button again, the main menu will be displayed
�page 16.
Radio
you select a radio station on the AM
band from the memory list and there is
no reception?
The list of radio stations on the AM band is static and has to be adjusted manually
to the current reception status
�page 59. This displays the stations, even if these
stations are not being received.
CD
MP3
the “Random” function does not start,
although you have activated “Random”?
The Random function depends on the setting in Repeat
�page 81 or
�page 86.
Name
(Directory)
only the data field Name c a n b e s e l e c t e d
in the directory and the remaining data
fields are shown greyed out?
Before all the data fields can be accessed, the name first has to be entered in the
directory
�page 100.
Navigation
you are not shown the destination entry
screen with the direct final destination?
The Route with stopover function is active. Select the menu item Route without
stopover in the Route function
�page 139.
you cannot enter your destination
address or you cannot find it in the navi-
gation system?
Destination entry is divided into regions. Before entering a street, a city, a special
destination, a special destination telephone number or map coordinates, the
appropriate region must be selected first.
you cannot leave the activated map
page menu?
Press the button
�page 144.
RETURN
163
General operation
RADIO, CD
NAME, TEL
NAV, INFO
CAR, SETUP
Information (INFO)IntroductionSelecting information function
Navigation information can be selected using the
button.")
 164
– Rotate the control knob to the right. The data for your
current location with its geographical data and the
number of receivable satellites is displayed.The main informati")
165
General operation
RADIO, CD
NAME, TEL
NAV, INFO
CAR, SETUP")