2007 AUDI R8 height adjustment
[x] Cancel search: height adjustmentPage 69 of 210
Seats and storage67
Controls
Safety
Driving tips
General maintenance
Self-help
Technical data
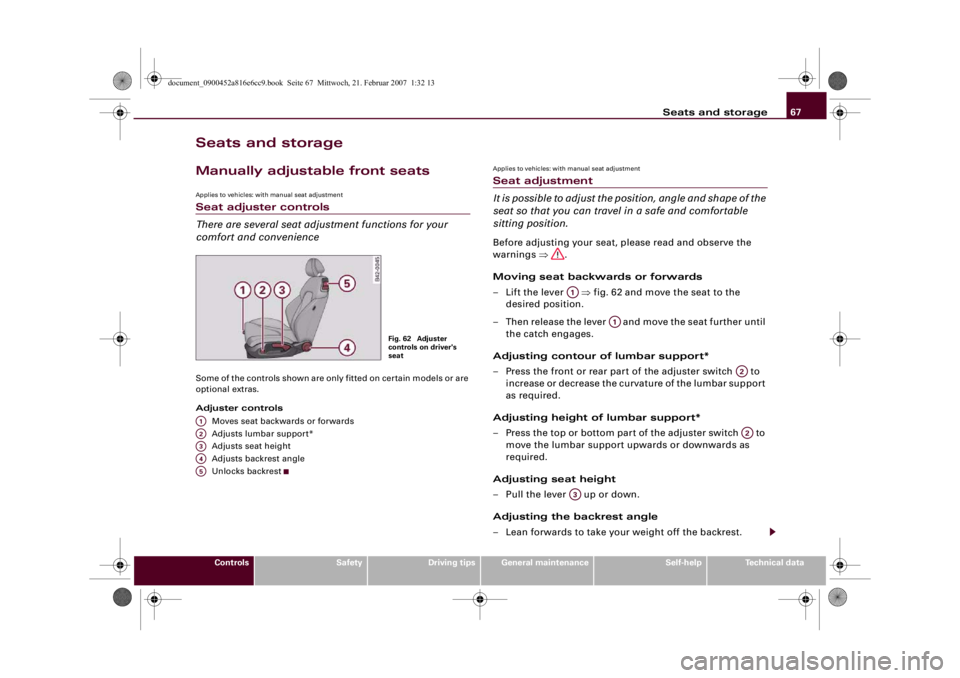
Seats and storageManually adjustable front seatsApplies to vehicles: with manual seat adjustmentSeat adjuster controls
There are several seat adjustment functions for your
comfort and convenienceSome of the controls shown are only fitted on certain models or are
optional extras.
Adjuster controls
Moves seat backwards or forwards
Adjusts lumbar support*
Adjusts seat height
Adjusts backrest angle
Unlocks backrest
Applies to vehicles: with manual seat adjustmentSeat adjustment
It is possible to adjust the position, angle and shape of the
seat so that you can travel in a safe and comfortable
sitting position.Before adjusting your seat, please read and observe the
warnings ⇒.
Moving seat backwards or forwards
– Lift the lever ⇒fig. 62 and move the seat to the
desired position.
– Then release the lever and move the seat further until
the catch engages.
Adjusting contour of lumbar support*
– Press the front or rear part of the adjuster switch to
increase or decrease the curvature of the lumbar support
as required.
Adjusting height of lumbar support*
– Press the top or bottom part of the adjuster switch to
move the lumbar support upwards or downwards as
required.
Adjusting seat height
– Pull the lever up or down.
Adjusting the backrest angle
– Lean forwards to take your weight off the backrest.
Fig. 62 Adjuster
controls on driver's
seat
A1A2A3A4A5
A1
A1
A2A2
A3
document_0900452a816e6cc9.book Seite 67 Mittwoch, 21. Februar 2007 1:32 13
Page 70 of 210

Seats and storage 68
– Turn the adjuster wheel to set the angle of the back-
rest as required.
Unlocking backrest
– Push the handle upwards.
– Fold the backrest forwards
WARNING
•
Never adjust the driver's seat when the vehicle is moving - this
could lead to an accident.
•
Be careful when adjusting the seat angle. Careless or uncon-
trolled use of the seat adjustment can cause injuries.
•
Do not drive with the backrests of the front seats reclined too
far as otherwise the seat belt and airbag could fail to restrain the
wearer properly in an accident, possibly leading to injury.
•
For safety reasons the front seat backrests must be locked
while driving.
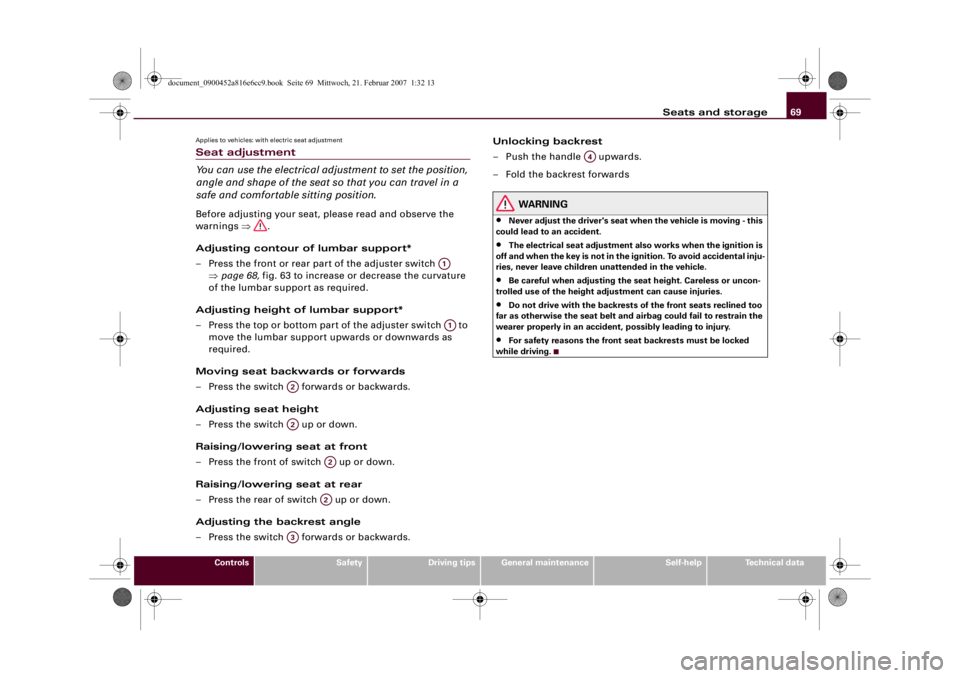
Electrically adjustable front seatsApplies to vehicles: with electric seat adjustmentSeat adjuster controls
The arrangement of the switches corresponds with the
design of the seats.The adjustment switches for the seat and backrest correspond with
the design of the seat. The seats can be adjusted simply by pressing
the corresponding switch in the required direction.
Adjuster controls
Adjusts lumbar support
Adjusts seat height and moves seat backwards or forwards
Adjusts backrest angle
Unlocks backrest
A4
A5
Fig. 63 Front seat:
Adjuster controls
A1A2A3A4
document_0900452a816e6cc9.book Seite 68 Mittwoch, 21. Februar 2007 1:32 13
Page 71 of 210
Seats and storage69
Controls
Safety
Driving tips
General maintenance
Self-help
Technical data
Applies to vehicles: with electric seat adjustmentSeat adjustment
You can use the electrical adjustment to set the position,
angle and shape of the seat so that you can travel in a
safe and comfortable sitting position.Before adjusting your seat, please read and observe the
warnings ⇒.
Adjusting contour of lumbar support*
– Press the front or rear part of the adjuster switch
⇒page 68, fig. 63 to increase or decrease the curvature
of the lumbar support as required.
Adjusting height of lumbar support*
– Press the top or bottom part of the adjuster switch to
move the lumbar support upwards or downwards as
required.
Moving seat backwards or forwards
– Press the switch forwards or backwards.
Adjusting seat height
– Press the switch up or down.
Raising/lowering seat at front
– Press the front of switch up or down.
Raising/lowering seat at rear
– Press the rear of switch up or down.
Adjusting the backrest angle
– Press the switch forwards or backwards.Unlocking backrest
– Push the handle upwards.
– Fold the backrest forwards
WARNING
•
Never adjust the driver's seat when the vehicle is moving - this
could lead to an accident.
•
The electrical seat adjustment also works when the ignition is
off and when the key is not in the ignition. To avoid accidental inju-
ries, never leave children unattended in the vehicle.
•
Be careful when adjusting the seat height. Careless or uncon-
trolled use of the height adjustment can cause injuries.
•
Do not drive with the backrests of the front seats reclined too
far as otherwise the seat belt and airbag could fail to restrain the
wearer properly in an accident, possibly leading to injury.
•
For safety reasons the front seat backrests must be locked
while driving.
A1A1
A2A2
A2A2
A3
A4
document_0900452a816e6cc9.book Seite 69 Mittwoch, 21. Februar 2007 1:32 13
Page 72 of 210
Seats and storage 70Bucket seatsApplies to vehicles: with bucket seatsSeat adjuster controls
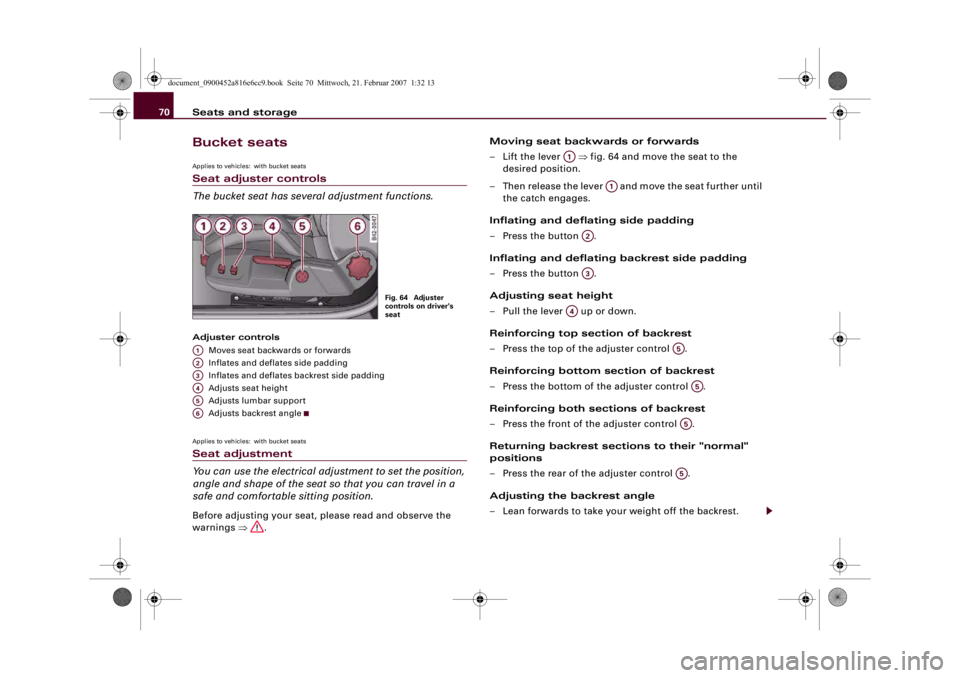
The bucket seat has several adjustment functions.Adjuster controls
Moves seat backwards or forwards
Inflates and deflates side padding
Inflates and deflates backrest side padding
Adjusts seat height
Adjusts lumbar support
Adjusts backrest angleApplies to vehicles: with bucket seatsSeat adjustment
You can use the electrical adjustment to set the position,
angle and shape of the seat so that you can travel in a
safe and comfortable sitting position.Before adjusting your seat, please read and observe the
warnings ⇒.Moving seat backwards or forwards
– Lift the lever ⇒fig. 64 and move the seat to the
desired position.
– Then release the lever and move the seat further until
the catch engages.
Inflating and deflating side padding
– Press the button .
Inflating and deflating backrest side padding
– Press the button .
Adjusting seat height
– Pull the lever up or down.
Reinforcing top section of backrest
– Press the top of the adjuster control .
Reinforcing bottom section of backrest
– Press the bottom of the adjuster control .
Reinforcing both sections of backrest
– Press the front of the adjuster control .
Returning backrest sections to their "normal"
positions
– Press the rear of the adjuster control .
Adjusting the backrest angle
– Lean forwards to take your weight off the backrest.
Fig. 64 Adjuster
controls on driver's
seat
A1A2A3A4A5A6
A1
A1
A2A3
A4
A5
A5
A5A5
document_0900452a816e6cc9.book Seite 70 Mittwoch, 21. Februar 2007 1:32 13
Page 73 of 210
Seats and storage71
Controls
Safety
Driving tips
General maintenance
Self-help
Technical data
– Turn the adjuster wheel to set the angle of the back-
rest as required.
Unlocking backrest
– Press one of the two levers ⇒page 68, fig. 63
upwards and fold down the backrest.
WARNING
•
Never adjust the driver's seat when the vehicle is moving - this
could lead to an accident.
•
The electrical seat adjustment also works when the ignition is
off and when the key is not in the ignition. To avoid accidental inju-
ries, never leave children unattended in the vehicle.
•
Be careful when adjusting the seat height. Careless or uncon-
trolled use of the seat adjustment can cause injuries.
•
Do not drive with the backrests of the front seats reclined too
far as otherwise the seat belt and airbag could fail to restrain the
wearer properly in an accident, possibly leading to injury.
•
For safety reasons the front seat backrests must be locked
while driving.
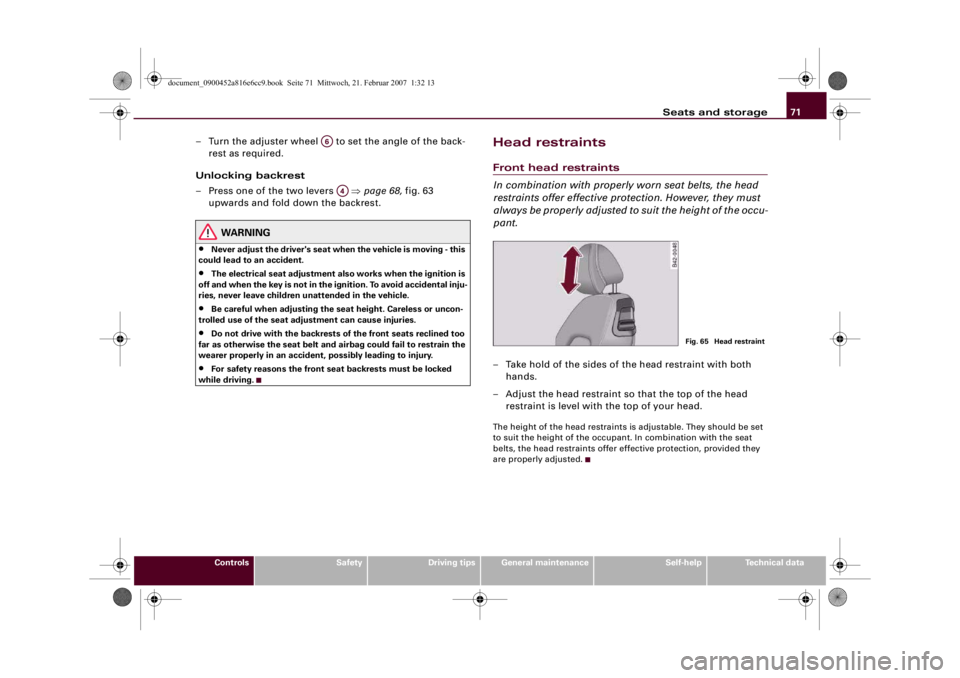
Head restraintsFront head restraints
In combination with properly worn seat belts, the head
restraints offer effective protection. However, they must
always be properly adjusted to suit the height of the occu-
pant.– Take hold of the sides of the head restraint with both
hands.
– Adjust the head restraint so that the top of the head
restraint is level with the top of your head.The height of the head restraints is adjustable. They should be set
to suit the height of the occupant. In combination with the seat
belts, the head restraints offer effective protection, provided they
are properly adjusted.
A6
A4
Fig. 65 Head restraint
document_0900452a816e6cc9.book Seite 71 Mittwoch, 21. Februar 2007 1:32 13
Page 114 of 210
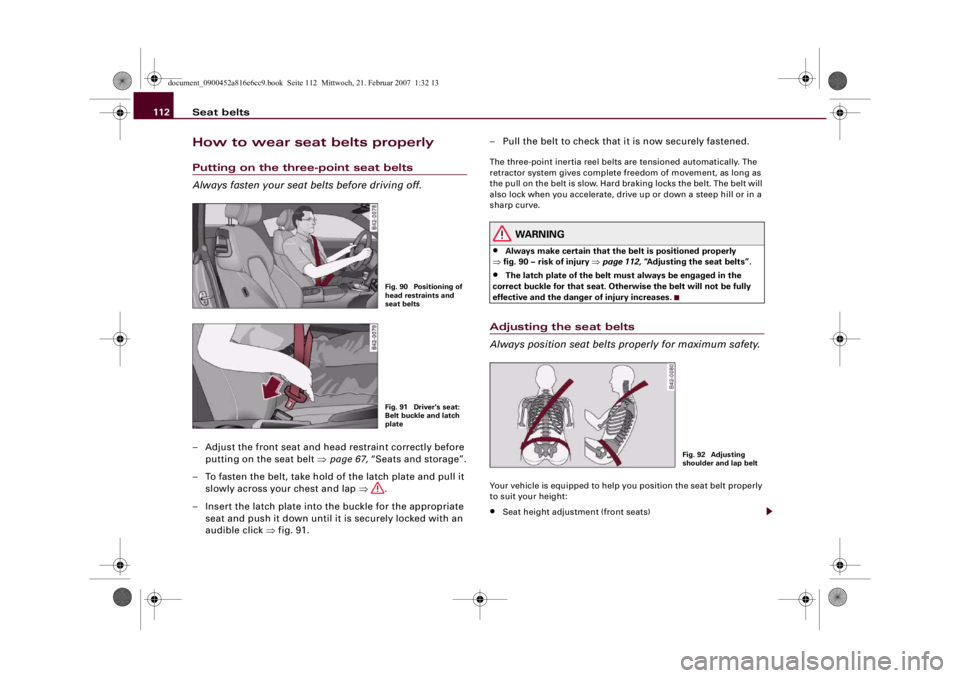
Seat belts 112How to wear seat belts properlyPutting on the three-point seat belts
Always fasten your seat belts before driving off.– Adjust the front seat and head restraint correctly before
putting on the seat belt ⇒page 67, “Seats and storage”.
– To fasten the belt, take hold of the latch plate and pull it
slowly across your chest and lap ⇒.
– Insert the latch plate into the buckle for the appropriate
seat and push it down until it is securely locked with an
audible click ⇒fig. 91.– Pull the belt to check that it is now securely fastened.
The three-point inertia reel belts are tensioned automatically. The
retractor system gives complete freedom of movement, as long as
the pull on the belt is slow. Hard braking locks the belt. The belt will
also lock when you accelerate, drive up or down a steep hill or in a
sharp curve.
WARNING
•
Always make certain that the belt is positioned properly
⇒fig. 90 – risk of injury ⇒page 112, “Adjusting the seat belts”.
•
The latch plate of the belt must always be engaged in the
correct buckle for that seat. Otherwise the belt will not be fully
effective and the danger of injury increases.
Adjusting the seat belts
Always position seat belts properly for maximum safety.Your vehicle is equipped to help you position the seat belt properly
to suit your height:•
Seat height adjustment (front seats)
Fig. 90 Positioning of
head restraints and
seat beltsFig. 91 Driver's seat:
Belt buckle and latch
plate
Fig. 92 Adjusting
shoulder and lap belt
document_0900452a816e6cc9.book Seite 112 Mittwoch, 21. Februar 2007 1:32 13
Page 209 of 210

Index207
Controls
Safety
Driving tips
General maintenance
Self-help
Technical data Radio display . . . . . . . . . . . . . . . . . . . . . . . . 20
Radio transmitters
Fixed installation . . . . . . . . . . . . . . . . . 175
Mobile equipment . . . . . . . . . . . . . . . . 175
Radio-controlled clock . . . . . . . . . . . . . . . . 11
Radio-operated remote control
SeeRemote control keys . . . . . . . . . . . 41
Rain sensor . . . . . . . . . . . . . . . . . . . . . . . . . 59
Rain sensor defective . . . . . . . . . . . . . . . . . 38
Rear fog light . . . . . . . . . . . . . . . . . . . . . . . . 54
Rear lights defective . . . . . . . . . . . . . . . . . . 37
Rear spoiler . . . . . . . . . . . . . . . . . . . . . . . . 134
Rear view mirrors
SeeMirrors . . . . . . . . . . . . . . . . . . . . . . . 63
Rear window heating . . . . . . . . . . . . . . . . . 79
Remote control keys . . . . . . . . . . . . . . . . . . 40
Indicator lamp . . . . . . . . . . . . . . . . . . . . 40
Replacing the battery . . . . . . . . . . . 40, 41
Synchronisation . . . . . . . . . . . . . . . . . . . 41
Unlocking and locking . . . . . . . . . . . . . 43
Repairs . . . . . . . . . . . . . . . . . . . . . . . . . . . . 174
Replacement keys . . . . . . . . . . . . . . . . . . . . 40
Replacement parts . . . . . . . . . . . . . . . . . . 174
Rev counter . . . . . . . . . . . . . . . . . . . . . . . . . 11
Reverse gear
R tronic . . . . . . . . . . . . . . . . . . . . . . . . . . 90
Running in . . . . . . . . . . . . . . . . . . . . . . . . . 138
SSAFE . . . . . . . . . . . . . . . . . . . . . . . . . . . . . . . 42
Safe driving . . . . . . . . . . . . . . . . . . . . . . . . 102Safety . . . . . . . . . . . . . . . . . . . . . . . . . . . . . 103
Safety features . . . . . . . . . . . . . . . . . . . . . 102
Seat adjustment
Bucket seats . . . . . . . . . . . . . . . . . . . . . . 70
Electrically adjustable seat . . . . . . . . . . 68
Manually adjustable seat . . . . . . . . . . . 67
Seat belts . . . . . . . . . . . . . . . . . . . . . . . . . . 109
Adjusting seat belts . . . . . . . . . . . . . . . 112
Belt tensioners . . . . . . . . . . . . . . . . . . . 114
Cleaning . . . . . . . . . . . . . . . . . . . . . . . . 150
During pregnancy . . . . . . . . . . . . . . . . 113
Putting on . . . . . . . . . . . . . . . . . . . . . . . 112
Safety notes . . . . . . . . . . . . . . . . . . . . . 110
Taking off . . . . . . . . . . . . . . . . . . . . . . . 113
Warning lamp . . . . . . . . . . . . . . . . . . . . . 18
Seat heating . . . . . . . . . . . . . . . . . . . . . . . . . 80
Security central locking . . . . . . . . . . . . . . . 46
Selector lever defective . . . . . . . . . . . . . . . 38
Service interval display . . . . . . . . . . . . . . . . 21
Service position for windscreen wipers . . 61
Setting time . . . . . . . . . . . . . . . . . . . . . . . . . 12
Setting time format . . . . . . . . . . . . . . . . . . . 12
Side lights . . . . . . . . . . . . . . . . . . . . . . . . . . 52
Sitting position
Driver . . . . . . . . . . . . . . . . . . . . . . . . . . . 104
Front passenger . . . . . . . . . . . . . . . . . . 105
Incorrect sitting position . . . . . . . . . . 106
Snow chains . . . . . . . . . . . . . . . . . . . . . . . 171
Spare key . . . . . . . . . . . . . . . . . . . . . . . . . . . 40
Speed warning . . . . . . . . . . . . . . . . . . . 31, 37
Speedometer . . . . . . . . . . . . . . . . . . . . . . . . 13
Spoiler . . . . . . . . . . . . . . . . . . . . . . . . . . . . 134Starting the engine . . . . . . . . . . . . . . . . . . . 82
Starting with jump leads . . . . . . . . . . . . . 185
Steering
Locking the steering . . . . . . . . . . . . . . . 81
Steering wheel height adjustment
(manual) . . . . . . . . . . . . . . . . . . . . . . . . 81
Steering lock . . . . . . . . . . . . . . . . . . . . . . . . 81
Stowing luggage safely . . . . . . . . . . . . . . 108
Sun visors . . . . . . . . . . . . . . . . . . . . . . . . . . . 58
Switching off the engine . . . . . . . . . . . . . . 83
Symbols
Red symbols in central display . . . . . . 33
Yellow symbols in central display . . . . 33
TTank capacity . . . . . . . . . . . . . . . . . . . . . . . 199
Temperature . . . . . . . . . . . . . . . . . . . . . . . . 76
Tool kit . . . . . . . . . . . . . . . . . . . . . . . . . . . . 178
Tools . . . . . . . . . . . . . . . . . . . . . . . . . . . . . . 178
Tow-away protection . . . . . . . . . . . . . . . . . 49
Towing away . . . . . . . . . . . . . . . . . . . . . . . 187
Towline anchorage . . . . . . . . . . . . . . . . . . 188
Tow-starting . . . . . . . . . . . . . . . . . . . . . . . . 187
Traction control system . . . . . . . . . . . . . . 132
Tread depth . . . . . . . . . . . . . . . . . . . . . . . . 168
Trip recorder . . . . . . . . . . . . . . . . . . . . . 13, 14
Trips, checklist . . . . . . . . . . . . . . . . . . . . . . 102
Turn signals . . . . . . . . . . . . . . . . . . . . . . . . . 56
Two-way radios . . . . . . . . . . . . . . . . . . . . . 175
Type plate . . . . . . . . . . . . . . . . . . . . . . . . . . 196
Tyre Mobility System . . . . . . . . . . . . . . . . 178
document_0900452a816e6cc9.book Seite 207 Mittwoch, 21. Februar 2007 1:32 13