2007 Acura MDX change time
[x] Cancel search: change timePage 101 of 166
100Navigation System
System Set-up
Auto Daylight
Sets automatic daylight saving time ON
or OFF . If you reside in a state or area
where daylight saving time is not used,
then you may want to turn this feature
off.
NOTE:
If you set Auto Daylight to ON, the Auto
Daylight function is activated even in an
area that does not adopt the Auto
Daylight system.
The federal government has mandated
that, starting in 2007, daylight savings
time will change in March & November
instead of the old schedule in April &
October. The new government daylight
savings time schedule is subject to
review and possible cancellation in
2008. At the time your navi DVD was
produced, the navi is programmed to
change its clock in April/October. The
dates that the navi switches between
standard and daylight savings time are
stored in the navi software, and is not
triggered by GPS satellite signals.
Therefore your navi clock will change
based on the old daylight savings time
schedule (April/October). To minimize
inconvenience caused by the new law,
we recommend the following:
1. The
Clock adjustment screen in the
Setup, set Auto Daylight to OFF.
2. When it is time to adjust the clock for daylight savings time, go to the Clock
adjustment screen in the Setup.
3. Select Time Adjustment and
simply adjust the navi time using the
Interface Dial by one hour.
Auto Time Zone
Sets automatic time zone selection by
GPS ON or OFF . If you are driving
across the country and passing through
time zones, then this feature will
automatically set the time to the time
zone you are traveling through.
However, if you live and work in two
different time zones, you may want to
turn this feature off.
NOTE:
When driving near a time zone
boundary, the displa yed time zone may
fluctuate between the two zone times.
Page 102 of 166
Navigation System101
System Set-up
Time Adjustment
Adjusts the current time in hours and
minutes. Switch HOUR and MINUTE
by moving the Interface Dial left or
right, and change value by rotating the
Interface Dial knob . Selecting
DONE returns you to the previous
screen. You can rese t the adjustment by
selecting RESET.
NOTE:
Selecting RESET also clears any
changes you made to “Auto Daylight”
or “Auto Time Zone” settings.
Depending on your location, you may
need to adjust these settings.
Vehicle
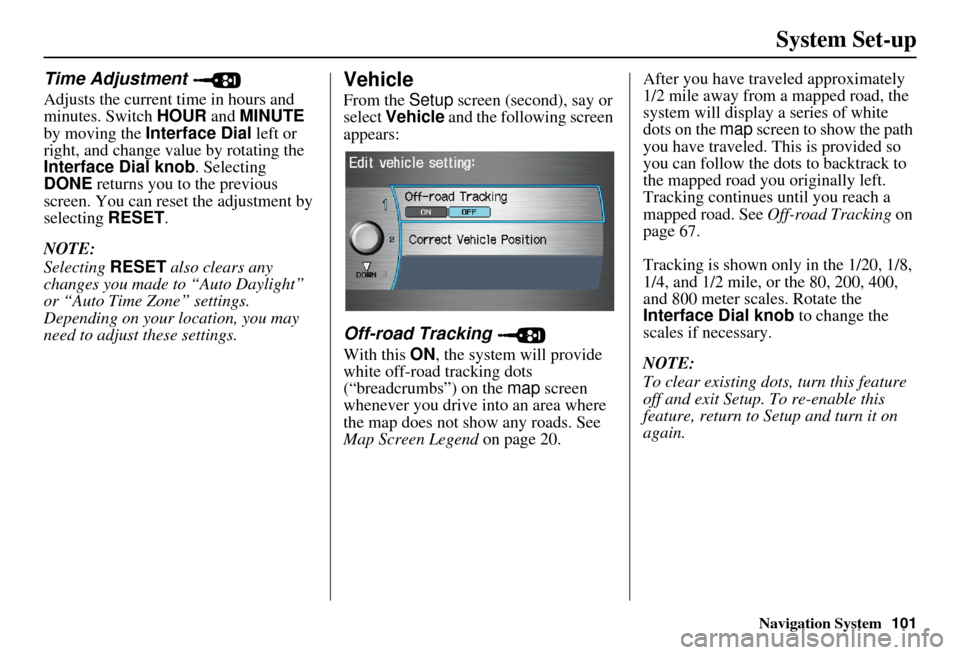
From the Setup screen (second), say or
select Vehicle and the following screen
appears:
Off-road Tracking
With this ON, the system will provide
white off-road tracking dots
(“breadcrumbs”) on the map screen
whenever you drive into an area where
the map does not show any roads. See
Map Screen Legend on page 20. After you have traveled approximately
1/2 mile away from a mapped road, the
system will display a series of white
dots on the
map screen to show the path
you have traveled. This is provided so
you can follow the dots to backtrack to
the mapped road you originally left.
Tracking continues until you reach a
mapped road. See Off-road Tracking on
page 67.
Tracking is shown only in the 1/20, 1/8,
1/4, and 1/2 mile, or the 80, 200, 400,
and 800 meter scales. Rotate the
Interface Dial knob to change the
scales if necessary.
NOTE:
To clear existing dots, turn this feature
off and exit Setup. To re-enable this
feature, return to Setup and turn it on
again.
Page 103 of 166
102Navigation System
System Set-up
Correct Vehicle Position
The system relies on satellites for
positioning information. Buildings,
tunnels, and other objects can block or
reflect these signals, requiring the
system to use “dead reckoning” to
determine your location and direction.
This can sometimes lead to small errors
in positioning, such as showing you on
an adjacent street.
NOTE:
Using this function to adjust vehicle
position is not recommended. When the
system acquires a GPS signal, it will
automatically place the vehicle in the
correct location.
If you choose to do this, follow these
steps:
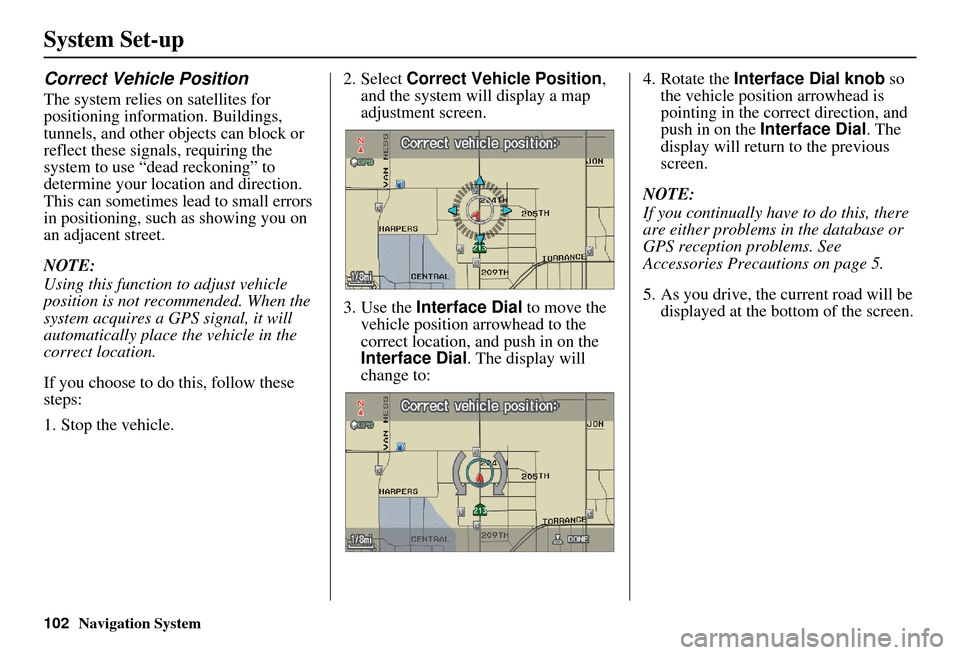
1. Stop the vehicle.2. Select
Correct Vehicle Position ,
and the system will display a map
adjustment screen.
3. Use the Interface Dial to move the
vehicle position arrowhead to the
correct location, and push in on the
Interface Dial . The display will
change to: 4. Rotate the
Interface Dial knob so
the vehicle position arrowhead is
pointing in the correct direction, and
push in on the Interface Dial . The
display will return to the previous
screen.
NOTE:
If you continually have to do this, there
are either problems in the database or
GPS reception problems. See
Accessories Precautions on page 5.
5. As you drive, the current road will be displayed at the bottom of the screen.
Page 110 of 166
Navigation System109
System Initialization
System Initialization
If for any reason, you lose power to the
navigation system (like the battery was
disconnected), the navigation system
will require initialization. Once
completed, your system will be ready to
use.
This initialization requires the
following:
Entry of the 4-digit anti-theft security code to “unlock” the navigation
system.
GPS initialization (may not be needed depending on the le ngth of time the
system was without power).
Map matching to align the GPS coordinates to a place on the map
(displays current street at the bottom
of the map).
Entering the Security Code
If the battery goes dead or is
disconnected for any reason, you will
have to enter a security code for both the
audio system and the navigation system
before you can use it again.
When you purchased the vehicle, you
should have received two cards that
have the audio and navigation system’s
security codes and serial numbers. Keep
these cards in a sa fe place in case you
need the codes. If you lose the cards,
you must obtain the security codes from
your dealer. Enter the four-digit s
ecurity code. If you
have entered it corr ectly, the display
changes to the Disclaimer screen. If
you make a mistake, the system will
display “INCORRECT PIN.” Re-enter
your 4-digit security code. You have ten
chances to enter the correct code. If all
ten are incorrect, turn the ignition to
OFF, then back to ON (II) to have ten
more chances to enter the correct code.
Follow the instructions in the vehicle
Owner’s manual to enter the 5-digit
audio code. The navigation voice will
not operate if the audio code is not
entered.
NOTE:
The anti-theft security code is unrelated
to your optional Navigation system PIN
(for Personal or Home Address).
Page 111 of 166
110Navigation System
System Initialization
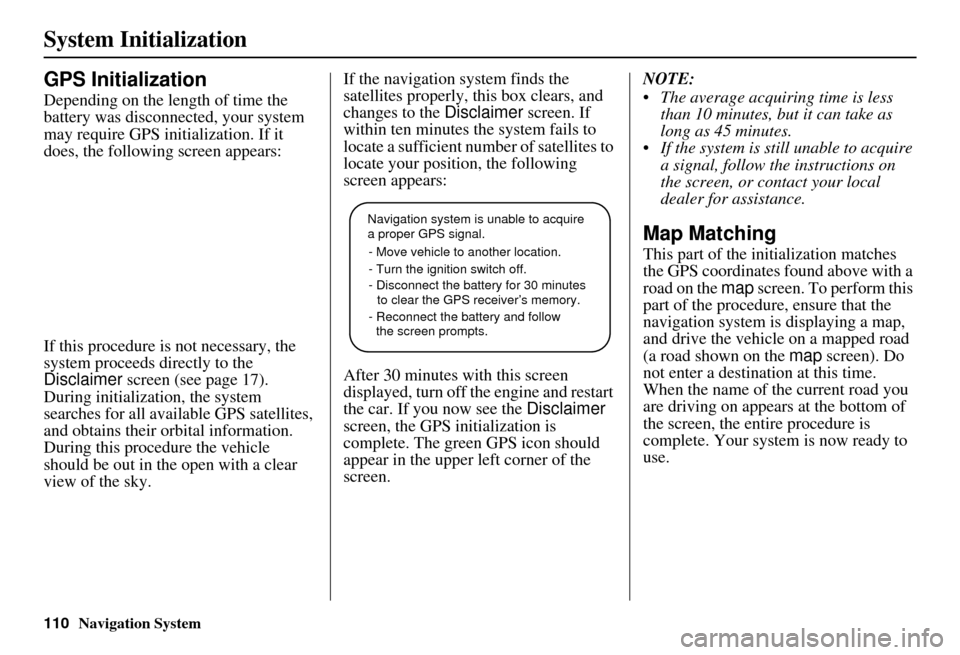
GPS Initialization
Depending on the length of time the
battery was disconnected, your system
may require GPS initialization. If it
does, the following screen appears:
If this procedure is not necessary, the
system proceeds directly to the
Disclaimer screen (see page 17).
During initialization, the system
searches for all available GPS satellites,
and obtains their orbital information.
During this procedure the vehicle
should be out in th e open with a clear
view of the sky. If the navigation system finds the
satellites properly, this box clears, and
changes to the
Disclaimer screen. If
within ten minutes the system fails to
locate a sufficient number of satellites to
locate your position, the following
screen appears:
After 30 minutes with this screen
displayed, turn off the engine and restart
the car. If you now see the Disclaimer
screen, the GPS initialization is
complete. The green GPS icon should
appear in the upper left corner of the
screen. NOTE:
The average acquiring time is less
than 10 minutes, but it can take as
long as 45 minutes.
If the system is still unable to acquire a signal, follow the instructions on
the screen, or contact your local
dealer for assistance.
Map Matching
This part of the initialization matches
the GPS coordinates found above with a
road on the map screen. To perform this
part of the procedure, ensure that the
navigation system is displaying a map,
and drive the vehicle on a mapped road
(a road shown on the map screen). Do
not enter a destina tion at this time.
When the name of the current road you
are driving on appears at the bottom of
the screen, the entire procedure is
complete. Your system is now ready to
use.
Navigation system is unable to acquire
a proper GPS signal.
- Move vehicle to another location.
- Turn the ignition switch off.
- Disconnect the battery for 30 minutes
to clear the GPS receiver’s memory.
- Reconnect the battery and follow
the screen prompts.
Page 114 of 166

Navigation System113
Database Limitations
You will find that some points of
interest (POI) may be missing when you
search the database. This can be caused
if at the time the database was gathered,
the name was misspelled, the place was
improperly categorized, or the POI
change is not yet in the database. This
means you may not find places listed
that you know exist. This is also true for
police agencies and hospitals. In
outlying areas, facilities listed may not
be the closest. Always check with local
information sources if you need law
enforcement or hospital services.
Every effort has been made to verify
that the system’s database was accurate
at the time it was created. However,
businesses do fail or move to new
locations, and new businesses start in
the old locations. For this reason, you
may occasionally find “inaccurate”
information when you select and drive
to a point of interest (for example, a
restaurant is now a jewelry store). The
number of these inaccuracies increases
the longer you go without an update. The digitized map database reflects
conditions as they existed at various
points in time before production.
Accordingly, your
DVD may contain
inaccurate or inco mplete data or
information due to the passage of time,
road construction, ch anging conditions,
or other causes.
In addition, this database does not
include, analyze, pr ocess, consider, or
reflect any of the following categories
of information:
Neighborhood quality or safety
Population density
Availability or proximity of law enforcement
Emergency, rescue, medical, or other assistance
Construction work, zones, or hazards
Road and lane closures
Legal restrictions (such as vehicular type, weight, load, height, and speed
restrictions)
Road slope or grade Bridge height, width, weight, or other
limits
Road, traffic or traffic facilities safety, or conditions
Weather conditions
Special events
Pavement characteristics or conditions
Traffic congestion
Travel time
We assume no liability for any incident
that may result from an error in the
program, or from changed conditions
not noted above.
Copyrights
infoUSA-Data: Certain business data provided by infoUS A, Inc., Omaha,
Nebraska, Copyright © 2003, All
Rights Reserved.
EXIT-Data: © ZENRIN CO., LTD. 2003. All Rights Reserved.
ZAGAT SURVEY: Copyright © [2003] Zagat Survey, LLC. All rights
reserved.
Page 130 of 166
Navigation System129
Frequently Asked Questions
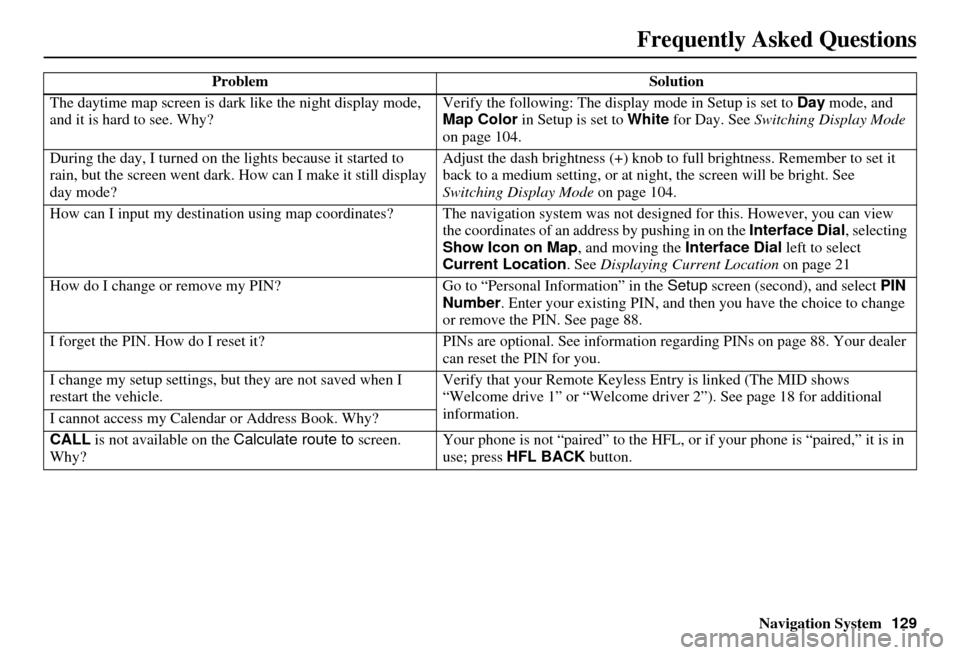
The daytime map screen is dark like the night display mode,
and it is hard to see. Why? Verify the following: The disp
lay mode in Setup is set to Day mode, and
Map Color in Setup is set to White for Day. See Switching Display Mode
on page 104.
During the day, I turned on the lights because it started to
rain, but the screen went dark. How can I make it still display
day mode? Adjust the dash brightness (+) knob to fu
ll brightness. Remember to set it
back to a medium setting, or at ni ght, the screen will be bright. See
Switching Display Mode on page 104.
How can I input my destination using map coordinates? The navigation system was not designed for this. However, you can view
the coordinates of an address by pushing in on the Interface Dial, selecting
Show Icon on Map , and moving the Interface Dial left to select
Current Location . See Displaying Current Location on page 21
How do I change or remove my PIN? Go to “Personal Information” in the Setup screen (second) , and select PIN
Number . Enter your existing PIN, and then you have the choice to change
or remove the PIN. See page 88.
I forget the PIN. How do I reset it? PINs are optional. See information regarding PINs on page 88. Your dealer
can reset the PIN for you.
I change my setup settings, bu t they are not saved when I
restart the vehicle. Verify that your Remote Keyless
Entry is linked (The MID shows
“Welcome drive 1” or “Welcome dr iver 2”). See page 18 for additional
information.
I cannot access my Calendar or Address Book. Why?
CALL is not available on the Calculate route to screen.
Why? Your phone is not “paired” to the HFL,
or if your phone is “paired,” it is in
use; press HFL BACK button.
Problem
Solution
Page 135 of 166
134Navigation System
Frequently Asked Questions
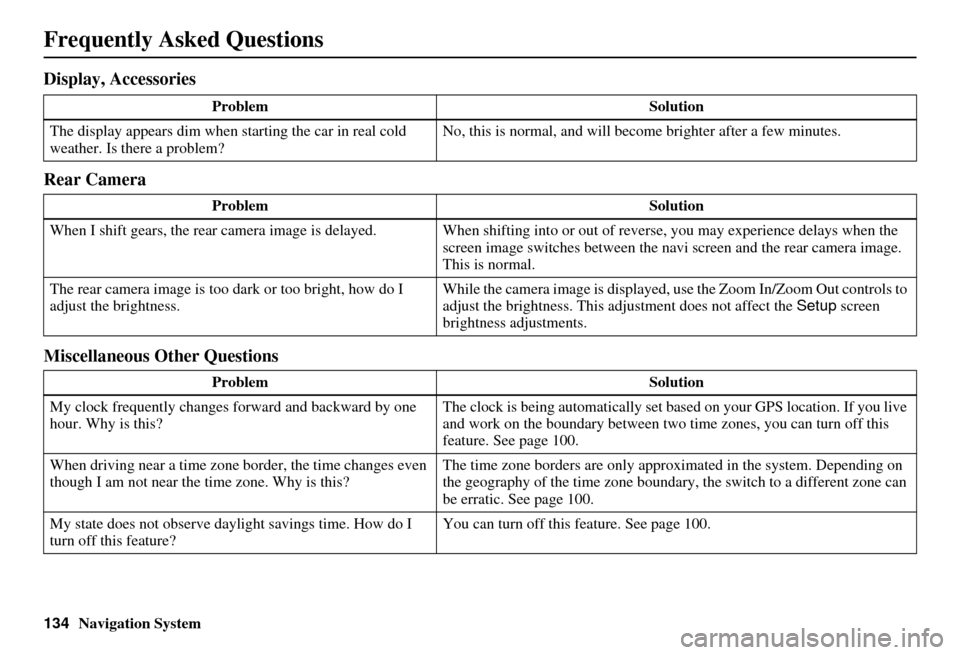
Display, Accessories
Rear Camera
Miscellaneous Other Questions
ProblemSolution
The display appears dim when starting the car in real cold
weather. Is there a problem? No, this is normal, and will beco
me brighter after a few minutes.
Problem Solution
When I shift gears, the rear camera image is delayed. When shifting into or out of reverse, you may experience delays when the
screen image switches between the navi screen and the rear camera image.
This is normal.
The rear camera image is too dark or too bright, how do I
adjust the brightness. While the camera image is displayed, use the Zoom In/Zoom Out controls to
adjust the brightness. This ad
justment does not affect the Setup screen
brightness adjustments.
Problem Solution
My clock frequently changes forward and backward by one
hour. Why is this? The clock is being automatically set based on your GPS location. If you live
and work on the boundary between two
time zones, you can turn off this
feature. See page 100.
When driving near a time zone border, the time changes even
though I am not near the time zone. Why is this? The time zone borders are only appr
oximated in the system. Depending on
the geography of the time zone boundary, the switch to a different zone can
be erratic. See page 100.
My state does not observe dayl ight savings time. How do I
turn off this feature? You can turn off this feature. See page 100.