2007 Acura MDX ad blue
[x] Cancel search: ad bluePage 55 of 166

54Navigation System
Map Screen Legend
Acura Dealer
School
Restaurant
AT M
Parking Lot
Post OfficeHonda Dealer
Hospital
Grocery Store
Gas Station
Hotel/Lodging
Parking Garage
Freeway Exit Information
Landmark Icon (see page 62)
Destination Icon (see page 62)
Map Features
Dark Green: Park
Light Blue: Hospital
Brown: Shopping Mall
Light Brown: Indian Reservation
Green: Golf Course
Gray: Airport/Stadium/Business
Blue: Body of Water
Blue/Green: Cemetery
Matte Blue: University
NOTE:
If you move the Interface Dial over an area (map
features shown above), the name is displayed on
the screen.
Map Scale Adjustment
(Mile or km per half inch appears
only when you zoom in or out by
rotating the
Interface Dial knob .)
(see page 60) NOTE:
See Map Legend on the Information screen for further explanation (see page 77).
Map Scale
(see page 60) Current Street
(see page 68) Vehicle Position
(see page 68) “Breadcrumbs”
(see page 67) Streets
(see
Map Overview on page 83, or
Unverified Area Routing on page 92)
Dark Red: Interstates or Freeways
Black: Verified Street
Light Brown: Unverified Street Direction of Destination
(when on route) (see page 56)
Map Orientation
(see page 61)
Distance to Destination
(see page 56)
Time to Destination
(see page 56) Waypoints (see page 71)
Blue Line
Calculated route
Map Menu (see page 56)
(Push in on the Interface Dial to view.)
Driving to Your Destination
Page 66 of 166

Navigation System65
Driving to Your Destination
Showing Icons on the Map
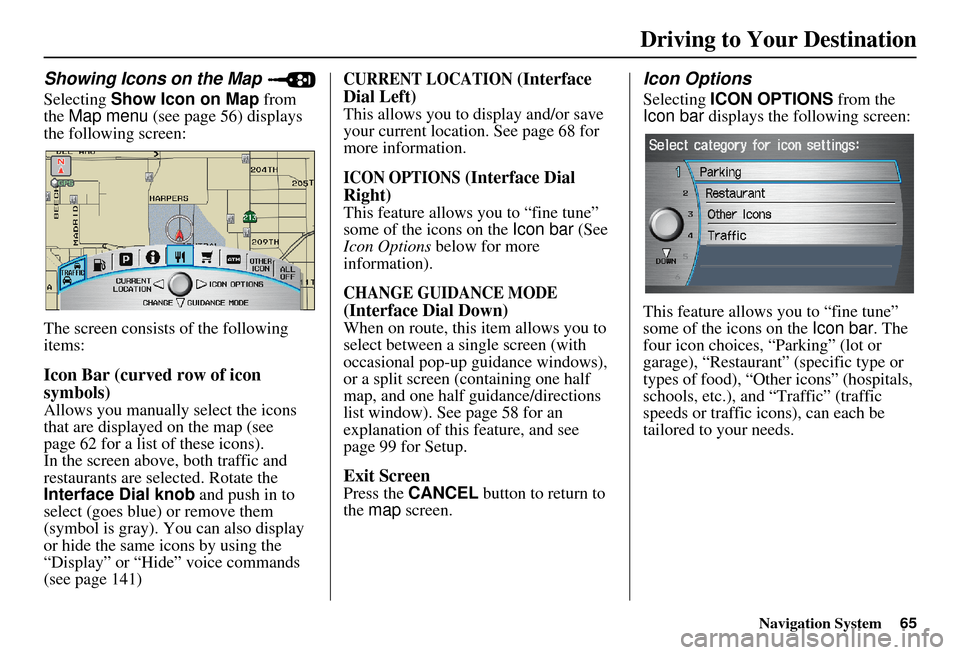
Selecting Show Icon on Map from
the Map menu (see page 56) displays
the following screen:
The screen consists of the following
items:
Icon Bar (curved row of icon
symbols)
Allows you manually select the icons
that are displayed on the map (see
page 62 for a list of these icons).
In the screen above, both traffic and
restaurants are selected. Rotate the
Interface Dial knob and push in to
select (goes blue) or remove them
(symbol is gray). You can also display
or hide the same icons by using the
“Display” or “Hide” voice commands
(see page 141)
CURRENT LOCATION (Interface
Dial Left)
This allows you to display and/or save
your current location. See page 68 for
more information.
ICON OPTIONS (Interface Dial
Right)
This feature allows you to “fine tune”
some of the icons on the Icon bar (See
Icon Options below for more
information).
CHANGE GUIDANCE MODE
(Interface Dial Down)
When on route, this item allows you to
select between a single screen (with
occasional pop-up guidance windows),
or a split screen (containing one half
map, and one half guidance/directions
list window). See page 58 for an
explanation of this feature, and see
page 99 for Setup.
Exit Screen
Press the CANCEL button to return to
the map screen.
Icon Options
Selecting ICON OPTIONS from the
Icon bar displays the following screen:
This feature allows you to “fine tune”
some of the icons on the Icon bar. The
four icon choices, “Parking” (lot or
garage), “Restaurant” (specific type or
types of food), “Other icons” (hospitals,
schools, etc.), and “Traffic” (traffic
speeds or traffic icons), can each be
tailored to your needs.
Page 67 of 166

66Navigation System
For instance, let’s assume that your real-
time traffic is not displayed on the map,
and you want to make sure that your
settings are correct. You would do the
following:
First you would ensure that the “Traffic” button on the Icon bar is
blue (See Icon Bar above).
Second, you select ICON OPTIONS
and verify that both traffic options are
also on (blue). This procedure is
explained below.
If you select Traffic from the Select
category for icon settings screen, the
traffic icon options are displayed: In the example above, only
Traffic
Icons is selected and will show up on
the map. To also see Traffic Speeds
flow on the map, this would need to be
turned on by first selecting it and then
pushing in on the Interface Dial to
select it so it appears as below.
Exit, and save your settings by moving
the Interface Dial to the right
(DONE ). NOTE:
When viewing the map screen, you
can turn some icons on using voice
control.
“Traffic Speeds” and “Traffic Icons” must be selected in the “Traffic”
choice of “Icon options” to enable
the traffic display on the map screen.
You can use voice commands, “Display (or hide) traffic icons,” or
“Display (or hide) traffic speeds.”
See page 141.
Driving to Your Destination
Page 81 of 166

80Navigation System
Information Features
The symbols, if displayed (blue circle), indicates the following
information: open on Sunday
closed on Sunday
open on Monday
closed on Monday
open for lunch
lunch not served
serving after 11 PM
no credit card accepted
Use the Interface Dial to scroll
through the Key to Zagat Ratings
screens.Calculator
When you say or select Calculator, the
display changes to:
Use the Interface Dial and its Knob to
use the following features:
Calculator
The calculator function operates like a
standard hand held calculator.
Unit Conversion
Values entered on the calculator can be
converted from one unit to another (e.g.,
inches-to-millimeters).
Page 82 of 166

Navigation System81
Information Features
Unit Conversion
To perform a conversion:
1. Enter a numeric value to be converted
(for example, 100).
2. Move the Interface Dial down to
select UNIT CONVERSION . The
screen changes to:
3. Rotate the Interface Dial knob to
select the type of unit you want to
convert (for exampl e, weight) and
push in on the dial to select. The
screen for that conversion type
appears (see illustrat ion in step 4). 4. Select the base unit (like pounds) that
you wish to convert to some other
unit. So, in the example below, 100
lbs converts to 1600 ounces, 0.05 ton
(US), etc.
NOTE:
If you do not enter a value to be converted, only “Temperature” units
are selectable.
Conversions using negative values may produce meaningless or
physically impossible values.
Roadside Assistance
When you say or select Roadside
Assistance, you will see the following
screen:
An Acura Roadside Assistance number
is provided as a courtesy to Acura
clients. If you have a “paired” Bluetooth
phone and it is ON, then you can call
Acura Roadside Assistance by using
your system. Select CALL by voice or
by using the Interface Dial , and then
select Yes on the confirmation screen.
Page 93 of 166

Navigation System92
System Set-up
Unverified Area Routing
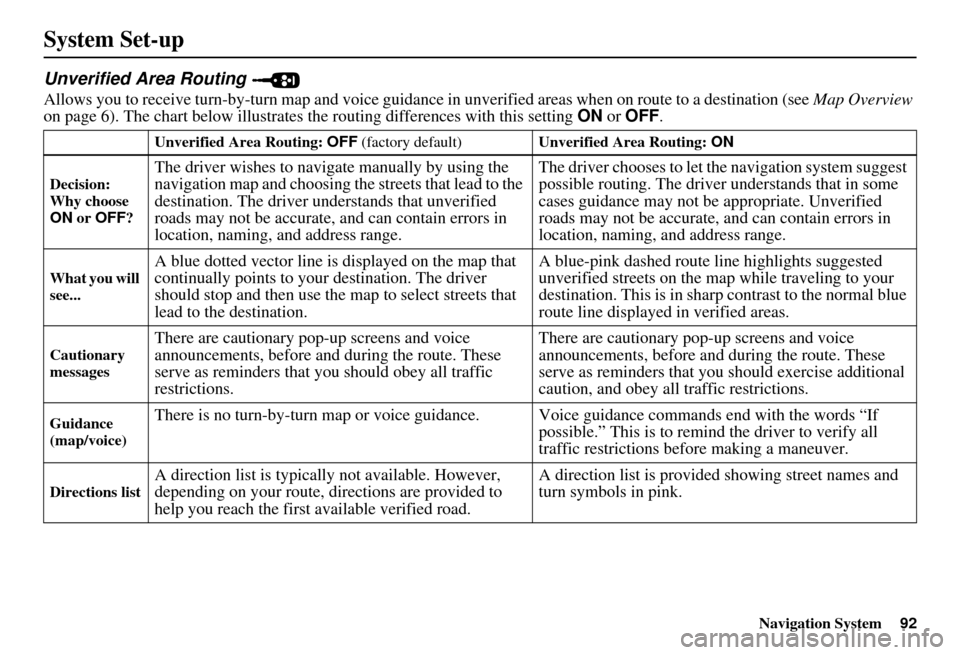
Allows you to receive turn-by-turn map and voice guidance in unverified areas when on route to a destination (see Map Overview
on page 6). The chart below illustrates th e routing differences with this setting ON or OFF .
Unverified Area Routing: OFF (factory default) Unverified Area Routing: ON
Decision:
Why choose
ON or OFF ?
The driver wishes to navigate manually by using the
navigation map and choosing th e streets that lead to the
destination. The driver un derstands that unverified
roads may not be accurate, and can contain errors in
location, naming, and address range. The driver chooses to let th
e navigation system suggest
possible routing. The driver understands that in some
cases guidance may not be appropriate. Unverified
roads may not be accurate, and can contain errors in
location, naming, and address range.
What you will
see...A blue dotted vector line is displayed on the map that
continually points to your destination. The driver
should stop and then use the map to select streets that
lead to the destination. A blue-pink dashed route line highlights suggested
unverified streets on the ma
p while traveling to your
destination. This is in sharp contrast to the normal blue
route line displayed in verified areas.
Cautionary
messagesThere are cautionary pop-up screens and voice
announcements, before and during the route. These
serve as reminders that you should obey all traffic
restrictions. There are cautionary pop-
up screens and voice
announcements, before and during the route. These
serve as reminders that you should exercise additional
caution, and obey all traffic restrictions.
Guidance
(map/voice)There is no turn-by-turn map or voice guidan ce. Voice guidance commands end with the words “If
possible.” This is to remind the driver to verify all
traffic restrictions before making a maneuver.
Directions listA direction list is typically not available. However,
depending on your route, directions are provided to
help you reach the first available verified road. A direction list is provided showing street names and
turn symbols in pink.
Page 95 of 166

94Navigation System
System Set-up
With Unverified Area Routing OFF ,
the driver chose to take a shortcut, and
avoid the long route. The moment you
enter an unverified street, a caution box
appears on the screen, and is read by the
voice. This lets you know that you are
about to enter an unverified area and
that you will be following a dotted
“vector line” that points to your
destination.
With Unverified Area Routing ON ,
a caution box appear s on the screen and
is read by the voice. In this case you will
be presented with a dashed blue/pink
line instead of the regular blue route
line. You cannot assume that all
guidance is appropriate. This is your
signal to pay attention to posted traffic
restrictions.
In both cases, when you actually enter
the unverified street, a short caution will
remind you. You will see and hear this
short caution message whenever you
enter unverified areas. Unverified Area Routing “OFF” Unverified Area Routing “ON”
Page 96 of 166

Navigation System95
System Set-up
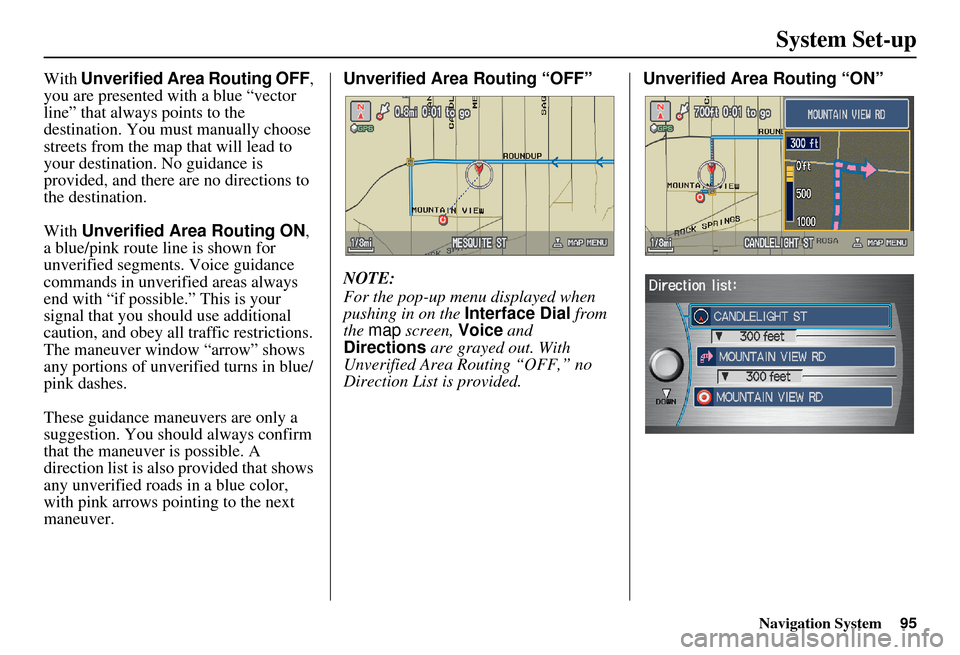
With Unverified Area Routing OFF ,
you are presented with a blue “vector
line” that always points to the
destination. You must manually choose
streets from the map that will lead to
your destination. No guidance is
provided, and there are no directions to
the destination.
With Unverified Area Routing ON ,
a blue/pink route line is shown for
unverified segments. Voice guidance
commands in unverified areas always
end with “if possible.” This is your
signal that you should use additional
caution, and obey all traffic restrictions.
The maneuver window “arrow” shows
any portions of unverified turns in blue/
pink dashes.
These guidance maneuvers are only a
suggestion. You should always confirm
that the maneuver is possible. A
direction list is also provided that shows
any unverified roads in a blue color,
with pink arrows pointing to the next
maneuver. Unverified Area Routing “OFF”
NOTE:
For the pop-up menu displayed when
pushing in on the
Interface Dial from
the map screen, Voice and
Directions are grayed out. With
Unverified Area Routing “OFF,” no
Direction List is provided. Unverified Area
Routing “ON”