Page 97 of 166
96Navigation System
System Set-up
Edit Avoid Area
This function allows you to select areas
you wish to avoid when calculating a
route to your destination. You can select
up to 5 areas to avoid. You may wish to
set up an “avoid ar ea” to route around
long term road construction, closures, or
any area you wish to avoid. If you enter
a route that takes you through or into an
“avoid area,” a pop-up box will warn
you that your route takes you into one of
these areas. However, you can still
choose destinations in an avoided area.
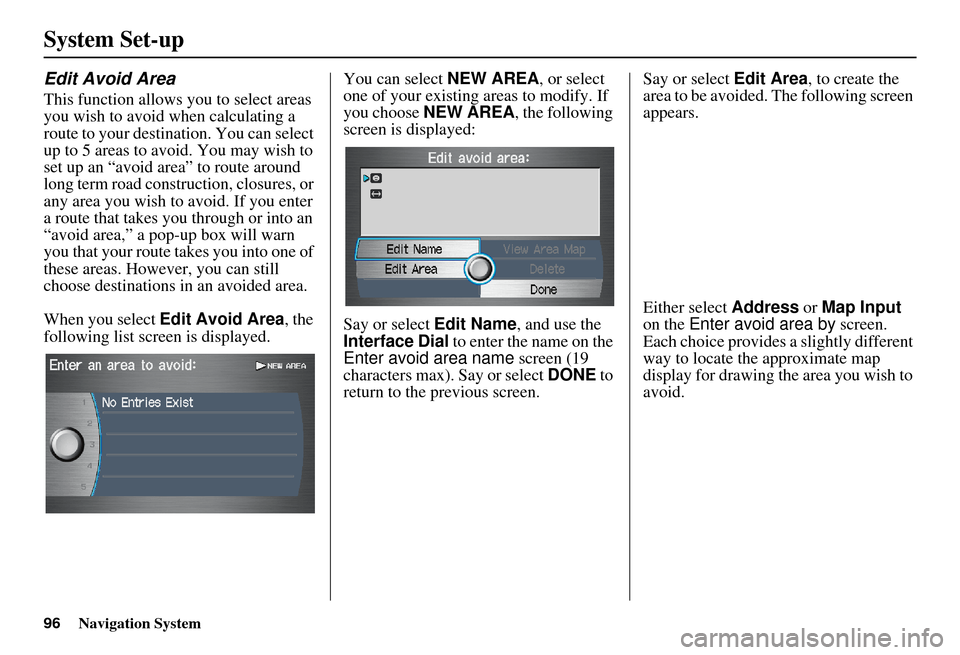
When you select Edit Avoid Area , the
following list screen is displayed. You can select
NEW AREA, or select
one of your existing areas to modify. If
you choose NEW AREA , the following
screen is displayed:
Say or select Edit Name, and use the
Interface Dial to enter the name on the
Enter avoid area name screen (19
characters max). Say or select DONE to
return to the previous screen. Say or select Edit Area
, to create the
area to be avoided. The following screen
appears.
Either select Address or Map Input
on the Enter avoid area by screen.
Each choice provides a slightly different
way to locate the approximate map
display for drawing the area you wish to
avoid.
Page 98 of 166
Navigation System97
System Set-up
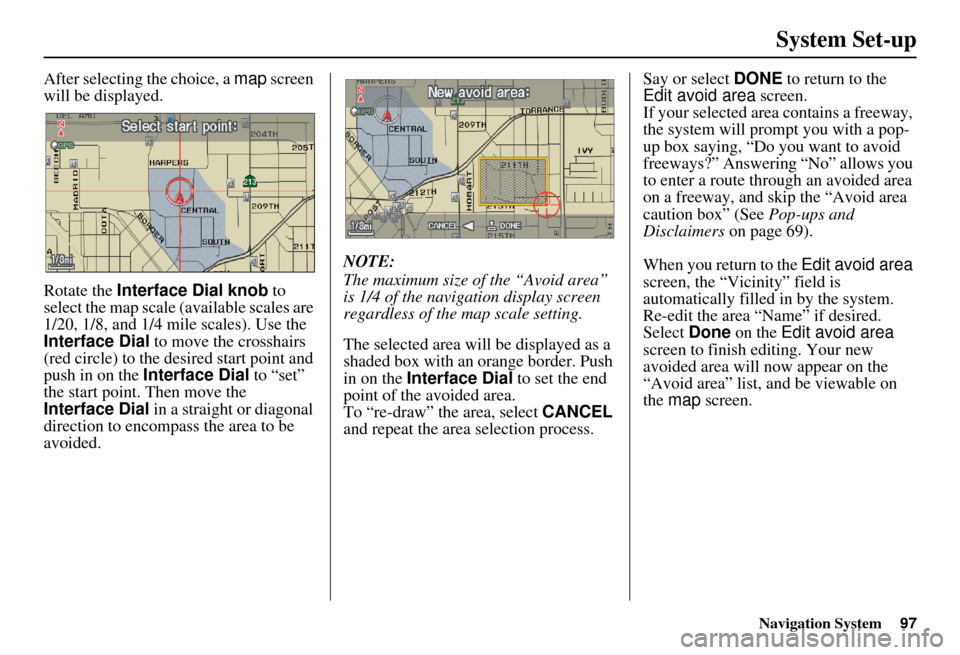
After selecting the choice, a map screen
will be displayed.
Rotate the Interface Dial knob to
select the map scale (available scales are
1/20, 1/8, and 1/4 mile scales). Use the
Interface Dial to move the crosshairs
(red circle) to the desired start point and
push in on the Interface Dial to “set”
the start point. Then move the
Interface Dial in a straight or diagonal
direction to encompas s the area to be
avoided. NOTE:
The maximum size of the “Avoid area”
is 1/4 of the navigation display screen
regardless of the map scale setting.
The selected area will be displayed as a
shaded box with an orange border. Push
in on the
Interface Dial to set the end
point of the avoided area.
To “re-draw” the area, select CANCEL
and repeat the area selection process. Say or select DONE
to return to the
Edit avoid area screen.
If your selected area contains a freeway,
the system will prompt you with a pop-
up box saying, “Do you want to avoid
freeways?” Answering “No” allows you
to enter a route thro ugh an avoided area
on a freeway, and skip the “Avoid area
caution box” (See Pop-ups and
Disclaimers on page 69).
When you return to the Edit avoid area
screen, the “Vicinity” field is
automatically filled in by the system.
Re-edit the area “Name” if desired.
Select Done on the Edit avoid area
screen to finish editing. Your new
avoided area will now appear on the
“Avoid area” list, and be viewable on
the map screen.
Page 100 of 166
Navigation System99
System Set-up
For “Places along the route,” the system
looks in front of yo u within a corridor
width specified by your values for “On
Freeways” or “On Surface Street.” The
system checks the upcoming area, based
on your input.
For “Places around the destination,” the
system searches outwards in a spiral
from the destination. In this case,
specific search values are not needed;
the matches are displayed in order of
distance from destination.
NOTE:
These settings do not affect the search
range used for the voice commands like,
“Find nearest gas station,” that are
also available wh en viewing the map
screen.Guidance Mode
Allows you to select the guidance
display mode: Single Screen or Split
Screen .
The factry default is Single Screen.
NOTE:
The Guidance Mode can also be
selected on the Icon Selection screen.
See Showing Icons on the Map on
page 65.
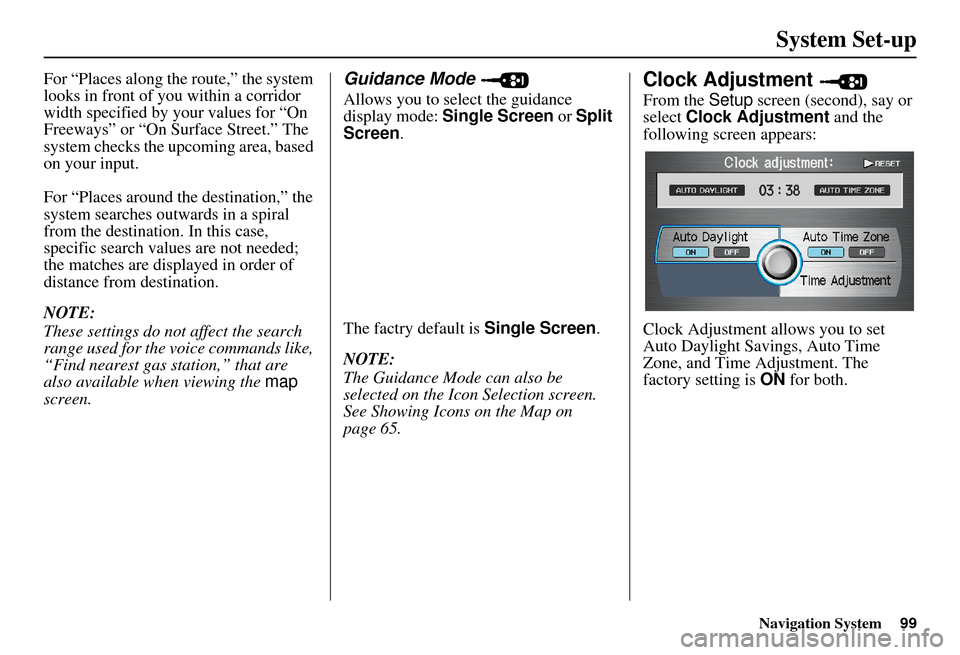
Clock Adjustment
From the Setup screen (second), say or
select Clock Adjustment and the
following screen appears:
Clock Adjustment allows you to set
Auto Daylight Savings, Auto Time
Zone, and Time Adjustment. The
factory setting is ON for both.
Page 102 of 166
Navigation System101
System Set-up
Time Adjustment
Adjusts the current time in hours and
minutes. Switch HOUR and MINUTE
by moving the Interface Dial left or
right, and change value by rotating the
Interface Dial knob . Selecting
DONE returns you to the previous
screen. You can rese t the adjustment by
selecting RESET.
NOTE:
Selecting RESET also clears any
changes you made to “Auto Daylight”
or “Auto Time Zone” settings.
Depending on your location, you may
need to adjust these settings.
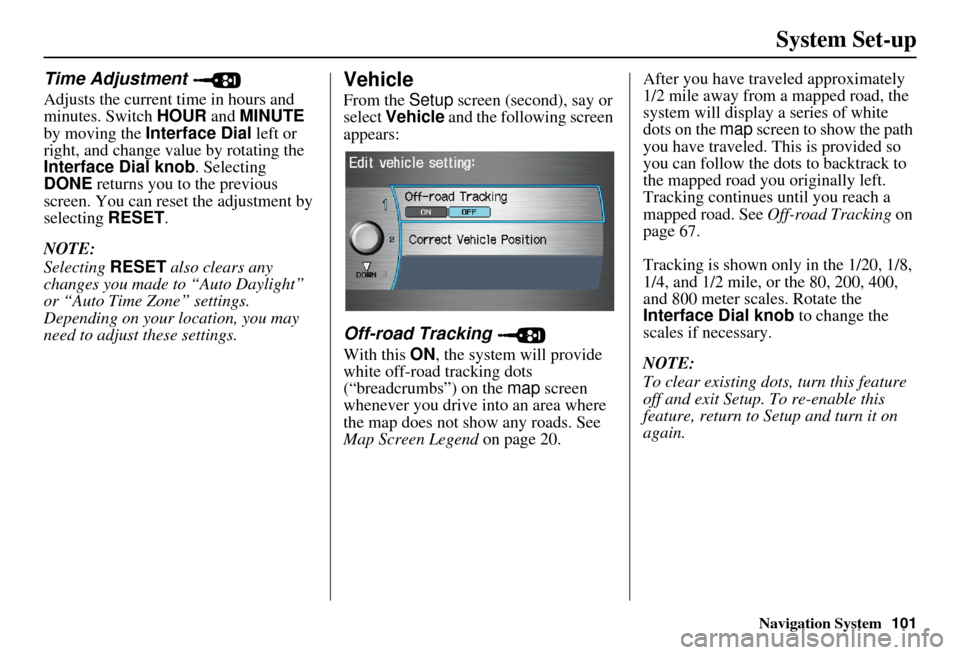
Vehicle
From the Setup screen (second), say or
select Vehicle and the following screen
appears:
Off-road Tracking
With this ON, the system will provide
white off-road tracking dots
(“breadcrumbs”) on the map screen
whenever you drive into an area where
the map does not show any roads. See
Map Screen Legend on page 20. After you have traveled approximately
1/2 mile away from a mapped road, the
system will display a series of white
dots on the
map screen to show the path
you have traveled. This is provided so
you can follow the dots to backtrack to
the mapped road you originally left.
Tracking continues until you reach a
mapped road. See Off-road Tracking on
page 67.
Tracking is shown only in the 1/20, 1/8,
1/4, and 1/2 mile, or the 80, 200, 400,
and 800 meter scales. Rotate the
Interface Dial knob to change the
scales if necessary.
NOTE:
To clear existing dots, turn this feature
off and exit Setup. To re-enable this
feature, return to Setup and turn it on
again.
Page 103 of 166
102Navigation System
System Set-up
Correct Vehicle Position
The system relies on satellites for
positioning information. Buildings,
tunnels, and other objects can block or
reflect these signals, requiring the
system to use “dead reckoning” to
determine your location and direction.
This can sometimes lead to small errors
in positioning, such as showing you on
an adjacent street.
NOTE:
Using this function to adjust vehicle
position is not recommended. When the
system acquires a GPS signal, it will
automatically place the vehicle in the
correct location.
If you choose to do this, follow these
steps:
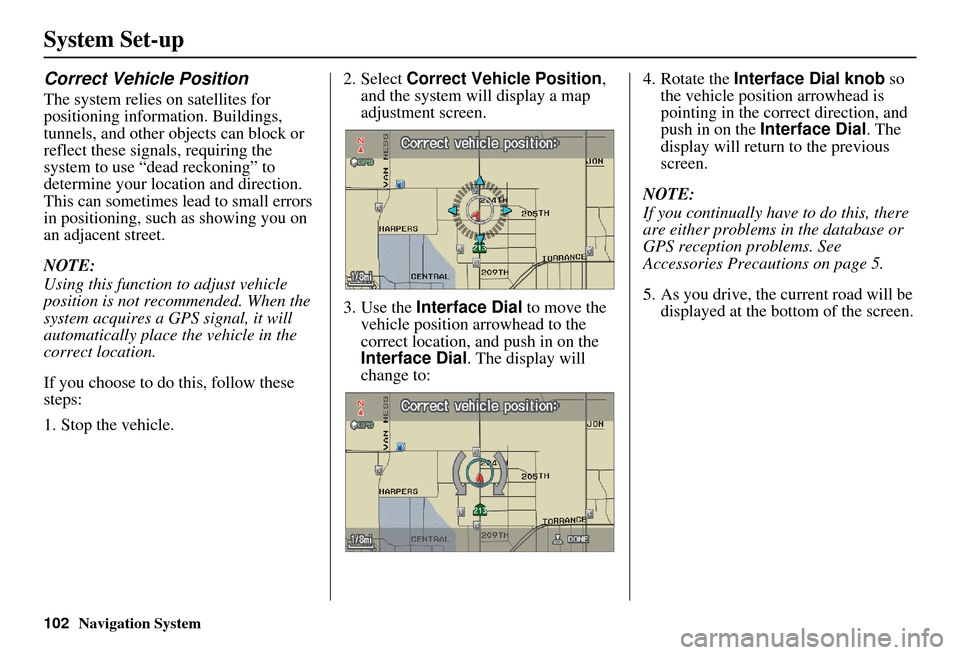
1. Stop the vehicle.2. Select
Correct Vehicle Position ,
and the system will display a map
adjustment screen.
3. Use the Interface Dial to move the
vehicle position arrowhead to the
correct location, and push in on the
Interface Dial . The display will
change to: 4. Rotate the
Interface Dial knob so
the vehicle position arrowhead is
pointing in the correct direction, and
push in on the Interface Dial . The
display will return to the previous
screen.
NOTE:
If you continually have to do this, there
are either problems in the database or
GPS reception problems. See
Accessories Precautions on page 5.
5. As you drive, the current road will be displayed at the bottom of the screen.
Page 104 of 166
Navigation System103
System Set-up
Color
From the Setup screen (second), say or
select Color and the following screen
appears:
Map Color
Allows you to choose the map color
from one of four colors for the Day and
Night mode.
Say “Return” or press the CANCEL
button to return to the previous screen.
NOTE:
Choose “White” (factory default is beige) as the Day color to obtain the
best daytime display contrast.
Choose “Black” (factory default) as the Night color to obtain the best
nighttime display contrast.
Menu Color
Allows you to choose the menu color
from one of five colors for the Day and
Night mode.
Say “Return” or press the CANCEL
button to return to the previous screen.
NOTE:
Choose “Silver metal” (factory default) as the Day color to obtain
the best display contrast.
Choose “Black metal” (factory default) as the Night color to obtain
the best display contrast.
Page 105 of 166
104Navigation System
System Set-up
Switching Display Mode
Pressing the (Display mode)
button allows you to toggle through the
screen display modes: Day, Night or
Off . This button is the overriding
control for the day/night display mode,
and is the simplest way to control the
display mode. If the display is turned
Off , press any navi button to cancel the
Off position.
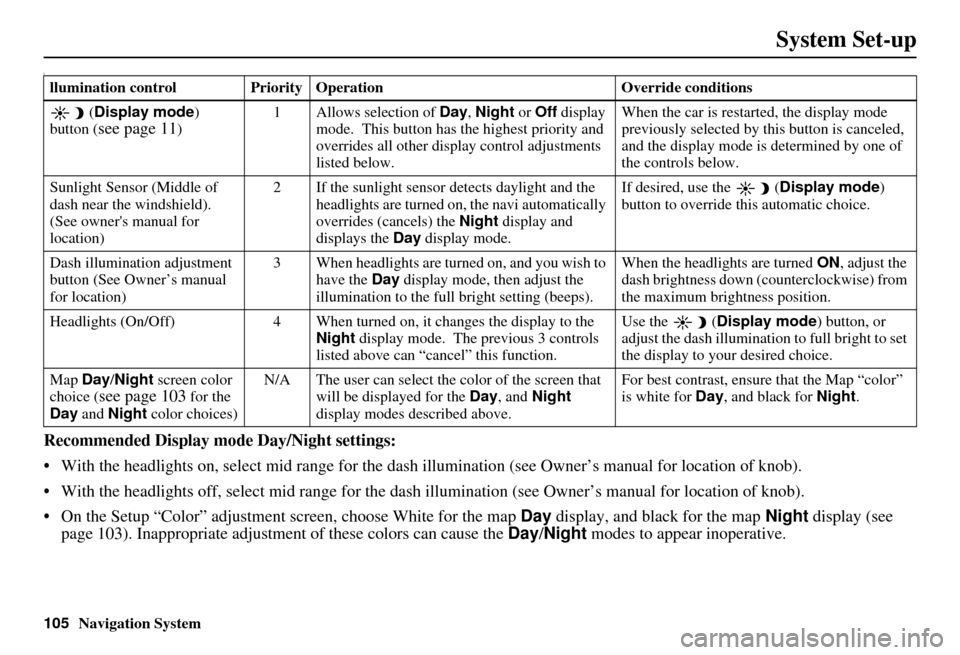
See the chart below for an explanation
of other day/night display mode
adjustment and how they interact with
each other.
(Factory default sc reen colors shown)
Day Mode
Night Mode
Page 106 of 166
105Navigation System
System Set-up
I
Recommended Display mode Day/Night settings:
With the headlights on, select mid range for the dash illumination (see Own er’s manual for location of knob).
With the headlights off, select mid range for the dash illumination (see Owner’s manual for location of knob).
On the Setup “Color” adjustment screen, choose White for the map Day display, and black for the map Night display (see
page 103). Inappropriate adjustment of these colors can cause the Day/Night modes to appear inoperative.
llumination control Priority Operation Override conditions
( Display mode )
button (
see page 11) 1 Allows selection of
Day, Night or Off display
mode. This button has the highest priority and
overrides all other displa y control adjustments
listed below. When the car is restarted, the display mode
previously selected by th
is button is canceled,
and the display mode is determined by one of
the controls below.
Sunlight Sensor (Middle of
dash near the windshield).
(See owner's manual for
location) 2 If the sunlight sensor
detects daylight and the
headlights are turned on, the navi automatically
overrides (cancels) the Night display and
displays the Day display mode. If desired, use the
(
Display mode )
button to override this automatic choice.
Dash illumination adjustment
button (See Owner’s manual
for location) 3 When headlights are turned on, and you wish to
have the Day display mode, then adjust the
illumination to the full bright setting (beeps). When the headlights are turned
ON, adjust the
dash brightness down (counterclockwise) from
the maximum brightness position.
Headlights (On/Off) 4 When turned on, it changes the display to the Night display mode. The previous 3 controls
listed above can “cancel” this function. Use the
(
Display mode ) button, or
adjust the dash illuminati on to full bright to set
the display to your desired choice.
Map Day/Night screen color
choice (
see page 103 for the
Day and Night color choices) N/A The user can select the color of the screen that
will be displayed for the Day, and Night
display modes described above. For best contrast
, ensure that the Map “color”
is white for Day, and black for Night.