Page 174 of 674
3 - 7
INSP
ADJ
RADIATOR CAP INSPECTION
CAUTION:
Do not mix more than one type of ethyl-
ene glycol antifreeze containing corro-
sion inhibitors for aluminum engine.
Do not use water containing impurities or
oil.
7. Install:
Radiator cap
Start the engine and warm it up for a sev-
eral minutes.
8. Check:
Coolant level
Coolant level low → Add coolant. Handling notes of coolant:
The coolant is harmful so it should be han-
dled with special care.
WARNING
When coolant splashes to your eye.
Thoroughly wash your eye with water
and see your doctor.
When coolant splashes to your clothes.
Quickly wash it away with water and
then with soap.
When coolant is swallowed.
Quickly make him vomit and take him
to a doctor.
EC355000
RADIATOR CAP INSPECTION
1. Inspect:
Seal (radiator cap) 1
Valve and valve seat 2
Crack/damage → Replace.
Exist fur deposits 3 → Clean or replace.
Page 186 of 674
3 - 13
INSP
ADJ
7. Install:
Air filter element 1
Washer
Fitting bolt
NOTE:
Align the projection a on filter guide with the
hole b in air filter case.
T R..2 Nm (0.2 m · kg, 1.4 ft · lb)
ENGINE OIL LEVEL INSPECTION
1. Start the engine, warm it up for several
minutes, and then turn off the engine and
wait for five minutes.
2. Place the machine on a level place and
hold it up on upright position by placing the
suitable stand under the engine.
3. Inspect:
Oil level
Oil should be up to the full level in the
check window 1.
Level check window is not full. → Add
0.2 L (0.18 Imp qt, 0.21 US qt) of oil.
1
1
ENGINE OIL LEVEL INSPECTION
Page 192 of 674

3 - 16
INSP
ADJ
ENGINE OIL REPLACEMENT
7. If the oil filter is to be replaced during this
oil change, remove the following parts and
reinstall them.
8. Install:
O-ring 1
Oil strainer 2
Oil hose
Bolt (oil hose)
Oil hose clamp
9. Install:
Copper washer
Oil filter element drain bolt
Crankcase oil drain bolt
Oil tank drain bolt
Lower engine guard
10. Fill:
Engine oil
11. Check:
Oil leakage
12. Install:
Oil filler cap
Washer (oil tank)
Bolt (oil tank)
13. Check:
Engine oil level Replacement steps:
Remove the oil filter element cover 1 and
oil filter element 2.
Check the O-rings 3, if cracked or dam-
aged, replace them with a new one.
Install the oil filter element and oil filter ele-
ment cover.
T R..
Oil filter element cover:
10 Nm (1.0 m kg, 7.2 ft lb)
Oil quantity:
Periodic oil change:
1.15 L (1.01 Imp qt, 1.22 US qt)
With oil filter replacement:
1.25 L (1.10 Imp qt, 1.32 US qt)
Total amount:
1.40 L (1.23 Imp qt, 1.48 US qt)
1
2
T R..9 Nm (0.9 m · kg, 6.5 ft · lb)
T R..8 Nm (0.8 m · kg, 5.8 ft · lb)
T R..2 Nm (0.2 m · kg, 1.4 ft · lb)
T R..10 Nm (1.0 m · kg, 7.2 ft · lb)
T R..20 Nm (2.0 m · kg, 14 ft · lb)
T R..18 Nm (1.8 m · kg, 13 ft · lb)
T R..10 Nm (1.0 m · kg, 7.2 ft · lb)
T R..7 Nm (0.7 m · kg, 5.1 ft · lb)
Page 194 of 674

3 - 17
INSP
ADJ
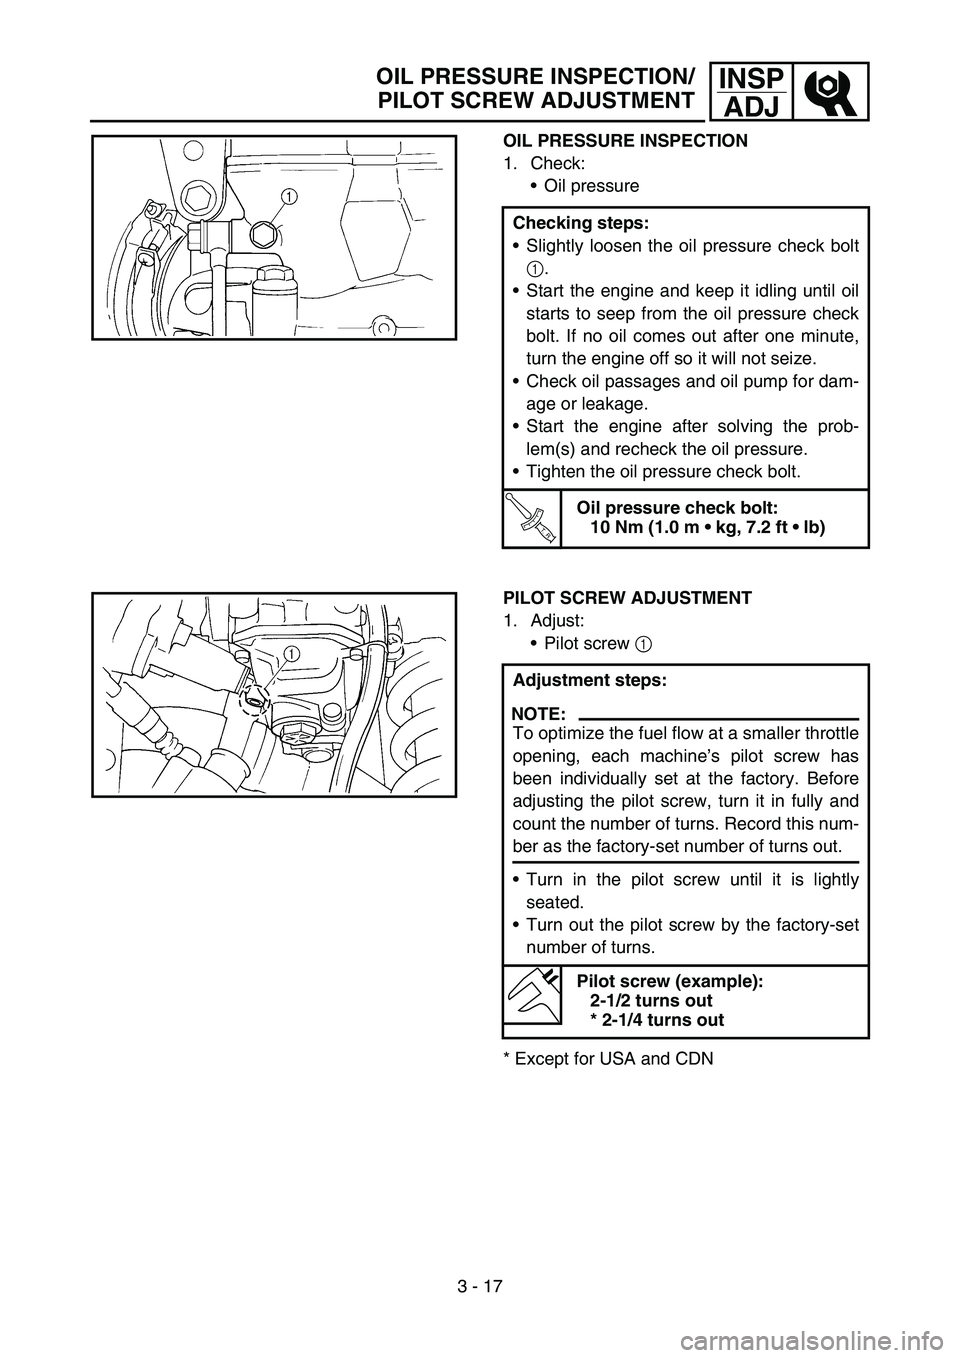
OIL PRESSURE INSPECTION
1. Check:
Oil pressure
Checking steps:
Slightly loosen the oil pressure check bolt
1.
Start the engine and keep it idling until oil
starts to seep from the oil pressure check
bolt. If no oil comes out after one minute,
turn the engine off so it will not seize.
Check oil passages and oil pump for dam-
age or leakage.
Start the engine after solving the prob-
lem(s) and recheck the oil pressure.
Tighten the oil pressure check bolt.
T R..
Oil pressure check bolt:
10 Nm (1.0 m kg, 7.2 ft lb)
PILOT SCREW ADJUSTMENT
1. Adjust:
Pilot screw 1
* Except for USA and CDNAdjustment steps:
NOTE:
To optimize the fuel flow at a smaller throttle
opening, each machine’s pilot screw has
been individually set at the factory. Before
adjusting the pilot screw, turn it in fully and
count the number of turns. Record this num-
ber as the factory-set number of turns out.
Turn in the pilot screw until it is lightly
seated.
Turn out the pilot screw by the factory-set
number of turns.
Pilot screw (example):
2-1/2 turns out
* 2-1/4 turns out
OIL PRESSURE INSPECTION/
PILOT SCREW ADJUSTMENT
Page 196 of 674

3 - 18
INSP
ADJ
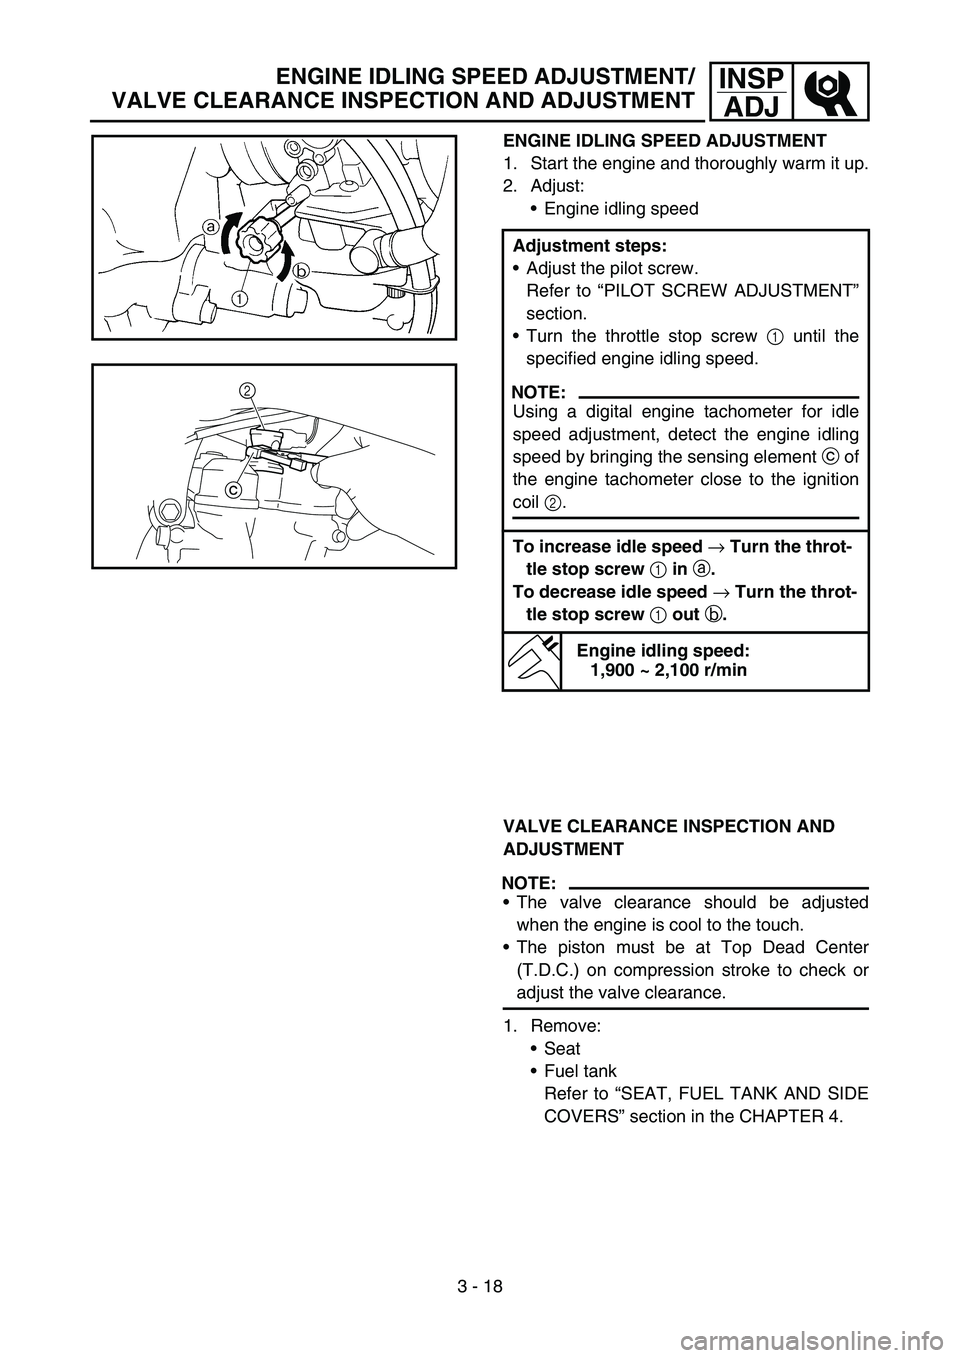
ENGINE IDLING SPEED ADJUSTMENT
1. Start the engine and thoroughly warm it up.
2. Adjust:
Engine idling speed
Adjustment steps:
Adjust the pilot screw.
Refer to “PILOT SCREW ADJUSTMENT”
section.
Turn the throttle stop screw 1 until the
specified engine idling speed.
NOTE:
Using a digital engine tachometer for idle
speed adjustment, detect the engine idling
speed by bringing the sensing element c of
the engine tachometer close to the ignition
coil 2.
To increase idle speed → Turn the throt-
tle stop screw 1 in a.
To decrease idle speed → Turn the throt-
tle stop screw 1 out b.
Engine idling speed:
1,900 ~ 2,100 r/min
c2
VALVE CLEARANCE INSPECTION AND
ADJUSTMENT
NOTE:
The valve clearance should be adjusted
when the engine is cool to the touch.
The piston must be at Top Dead Center
(T.D.C.) on compression stroke to check or
adjust the valve clearance.
1. Remove:
Seat
Fuel tank
Refer to “SEAT, FUEL TANK AND SIDE
COVERS” section in the CHAPTER 4.
ENGINE IDLING SPEED ADJUSTMENT/
VALVE CLEARANCE INSPECTION AND ADJUSTMENT
Page 224 of 674
3 - 31
INSP
ADJ
DRIVE CHAIN SLACK ADJUSTMENT
4. Check:
Drive chain stiffness a
Clean and oil the drive chain and hold as
illustrated.
Stiff → Replace drive chain.
5. Install:
Drive chain 1
Joint 2
Master link clip 3
CAUTION:
Be sure to install the master link clip to the
direction as shown.
aTurning direction
6. Lubricate:
Drive chain
Drive chain lubricant:
SAE 10W-30 motor oil or
suitable chain lubricants
DRIVE CHAIN SLACK ADJUSTMENT
1. Elevate the rear wheel by placing the suit-
able stand under the engine.
2. Check:
Drive chain slack a
Above the seal guard installation bolt.
Out of specification → Adjust.
NOTE:
Before checking and/or adjusting, rotate the
rear wheel through several revolutions and
check the slack several times to find the tight-
est point. Check and/or adjust the drive chain
slack with the rear wheel in this “tight chain”
position.
Drive chain slack:
48 ~ 58 mm (1.9 ~ 2.3 in)
Page 254 of 674
3 - 46
INSP
ADJ
IGNITION TIMING CHECK
IGNITION TIMING CHECK
1. Remove:
Timing mark accessing screw 1
2. Attach:
Timing light
Inductive tachometer
To the ignition coil lead (orange lead 1).
Timing light:
YM-33277-A/90890-03141
1
3. Adjust:
Engine idling speed
Refer to “ENGINE IDLING SPEED
ADJUSTMENT” section.
4. Check:
Ignition timing
Visually check the stationary pointer a is
within the firing range b on the rotor.
Incorrect firing range → Check rotor and
pickup assembly.
5. Install:
Timing mark accessing screw
Page 308 of 674

4 - 27
ENGCAMSHAFTS
Decompression system
1. Check:
Decompression system
Timing chain tensioner
1. Check:
While pressing the tensioner rod lightly
with fingers, use a thin screwdriver 1
and wind the tensioner rod up fully clock-
wise.
When releasing the screwdriver by press-
ing lightly with fingers, make sure that the
tensioner rod will come out smoothly.
If not, replace the tensioner assembly.
ASSEMBLY AND INSTALLATION
Camshaft
1. Install:
Exhaust camshaft 1
Intake camshaft 2 Checking steps:
Check that the decompression mecha-
nism cam 1 moves smoothly.
Check that the decompression mecha-
nism cam lever pin 2 projects from the
camshaft.
Installation steps:
Turn the crankshaft counterclockwise with
a wrench.
NOTE:
Apply the molybdenum disulfide oil on the
camshafts.
Apply the engine oil on the decompression
system.
Squeezing the decompression lever
allows the crankshaft to be turned easily.
Align the T.D.C. mark a on the rotor with
the align mark b on the crankcase cover
when piston is at T.D.C. on compression
stroke.