Page 112 of 424
5-13
EBU09981
Fuel
Make sure there is sufficient gasoline in the
tank.
NOTE:
(for Europe only)
If knocking or pinging occurs, use a different
brand of gasoline or higher octane grade.
Recommended fuel:
Unleaded gasoline only
For Europe: Regular unleaded gasoline
only with a research octane
number of 91 or higher
Fuel tank capacity:
Total: 11 L
Reserve: 2.6 L
1S3-9-60 5-6 6/7/05 10:22 AM Page 5-13
Page 114 of 424
5-15
cC
Use only unleaded gasoline. The use of lead-
ed gasoline will cause severe damage to
internal engine parts, such as the valves and
piston rings, as well as to the exhaust sys-
tem.
w
8Do not overfill the fuel tank. Fuel expands
when it heats up. If the fuel tank is over-
filled, fuel could spill out due to heat from
the engine or the sun.
8Be careful not to spill fuel, especially on
the engine or exhaust pipe which can
cause a fire and severe injury. Wipe up
any spilled fuel immediately.
8Do not refuel right after the engine has
been running and is still very hot.
8Be sure the fuel tank cap is closed secure-
ly.
q
w
1. Filler tube 2. Fuel level1. Tube de remplissage 2. Niveau de carburant1. Tubo de llenado 2. Nivel de combustible
1S3-9-60 5-6 6/7/05 10:22 AM Page 5-15
Page 134 of 424
6-3
EBU15901
Starting the engine
w
Always make sure all control cables work
smoothly before you begin riding in cold
weather. If the control cables are frozen or
do not work smoothly, you could be unable
to control the ATV, which could lead to an
accident or collision.
1. Set the parking brake.
2. Turn the main switch to “ON” and the
engine stop switch to “RUN”.
cC
The engine trouble warning light and the fuel
level warning light should come on, and then
go off.
If a warning light does not go off, see page
4-7 for the corresponding warning light cir-
cuit check.
3. Shift the transmission into neutral.
1S3-9-60 5-6 6/7/05 10:22 AM Page 6-3
Page 256 of 424

8-7
EBU02622
PERIODIC MAINTENANCE/LUBRICATION
NOTE:8For ATVs not equipped with an odometer or an hour meter, follow the month maintenance intervals.
8For ATVs equipped with an odometer or an hour meter, follow the km (mi) or hours maintenance intervals. However, keep in mind
that if the ATV isn’t used for a long period of time, the month maintenance intervals should be followed.
8Items marked with an asterisk should be performed by a Yamaha dealer as they require special tools, data and technical skills.
INITIAL EVERY
month 1 3 6 6 12
ITEM ROUTINEWhichever
km 320 1200 2400 2400 4800 comes first
(mi) (200) (750) (1500) (1500) (3000)
hours 20 75 150 150 300
Fuel line*9Check fuel hose for cracks or damage.
222
9Replace if necessary.
9Check condition.
Spark plug9Adjust gap and clean.22222
9Replace if necessary.
Valves*9Check valve clearance.
2 222
9Adjust if necessary.
Fuel injection*9Check and adjust engine idle speed.22222
Crankcase breather9Check breather hose for cracks or damage.
222
system*9Replace if necessary.
9Check for leakage.
Exhaust system*9Tighten if necessary.222
9Replace gasket if necessary.
1S3-9-60 8 6/7/05 10:25 AM Page 8-7
Page 312 of 424
8-63
cC
Never operate the engine with the air filter
element removed. This will allow unfiltered
air to enter the engine, causing rapid engine
wear and possible engine damage.
Additionally, operation without the air filter
element will affect the fuel injection system
with subsequent poor performance and pos-
sible engine overheating.
1S3-9-60 8 6/7/05 10:25 AM Page 8-63
Page 316 of 424
8-67
EBU03030
Valve clearance adjustment
The correct valve clearance changes with use,
resulting in improper fuel/air supply or engine
noise. To prevent this, the valve clearance must
be adjusted regularly. This adjustment however,
should be left to a professional Yamaha service
technician.
1S3-9-60 8 6/7/05 10:25 AM Page 8-67
Page 370 of 424

8-121
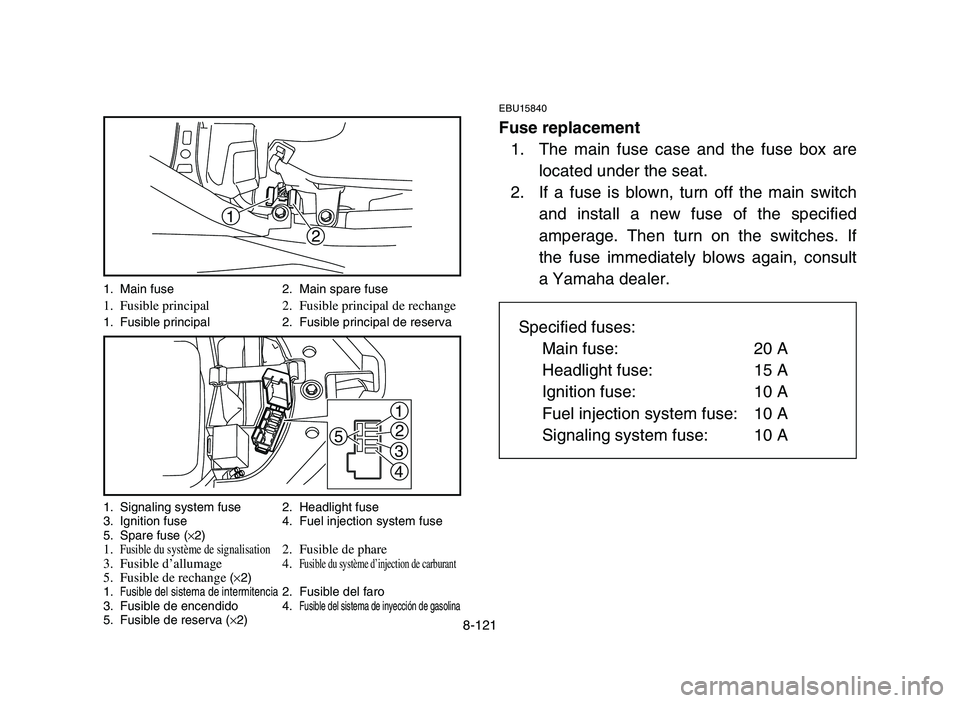
EBU15840
Fuse replacement
1. The main fuse case and the fuse box are
located under the seat.
2. If a fuse is blown, turn off the main switch
and install a new fuse of the specified
amperage. Then turn on the switches. If
the fuse immediately blows again, consult
a Yamaha dealer.
2 1
1
2
3
4 5
1. Main fuse 2. Main spare fuse1. Fusible principal 2. Fusible principal de rechange1. Fusible principal 2. Fusible principal de reserva
1. Signaling system fuse 2. Headlight fuse
3. Ignition fuse 4. Fuel injection system fuse
5. Spare fuse (×2)
1.Fusible du système de signalisation2. Fusible de phare
3. Fusible d’allumage 4.Fusible du système d’injection de carburant5. Fusible de rechange(×2)
1.Fusible del sistema de intermitencia2. Fusible del faro
3. Fusible de encendido 4.Fusible del sistema de inyección de gasolina5. Fusible de reserva (×2)
Specified fuses:
Main fuse: 20 A
Headlight fuse: 15 A
Ignition fuse: 10 A
Fuel injection system fuse: 10 A
Signaling system fuse: 10 A
1S3-9-60 9-11 4/27/05 2:13 PM Page 8-121
Page 382 of 424
8-133
EBU04130
Troubleshooting
Although Yamaha machines receive a rigid
inspection before shipment from the factory,
trouble may occur during operation.
Any problem in the fuel, compression, or ignition
systems can cause poor starting and loss of
power. The troubleshooting chart describes a
quick, easy procedure for making checks. If your
machine requires any repair, take it to a
Yamaha dealer.
The skilled technicians at a Yamaha dealership
have the tools, experience, and know-how to
properly service your machine. Use only gen-
uine Yamaha parts on your machine. Imitation
parts may look like Yamaha parts, but they are
often inferior. Consequently, they have a shorter
service life and can lead to expensive repair
bills.
1S3-9-60 9-11 4/27/05 2:13 PM Page 8-133