2006 YAMAHA TTR90 check oil
[x] Cancel search: check oilPage 37 of 390

GEN
INFO
1 - 7
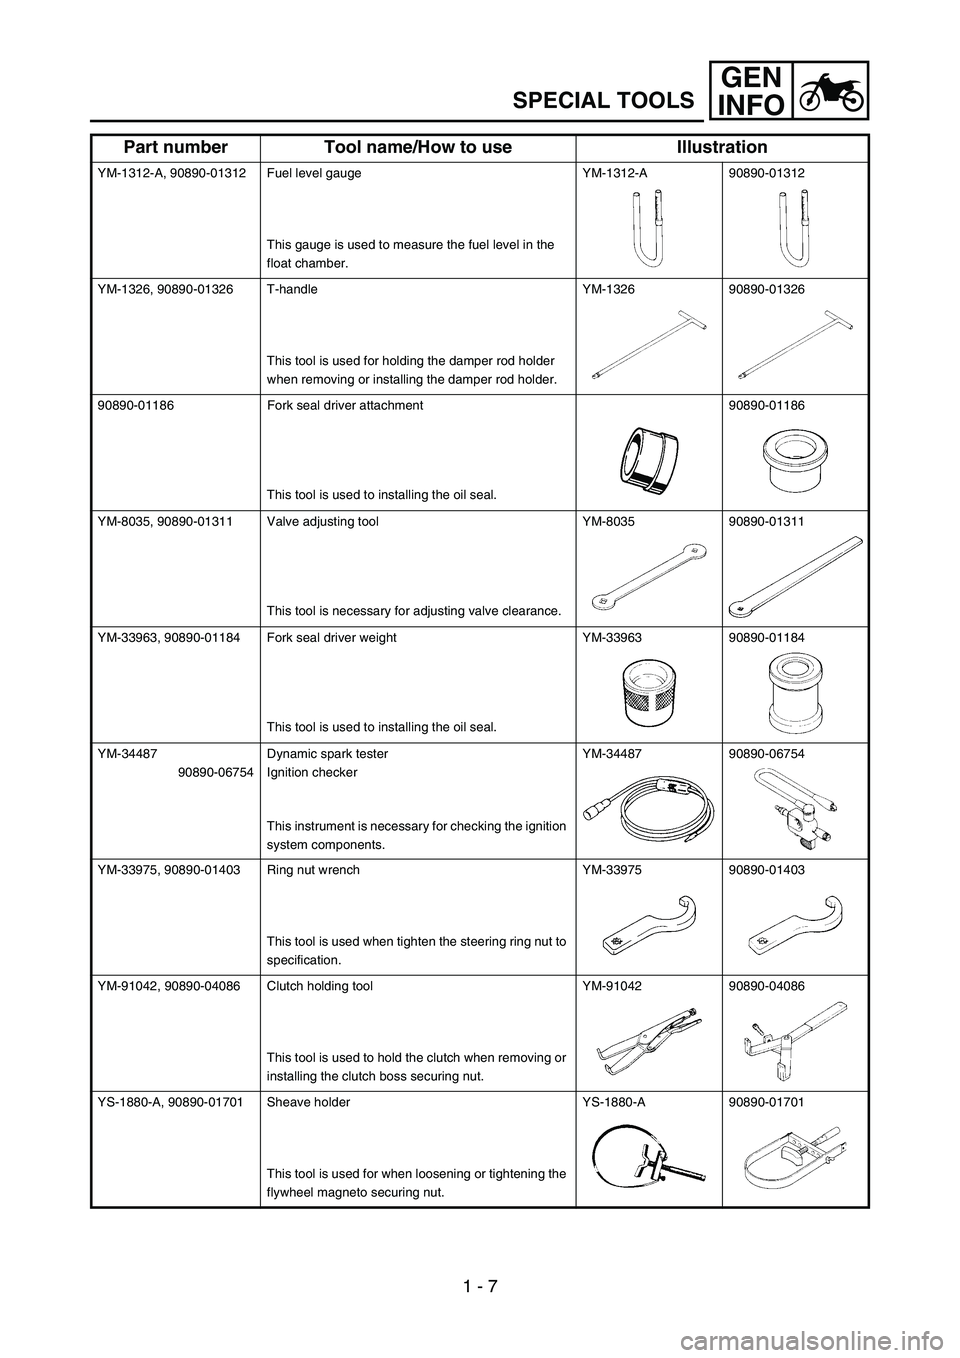
SPECIAL TOOLS
YM-1312-A, 90890-01312 Fuel level gauge
This gauge is used to measure the fuel level in the
float chamber.YM-1312-A 90890-01312
YM-1326, 90890-01326 T-handle
This tool is used for holding the damper rod holder
when removing or installing the damper rod holder.YM-1326 90890-01326
90890-01186 Fork seal driver attachment
This tool is used to installing the oil seal.90890-01186
YM-8035, 90890-01311 Valve adjusting tool
This tool is necessary for adjusting valve clearance.YM-8035 90890-01311
YM-33963, 90890-01184 Fork seal driver weight
This tool is used to installing the oil seal.YM-33963 90890-01184
YM-34487
90890-06754Dynamic spark tester
Ignition checker
This instrument is necessary for checking the ignition
system components.YM-34487 90890-06754
YM-33975, 90890-01403 Ring nut wrench
This tool is used when tighten the steering ring nut to
specification.YM-33975 90890-01403
YM-91042, 90890-04086 Clutch holding tool
This tool is used to hold the clutch when removing or
installing the clutch boss securing nut.YM-91042 90890-04086
YS-1880-A, 90890-01701 Sheave holder
This tool is used for when loosening or tightening the
flywheel magneto securing nut.YS-1880-A 90890-01701
Part number Tool name/How to use Illustration
Page 54 of 390

GEN
INFO
1 - 13
STARTING AND OPERATION
STARTING AND OPERATION
CAUTION:
Prior to operating the machine, perform
steps listed in pre-operation check list.
WARNING
Never start your engine or let it run for any
length of time in a closed area. The exhaust
fumes are poisonous and can cause loss of
consciousness and death within a short
time. Always operate your machine in an
area with adequate ventilation.
STARTING A COLD ENGINE
TT-R90
WARNING
Before starting the engine, be sure to shift
the transmission into neutral.
1. Turn the fuel cock to “ON”.
2. Operate the starter (choke) and completely
close the throttle grip.
3. Slide the “ENGINE STOP” switch to the
“”.
4. Kick the kick starter with full strength to
start the engine.
5. After the engine starts, warm up for one or
two minutes. Make sure the stater (choke)
is returned to the original position before
riding.
TT-R90E
WARNING
Before starting the engine, be sure to shift
the transmission into neutral.
NOTE:
This model is equipped with an ignition cir-
cuit cut-off system. In case of electric start-
ing, the engine can be started only when the
transmission is in neutral.
If the engine fails to start by pushing the start
switch, release the switch, wait a few sec-
onds, and then try again. Each starting
attempt should be as short as possible to
preserve the battery. Do not crank the
engine more than 10 seconds on any one
attempt. If the engine does not start with the
starter motor, try using the kickstarter.1. Turn the fuel cock to “ON”.
2. Turn the main switch to “ON”.
3. Shift the transmission into neutral.
4. Operate the starter (choke) and completely
close the throttle grip.
5. Slide the “ENGINE STOP” switch to the
“”.
6. Start the engine by pushing the start switch
or by kicking the kickstarter.
7. After the engine starts, warm up for one or
two minutes. Make sure the stater (choke) is
returned to the original position before riding.
STARTING A WARM ENGINE
To start a warm engine, refer to the “Starting a
cold engine” section. The starter (choke)
should not be used. The throttle should be
opened slightly.
CAUTION:
See “Engine break-in Section” prior to
operating engine for the first time.
WARMING UP
To get maximum engine life, always “warm-up”
the engine before starting off. Never accelerate
hard with a cold engine! To see whether or not
the engine is warm, see if it responds to throttle
normally with the stater (choke) turned off.
WARNING
Before starting off, be sure to turn up or
remove the side stand.
Failure to retract the side stand completely
can result in a serious accident when you
try to turn a corner.
ENGINE BREAK-IN
Brake-in is important to better fit the moving
and sliding parts as well as the installed parts.
It is also important to accustom the rider to the
machine better.
Avoid full-throttle run on a new machine for the
first 5 hours.
After the trial run, check for loose parts, oil
leakage and other problems.
Make full inspection and adjustment especially of
slack cables and drive chain and loose spokes.
CAUTION:
After the break-in period, check every fit-
ting and fastener for looseness.
If any loose is found, retighten it securely.
Page 128 of 390

3 - 1
INSP
ADJ
MAINTENANCE INTERVALS
EC300000
REGULAR INSPECTION AND ADJUSTMENTS
MAINTENANCE INTERVALS
The following schedule is intended as a general guide to maintenance and lubrication. Bear in mind
that such factors as weather, terrain, geographical location, and individual usage will alter the
required maintenance and lubrication intervals. If you are a doubt as to what intervals to follow in
maintaining and lubricating your machine, consult your Yamaha dealer.
NOTE:
From 18 months or 210 hours, repeat the maintenance intervals starting from 6 months or
90 hours.
Items marked with an asterisk should be performed by a Yamaha dealer as they require special
tools, data and technical skills.
No. ITEMCHECKS AND
MAINTENANCE JOBSWHICH-
EVER
COMES
FIRSTINITIAL EVERY
month 1 6 12
hours 30 90 150
1 * Fuel lineCheck fuel hoses for cracks or damage.
Replace if necessary.√
√
2 Spark plugCheck condition.
Adjust gap and clean.√
√
3 * Valve clearanceCheck and adjust valve clearance when engine is
cold.√
4 * Air filter elementClean with solvent.
Replace if necessary.√
√
5 * Breather systemCheck ventilation hose for cracks or damage.
Replace if necessary.√
√
√
6 * CarburetorCheck engine idling speed and starter operation.
Adjust if necessary.√
√
√
7 Exhaust systemCheck for leakage.
Tighten if necessary.
Replace gasket if necessary.√
√
8 Engine oil Change (warm engine before draining).
√
√
√
9 ClutchCheck operation.
Adjust or replace cable.√
√
√
10 * Front brakeCheck operation.
Adjust brake lever free play and replace brake shoes
if necessary.√
√
√
11 * Rear brakeCheck operation.
Adjust brake pedal free play and replace brake shoes
if necessary.√
√
√
12 * WheelsCheck runout, spoke tightness and for damage.
Tighten spokes if necessary.√
√
√
13 * TiresCheck tread depth and for damage.
Replace if necessary.
Check air pressure.
Correct if necessary.√
√
14 * Wheel bearingsCheck bearings for smooth operation.
Replace if necessary.√
√
15 * SwingarmCheck swingarm pivoting point for play.
Correct if necessary.
Lubricate with lithium soap based grease.√
√
√
16 Drive chainCheck chain slack/alignment and condition.
Adjust and lubricate chain.Every ride
3
Page 129 of 390

3 - 2
INSP
ADJ
MAINTENANCE INTERVALS
NOTE:
The air filter needs more frequent service if you are riding in unusually wet or dusty areas.
17 * Steering bearingsCheck bearing assemblies for looseness.
Lubricate with lithium soap based grease every or
120 hours or 12 months (whichever comes first).√
√
18Brake and clutch
lever pivot shaftsApply lithium soap based grease lightly.
√
√
√
19Brake pedal pivot
shaftApply lithium soap based grease lightly.
√
√
√
20 Sidestand pivotCheck operation.
Apply lithium soap based grease lightly.√
√
21 * Front forkCheck operation and for oil leakage.
Replace if necessary.√
√
22 *Shock absorber
assemblyCheck operation and for oil leakage.
Replace if necessary.√
√
23 * Control cablesApply Yamaha chain and cable lube or engine oil
10W-30 thoroughly.√
√
√
24 *Throttle grip hous-
ing and cableCheck operation and free play.
Adjust the throttle cable free play if necessary.
Lubricate the throttle grip housing and cable.√
√
√
25 * Chassis fastenersCheck all chassis fitting and fasteners.
Correct if necessary.√
√
√
26Battery (TT-R90E
only)Check terminal for looseness and corrosion.
√ No. ITEMCHECKS AND
MAINTENANCE JOBSWHICH-
EVER
COMES
FIRSTINITIAL EVERY
month 1 6 12
hours 30 90 150
3
Page 130 of 390

3 - 3
INSP
ADJ
PRE-OPERATION INSPECTION AND MAINTENANCE
PRE-OPERATION INSPECTION AND MAINTENANCE
Before riding for break-in operation or practice, make sure the machine is in good operating condi-
tion.
Before using this machine, check the following points.
GENERAL INSPECTION AND MAINTENANCE
Item Routine Page
Brake Check operation/adjustment. P3-12
Engine oil Change oil as required. P3-6 ~ 8
Drive chain Check alignment/adjustment/lubrication. P3-13 ~ 15
Spark plug Check color/condition. P3-23
Throttle Check for proper throttle cable operation. P3-4
Air filter Foam type – must be clean and damp oil always P3-4 ~ 5
Wheels and tires Check pressure/runout/spoke tightness/bead stopper/axle nuts. P3-17 ~ 20
Fittings/fasteners Check all – tighten as necessary. P2-13
Page 142 of 390

3 - 6
INSP
ADJ
ENGINE OIL LEVEL INSPECTION
1. Start the engine, warm it up for several
minutes, and then turn off the engine and
wait for five minutes.
2. Place the machine on a level place and
hold it up on upright position by placing the
suitable stand under the engine.
3. Remove:
Dipstick 1
4. Check:
Oil level
Oil level should be between maximum a
and minimum b marks.
Oil level is low → Add oil to proper level.
NOTE:
When inspecting the oil level, do not screw the
dipstick into the oil tank. Insert the gauge
lightly.
(For USA and CDN)
CAUTION:
Do not add any chemical additives.
Engine oil also lubricates the clutch and
additives could cause clutch slippage.
Do not allow foreign material to enter the
crankcase.
Recommended oil:
At –10 °C (10 °F) or higher È:
Yamalube 4 (10W-30) or SAE
10W-30 type SE/SF/SG motor
oil
At 5 °C (40 °F) or higher É:
Yamalube 4 (20W-40) or SAE
20W-40 type SE/SF/SG motor
oil010 30 50 70
90110
130
-20
-10010
20 30 40
50
È
É
˚C ˚F
ENGINE OIL LEVEL INSPECTION
Page 156 of 390

3 - 13
INSP
ADJ
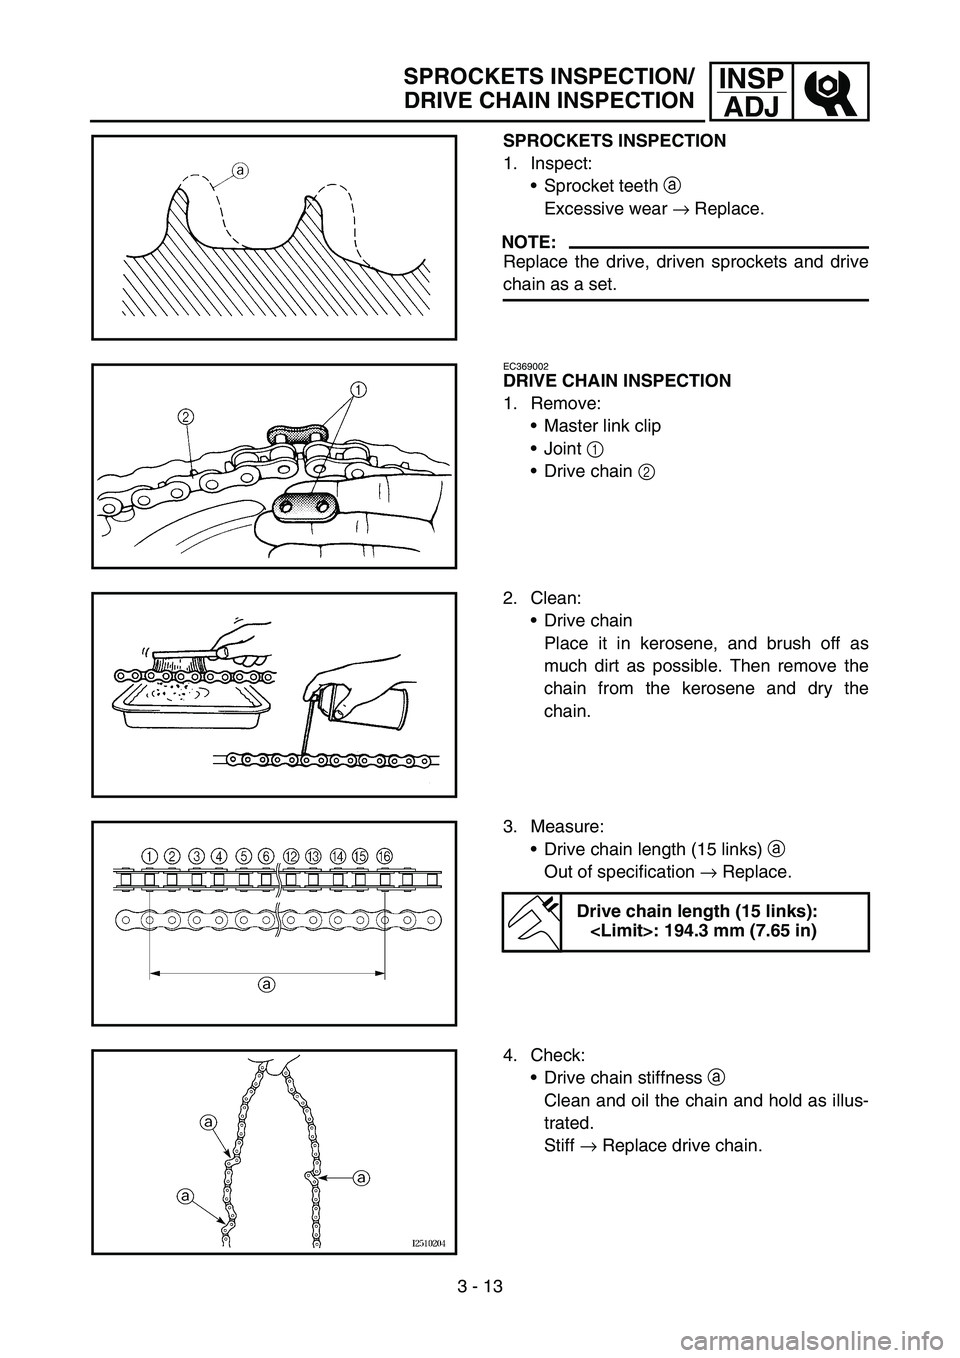
SPROCKETS INSPECTION
1. Inspect:
Sprocket teeth a
Excessive wear → Replace.
NOTE:
Replace the drive, driven sprockets and drive
chain as a set.
EC369002
DRIVE CHAIN INSPECTION
1. Remove:
Master link clip
Joint 1
Drive chain 2
2. Clean:
Drive chain
Place it in kerosene, and brush off as
much dirt as possible. Then remove the
chain from the kerosene and dry the
chain.
3. Measure:
Drive chain length (15 links) a
Out of specification → Replace.
Drive chain length (15 links):
4. Check:
Drive chain stiffness a
Clean and oil the chain and hold as illus-
trated.
Stiff → Replace drive chain.
SPROCKETS INSPECTION/
DRIVE CHAIN INSPECTION
Page 158 of 390

3 - 14
INSP
ADJ
DRIVE CHAIN SLACK ADJUSTMENT
5. Install:
Drive chain 1
Joint 2
Master link clip 3
CAUTION:
Be sure to install the master link clip to the
direction as shown.
aTurning direction
New
6. Lubricate:
Drive chain
Drive chain lubricant:
SAE 10W-30 motor oil or
suitable chain lubricants
DRIVE CHAIN SLACK ADJUSTMENT
1. Elevate the rear wheel by placing the suit-
able stand under the engine.
2. Check:
Drive chain slack
a
In the center between the drive axle and
rear wheel axle.
Out of specification → Adjust.
NOTE:
Before checking and/or adjusting, rotate the
rear wheel through several revolutions and
check the slack several times to find the tight-
est point. Check and/or adjust chain slack with
rear wheel in this “tight chain” position.
Drive chain slack:
40 ~ 53 mm (1.6 ~ 2.1 in)