2006 VOLKSWAGEN GOLF PLUS wheel bolts
[x] Cancel search: wheel boltsPage 274 of 541
(contin ued )
tire inflation pressure
regularly when
the tires are cold
and always maintain the pre
scribed tire pressure .
Low tire
pressure
can cause tires to get too
hot, resulting in
tread separation,
sudden loss of pressure , and
blowouts . This is because tires
with excess ively low pressure
un
dergo more flexing, which can
cause the tire to overheat and de
stroy
the tire.
Never exceed the permissible
maximum speed
and load rating
of the tires on your vehicle.
The effectiveness of the driver
assistance systems
and the brak
ing
support systems depends
on the tire traction.
care and maintenance
To reduce the risk of losing
control,
crashes and serious per
sonal injuries, never loosen the
bolts on wheels with bolted rim
rings.
Never mount used tires on
your vehicle if you are not sure of
their past use.
Tires age even if they are not
being used and can fail suddenly,
especially
at high speeds,
causing loss of vehicle control,
accidents,
and severe personal
injuries. Tires that are more than
6 years old can be used only in an
emergency and then only with
special care and at low speed.
For technical reasons it is usu-
ally
not possible to use wheel
rims from other vehicles. Even
wh eel rims from
the same model
may not fit properly.
Fac ility if necessa1y.
276
Page 277 of 541
Aggressive fluids and materials
can cause visible and invisibl e
tire
damage that can cause tire
blowouts .
Always keep chemicals, oils,
grease, fuels, braking fluids
and
other aggressive substances
away from tires.
read and note the introductory inform ation and heed the on page 276.
The desig n of the w heel b o lt s is matc h ed to the fac
tor y-install ed wheels. If different wheels are in
s tall ed, wh
eel b o lts the ri ght length and bolt
head sh ap e must b e used. Thi s helps to e nsure that
w heels can b e m ounted securely and that the
brakes will work page
In mos t yo u cannot use w heel bolt s from diff erent ve hicl e. Even wheel rims from the same m od el m ay not properly.
Tires and w heel rim s approved by Volkswag en
h ave been matched precise ly to your ve hicl e
m od el and cont ribut e consid erabl y to good han
dlin g and safe ve hicl e performance.
Tight ening
torque
bolt s must alway s be install ed with the co r
rect tightenin g page The required
tight enin g torqu e for the wheel bolts is 88 ft-lb s Nm). After changing
torqu e wre n ch b y an authorize d Volksw age n
d eal er or a uthorized Volk swagen Facility.
Care, maintenance
Tires age even if they are not
being used and can fail suddenly,
especially
at high speeds,
causing loss
of vehicle control,
accidents,
and severe personal
injuries.
Tires that are more than 6
years old
can be used only in an
emergency and then only with
special care
and at low speed.
Wheel rims with bolted rim rings
run true and safe ly . Damage d wheel rim s must b e re
to repair them yourself. Ha ve an authorized
Facility re pai r them for you
Wheel rims with bolted decorative covers
Ligh t-allo y wheels may have interc h angeable d ec
o rativ e cove rs attac h ed t o th e rim with self-locki ng
screws. If yo u want to replace damaged wheel
cove rs. contact your authorize d Volkswa gen deale r or authorize d Volk swa gen Fac ilit y
improper or damaged wheel rim s can affect driving cause accidents and serious personal injury.
only wheel rim s approved for the ve
hicl e.
Page 278 of 541
Improper loosen ing and tightening of the bolts on wheel rim s with bolted rim rings can ca use accident s and serious personal injury.
Never loosen bolted connections on wheel
rim s with bo lt ed rim rings.
New and
Please first read and note the
introductory information
and h ee d the on
page 276.
New tires
Drive a ve hicle with new tires es
pecially carefully for
the first
miles km) because the tires
must first be broken in. Tires that
a re not broken in have reduce d
traction
and brakin g perfo r
In stall radial tires only of same
make , same dimensions (rollin g
circumference),
and s imil ar tread
profil e
onto all four wheels.
The tread depth of new tir es can
diff er
between tir e models and
manufacturers b eca use of dif
f e re
nt d esig n feature s and trea d
design.
Replacing tires
Tires should be replaced in pairs
a
nd not indi viduall y (both front
Have all work on wheel rim s with bolted rim rings performed by an authorized Volkswage n
dealer or autho ri ze d Volkswage n Facility.
tires or both rear tires at the same
Replace tires only with tires that
have the same s pecif ica tions , in
cluding width
and diameter, load
a
nd top sp ee d rating as the tires
a
pproved by Volkswagen for your
vehicle and model.
Never use tires that are larg er or
wider
than the dim ension s of the
t ir es appro ved b y Volkswagen for
your vehicl e and model. Larger
t ir es co
uld scrape and rub on the
vehicle body or other parts of the
veh icle.
N ew tires must be broken in be
cause new tires do not have full
traction and braking perfor
mance.
miles km) to
h elp
reduce the risk of losing
control, a collision, and serious
personal injuries.
280
Page 286 of 541
the road wheels , at le a st once a
month. Inflat e a spare wheel to the
cold tire pressure s pecified for the
vehicl e's roa d whee ls on the tir e
press ure la b el; inflat e a compact
spare wheel to the cold tire pres
s
ure s peci fie d for the compact
spare on the tir e pressure label or
on a separate lab el for the compact
spare, if th ere is one .
Improper use of a spare wheel or
a compact spare wheel can cause
loss of vehicle control, a crash or
other accident and serious per
sonal injury.
These words identify the max
imum permissible speed for
driving
with this tire.
Never drive faster than mph
km/h). Avoid full-throttle ac
celeration, heavy braking,
and
fast cornering!
Never drive more than 124
miles km) if a
the age of the compact
spare wheel with the Tire Identi
fication
Number (TIN)
page
The compact spare wheel must
always be secured with the wheel
bolts provided by the factory.
Never drive using more than
one compact spare wheel.
After installing the compact
spare wheel, the tire pressure
must be checked as soon as pos
sible page 283.
288 289
Page 329 of 541
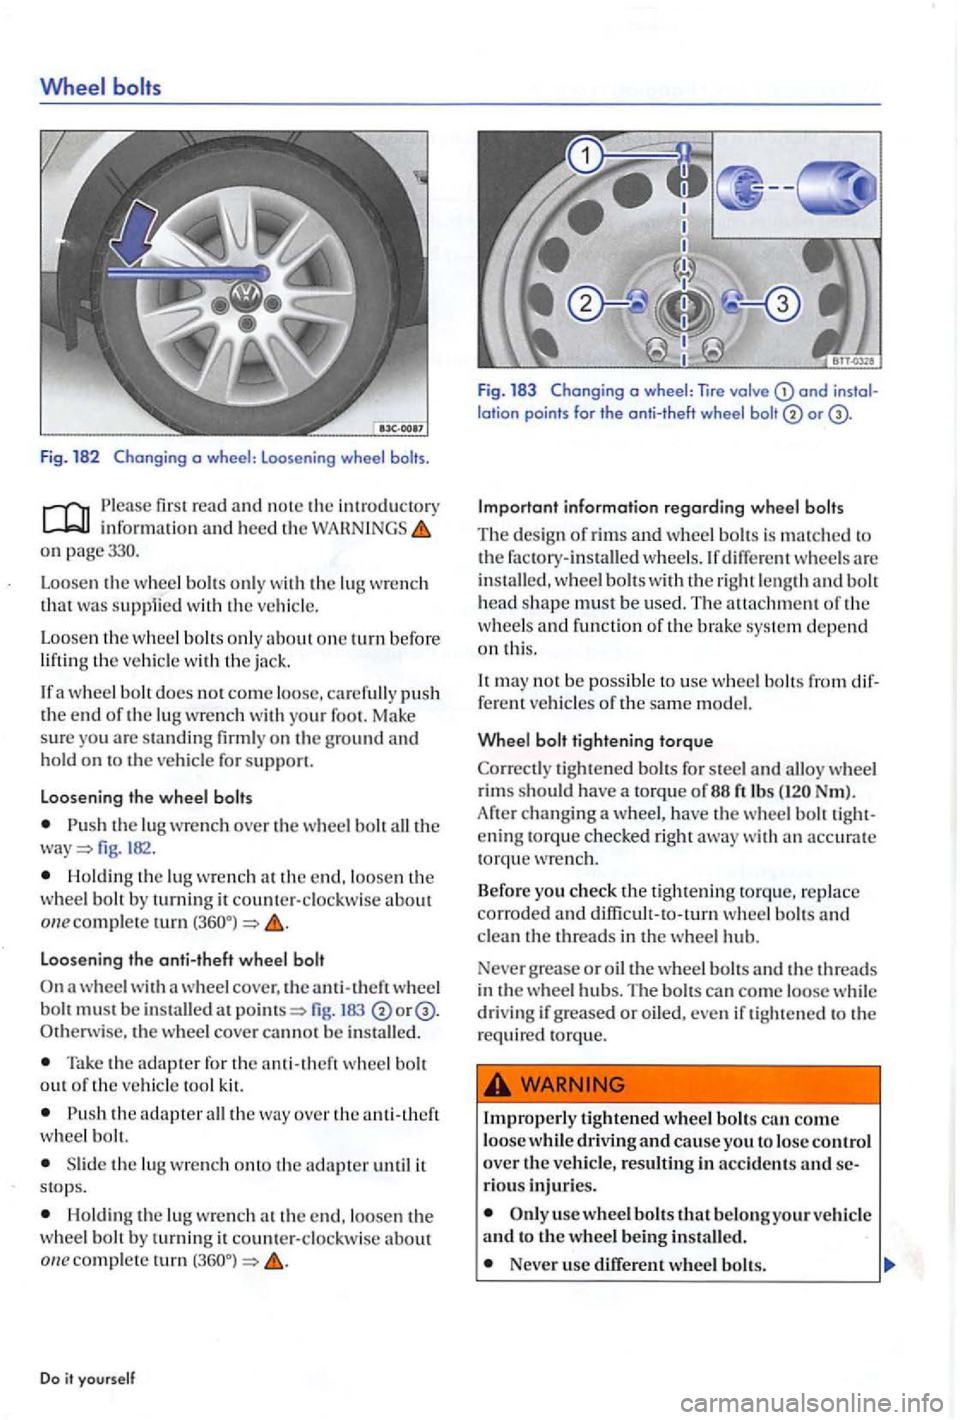
a wheel : loosen ing wheel
info rmation and heed the on p age330.
Loose n
the wheel only with the lu g that supp1ied w ith the
Loosen th e w heel bolt s onl y about one tu rn befor e
liftin g th e
a w heel docs no t come loose, p ush the end of the lug wrench with your foot. Make sure you are s tanding firml y on the ground and hold on to the ve hicle fo r support.
loosening th e wheel bolts
th e lug wre nch over th e wheel fig. 182.
Holdin g th e lu g wre nch at the end, loosen the
wheel b y turnin g it counter-clockw ise about
loosening the anti-theft wheel bolt
wheel with a wheel cover, the anti-th eft wheel must b e at fig. 183 the wheel cover canno t be
Take the adapte r for the a nti -th eft wheel b olt out o f the vehicle tool kit.
the adapter all the w ay ove r the anti-theft wheel b olt.
the lu g w re nch onto the adapte r until it
s to ps.
H olding the lu g w re n ch th e end, loosen the w heel bo lt by turning it count er-c lockw ise about comple te tu rn
information regarding wheel bolts
The des ign of rims and wheel different wheels are ins tall ed, wheel bolts with the right length and bolt head sh ape must be used. The attachment of the
w heels and fun ction of the brake syste m depen d on thi s.
from fe rent ve hicles of the same mod el.
Wheel bolt tightening torque
tightened bolts for steel a nd alloy w heel rims should have a to rqu e of88 ft lb s
Improperly tightened w heel bolts can co me
loose w hil e driving and cause you to lose control over the ve hicle, resulting in accidents and rious injuries.
Never u se differen t wheel bolt s.
Page 330 of 541
Wheel bolt s and w heel hub threads must
use the
wit h th e jack
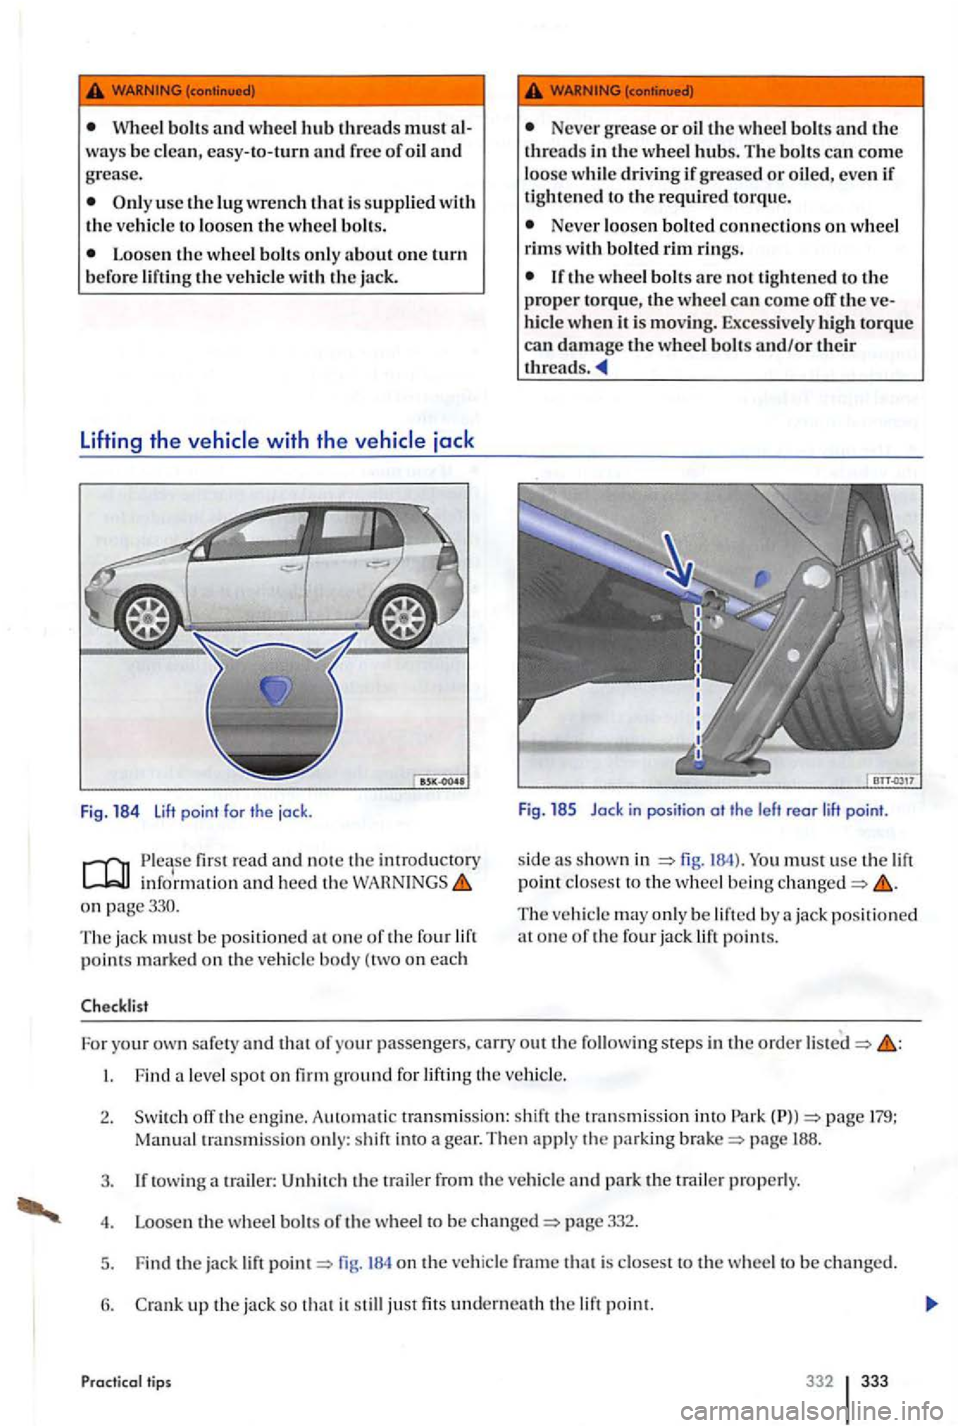
Fig . 184 lift point for th e jock .
first re a d and n o te the intro ducto ry infor mat io n and heed th e on page330.
T he jac k
must b e po sition ed at one o f the four lift points m arked on the ve hicl e bo d y ( tw o on each
Checkli st
Never grease or oil th e w heel bolts and the threads in the wheel hubs. The bo lt s can come
loos e w hile driving if greased or oiled, even if
tigh tened to the requi r e d torque.
Neve r loosen bolted connections on w heel
rims with bolted rim rin gs.
the w heel bolts are not tight en ed to the
p ro pe r torque, the wheel can come off the ve
hi cle whe n it is moving. E.xcessive ly
The ve hicle may only be lifte d by a jack positio ned
a t o n e o f th e four jack lift po int s.
F o r yo
ur own safety and that o f your passengers. carry out the follo wing step s in the o rder
tow in g trailer: the tr aile r from the ve hicle and park the trail er properly.
4 . Loosen the whee l b o lts o f th e w heel to be c han ged=> page 332.
5 . Find the ja ck lift
point=> fig. 184 on the ve hicle fram e tha t is closes t to the w heel to be c han ge d.
6.
up th e jack so tha t it still just fits undern eath the lift po int.
Pr actical tip s 332 333
Page 332 of 541
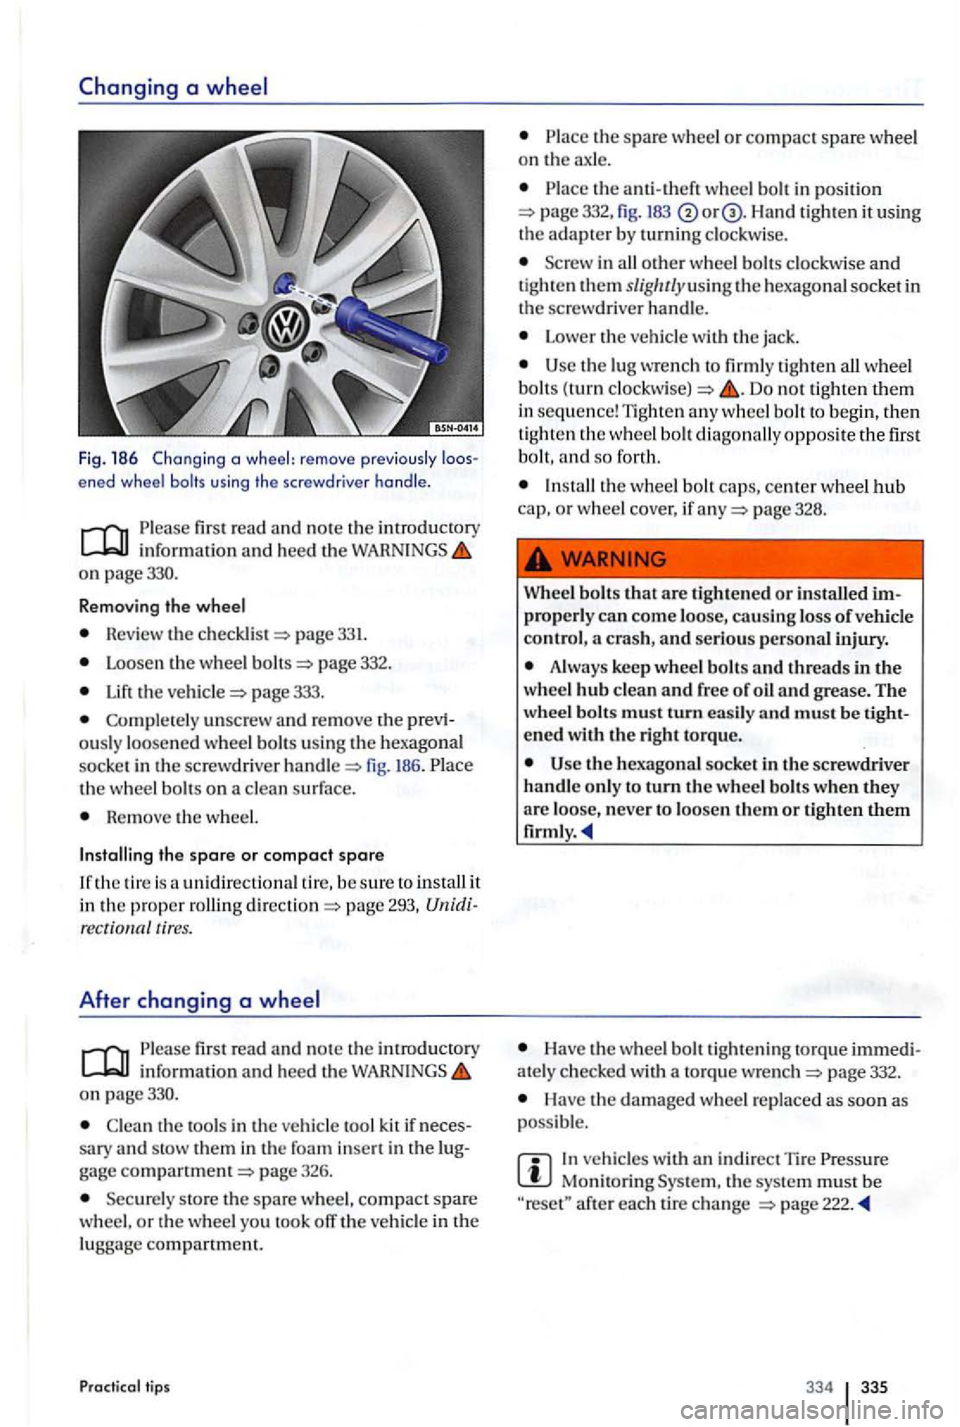
Fig. 186 Chang ing a wheel: remove previo usly ened wheel bolts using the screwdr iver handle .
first read and no te th e introduct ory inform ation and hee d the on page330.
R emov
ing the wheel
Revie w the pag e 331.
Loosen th e w heel page 332.
the page 333.
Complete ly unscrew and rem ove the ously loosened whee l bolt s using the hexago nal
soc ke t in the sc rew dri ver h andl e fig. 186. th e wheel bolts on a clea n surf ace .
Re m ove the w heel.
Installing the spare or compact spare
unidirectiona l tir e, b e sure to install it in the proper ro llin g pag e 293, tires.
After changing a
fir st read and note th e introductory info rm ation and hee d th e on page330.
Clea n th e tools in the vehicl e too l kit if sary and stow th em in th e foa m gage pag e 326.
Securely sto re th e spare whee l, compact spare
w heel, o r th e whee l yo u took off the vehicle in th e
lugga ge compartment.
Practical tips
the spare whee l o r compac t spare wheel on th e ax le.
th e a nti-th eft wheel bolt in position 332, fig. 183 Han d tigh ten it using the adapter b y turnin g clockw ise.
i n all other w hee l b olts clockw ise and tig ht en them slig/ u/yusin g th e hexago nal socket in
the screwdrive r handle.
Lower the ve hicl e with the jack .
the lug wre n ch to firml y tighten all wheel
bolt s (turn Do not tighten them in sequ en ce ! Tight en any wheel bolt to beg in, th en tighten th e wheel bo lt dia gonally opposite the first
b o lt, and so for th.
page 328.
Wh
eel bolts that a re tighte ned or installed p rope rly can come loo se, causing loss of vehicle
contro l,
Always keep whee l bolt s and threads in the
w hee l hub clean and free of oil and grease . The
wheel bolts mus t turn easil y and must be
the hexagona l socket in th e sc rewdriver
handl e o nly to turn th e w hee l bolt s when they are loo se, never to loosen th em or
Have th e w heel b o lt tightening to rqu e ately c hec ke d with a to rqu e wre nch page 332.
Have the dam aged whee l re p laced as soo n as
poss ible.
In ve hicles with indir ect T ir e Monitoring th e sys te m mu st b e after each tir e ch a nge
334 335
Page 360 of 541
. . . . . . . . . . . . .
A
Abroad
Extended stays with th e vehicle . . . . . . . 312
Sale of the vehicle ................... 312
see Braking assistance systems . . . . . . . 194
Accessories . . . . . . . . . . . . . . . . . . . . . . . .
Acoustic warnings Light . . . . . . . . . . . . . . . . . . . . . . . . . . . . . . . 123
Adaptive Front Lighting System
Dynamic. . . . . . . . . . . . . . . . . . . . . . . . . . . .
124
Adjusting
Electrically adjustable front seat . . . . . . .
Aftermarket installation Ca r phone ......................... .
232
Airbag system. . . . . . . . . . . . . . . . . . . . . . . . . . .
airbags. . . . . . . . . . . . . . . . . . . . . . . . . . 96
Side Curtain Protection . . . . . . . . . . . . . . . 98
of child restraints ................. 95
Vehicle
care ..................... .... 274
Alarm button in vehicle key. . . . . . . . . . . . . . 34
Alarm system . . . . . . . . . . . . . . . . . . . . . . . . . . . 42
Alcantara. . . . . . . . . . . . . . . . . . . . . . . . . . . . . . 271
Ambient lighting. . . . . . . . . . . . . . . . . . . . . . . 125
Anodized trim . . . . . . . . . . . . . . . . . . . . . . . . . 267
Antenna. . . . . . . . . . . . . . . . . . . . . . . . . . . . . . . 312
Antif reeze agent. . . . . . . . . . . . . . . . . . . . . . . . 254
Anti-lock
brake system (ABS)............ 194
Ant i-Slip Regulation (ASRJ . . . . . . . . . . . . . . 196
Anti-slip regulation (ASR). . . . . . . . . . . . . . . 194
Anti-theft alarm system .................. 42 Description . . . . . . . . . . . . . . . . . . . . . . . . . . 42
Anti-theft wheel bolts ...........
Armrest ................................ 64
Ash tray ............................... 168
Ashtray
Front ............................... 168
brakin g assis tance systems ....... 196
see Braking assistance systems ....... 194
Swit ch in g on and off ................. 196
Assistance systems
Ant i- lock brake syste m (ABS) ......... 194 Anti-Slip Regulation (ASR) ............ 196 Anti-slip regulation (ASR) ............ 194
Brake Assist ......................... 194
Brake Assist
(BAS) . .. ................ 194
ccs ................................ 2 14
Cruise control syst
em ........ ........ 214
............................... 218 Dynamic Chass is Contro l ............ 218 Electronic differentia l lock (EDL) ...... 195
E l
ectronic stabilization program 194
Hill Hold ............................
362 363