2006 VOLKSWAGEN GOLF PLUS spare tire
[x] Cancel search: spare tirePage 32 of 541
Technical data
In thi s section yo u 'll find inf ormatio n on the fol
l owing:
.... _.. . . 31
Engi ne data and dimensions ......... _. . . . . . . . . 32
D im ensions . . . . . . . . . . . . . . . . . . . . . . . . . . . . . . . . . 33
Th e engine configu rat io n ca n be found on the ve
hi cle identification label in the Warranty an d
Maint enance bookle t or in th e officia l vehicle documents.
Specifications in ve hicl e documents al
way s take precede nce. Th e specificatio n s i n thi s
Manual r e fer to the basic m odel. The stated values m ay vary, dep ending upon diff erent equipment opti o ns o r models , a s well as with respect to special vehicles and vehicles exported to different countries.
45-7-5545
o
PRSSRT Lim. NRR
147kl.J
..
D9l 162 5RQ 5SL TQ3 352 BGV 12H
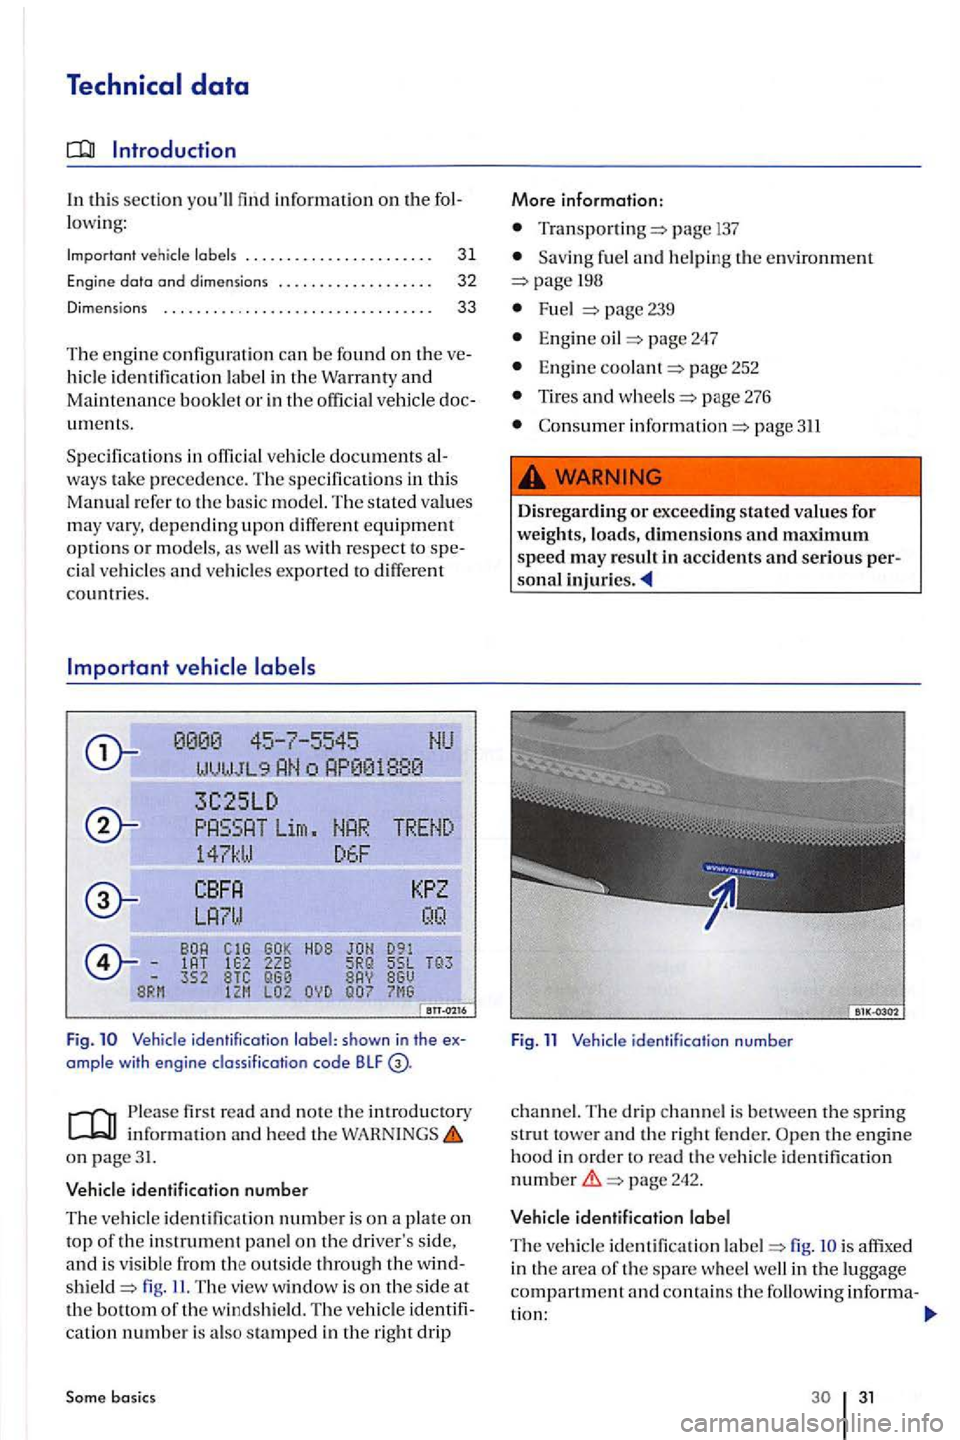
Fig. Vehicle identification Iobel: shown in the ex
ample with eng ine classi fication code BLF
read and no te th e introductory informatio n an d heed th e on page31.
V ehicl e id entification number
The ve hicl e identification number is on a plate on top of the in strument pan el o n the dri ver's s ide,
and is v isibl e from the outsid e th rough the windfig . The v iew window is on t h e side at the botto m of th e w ind shi eld. Th e vehicle identification number i s al so in the right drip
Some basic s
M ore informatio n:
page
Sav ing fuel and helping th e enviro nment
Fu el page 23 9
Engine page 247
En gin e page 252
Tires and 276
page 311
Disregarding or exceeding stated values for weights , loads, dimensions and maximum speed may result in accidents and serious per-son al
Fig. 11 Vehicle identification number
c h a
nnel. The drip ch annel is between the spring stru t towe r and the right fender.
p age 242.
Vehicle identification Iobel
T he ve hicle i
dentifi cation fig . is in th e area o f th e spare w heel well in the luggage
compartm en t a nd contains th e follo wing informa-
tion :
31
Page 220 of 541

Each tire, including the spare (if
provided),
should be checked
monthly w hen cold and inflated to
the inflation pressure recom
mended by the vehicle manufac
turer
on the vehicle placard or tire
inflation pressure label.
(If your
vehicle
has tires of a different size
than the size indicated on the ve
hicle placard
or tire inflation pres
sure label, you sho uld determine
the proper tire inflation pressure
for
those tires.)
As an added safety feature, your
vehicle
has been equipped with a
Tire
is not a
substitute for proper tire mainte
nance,
and it is the driver's re
sponsib ility to
maintain correct
tire pressure , even if under-infla
tion
has not reached the level to
trigger illumination
of the
low tire pressure telltale.
Driver assistance systems
Your vehicle has also been
equipped with a malfunc
tion indicator to indicate
when the
system is not operating properly.
The
malfunction indicator is
combined with the low tire pres
sure telltale. When
the system de
tects a malfunction, the telltale
will flash for approximate ly
one
minute and then remain continu
ously illuminated. This sequence
will continue upon subsequent ve
hicle
start-ups as long as the mal
function exists.
When
the malfunction indicator is
illuminated, th e system may not
be able to detect or signal low tire
pressure
as intended.
to continue
to function properly.
Re-setting and reconfirming the
benchmark tire pressure for TPMS
The Reset button for the Tire
sure Monitoring is in the
glove compartment=> page 222,
fig. 142. The Reset button resets the
benchmark tire pressure used by
the
to the current tire pres
sure
in the tires based on the cir
cumference
of the tires. To reset
222 223
Page 273 of 541
Tires and wheels
Introduction
In this section you'll find informa
tion on th e following:
Tire and . . . . . . . . . 278
New and tires . . . . . . 281
Tire
tires . 285
Tread depth and tread wear
indicators . . . . . . . . . . . . . . . . . . . . . 286
Tir e wear and damage . . . . . . . . . . 286
Spare or compact spare
....... ................. 288
Braking, stopping and parking
188
Tire Pressure Monitoring System
Exterior care and cleaning
page262
Consume r information
Wheel covers page 328
Changing a wheel page
T ir e mobili ty page 336
Tire ...................
Winter tires . . . . . . . . . . . . . . . . . . . 29 4
Snow chains . . . . . . . . . . . . . . . . . . . 295
of tire and
. . . . . . . . . . . . . . . . . . . 296
Tires and . . . . . .
Determi ning the correc t
page 137
Trailer towing page 152
Core, maintenance
New tires or tires that are old,
worn or damaged cannot provide
maximum control and braking
performance.
New tires must be broken in
because new tires do not have
full traction and braking perfor
mance. Always drive with special
care for the first
Page 276 of 541
Always keep aggressive chemi
cals including grease, oil , gaso line
and brak e fluid off the tires, in
clud ing the
spare tire
Rep lace missing valve caps im
m
ediate ly .
Unidirectional tires
Unidirection al tires are des ig n ed
to rotat e only in one direction.
Unidirectional tires have arrows
o n
the s idewall s that show the di
rection
of page
Unidirection al tires must alway s
b e
moun ted acco rding to the spec
ifi ed direct io n
of rotation in order
to deliver thei r bes t grip, braking
performance, low
road noise, and
good wear as well as good hydro
p l
aning res ista nce .
If yo u have to
mount a tire oppo
sit e to its proper direction of rot a
t i
on, you must drive more care
full
y, s ince th e tir e is no longer
b ein g used
as des igned. Thi s is
parti c
ularly important on wet
road s. must replace or re
mount the tir e as soon as poss ibl e
in
orde r to restore the co rrect di
r ect ion
of rotat ion.
Rotating tires
To h elp en sure eve n wea r on all
tires, regu la r tir e rotation ac
cord ing to
the diagram
278, fig. is recom
mended. In thi s way all tires can
have about the sa me service life.
Fa
cility.
Tires more than 6 years old
Tires age even if they are not being
used. Physical and ch emical pro
cesses
reduce tire strength and
perform ance and cause them to
h ard en a
nd become brittle.
The age of eac h tir e ca n be deter
m ined w
ith the manufacturing
date that is part of the tire identifi
ca tion
number (TIN)
Tire storage
Mark tires b efor e re m oving them
to h elp make sure that the previous
l
ocation (left, rig h t, front, rear) and
rollin g dir ection can be m ain
t ai ned wh
en remounting the m.
tir es in a coo l, dry and prefer
ably dark place. Donot store tires
mounted on wheels standin g up.
T ires
not mounted on wheels
s
hould b e covere d to help protect
them from dirt and s tor ed verti-
cal ly (sitting
on the tread).
278 279
Page 281 of 541
page220.
Remember that the vehi cle
manufacturer, not the tire manu
facturer, determines the correct
tire
pressu re for the tires on your
ve hicl
e. Never exceed the max
imum inflation pressure listed on
the tire s idewa ll for any reaso n.
Inflat e a
spare wheel to the pres
sure specif i
ed for the vehicle's
road whee ls
on the tire pressure
label; inflate a
compact spare
wheel to the pressure specified for
the compact spare on the tire pres
sure label
or on a separate label for
the compact spare, if there is one.
Incorrect tire pressure can cause
a
sudden tire failure or blowout,
loss
of control, collision, serious
personal injury, and even death.
Always inflate tires to the rec
ommended and correct cold tire
pressure before driving off.
Excessive speed and/or over
loading
can cause heat build-up ,
sudden tire failure including a
blowout
and tread separation
and loss of control.
maintenance
If the tire pressure is too low or
too high, the tires will wear pre
maturely and the vehicle will not
handle well.
Regularly check tire inflation
pressure, at least once a month,
and also especially before a long
trip.
Note
increases fuel
There may be differences be-
tween the pressure readings
from a tire pressure gauge
and the
pressures registered by the Tir e
Monitoring System. The
e lec tronic Tire
Moni-
toring System
is more accurate .
Page 282 of 541
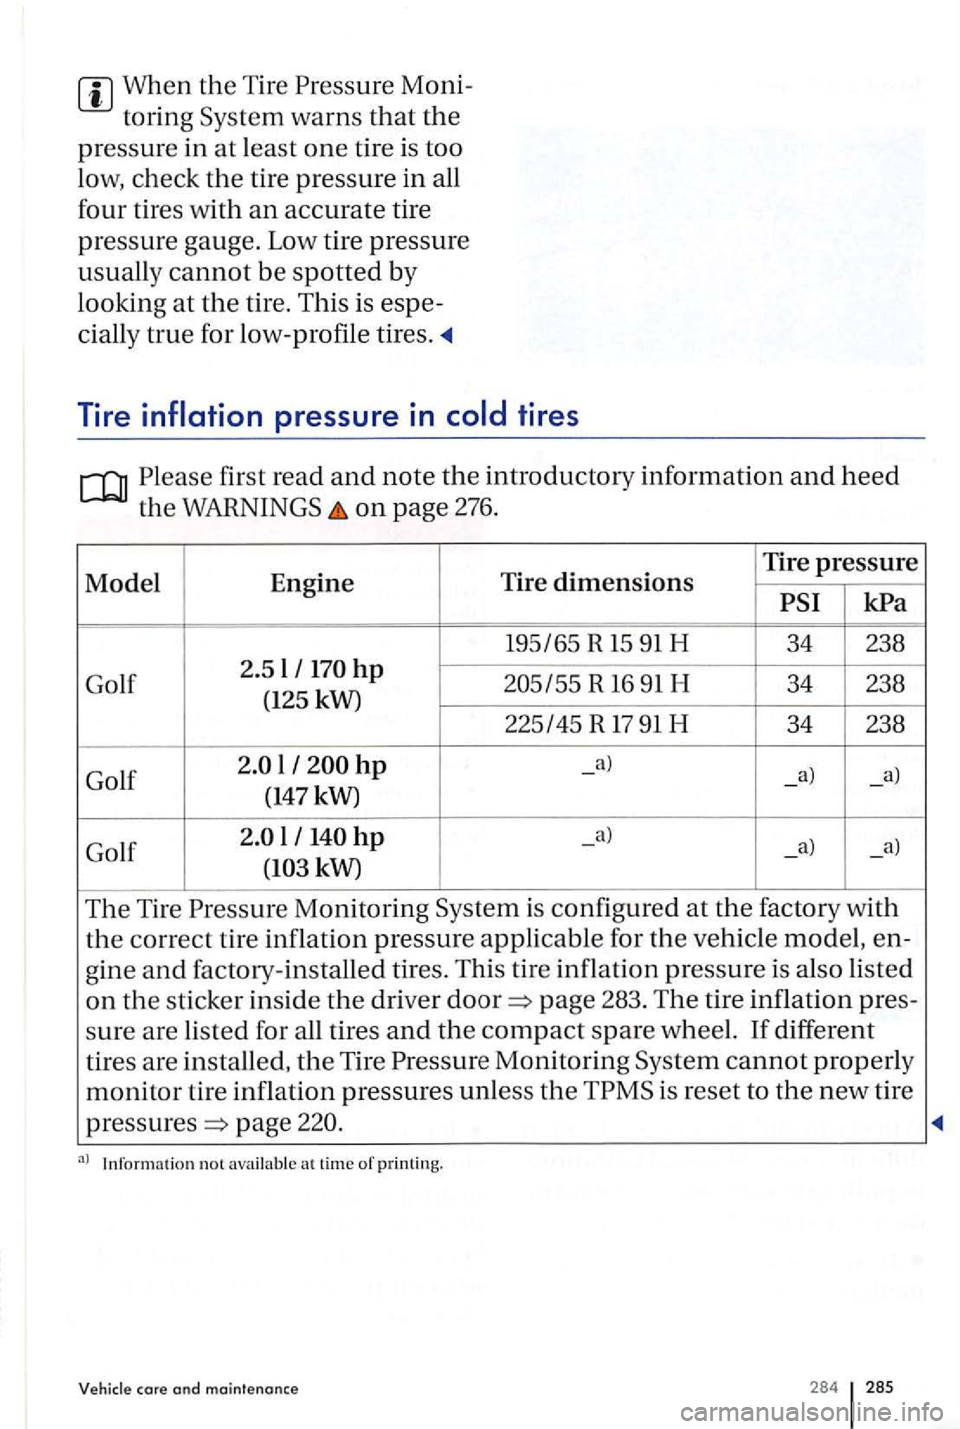
When the Tire
first read and note the introductory information and heed
the on page 276.
Model Engine Tire dimensions Tire pressure
R 16 91 H 34 238
(125 kW)
225145 R
17 91 H 34 238
Golf
l -
The Tire is confi gured at the factory with
the correct tir e inflation pressure applicabl e for the ve hicl e model, en-
g in e
and factory-install ed tire s. This t ire inflation pressure is also listed
on the sticke r insid e the driver page 283 . The tire inflation pres -
s
ure a re listed for all tires and the compact spare wheel. If diff ere n t
tires are
installed, the Tire Monitoring cannot properly
monitor tir e inflation pressures unl ess the is reset to the new tire
page
Informatio n n ot availa b le at t ime o f printing.
Vehicle core and maintenance 284 285
Page 285 of 541
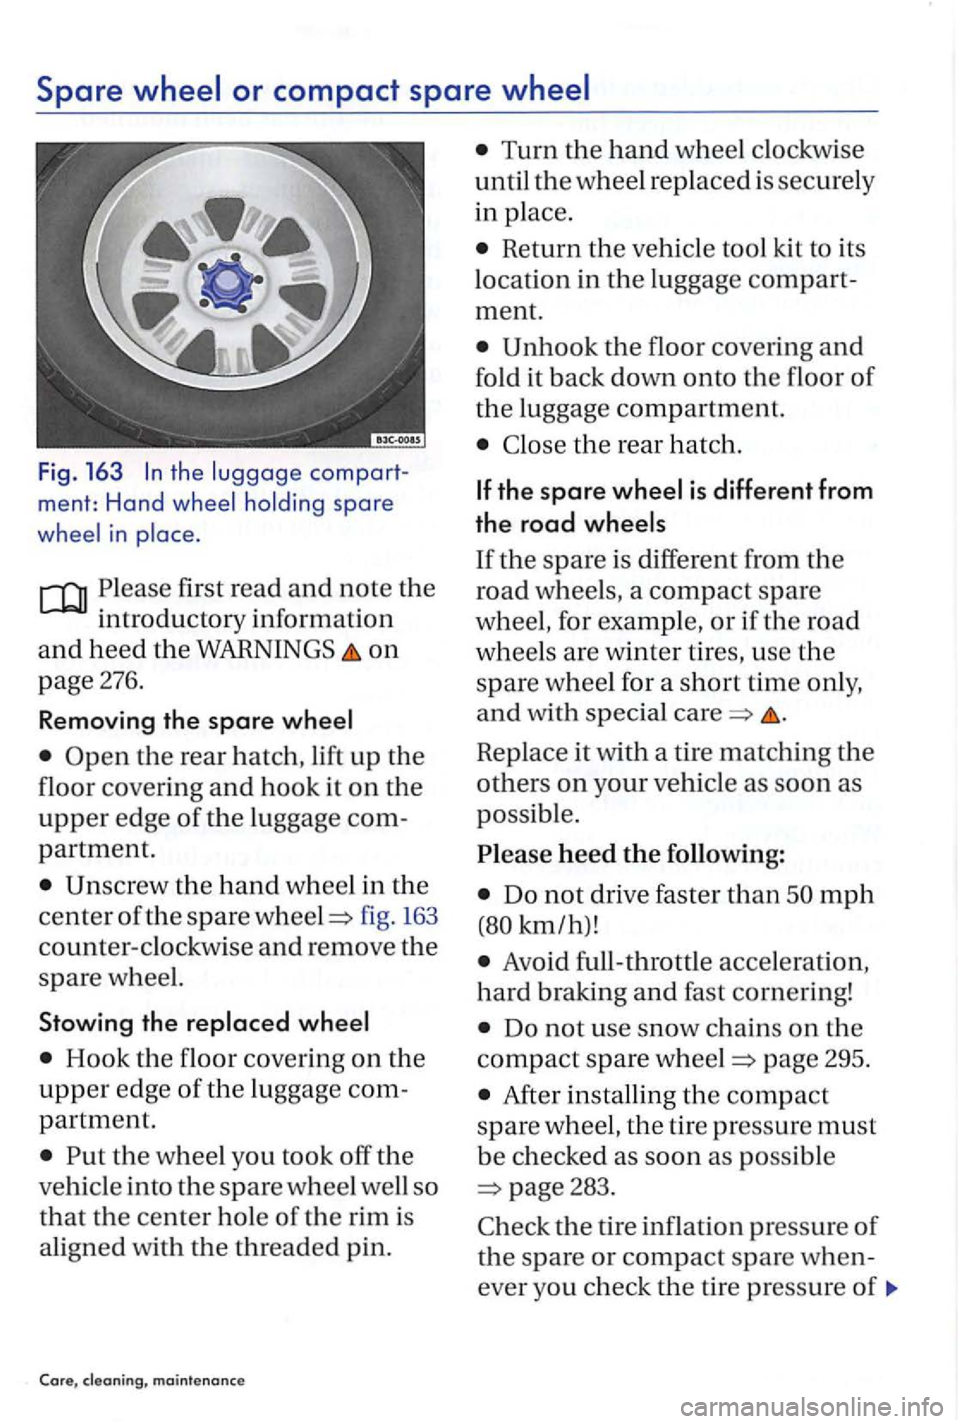
Spare
the compart
ment: Hand
Please first read and note the
introductory information
and heed the WARNINGS on
page 276.
Removing the spare
fig . 163
counter-clockwise and remove the
spare wheel.
Stowing the replaced wheel
Hook the floor cover ing on the
upper edge of the luggage com
partment.
Turn the hand wheel clockwise
until
the wheel replaced is securel y
in place .
Return the vehicle tool kit to its
location in
the luggage compart
ment.
the floor covering and
fold it back down onto the floor of
the luggage compartment.
Close the rear hatch.
Rep lace it with a tire matching the
others on your vehicle as soo n as
poss ible.
Please heed the following:
Do not drive faster than mph
km/h)!
Avoid full-throttle acceleration,
hard braking and fast cornering!
Do not use snow chains on the
compact spare whee l page 295.
After installing the compact
spare wheel, the tire pressure must
b e checked as soon as possib le
283.
Check
the tire inflation pressure of
the spare or compact spare when
ever you ch eck
the tire pressure of
Page 286 of 541
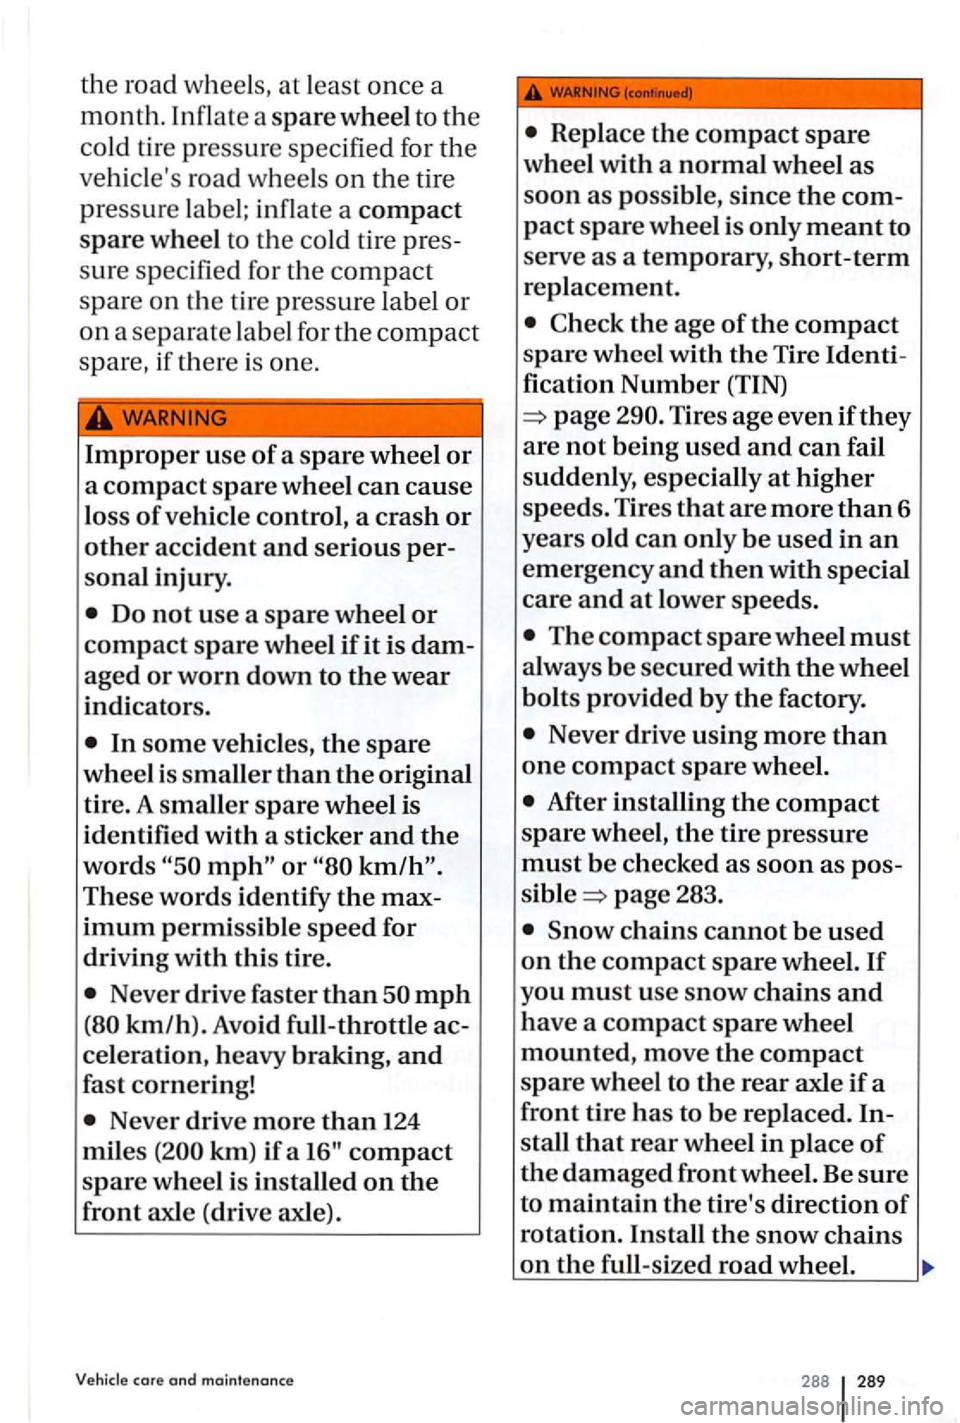
the road wheels , at le a st once a
month. Inflat e a spare wheel to the
cold tire pressure s pecified for the
vehicl e's roa d whee ls on the tir e
press ure la b el; inflat e a compact
spare wheel to the cold tire pres
s
ure s peci fie d for the compact
spare on the tir e pressure label or
on a separate lab el for the compact
spare, if th ere is one .
Improper use of a spare wheel or
a compact spare wheel can cause
loss of vehicle control, a crash or
other accident and serious per
sonal injury.
These words identify the max
imum permissible speed for
driving
with this tire.
Never drive faster than mph
km/h). Avoid full-throttle ac
celeration, heavy braking,
and
fast cornering!
Never drive more than 124
miles km) if a
the age of the compact
spare wheel with the Tire Identi
fication
Number (TIN)
page
The compact spare wheel must
always be secured with the wheel
bolts provided by the factory.
Never drive using more than
one compact spare wheel.
After installing the compact
spare wheel, the tire pressure
must be checked as soon as pos
sible page 283.
288 289