2006 VOLKSWAGEN GOLF PLUS towing
[x] Cancel search: towingPage 312 of 541
Engine
Introduction
In this sec tio n yo u'll fin d infor matio n on th e lowing:
Indicator lights . ......... , . . . . . . . . .. . . . 315
Catalytic converter ............. , . . . . . .
.......... , . . . . . . . . . . . . . 317
More informatio n:
179
234
pa ge 239
Engi ne page 247
Notice about data r eco rded by vehicle control page
Towing a nd
The vehicle exhaust sys te m and the catalyt ic
co nve rter or di ese l parti cu la te filter very hot
a n d can cause a fir e a nd serious perso na l in jury.
Neve r park where parts oft h e hot exhaust syste m and catal ytic con ver te r co uld ignite
O ammabl e m ate ri als, su c h as bru sh , lea ves, dry fu el, e tc.
Neve r appl y addition al undercoatin g o r rust
proofi ng on or near th e exhaust manifold, pipes , catalyti c converter, d ies el pa rti cu-
l a te or heat shi eld s.
Califo rni a Propo sition 65 Warnin g
E ngine exha ust, some of it s constitu ents, and ce rtain v ehi cle component s cont ain or emit ch em ica ls kno wn to th e Sta te o f California to
ca use cance r and birth defec ts and reproduc tive h arm. In additio n, cert ain flu ids contain ed in
ve hicles and ce rtain products of compone nt
wea r contain or emit ch emicals know n t o the Sta te o f Ca lifornia to cause cancer and birtJ1
firs t read and note the int rod uctory in formati on an d heed th e WARN INGS on page 315.
Light s
th orized dea le r o r a uth orized Serv ice Facility .
Diesel e ng in e preheating before eng in e 172 sta rt -up .
Page 324 of 541
Cont ents
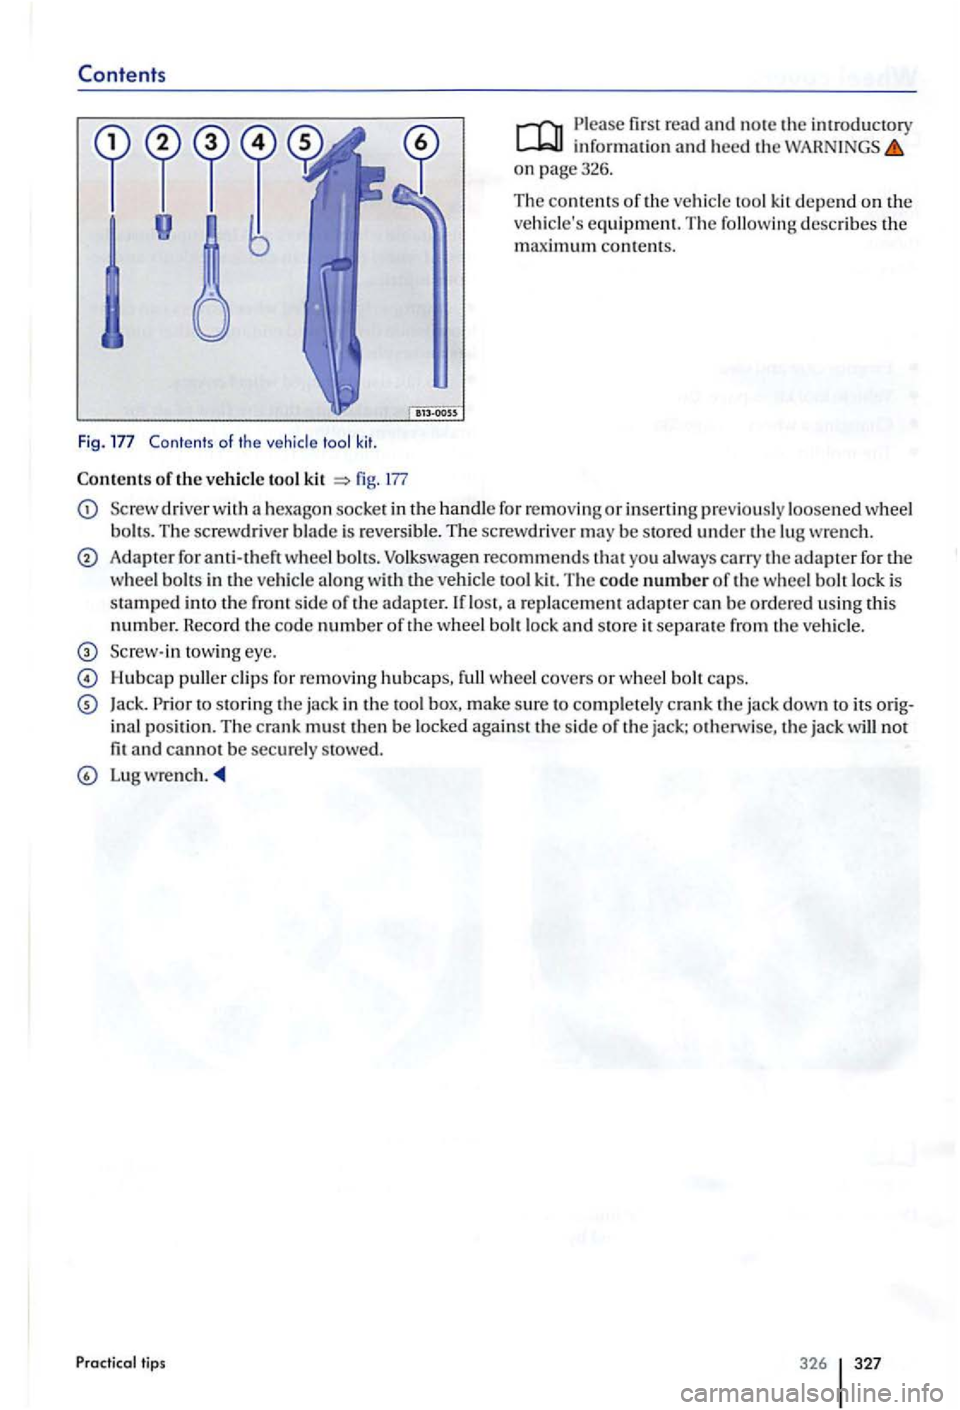
Fig . Contents of th e vehicle tool kit .
Con tents of th e vehicle tool kit fig. 177
Please first read and note the information and heed th e on page326.
T he
contents of th e ve hicl e tool kit d epend on the vehicle's equ ipment. The followin g describe s the maximum conte nt s.
Sc rewdri ver with a hexago n socke t in the handl e fo r r em ov ing or in se rting prev iou sly loosened w heel
bolt s. The screwdrive r blade is revers ible. The screw driver may be stored unde r th e lug wre nch.
Adapter for anti-theft wheel b olts. Volkswagen recom mends that yo u alw ays carry the adapte r fo r th e
w heel b olt s in the ve hicl e along w ith the veh icle tool The code number of the w heel bolt lock is
stamped th e sid e ofthe ad apter.
towing eye.
Hu bca p puller clip s for remov ing hubcaps, full wheel cover s or wheel b o lt caps.
Jack. Prior to stor in g th e jac k in the too l box, make s ure to co mpl ete ly crank the ja ck down to its ina l position. The cra nk mu st then b e locked against the sid e of the jack: oth erwise, the jack will not fit and cannot be sec urel y stowed.
Lug w rench .
Practica l tips
Page 327 of 541
Introduction
In this s ec tion lowing :
Preparation s chang ing a . . . . . . . . . . . . . 331
. . . . . . . . . . . . . . . . . . . . . . . . . . . . . . . . 332
the with the jack . . . . . . . . . . 333
Changing a
. . . . . . . . . . . . . . . . . . . . . . 335
ve hicl e design s and models are not ered with a jack and lug w re n ch . su ch cases , Volkswage n recommend s havi ng tires and wheels
changed by an authorized Volk swage n dealer or an authorized Volkswag en Servic e Facility.
Vehi cle key page 34
Tir es and wheels=>
In an page
Vehi cle tool pag e 32 6
Whee l cover s page 328
a whe el, especially on th e side of the road, can be da ngerou s. To help reduce the risk of ser ious personal injury:
Always stop the vehicle
Always make sure that all passengers , cially children, are in safe place outside the
Turn on the emergency nasher and set up another
Always make sure th at the ground is level and firm . If necessary place a sturdy board under the jack.
a whee l by yourse lf only if yo u arc
Always use proper and undamaged tools
when changing tire.
Always apply the parking brake and sh ift the transmission into Park mission ) or any gear (manual only) to help ve nt the ve hicle from moving suddenly and ping off the jack.
a w heel is lifted off the ground, having the tran smission in Park or in gea r not prevent sudden vehicl e movement.
Alwa ys blo ck
Jar object.
If you are towing trail er, alway s unhitch it
from your vehicle before star ting to change the
wh eel. Always apply th e trailer bra kes firmly and make sure the
Always use jac k that has been approved by th e m anufacturer for your vehicle . Never use other jack s, eve n if th ey have been approved for
u se on other Volk swag en models.
To reduce the risk of los ing control , crashes, and se riou s personal injurie s, neve r loosen the
sc re w s on rim s with threa ded rim rings.
Mter changin g a wheel , have the wheel bolt
tightening torque checked with an accurate
torqu e
wrench .
Page 336 of 541
Please first read and note the introdu ctory information and heed the on page 336 .
the valve core from th e tir e valve
u sin g th e valve core page 337 , fig . 187 and place it on a clean surface.
Vigorous ly shake th e tir e inflation cylinder page 337, fig. 187
Tigh tly sc rew the filling page 337, fig. 187 to the tire inflation bo ttl e ( turn
He mov e the sealing plug from th e page 337, fig. 18 7 and slid e th e open end th e way onto the tire va lve.
H old the cylinder with the bottom po inting up and the entire contents of th e tir e inflati on inder int o th e tir e.
Detach the empty tir e inflation cylinder from
th e va lve.
p age337,fig. 187 sc rew the v al ve core back into the tir e valve.
the tire
the tire inflation page 337, fig. 187 o f th e air compressor tightl y to th e tir e va lve .
whether the air release pag e 337, 187 is screwe d on tightly.
page 337, fig. 187 into a soc ket of the page
Switch th e ai r compresso r on using th e page 337, fig. 187
Le t th e air compre ssor run until 2 .5 ) bar is re ach ed
Switch off the air compressor.
an air press ure of29-36 psi 2.5 bar)
cannot b e reac hed, unscrew the tire inflation hose from the tire v alve.
tips
Dr ive about feet m ete rs) backward s o r
f o rward s so that the sealant ca n be distributed sid e th e tire .
th e tire inflat ion hose of th e air pr esso r aga in to the tir e va lve and r epeat th e
th e required tir e pressure still cannot be reached. the tir e is too badly damaged. The t ir e
canno t b e sealed us ing th e tire mobilit y set. Do not
d rive the v ehicle. Get expert
Disconnect th e air compresso r and unscrew the tire infl ation hose from the tir e va lve .
mph km/h).
page340.
The tire inflation hose and ai r compresso r ca n
get hot during inflation.
Protec t hands and skin fro m hot parts.
Do not p lace th e hot tire inflation hose or hot air compressor on flammable material.
Let th e equipment cool off almost plet ely before sto wing it.
bar), th e damage is to o great to be repaired
wi th the tire mobility set. The sealant is not able to seal the tire. Do not drive the ve hicle. Get pert assistance.
Note
Do not let the compressor run for more than 8 minutes to help prevent overheating damage.
Let the compressor cool down for a few minutes
befor e switching it on again. Let it cool down most completely before stowing it in the re p a ir
kit.
338 339
Page 354 of 541
Tow-starting and towing
Introduction
In thi s sec tion you'll find informati on on the low ing:
ti ps on towin g your vehicle . . . . . . . . . . . . . . . . . . . 357
Installing the towing eye in the fron t . . . . . . . . . . . . . 358
In stalling the towing eye in the rear . . . . . . . . . . . . . 359
Driving tips while towing . . . . . . . . . . . . . . . . . . . . . .
Ob serve lega l regulations tow -startin g and
t ow ing.
For technical rea sons: A vehicle with dead battery must never be towed;
Engin e control and emissio n control system page315
Never tow a vehicle without any electrica l
power.
Neve r remove the vehicle key from the
first r ea d and no te th e introductory inf ormation and heed the WARNINGS on page357.
Towing eye; bar
A to w ing eye is includ ed in your vehicl e's tool kit.
Thi s ca n b e inserted in a th rea ded h ole in the front bumper a nd use d whe n your ve hicl e is bei ng
t owed by an o th er ve hicle.
Towing a veh icle change s th e way it handles and brake s. To help reduce the risk of an accident and serious personal injury, note the following:
The driver of the ve hicl e that is being towed:
-
need to
press harder on the brak e pedal to slow down or stop. Always be alert so as not to rear-end the towing vehicle.
-
You will have to use conside rably more
force to turn the steerin g whee l because the power steering is not working.
The driver of the ve hicl e that is doing the towing:
- Accelerate gradually
and gently and avoid
jerking movements.
- Do
not brake hard or stee r sharply.
- Brake earlier
and more gently than in normal driving.
Note
Be careful not to damage the paint when stalling and removing the eye and the cove r for the threaded hole behind the bumper.
Unburned fuel can get into the catalytic verter during towing and damage it.
The tow rope s ho uld be nexib le e no ug h to help
protect both v ehicle s from damage . thetic fiber rope or simil ar rope.
A tta ch th e
tow rope or tow bar onl y to the towing
eye included in the vehicl e tool kit for thi s
the transmission in Ne utra l (N).
Do not tow faster than mph km /h ).
D o not tow more than miles
Page 355 of 541
If transmission has leake d out of th e missio n.
If there is o r n o oil in th e transmiss io n cause of damage to your ve hicl e, it mus t be moved
w ith th e dri ve wheels off th e ground.
If the front and rear w heels cannot t u rn.
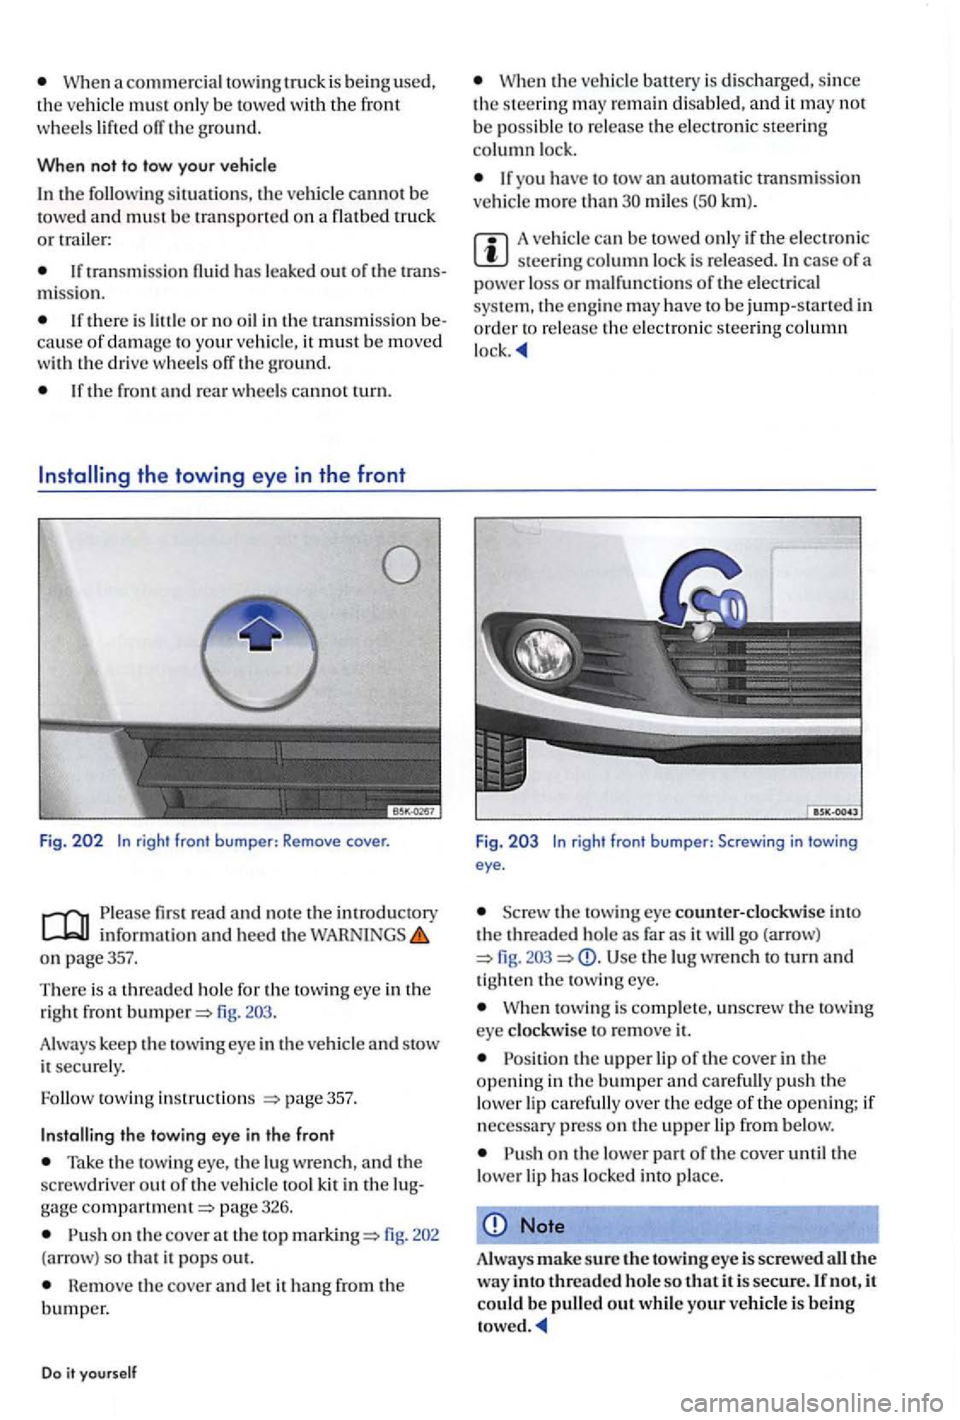
Fig . 202 In righ t front bumper : Remove cover.
read and note the introdu ctory information and heed the on page357.
T he re is a thread ed hole for
the tow ing eye in the
right front
Take the tow ing eye, the lu g wre nch, and the
sc rewdriver out o f the ve hicle too l kit in the page 326.
on the cove r at the top 202
(a rrow ) so that it pops out.
Remove the cover and let it hang from the bumper.
Do it yourself
the ve hicl e battery is disc harged, since the s teering re m ain disabled, and it may not be poss ibl e to release the elect ro ni c steerin g column lock.
If yo u have to tow an automatic tran smissio n
ve hicl e m ore th an miles km ).
A vehicle can be to we d onl y if the electro nic steerin g co lumn lock is released. In case of a
power loss or malfunc tions of the e lectrical
sys te m , th e e ngine may have to be jump-start ed in order to re lease the electroni c steerin g column
Fig . 2 0 3 In righ t front bumper: Screwing in t owi ng eye .
the tow ing eye counter-clock wise into the threaded ho le as far as it will go (arrow) Use the lug wrenc h to turn and tig ht en th e towing eye.
towing is compl e te, unscrew the towi ng eye cl ock wise to re m ove it.
on the lower part of the cover until the
lower lip has locke d into pla ce.
Note
Always make sure the towin g eye is screwe d all the w ay into threaded hole so that it is secure. If not, it could be pull ed out while your vehicle is being
Page 356 of 541
the towing eye in the rear
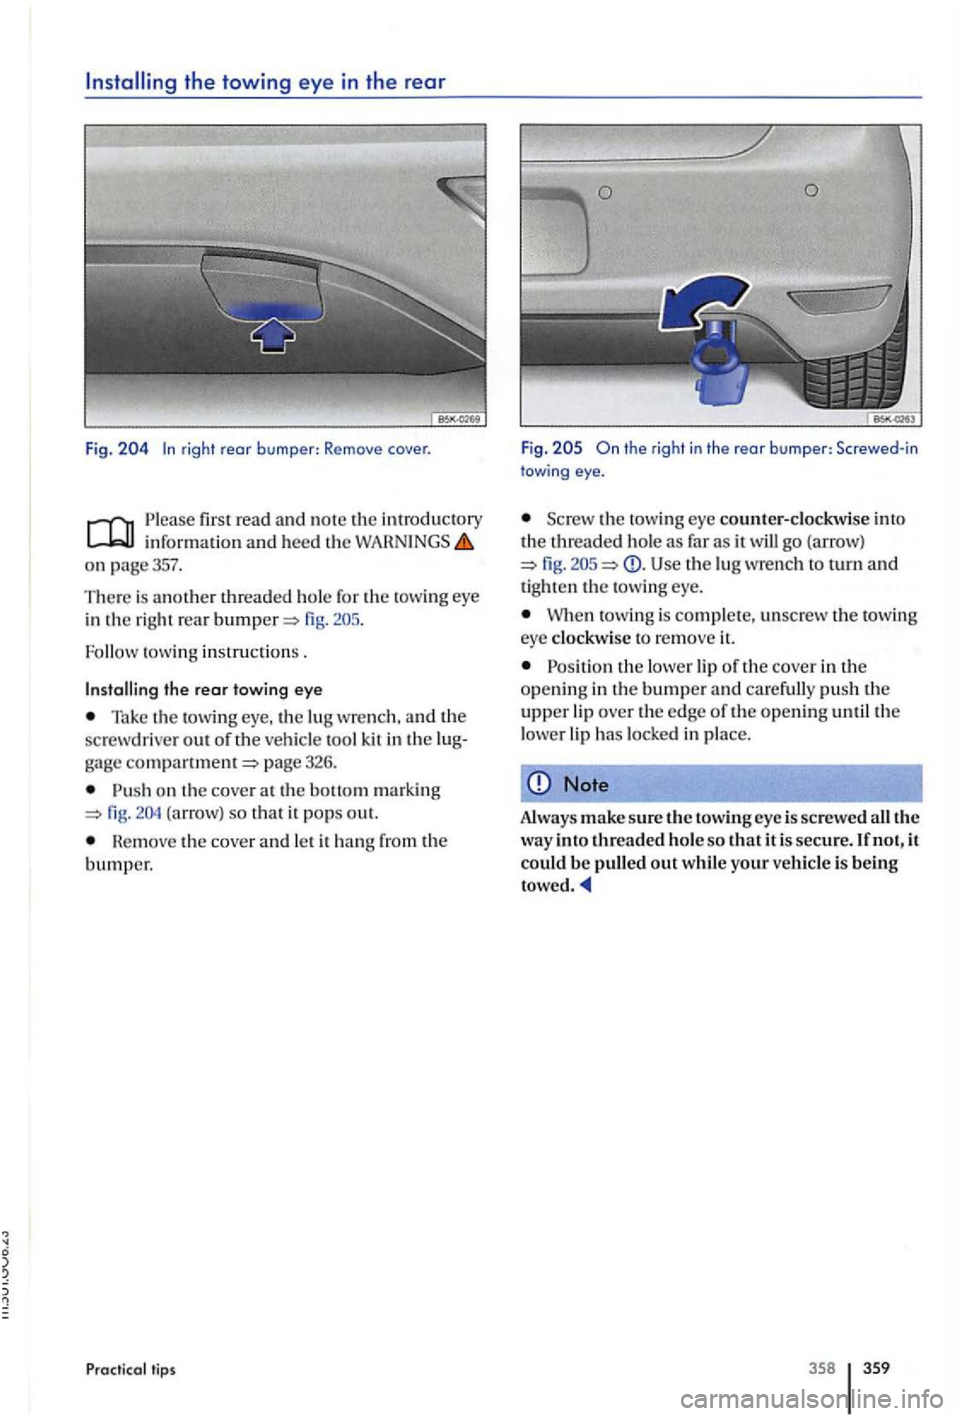
Fig. rig ht rear b umper: Remove cover.
P le ase first read and not e th e information and heed the
on page357.
The re is another threaded hole for the towing eye
in the right rear
tow ing instruction s .
the rear towing eye
Tak e the towing eye, the lu g w rench, and the
sc rewdrive r out of the veh icle tool kit in the
Pu sh on the cove r at the (arrow) so that it po ps out.
th e cover and le t it
tips
Fig .
the towing eye counter-clockwise into
th e threade d hol e as far as it will go (arrow) fig. Use th e lu g wrench to turn and tighten th e towin g eye.
W hen t owi ng is complet e, unscrew the towin g
eye clockwise to remove
Position th e lower lip of th e cover in th e
o penin g in the bumper and ca re full y push th e upper lip over the edge of th e opening until the
l ower lip has locke d in plac e.
Note
Always make sure the towing eye is screwe d all the way into threaded ho le so that it is secure . If n ot, it could be pulled out while your veh icle is being
358 359
Page 357 of 541
Driving tips towing
Please fir st read and note the introd uctory in form ation and heed the on p age357.
Tow
ing r equires som e ex perience, especiall y w hen
u sin g a tow rop e. Both drivers mus t be familiar
w ith the techniques required f or towin g.
paved roa d, there is always a risk of overloading and damaging th e a ttachment points.
your ve hicl e is bein g towe d, it can still sign al turns eve n if the em erge ncy flashers are activate d , as lo n g as the ig nit ion is switched on. the turn sig nal in the no rm al way. The e merge ncy flashers
go off as l ong as th e tu rn sig nal is blin kin g. As soon as the turn sig nal lever returns to its ne u tr a l tio n . the e merge ncy flash e rs are auto matically tiv ated agai n.
The driver of the vehicl e towed:
your vehicle is the on e being towed, the ti on switch m ust b e swit ch ed on to keep the
Do it yourself
s teeri ng wheel from loc king. Also m ake sure that the turn signal s, horn , winds hi eld wip ers, and w indshi eld was he rs wo rk properly.
power steering does not wo rk w hen th e
e ngi ne is swi tc h e d off, more e ffort is needed t o
s teer th e ve hicl e.
the brak e booster also does no t w ork when the engin e is s topped, you will need t o press harder o n the brak e ped al to slo wdown or stop. Do not hit the towing vehicl e.
Head and heed the inform ation and in the tow in g ve hicle's owners m anu al.
The driver of the towing vehicle:
Accele rat e g raduall y and gentl y a nd avoid
jerking move men ts. Do no t s teer s h arply.
Brake earli er and m ore ge ntl y than in normal driving.
Head and heed the informatio n and in the owner's m anual of the ve hicl e bein g
tow ed