2006 VOLKSWAGEN GOLF MK5 window
[x] Cancel search: windowPage 301 of 444
Booklet 3.2 Tips and Advice
Dampen the windows w ith commer
cially avai lable, alcohol-based g lass
clean er.
Dr y the windows with a clean chamois
or a lint-free cloth.
Removing snow
- Use a s mall brush to remov e snow from
the windows and mirror s.
Removing ice
-Use a de-i cer spra y.
U se a clean cloth to dry th e windows. The
c h amois leather, whic h was use d to wip e paint
surfaces, contains oily res idu e from protective
agents and would smear th e
poss ible use a de- ic in g spray to remove ice. you have to use an ice scraper, push it on ly in one dire ctio n- away from 0.
Use window cleane r or a silico ne remover to re
move rubber, oil, grease silicone depo sits.
Wiper blades should be cleaned regularly.
Clean wiper blades are important so that
y
ou can see.
- Use a so
ft cloth to re mov e dust and dirt
from the windshi eld wiper blades.
- U se window clean
er to clean the w ind
s hi eld wip er blad es. U se a s
ponge or a
cloth to re
move stubborn dirt.
Wax deposits have to be remove d with sp ecial
cleaner. Wax deposits on the windshield could cause the wiper blades to rub. A window clea ner sp ecifica lly for removing wax will stop the b lades
f rom rubbing if added to the windshie ld wash wa te r. Grease removing cleaners will not remove
wax deposits.
WARNING
Poor visi bili ty inc re ases the risk of collisions and oth er ac cid ent s.
Always make sure all win dows are clear of ice , snow , and cond ensation for goo d vis ibility -out the windshie ld, side and rear windows.
Never use warm or h ot water to re move snow and ice from wind ows and mirro rs. This could
ca use th e glass to crack!
The heati ng ele ment s for the rear defogger
a re on t h e in side of the rear window. To preve nt damage, do not put sticke rs over the heatin g e l
ements o n the in side of the rear w indow.
Never move the ice scraper back and forth to
p reve nt dirt from being ground against the gla ss
when you pull the sc raper back towa rds yo u.
Cleaning and protection 25
Page 328 of 444
3.2 Tips and Advice
Replacement wiper blades are available from your authorize d Volkswagen dealer.
lf the windshield wipers rub, or if th ey are dam
aged they s hou ld be replace d, or cleaned if they are dirt y.
If th is
does not produ ce the desi red results, th e setting angle of the windshield wiper arms m ay
b e in correct and sh o ul d be checked and adju sted if neces sa ry by an a uthorize d Volkswage n dealer or qualified worksh op.
WARN ING
Worn or dirty wiper blades will reduce v is iand increase th e risk of accide nt leading
to seriou s pe rso nal injury to you and your passengers.
WARNING (continued )
Alw ays clea n th e windshield wiper blades
a n d all windows regularly.
Always make sure to change the wiper bla des once or tw ice a yea r.
D am aged or dirt y windshi eld wipers can
scra tc h th e windshield.
Never use gasoline. nail polish r em over,
paint thinner o r similar produc ts to clea n th e
windows. This could damage the windshie ld
w iper blades.
Neve r move the windshield wipe r or wind
s hi eld wiper arm manually-thi s co uld cause
damage!
To preven t damage to th e w ipin g sys te m , a l
w ays loosen blades frozen to tl1e g lass be fore op
e rat ing th e
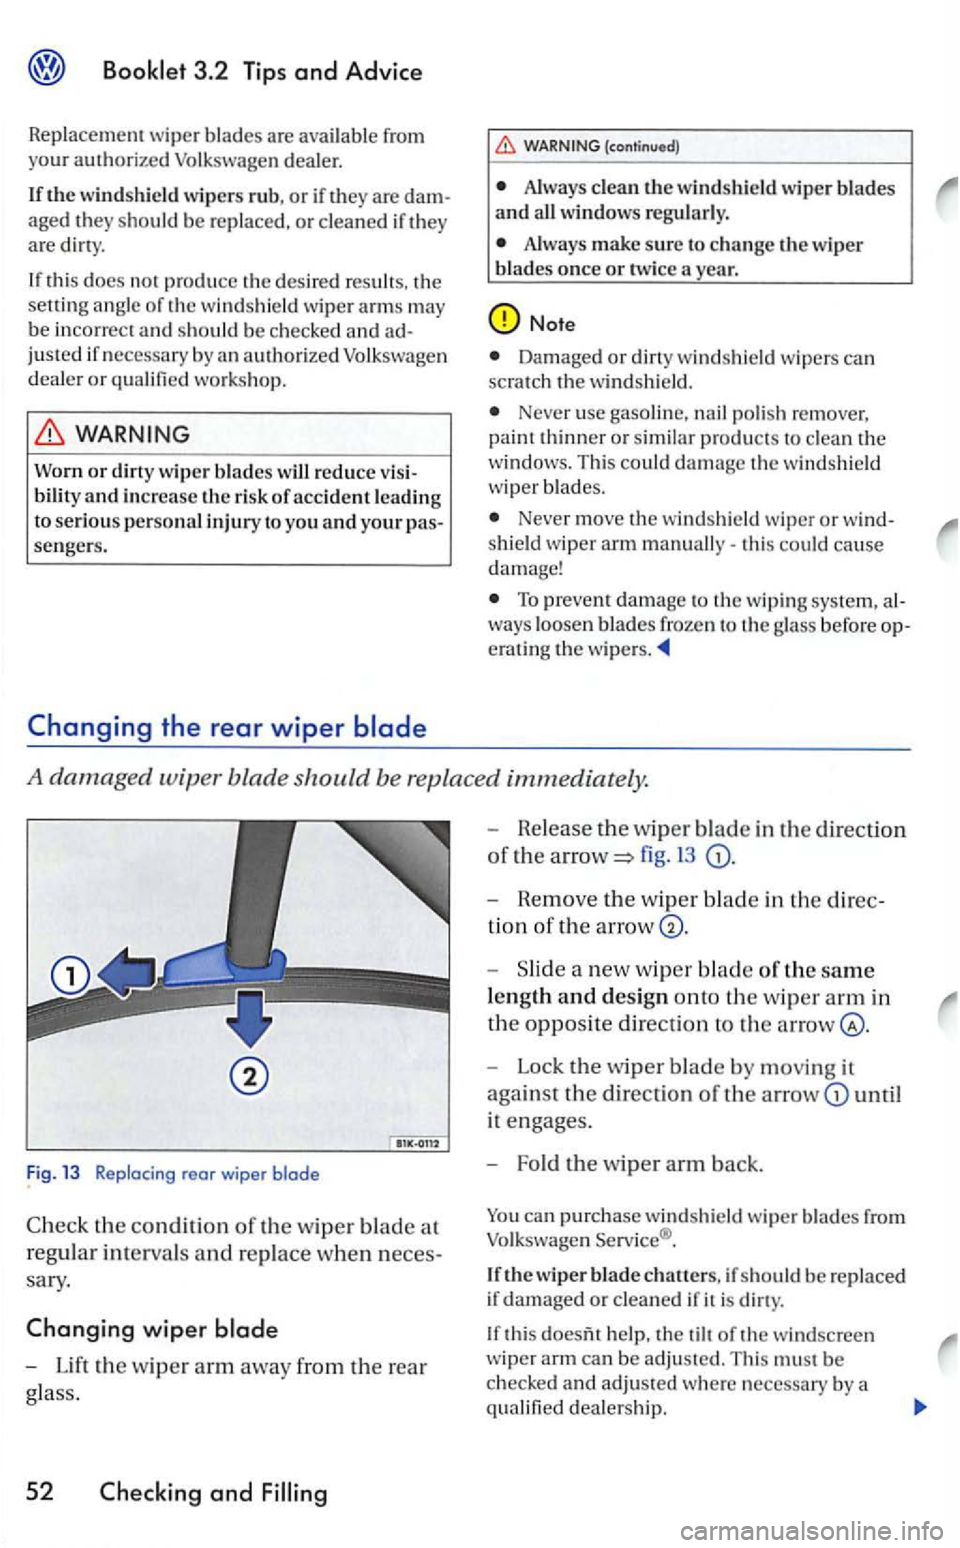
A damaged wiper blade should be replace d immediately.
Fig. 13 Replacing rear wiper blade
Check the condit io n of th e w ip er blade at
r
egul ar interva ls and rep lace when n eces
sary.
Changing wiper
-Lift the w ip er arm away from the rear
glass.
52 Checking and
- Release th e wiper blade in the direction
of th e a rrow=> 13
- Hemove the w ip er bla d e in the direc
tion of the arrow
-a new w iper blade of the same
le n gth and design onto th e w iper arm in
the oppos it e directio n to th e
- Lock the wiper blade by moving it
aga in
st the direction of th e until
it engages.
- Fo ld the
wiper arm back.
can pu rchase wind shield wiper blades from Volkswage n Service ®.
If th e wiper blade chatters, if sh o ul d be re pla ced
i f damaged or cleaned if it is dirty.
If thi s help, the tilt of the windsc reen
w iper arm can be adju sted. Thi s must b e
c h ecke d and adju sted where necessary by a
q ualified dea lershi p.
Page 329 of 444
drive if you have clear vis io n through all the windows.
A defect ive or d irt y w iper blade can scratch
t h e rear glass.
Never clean gla ss panel with fuel. nail polish remove r, p aint thinn er o r similar flu ids.
Thi s ca n damage th e w iper bla d es.
Never move the w iper or the wiper arm your hand can dam age it.
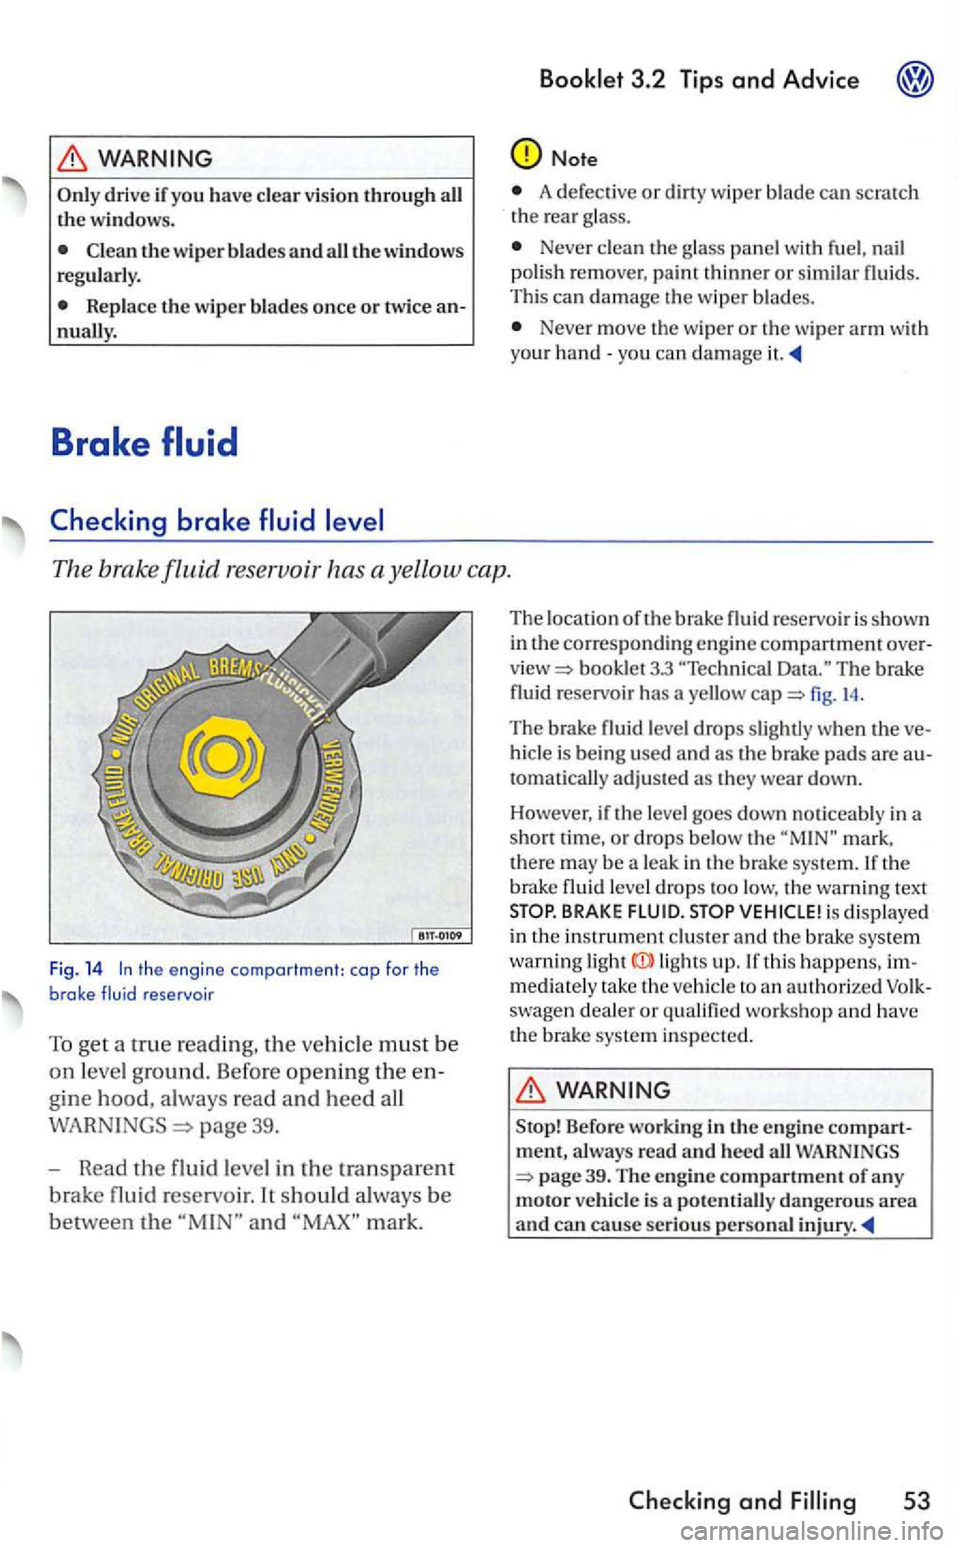
The brak e fluid reservoir has a ye llow cap.
Fig. 14 the engine compartment: cap for the brake fluid reservoir
To get a true reading, the m ust b e
on leve l ground. Before opening th e en
g
ine hood, a lways read and heed all
page 39.
- Read
the fluid leve l in the tra nsparent
bra ke fluid re servoir. It should always be
between the and mark.
Th e lo cation of th e brake fluid reservoi r is shown
in
bookl et 3.3 The brake
fluid reservoir has a yello w fig. 14 .
The brake fluid lev el drops s lightl y when th e ve
hicl e is bein g used and a s th e brake pad s are autom atically adju sted a s they wear down.
Ho wev
er, if th e le ve l goes down noticeably in a
s ho rt time, or drops below th e mark ,
th ere may be a leak in the brake system. If the b rake fluid leve l d rops too low, the wa rnin g text BRAKE FLUID. is displayed
in the instrument clu ste r and th e b rake system warni ng ligh ts up. If t his happens, immediately rake th e ve hicle to an au thorize d swage n deale r or q ualifi ed wo rkshop a nd have
th e brake system inspected.
Stop! Before wo rkin g in th e engin e compartment, a lways read and heed all WARNINGS
53
Page 369 of 444
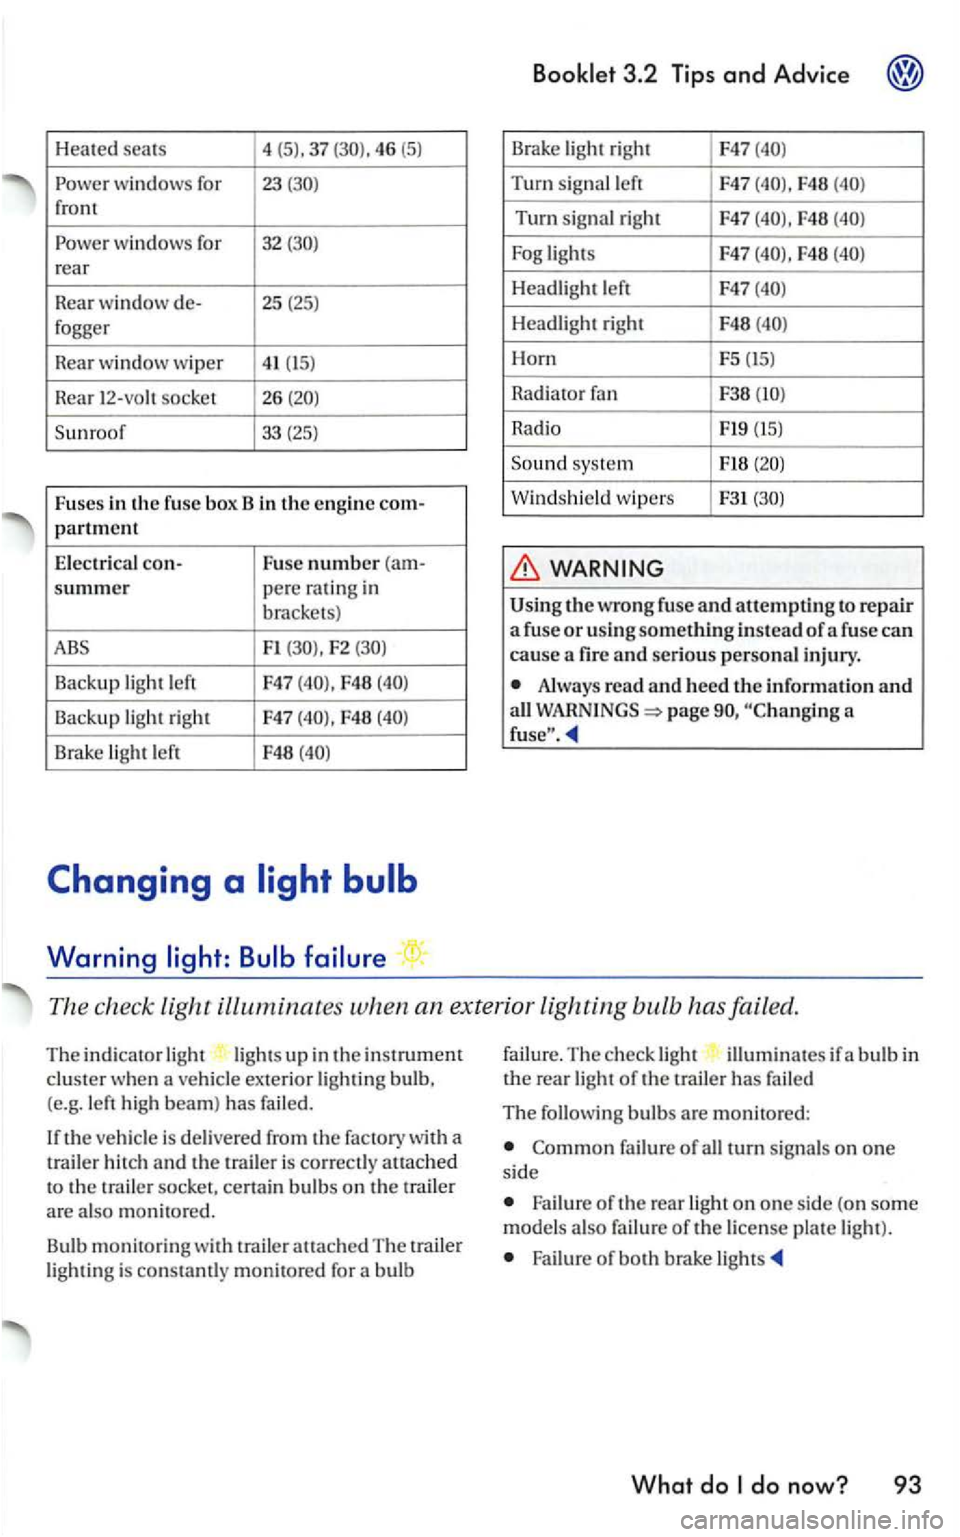
Heated seats 4
(5). 37 46 (5)
windows for 23 front
wind ows for 32 rear
Rea r
window de- 25 (25) fogger
R
ear w indow wiper 41 (15)
R ear 12-vo h socket 26
F1 F2
Backup light left F47 F48
Backup light right F47 F48
Brake light left F48
Warning
Brake light righ t F47
Turn sig na l left F47 F48
Turn signal right F47 F48
F48
Headlight left F47
Headli gh t right F48
Horn F5 (15)
Rad i
ator
Radio Fl9 (15)
Sound syste m
Windshield wipers F31
the wrong fuse and attempti ng to re pair a fuse or usi ng something instead of a fuse can
cause a fir e and serious personal injury.
Alway s read and heed the information and all page a
The check light ill uminates when an ex terior lighting bulb has failed.
The indicato r light lig ht s up in the instrument clus ter when a ve hicle exterior lightin g bulb,
(e.g. le ft high beam) has failed.
th e ve hicle is delivered from the factory with a
t railer h itch and the is correct ly atLached to the trai le r socket, cert ain bulb s on the trail er are also monit ore d .
Bu lb
monitorin g with trailer attach ed The traile r light ing is con stamly monitored for a bulb failu
re.
The ch eck ligh t illumin ates if a b ulb in the rea r light of the trailer has fai led
The following bulbs are mon itored:
failure of all turn signa ls on one si de
Failure o f the rear light on one si de (on som e
model s als o failu re of the license pla te light ).
Failure of both brake li gh ts
What do
Page 376 of 444
4.
1.
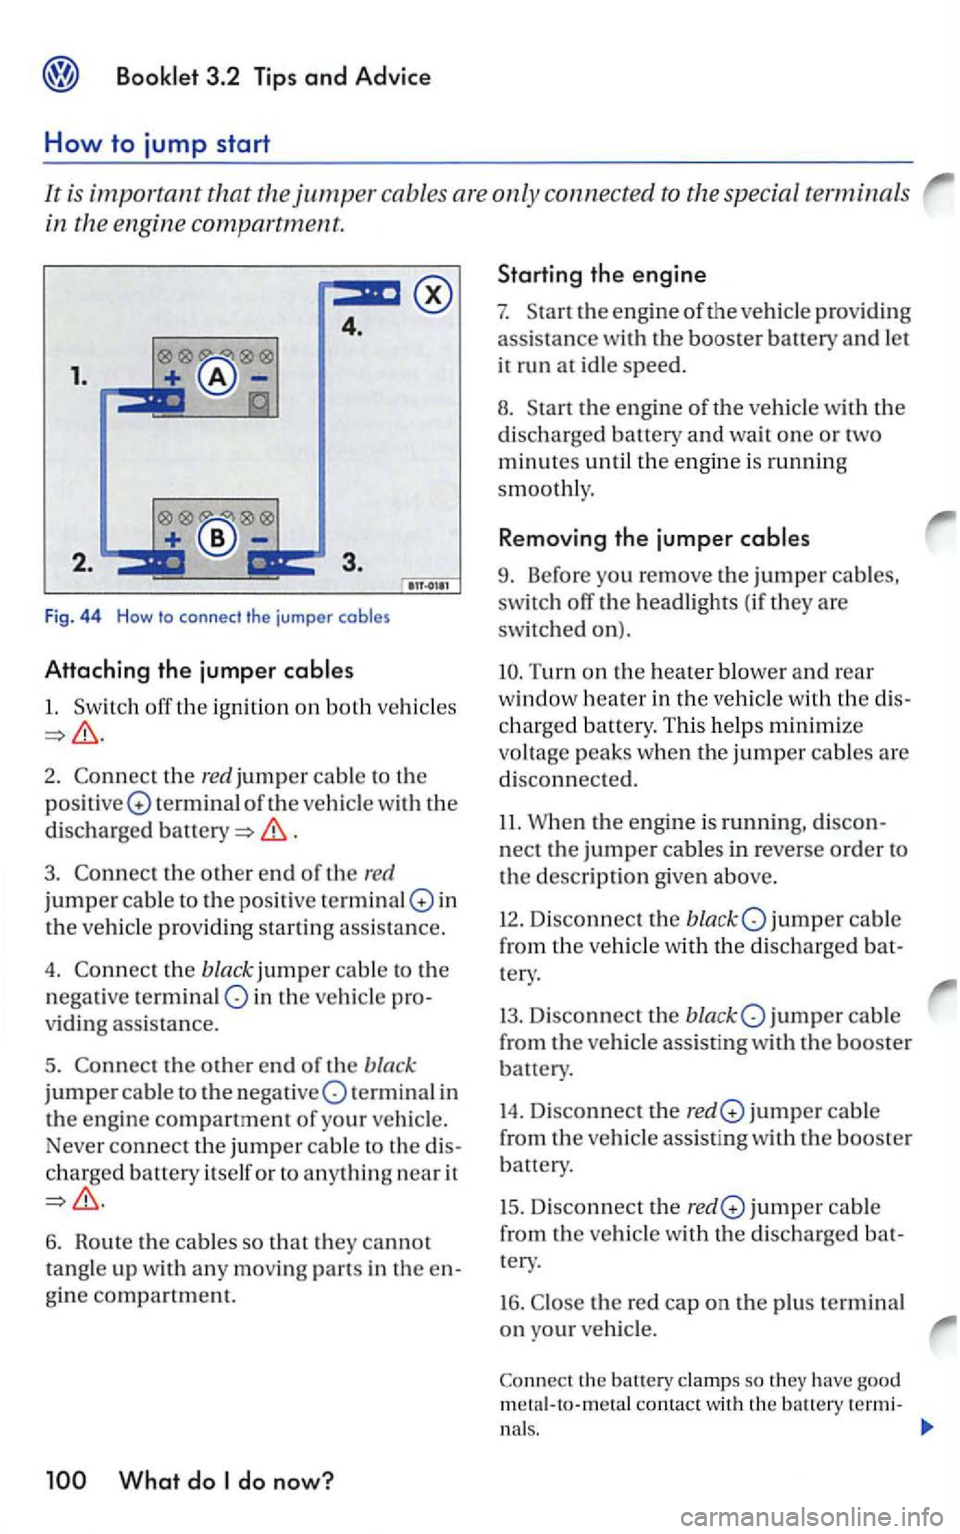
F ig. 44 How to connect the jumper cables
Attaching the jumper
1.
2. the red jumper cable to the
positi ve Q terminal of the vehicle with the
disch arg ed
.
3 . the other end of th e red
jumpe r cable to the posit ive terminal in
the veh icle providing startin g ass is ta n ce.
4. the black jumper ca ble to the
negative terminal in the vehic le
v idin g assistance.
5.
ch arged battery itself or to anything near it
6. Route the cables so that they cannot
tangle up with an y mo vin g parts in the
the engine of the vehicle with the
discharged battery and wait one or two
minutes until the engin e is running
s m
oothly.
Removing the jumper
9. Before you remove th e jumper cables,
switch off the headlights (if they are
switched on).
Turn on the heater blower and rear
window heater in the vehicl e with the
charged battery. This helps minimi ze
voltage peaks wh
en the jumper cables are
di sconnected.
11. Whe n the engine is running,
nect the jumper cables in r everse order to
the description given above.
12. Disconnect the jumper cable
fro m the vehicle with the di
scharged
jumper cable
from
the ve hicle assist ing with the booster
battery.
14. Disconn ect the jumper cabl e
from
the ve hicle assisting w ith the booste r
battery.
15. D isconnect the jumper ca ble
from the
vehicle with the discharged
th e re d cap on th e plu s te rminal
on your vehicle .
contact with the battery