Page 188 of 444
Booklet 3 .1 Controls and Equipment
Functio n lights & Vision
Factory setting This menu resets all of these functio ns to the original factory tings.
Back Heturn to the m enu.
Tips
The menus shown in the dis play depends o n ve hicle electronics and the options installed on
Applies to with sound system
Sound system menu
Fig. 13 Display in the instrument cluster:
gram appears.
- Sw itch the s
ound sys te m on
18 panel
your veh icle.lfyou arc not sure, your rized Volk swage n dea ler or qualified workshop
for
Fig. 14 Left side of the multi-function steering wheel with the controls for the telephone and the radio
-Press page 17, fig. 12 butto n
on th e multi -functio n steerin g wheel until
th e
Sound system menu is di splaye d
fig.l3 .
Changing the volume of the sound
syste m
-
to ns to ch ange the
Page 213 of 444

and Equipment
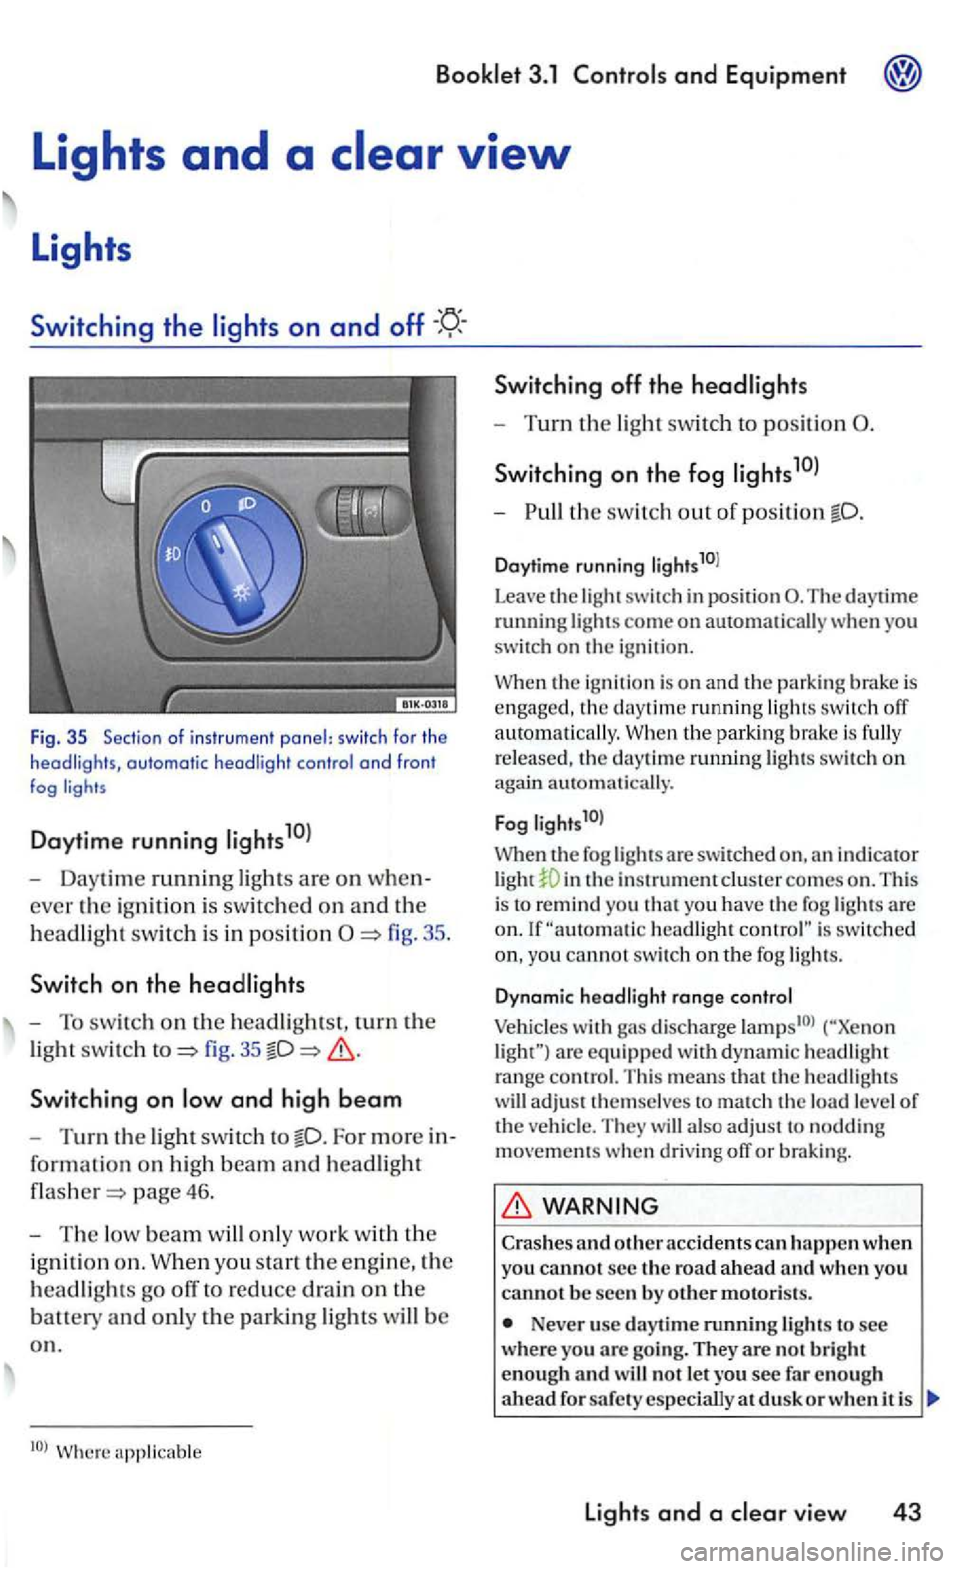
Fig . 35 Sec tio n of i nstr u m ent panel: switc h fo r th e headligh ts, automatic headli ght contro l a nd fron t fog
Daytime running
- Daytime running ligh ts are on when
ever the ig ni tio n i s sw itc hed on an d th e
h
eadlig ht swit c h i s in positi on
fig. 35
Switchin g on
For more in
for ma
tion on hig h beam an d headlight
page 46.
-The low beam w ill only work w it h th e
i g ni
tion o n . W hen you sta rt the e ngin e, the
h
eadlights go off to reduce drain on the
batt ety an d only th e parkin g lights will b e
o n .
Switching off th e headlights
- Turn the light swit ch to position
S wi tch ing on the fog
-th e switch out o f position
Daytime running li g hts10l
Leave
the light switch in posit ion The daytime running lights come on automatically you
switch on the igni tio n.
the ignition is o n and the parking brake is engaged , the daytime running ligh ts switch off
a uto m atically. the park in g bra ke is fully
r e leased , th e daytime ru nning lights swit c h on again automati cally.
F
og l ights1 0l
When th e fog lights a re swit ch ed in th e instrument clus te r comes on . This
i s to remind you t h at yo u have the fog lights are headlight is switc hed
yo u cannot switc h on th e fog ligh ts.
D ynam ic hea d light range co ntrol
Vehicles with gas discharge are eq uip ped w ith d yn am ic headlig h t range contro l. T his means that th e headlig hts
w ill adjust t hemselves to match th e load level of the ve hicl e. They will also ad ju st to noddin g movements when d riving off or braking.
WARNING
Crashes and o ther acc idents can h appen when you cannot s e c the ro a d a head and w hen you canno t b e seen by o th er motoris ts.
Never use day tim e running lights to see wher e you arc goi ng. They are no t b rig h t
enough an d w ill not le t you see fa r en o ug h
a head d usk o r w hen i t is
lights and a vie w 43
Page 214 of 444
Booklet 3.1 Controls and Equipment
Always tu rn on the headlights befo re dus k
a nd in rain or fog s o tha t you can sec a head and so that others can sec yo ur ve hicl e from the back.
yo u r em ove the key fro m the ign it io n lock
w ith th e lig h ts s o und
the orr.
Fig. 36 Se ction of the dosh ponel: control
Always observe loca l o rd in ances and
cool or dam p weather conditions th e light len ses can fog over temporarily .
The c ritical factor is ence between the i nterior and the ex terior of hea dlight le n s.
W ith the main bea ms swit c h ed on, area h oweve r edge s of th e glass may be fogge d. Th e rear lig h ts and turn signa ls
may also be affect e d.
T hi s physical phe nomeno n has no effect on lig htin g sys tem of you r
36 to
jus t the brig htn ess of the in strument
cluster lig h ting. The headligh ts must b e on
w h
en yo u d o this to adjus t the bri gh tness
o f the in strume nt
Page 215 of 444

3.1
Emergency switch
Use the eme1gency flasher del ete space to attention
your icle in cas e of an emerge ncy.
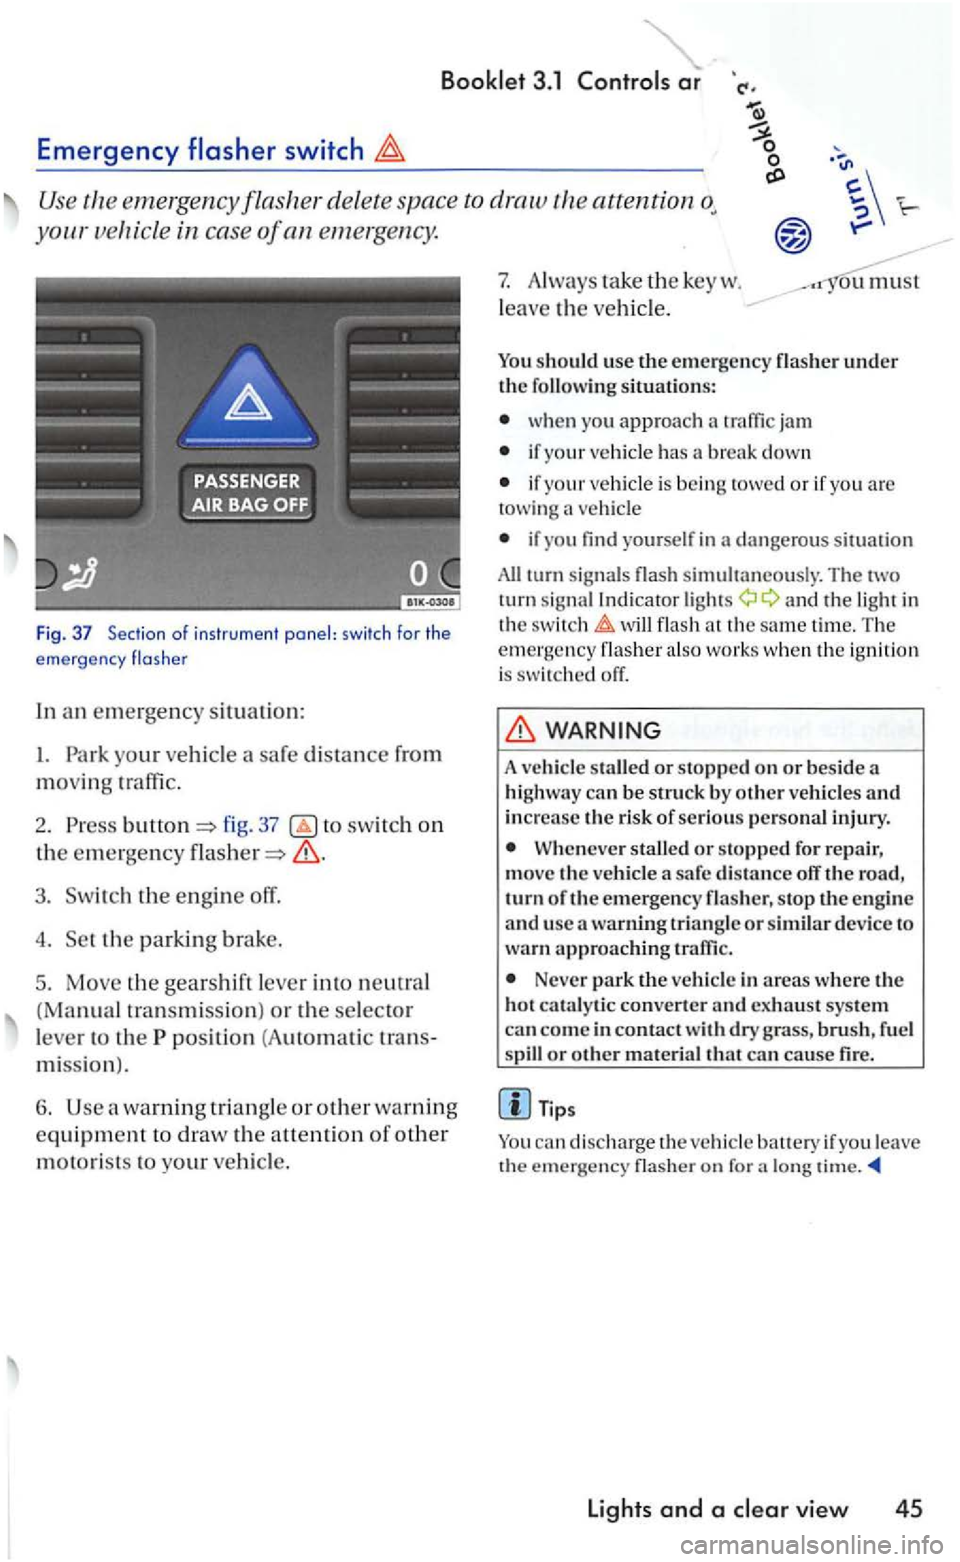
Fig. 37 Section o f ins trume nt panel: swi tch for the
e mergency flas he r
In an em ergen cy situation:
I. Park your vehicl e
fig. 37 switch on
the emergency
3. Switch the engine off.
4. Set the parkin g brake.
5. Move the gea rshift lever into neutral
(Manual tra nsmiss ion ) or the selector
l e ve r to the
position (A uto m ati c tran s
mi ssio n
).
6. Use warning tria ng le or other warning
equipme nt to draw the a uention of other
motorists to your vehicl e.
7. Always ta ke the key w .
l
eave the ve hicl e.
ou must
You should use th e e mergency
wh en you approach
if your vehicle has a break down
if your vehicle is bein g towed or if yo u are towing vehicl e
if yo u find yourself in dange ro us s ituation
All turn sig nal s simultaneously. Th e tw o
turn sig nal Indi cator a nd the light in
the t im e. Th e emergency also wo rk s w he n th e ig n ition is switch ed off.
WARNING
A vehicle staUed or stopp ed on or bes ide a
hi ghway can b e struck by o ther ve hicle s and increase the risk of se rious pe rso nal injury.
When eve r stalled or stopped for re pair,
mov e th e vehicle a safe dis ta n ce off the road, turn o f th e emerg ency flas her, s top the e n gin e
a nd usc a warning triangl e or similar device to wa rn ap proac hing traffic .
Never park the ve hicle in areas where the
hot cat a ly tic converter and exhaust syste m
can co me in contact dry grass , brush , f uel or othe r mate rial that can cause fire.
a lo ng
lights and a
Page 216 of 444

and Equipment
and high beam
signa l and high leve r also operates
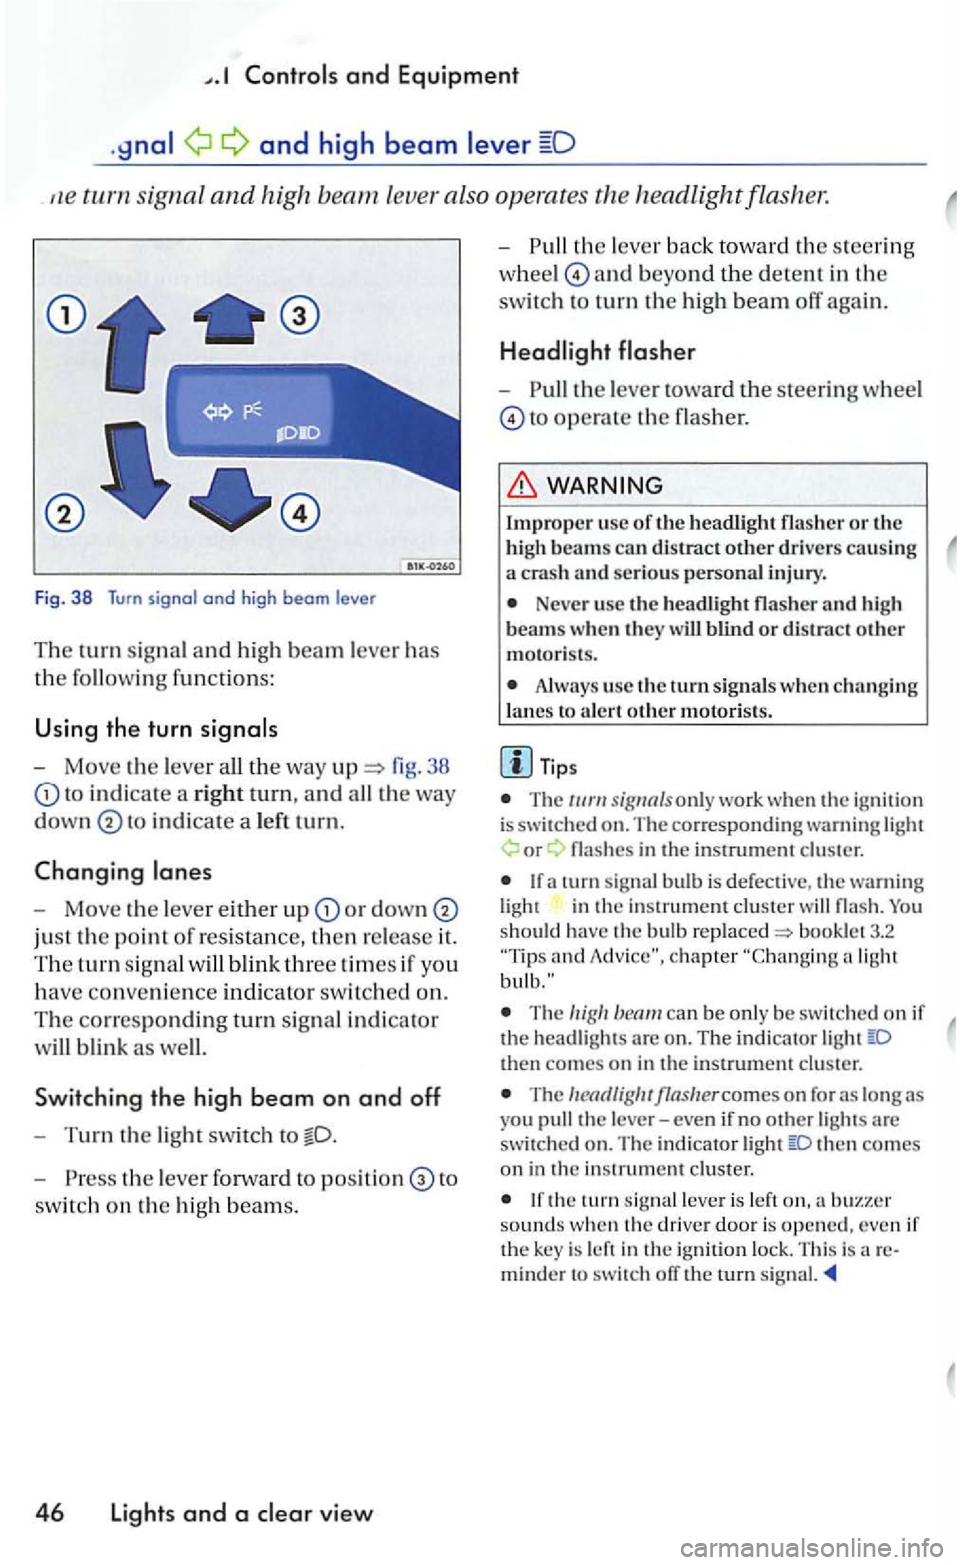
Fig. 38 Turn signal and high beam le ve r
Th e turn signal a n d hi gh beam lever has
the followin g functions:
U sing the turn
- Move the lever 38
to in d icate a rig ht tu rn, and
in dicate a le ft tu rn.
Changing
-Move the leve r either u p or down
just the point of resistance, then re lease it.
The tu rn sig n al
Sw itchin g the high b eam on and off
-Turn the light swit ch to
- P ress the lever forward to to
switc h on the hig h beam s.
4 6 Lights and a view
-th e lever back to wa rd th e s teering
w hee l
and beyond the dete n t in the
switc h to turn th e high beam off again.
-the lever toward the steeri ng wheel
to operate the flasher.
Impro per usc of th e headli ght flasher o r the
h igh beams can distract other drive rs causing a crash an d serious personal injury.
Neve r use the headli gh t flasher and h igh
beam s w hen th ey w ill blind o r distract other motoris ts .
Always use the turn s ig nals w hen ch a nging
l a nes to a le rt oth e r m otori sts .
T ips
T he only work whe n the ig nition is switched on. The co rre sponding warning or
in the in strument cluster
and
The can be only be sw itc hed on if the head ligh ts are o n . The indi cator then comes on in the instrument cluster.
The
then co mes on in the in strument cluster.
the tu rn leve r is left sounds w hen th e driver door is opened, even if the key is left in the ign ition lock. This is areminder to switch ofT the rurn signal.
Page 217 of 444
Bookle t 3.1 and Equipment
39 to select the lowing positions:
Doo r contact switch
door contac t swi tch is turned on. The front rear interior lights come on automatically as soon as you unlock the
seconds the doors are is locked or is o n. the interior are turned orr.
Front reading
th e on the rocker switch o n a front or rear interior The light will stay on.
light switched off
!h e sy mbol on the rocke r switc h to switch off a front or rear interior light.
Glove compartment ligh t
The light comes on
yo u the compartment.
Luggage compartment light
Th e light comes on au tomat ically when your open the rear lid and goes orr when you it.
Tips
doors
open, !he incerior orr after
is in
Switching on the reoding lights
to
switc h on !h e reading light.
Light s and a clear view 47
Page 218 of 444
and Equipment
Background
The background lighting lights control elements
fig. -arrows -the ignit io n and headlights
a re swit ch ed on. The cente r console is nated from above.
Rear interior
J
Switching on the reading
-the fig. 42 to swi tc h on
t h e read ing ligh t.
Switching off the reading
-the b utto n to switch off the
read ing
light.
Tips
the doo rs are n o t interio r
Fig . 42 Sec tion of roof : rear in te rior light and reading ligh ts
48 Lights and a view
lig hts go ofT after about minutes if the ig n ition is re m ove d and the door contact c ircuit is switched on. Thi s prevems th e
There are variou s versions of the rear interior reading ligh ts. dependin g on your m odel and its
Page 219 of 444

The su n viso r for th e drive r a nd the fro nt senger can be pulled out of its re taining clip in the of the vehicle and lUrned fig.
The mirrors in the sun viso rs have covers. yo u open the cover® . the light in
the com es on.
Tip s
Before you leave your vehicle , make sure that the make-up mirror cover in th e visor is closed.
the ignition key is re m oved, the light in the headliner goes out after about minutes.
This prevents th e
windshie ld wiper leve r operates both the windshield wip ers and
shield washing systems.
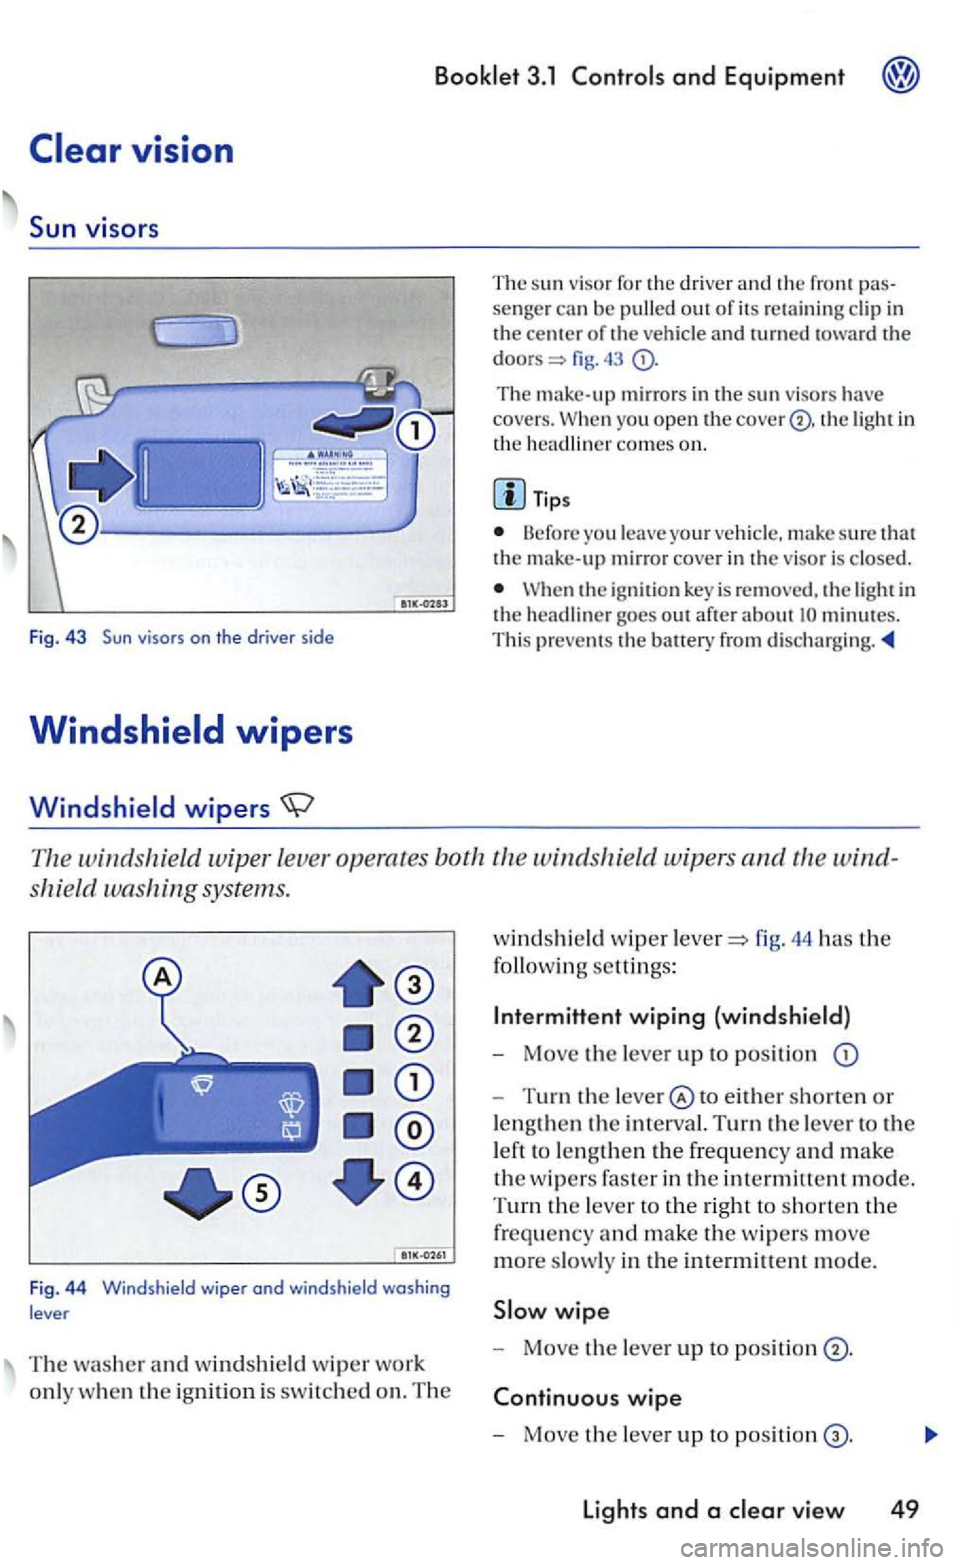
Fig . 4 4 Windshield wiper ond windshield washing
lever
T he washer and windshield w ip er wo rk
onl y w hen
the ignition is switch ed on. The
windshi eld wip er fig. 44 has the
following settings:
Inte rmittent wiping (windshield)
- Move the lever up to position
-Turn the to either shorten or
lengt hen
the in terval. Turn the lever to the
l eft to le n g
then the frequency and make
the w ipers faste r in the intermittent mode.
T
urn the lever to the right to shorten the
frequency and make the w ipers move
more slowly in the intermittent mode.
wipe
- Move the lever up to positi on
wipe
- Mo ve the lever up to positi on
Lights and a