Page 113 of 244
105
Ventilation
For best results, set controls to:Fan speed— Any setting except “OFF”
Temperature— Towards blue zone
Air intake—FRESH (outside air)
Air flow—PANEL
Air conditioning—OFF
Defogging
The inside of the windshield
For best results, set controls to:
Fan speed— Any setting except “OFF”
Temperature— Towards red zone to
heat; blue zone to cool
Air intake—FRESH (outside air)
Air flow—WINDSHIELD
�On humid days, do not blow cold air
on the windshield—the difference be-
tween the outside and inside tempera-
tures could make the fogging worse. Defrosting
The outside of the windshield
For best results, set controls to:
Fan speed— Any setting except “OFF”
Temperature— Towards red zone
Air intake—FRESH (outside air)
Air flow—WINDSHIELD
�To heat the vehicle interior while de-
frosting the windshield, choose
floor/windshield air flow.
To c l o s e
To open
If air flow control is not satisfactory, check
the side vents. The side vents may be
opened or closed as shown.
Side vents
Page 114 of 244
 106
The air conditioning filter information
label is placed on the inside of the
glove box as shown and indicates that
the filters have been installed.
The air conditioning filters prevent dust
from")
106
The air conditioning filter information
label is placed on the inside of the
glove box as shown and indicates that
the filters have been installed.
The air conditioning filters prevent dust
from entering the vehicle through the air
conditioning vent.
Air conditioning
filter No.1Air conditioning
filter No.2
The air conditioning filters are behind
the glove box. The air conditioning filters may clog
after long use. The filters may need to
be replaced if the air flow of the air
conditioning and heater experiences ex-
treme reductions in operating efficiency,
or if the windows become to fog up
easily in FRESH mode.
To maintain the air conditioning efficiency,
clean the air conditioning filters according
to the maintenance schedule. In dusty
areas or areas with heavy traffic flow,
such as inner city or desert areas, early
replacement may be required. (For sched-
uled maintenance information, please refer
to the “Scheduled Maintenance Guide” or
“Owner ’s Manual Supplement”.)
Air conditioning filters
(on some models)—
—Checking and cleaning the
air conditioning filters
Page 115 of 244
107
1. Remove the glove box from the in-strument panel.2. Pull out the air conditioning filtercase as shown in the illustration.3. Clean the filter No.1.
Blow the dust of the filter No.1 with com-
pressed air from the backside of the filter
No.1.
If it is dirty or torn, it should be replaced.
Page 116 of 244
108
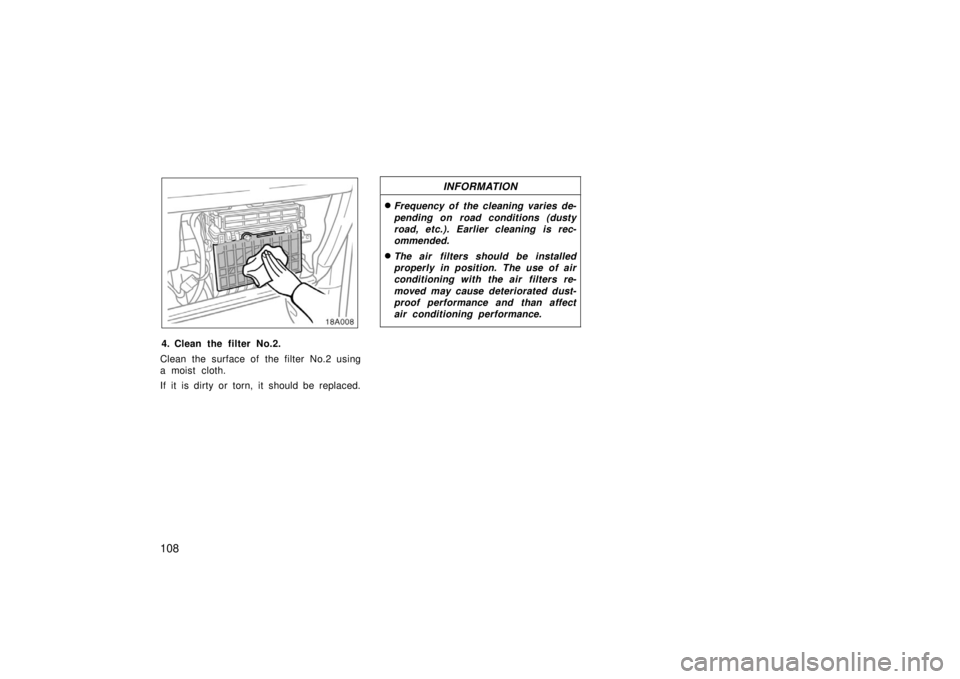
4. Clean the filter No.2.
Clean the surface of the filter No.2 using
a moist cloth.
If it is dirty or torn, it should be replaced.
INFORMATION
�Frequency of the cleaning varies de-
pending on road conditions (dusty
road, etc.). Earlier cleaning is rec-
ommended.
�The air filters should be installed
properly in position. The use of air
conditioning with the air filters re-
moved may cause deteriorated dust-
proof performance and than affect
air conditioning performance.
Page 144 of 244
 136Ti r e relat ed ter m
Meaning
Cold tire inflation pressure
tire inflation pressure when the vehicl
e has been parked for at leas t 3 hour s
or more, or it has not been driven more than 1.5 km or 1")
136Ti r e relat ed ter m
Meaning
Cold tire inflation pressure
tire inflation pressure when the vehicl
e has been parked for at leas t 3 hour s
or more, or it has not been driven more than 1.5 km or 1 mile under that
condition
Maximum inflation pressurethe maximum cold inflation pressure to which a tire may be inflated and it is
shown on the sidewall of the tire
Recommended inflation pressurecold tire inflation pressure recommended by a manufacturer
Accessory weight
the combined weight (in excess of those standard items which may be replaced)
of automatic transmission, power steering, power brakes, power windows, pow-
er seats, radio, and heater, to the extent that these items are available as
factory −installed equipment (whether installed or not)
Curb weight
the weight of a motor vehicle with standard equipment including the maximum
capacity of fuel, oil, and coolant, and, if so equipped, air conditioning and addi-
tional weight optional engine
Maximum loaded vehicle weight
t he sum of —
(a) curb weight;
(b) accessory weight;
(c) vehicle capacity weight; and
(d) production options weight
Normal occupant weight68 kg (150 lb.) times the number of occupants specified in the second column
of Table 1 that follows
—Glossary of tire terminology
Page 165 of 244
 157
5. Start your engine in the normal way.After starting, run it at about 2000 rpm
for several minutes with the accelerator
pedal lightly depressed.
6. Carefully disconnect the cables in the exact re")
157
5. Start your engine in the normal way.After starting, run it at about 2000 rpm
for several minutes with the accelerator
pedal lightly depressed.
6. Carefully disconnect the cables in the exact reverse order: the negative cable
and then the positive cable.
7. Carefully dispose of the battery cover cloths—they may now contain sulfuric
acid.
8. If removed, replace all the battery vent plugs.
If the cause of your battery discharging is
not apparent (for example, lights left on),
you should have it checked at your Scion
dealer.
If the first start attempt is not success-
ful...
Check that the clamp on the jumper
cables are tight. Recharge the discharged
battery with the jumper cables connected
for several minutes and restart your en-
gine in the normal way.
If the another attempt is not successful,
the battery may be depleted. Have it
checked at your Scion dealer. If your engine stalls while driving...
1. Reduce your speed gradually, keeping a straight line. Move cautiously off the
road to a safe place.
2. Turn on your emergency flashers.
3. Try starting the engine again.
If the engine will not start, see “If your
vehicle will not start” on page 154.
CAUTION
If the engine is not running, the pow-
er assist for the brakes and steering
will not work so steering and braking
will be much harder than usual.
If your vehicle overheats
If your high engine coolant temperature
warning light flashes to indicates over-
heating, if you experience a loss of
power, or if you hear a loud knocking
or pinging noise, the engine has prob-
ably overheated. You should follow this
procedure... 1. Pull safely off the road, stop the ve- hicle and turn on your emergency
flashers. Put the transmission in “P”
(automatic) or neutral (manual) and ap-
ply the parking brake. Turn off the air
conditioning if it is being used.
2. If coolant or steam is boiling out of the radiator or reservoir, stop the engine.
Wait until the steam subsides before
opening the hood. If there is no coolant
boiling over or steam, leave the engine
running and make sure the electric
cooling fan is operating. If it is not,
turn the ignition off.
CAUTION
To help avoid personal injury, keep
the hood closed until there is no
steam. Escaping steam or coolant is
a sign of very high pressure.
If your engine stalls while
driving
Page 166 of 244
 158
3. Look for obvious coolant leaks from theradiator, hoses, and under the vehicle.
However, note that water draining from
the air conditioning is normal if it has
been used.
CAUTION
When the engin")
158
3. Look for obvious coolant leaks from theradiator, hoses, and under the vehicle.
However, note that water draining from
the air conditioning is normal if it has
been used.
CAUTION
When the engine is running, keep
hands and clothing away from the
moving fan and engine drive belts.
4. If the coolant is leaking, stop the en-gine immediately. Call a Scion dealer
for assistance.
5. If there are no obvious leaks, check the coolant reservoir. If it is dry, add
coolant to the reservoir while the en-
gine is running. Fill it about half full.
CAUTION
Do not attempt to remove the radiator
cap when the engine and radiator are
hot. Serious injury could result from
scalding hot fluid and steam blown
out under pressure.
6. After the engine coolant temperaturehas cooled to normal, again check the
coolant level in the reservoir. If neces-
sary, bring it up to half full again. Seri-
ous coolant loss indicates a leak in the
system. You should have it checked as
soon as possible at your Scion dealer.
If you have a flat tire—
1. Reduce your speed gradually, keeping a straight line. Move cau-
tiously off the road to a safe place
well away from the traffic. Avoid
stopping on the center divider of
a highway. Park on a level spot
with firm ground.
2. Stop the engine and turn on your emergency flashers.
3. Firmly set the parking brake and put the transmission in “P” (auto-
matic) or reverse (manual).
4. Have everyone get out of the ve- hicle on the side away from traffic.
5. Read the following instructions thoroughly.
Page 188 of 244
 180
Vinyl interior
The vinyl upholstery may be easily
cleaned with a mild soap or detergent
and water.
First vacuum over the upholstery to re-
move loose dirt. Then, using a sponge or
soft cloth, appl")
180
Vinyl interior
The vinyl upholstery may be easily
cleaned with a mild soap or detergent
and water.
First vacuum over the upholstery to re-
move loose dirt. Then, using a sponge or
soft cloth, apply the soap solution to the
vinyl. After allowing it to soak in for a few
minutes to loosen the dirt, remove the dirt
and wipe off the soap with a clean damp
cloth. If all the dirt do not come off, re-
peat the procedure. Commercial foaming−
type vinyl cleaners are also available
which work well. Follow the manufacturer ’s
instructions.
NOTICE
Do not use solvent, thinner, gasoline
or window cleaner on the interior.
Carpets
Use a good foam�type shampoo to
clean the carpets.
Begin by vacuuming thoroughly to remove
as much dirt as possible. Several types of
foam cleaners are available; some are in
aerosol cans and others are powders or
liquids which you mix with water to pro-
duce a foam. To shampoo the carpets,
use a sponge or brush to apply the foam.
Rub in overlapping circles.
Do not apply water—the best results are
obtained by keeping the carpet as dry as
possible. Read the shampoo instructions
and follow them closely.
Seat belts
The seat belts may be cleaned with
mild soap and water or with lukewarm
water.
Use a cloth or sponge. As you are clean-
ing, check the belts for excessive wear,
fraying, or cuts.
NOTICE
� Do not use dye or bleach on the
belts—it may weaken them.
� Do not use the belts until they be-
come dry.
Windows
The windows may be cleaned with any
household window cleaner.
NOTICE
When cleaning the inside of the rear
window, be careful not to scratch or
damage the heater wires or connec-
tors.
Air conditioning control panel, instru-
ment panel, console panel, and
switches
Use a soft damp cloth for cleaning.
Soak a clean soft cloth in water or luke-
warm water then lightly wipe off dirt.
 105
Ventilation
For best results, set controls to:Fan speed— Any setting except “OFF”
Temperature— Towards blue zone
Air intake—FRESH (outside air)
Air flow—PANEL
Air conditioning—OF")
 107
1. Remove the glove box from the in-strument panel.2. Pull out the air conditioning filtercase as shown in the illustration.3. Clean the filter No.1.
Blow the dust of the filter No.1 with com-
p")