Page 226 of 527

’06 TUNDRA_U (L/O 0508)
214
2006 TUNDRA from Oct. ’06 Prod. (OM 34458U)
When parking, firmly apply the parking
brake to avoid inadvertent creeping.
Pedal type—
To set: Fully depress the parking brake
pedal. For better holding power, first de-
press the brake pedal and hold it while
setting the parking brake.
To release: Depress the parking brake
pedal once again.
Lever type—
To set: Pull out on the lever. For better
holding power, first depress the brake
pedal and hold it while setting the parking
brake.
To release: Press the lock release button
(1), turn the lever (2), then push it in (3).
To remind you that the parking brake is
set, the parking brake reminder light in
the instrument panel remains on until you
release the parking brake.
CAUTION
Before driving, be sure the parking
brake is fully released and the park-
ing brake reminder light is off.
The cruise control is designed to main-
tain a set cruising speed without requir-
ing the driver to operate the accelera-
tor. Cruising speed can be set to any
speed above 40 km/h (25 mph).
Within the limits of the engine’s capabili-
ties, cruising speed can be maintained up
or down grades. However, changes in ve-
hicle speed may occur on steeper grades.
CAUTION
�To help maintain maximum control
of your vehicle, do not use the
cruise control when driving in
heavy or varying traffic, or on slip-
pery (rainy, icy or snow�covered) or
winding roads.
�Avoid vehicle speed increases when
driving downhill. If the vehicle
speed is too fast in relation to the
cruise control set speed, cancel the
cruise control then downshift the
transmission to use engine braking
to slow down.
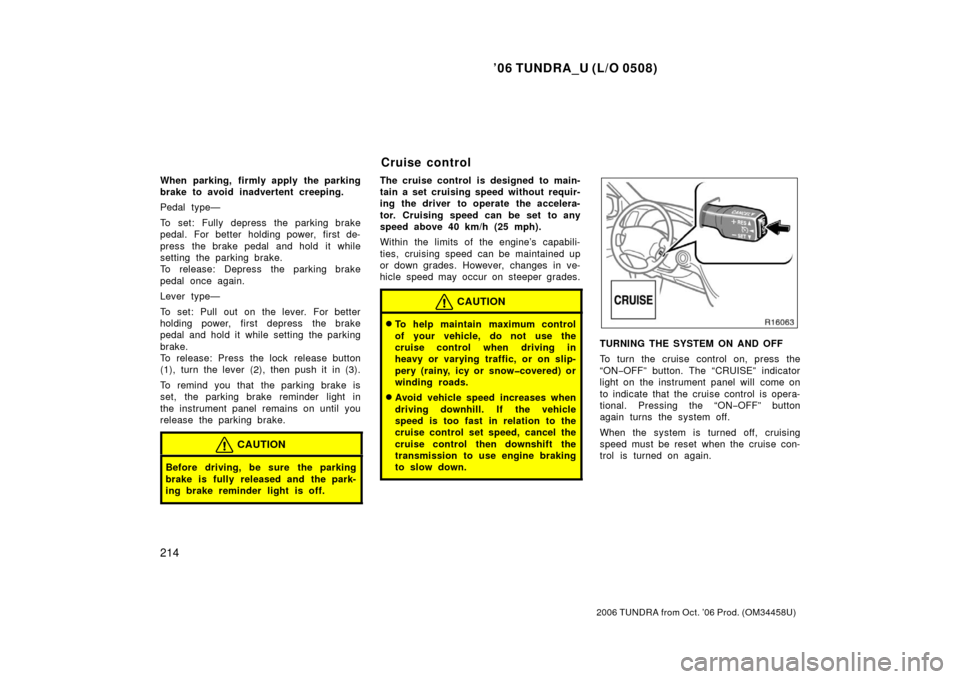
TURNING THE SYSTEM ON AND OFF
To turn the cruise control on, press the
“ON−OFF” button. The “CRUISE” indicator
light on the instrument panel will come on
to indicate that the cruise control is opera-
tional. Pressing the “ON −OFF” button
again turns the system off.
When the system is turned off, cruising
speed must be reset when the cruise con-
trol is turned on again.
Cruise control
Page 251 of 527
’06 TUNDRA_U (L/O 0508)
239
2006 TUNDRA from Oct. ’06 Prod. (OM 34458U)
TYPE (Program Types)
When you push the “TYPE” button while
receiving an RDS station, the current pro-
gram type appears on the display.
Each time you push this button, the pro-
gram type changes as in the following:
�ROCK
�EASY LIS (Easy listening)
�CLS/JAZZ (Classical music and Jazz)
�R&B (Rhythm and Blues)
�INFORM (Information)
�RELIGION
�MISC (Miscellaneous)
�ALERT (Emergency message)
Page 257 of 527
’06 TUNDRA_U (L/O 0508)
245
2006 TUNDRA from Oct. ’06 Prod. (OM 34458U)
CONTROLLER HOLDER
The controller can be stowed in the
holder when it is not in use. The holder
can be hooked on the back of the driv-
er ’s or front passenger ’s seatback.
CAUTION
To reduce the chance of injury in
case of an accident or a sudden stop
while driving, stow the controller in
the holder when it is not in use.
NOTICE
Do not leave the controller exposed
to high temperatures (such as on the
instrument panel) for a long time,
otherwise the controller may be dam-
aged.
Page 259 of 527

’06 TUNDRA_U (L/O 0508)
247
2006 TUNDRA from Oct. ’06 Prod. (OM 34458U)
Cassette tape player
This button has the following features—
To fast forward or reverse:
Push and hold the “
” (TUNE/TRACK)
button until “FF” will appears on the dis-
play to forward a tape. Push and hold the
“
” (TUNE/TRACK) button until “REW”
appears on the display to rewind a tape.
To stop the tape while it is fast forward-
ing, push the “
” (TUNE/TRACK) button.
To stop the tape while it is rewinding,
push the “
” (TUNE/TRACK) button.
If a tape rewinds completely, the cassette
player will stop and then play that same
side. If a tape fast forwards completely,
the cassette will play the other side of the
tape using the auto −reverse feature.
To skip up or down to locate a song or
recording:
You can select up to nine recordings (in-
cluding current one).
Push the “
” or “” (TUNE/TRACK) but-
ton. “FF 1” or “REW 1” will appear on the
display.
Next, push either side of the track button
until the number on the display reaches
the number of tracks you want to skip. If
you push the button 10 times, the skip
feature will be turned off. For the skip feature to work correctly a
blank space of at least 3 seconds is con-
sidered to be a start of a recording.
When a beginning of a tape is reached,
the player automatically resumes play.
When the end of the tape is reached, the
player automatically reverses sides and
resumes normal play.
In addition, the feature may not work well
with some spoken, live, or classical re-
cordings.
Compact disc player
This button has the following features—
To skip up or down to a different track:
Push the “
” or “” (TUNE/TRACK) but-
ton until the number of the track you want
to listen to appears on the display. If you
want to return to the beginning of the
current track, quickly push the “
”
(TUNE/TRACK) button one time.
To fast forward or reverse:
Push and hold the “
” or “” (TUNE/
TRACK) button to fast forward or reverse
within a compact disc. When you release
the button, the compact disc player will
resume playing. 3. “ON/SOURCE” button
Push “ON/SOURCE” button to turn on the
rear seat audio system.
Use “ON/SOURCE” button to select an
audio mode when the rear seat audio sys-
tem is on. Each time you push this but-
ton, the system changes between the ra-
dio, cassette player and compact disc
player.
When you change the mode, the display
indicates which mode is selected.
When a cassette tape and compact discs
are not loaded in the front audio system,
only a radio mode can be selected in the
rear seat audio system.
If you push “ON/SOURCE” button to se-
lect the casette tape player mode or com-
pact disc player mode in that case, a
beep sounds from front audio system and
“INVALID” flashes on the screen for 6
seconds, and then the rear audio system
returns to the radio mode.
If you push “ON/SOURCE” button while
receiving an emergency broadcast, a beep
sounds and “INVALID” appears on the
screen to indicate that no button can be
operated.
Page 265 of 527
’06 TUNDRA_U (L/O 0508)
253
2006 TUNDRA from Oct. ’06 Prod. (OM 34458U)
To open the display, push the lock release
button.Push down the display to the desired
angle.
NOTICE
The screen should be cleaned with a
dry soft cloth. If the screen is pushed
by hand or wiped with a hard cloth,
the surface of the screen may be
scratched.
To close, push up the display until you
hear a click.
The illumination of the screen is automati-
cally turned off when the display is
closed. However, the rear seat entertain-
ment system is not turned off.
CAUTION
To reduce the chance of injury in
case of an accident or sudden stop
while driving, close the display when
it is not in use.
—Display
Page 267 of 527
’06 TUNDRA_U (L/O 0508)
255
2006 TUNDRA from Oct. ’06 Prod. (OM 34458U)
USING THE CONTROLLER
To use the rear seat entertainment sys-
tem controller, direct the signal output
portion of the controller to the signal
reception portion of the rear seat enter-
tainment system display.
The controller does not operate properly
when the signal reception portion of the
display is exposed to direct sunlight.
Block the display from direct sunlight.
NOTICE
Observe the followings, otherwise the
controller may be damaged.
�Do not drop or strongly knock the
controller against hard objects.
� Do not sit on or place heavy ob-
jects on the controller.CONTROLLER HOLDER
The controller can be stowed in the
holder when it is not in use. The holder
can be hooked on the back of the driv-
er ’s or front passenger ’s seatback.
CAUTION
To reduce the chance of injury in
case of an accident or a sudden stop
while driving, stow the controller in
the holder when it is not in use.
Page 278 of 527

’06 TUNDRA_U (L/O 0508)
266
2006 TUNDRA from Oct. ’06 Prod. (OM 34458U)
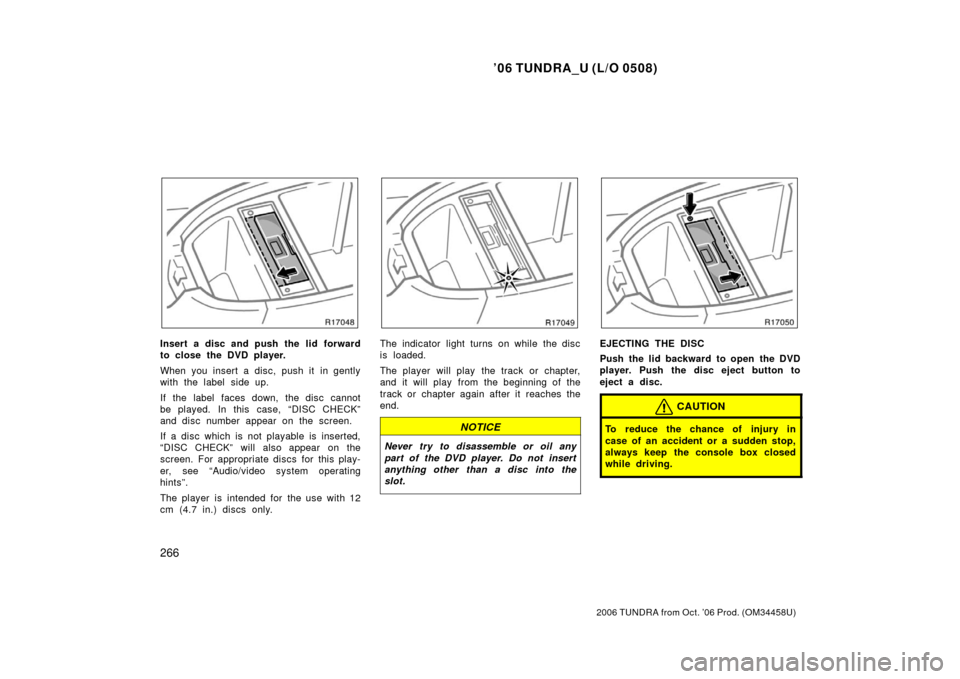
Insert a disc and push the lid forward
to close the DVD player.
When you insert a disc, push it in gently
with the label side up.
If the label faces down, the disc cannot
be played. In this case, “DISC CHECK”
and disc number appear on the screen.
If a disc which is not playable is inserted,
“DISC CHECK” will also appear on the
screen. For appropriate discs for this play-
er, see “Audio/video system operating
hints”.
The player is intended for the use with 12
cm (4.7 in.) discs only.The indicator light turns on while the disc
is loaded.
The player will play the track or chapter,
and it will play from the beginning of the
track or chapter again after it reaches the
end.
NOTICE
Never try to disassemble or oil any
part of the DVD player. Do not insert
anything other than a disc into the
slot.
EJECTING THE DISC
Push the lid backward to open the DVD
player. Push the disc eject button to
eject a disc.
CAUTION
To reduce the chance of injury in
case of an accident or a sudden stop,
always keep the console box closed
while driving.
Page 283 of 527

’06 TUNDRA_U (L/O 0508)
271
2006 TUNDRA from Oct. ’06 Prod. (OM 34458U)
To turn off the switches on the screen,
push the “CURSOR” button on the control-
ler once again or push the “Hide Keys” on
the screen. NOTE:
The playback condition of some
DVD video discs may be determined by
a DVD video software producer. This
DVD player plays a disc as the software
producer intended. So, some functions
may not work properly. Be sure to read
the instruction manual for the DVD vid-
eo disc separately provided. For de-
tailed information about DVD video
discs, see “—DVD video disc informa-
tion” in this Section.
Precautions for DVD video discs
When recording on a DVD video, DVD
audio, video CD or audio tracks may not
record in some cases while the menu is
displayed. As audio will not play in this
case, verify that the video tracks are play-
ing and then activate playback.
When playback of a disc is completed:
�If an audio CD is playing, the first
track starts.
�If a DVD video, DVD audio or video
CD is playing, playback will stop or the
menu screen will be displayed.
The title/chapter number and playback
time display may not appear while playing
back certain DVD video discs.
CAUTION
Conversational speech on some DVDs
is recorded at a low volume to em-
phasize the impact of sound effects.
If you adjust the volume assuming
that the conversations represent the
maximum volume level available for
the DVD, you may be startled by
louder sound effects or when you
change to a different audio source.
Loud sounds may have a significant
impact on the human body or pose a
driving hazard. Keep this in mind
when you adjust the volume.
—DVD player operation (DVD
video/DVD audio)