Page 93 of 455

93
�On vehicles with side airbags and
curtain shield airbags, do not allow
the child to lean his/her head or
any part of his/her body against the
door or the area of the seat, front
or rear pillar or roof side rail from
which the side airbags or curtain
shield airbags deploy even if the
child is seated in the child restraint
system. It is dangerous if the side
airbag and curtain shield airbag in-
flate, and the impact could cause
death or serious injury to the child.
22p036f
�Do not install a child restraint sys-
tem on the rear seat if it interferes
with the lock mechanism of the
front seats. Otherwise, the child or
front seat occupant(s) may be killed
or seriously injured in case of sud-
den braking or a collision.
�If the driver ’s seat position does
not allow sufficient space for safe
installation, install the child re-
straint system on the rear right
seat.
22p046c
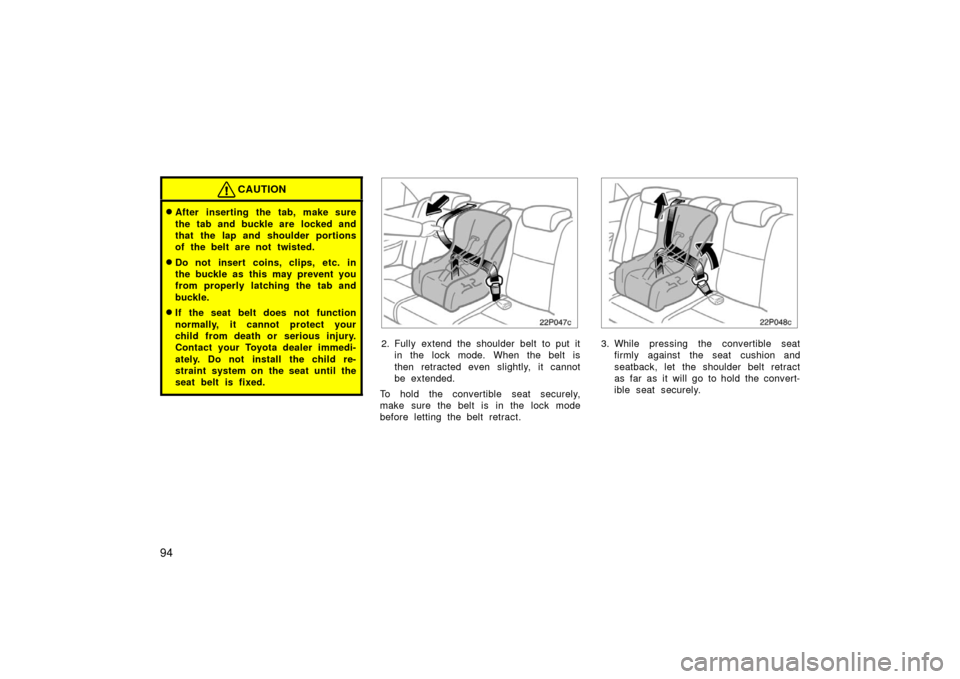
1. Run the lap and shoulder belt throughor around the convertible seat following
the instructions provided by its
manufacturer and insert the tab into
the buckle taking care not to twist the
belt. Keep the lap portion of the belt
tight.
Page 94 of 455
94
CAUTION
�After inserting the tab, make sure
the tab and buckle are locked and
that the lap and shoulder portions
of the belt are not twisted.
�Do not insert coins, clips, etc. in
the buckle as this may prevent you
from properly latching the tab and
buckle.
�If the seat belt does not function
normally, it cannot protect your
child from death or serious injury.
Contact your Toyota dealer immedi-
ately. Do not install the child re-
straint system on the seat until the
seat belt is fixed.
22p047c
2. Fully extend the shoulder belt to put itin the lock mode. When the belt is
then retracted even slightly, it cannot
be extended.
To hold the convertible seat securely,
make sure the belt is in the lock mode
before letting the belt retract.
22p048c
3. While pressing the convertible seat firmly against the seat cushion and
seatback, let the shoulder belt retract
as far as it will go to hold the convert-
ible seat securely.
Page 97 of 455

97
CAUTION
�Always make sure the shoulder belt
is positioned across the center of
child’s shoulder. The belt should be
kept away from child’s neck, but
not falling off child’s shoulder.
Otherwise, the child may be killed
or seriously injured in case of sud-
den braking or a collision.
�Both high�positioned lap belts and
loose�fitting belts could cause
death or serious injuries due to
sliding under the lap belt during a
collision or other unintended event.
Keep the lap belt positioned as low
on a child’s hips as possible.
�For child’s safety, do not place the
shoulder belt under child’s arm.
�After inserting the tab, make sure
the tab and buckle are locked and
that the lap and shoulder portions
of the belt are not twisted.
�Do not insert coins, clips, etc. in
the buckle as this may prevent you
from properly latching the tab and
buckle.
�If the seat belt does not function
normally, it cannot protect your
child from death or serious injury.
Contact your Toyota dealer immedi-
ately. Do not install the child re-
straint system on the seat until the
seat belt is fixed.
22p050b
2. To remove the booster seat, press the buckle release button and allow the
belt to retract.
Page 98 of 455
98
— U sin g a to p st rap
22p055c
Follow the procedure below for a child
restraint system that requires the use
of a top strap.
22p056e
Anchor brackets
Symbol
Use the anchor brackets on the back of
the rear seatback to attach the top strap.
Anchor brackets are installed for each
rear seating position.
This symbol indicates the location of the
anchor brackets.
22p063b
TO USE THE ANCHOR BRACKET:1. Remove the luggage cover (see “Luggage cover” on page 314.) and
raise the head restraint to the upper-
most lock position.
Page 101 of 455

101
CHILD RESTRAINT SYSTEM INSTALLA-
TION1. Widen the gap between the seat cushion and seatback slightly and
confirm the position of the lower an-
chorages below the symbol in the
seatback.
2. Type A—Latch the hooks of lower straps onto the anchorages and
tighten the lower straps.
Type B—Latch the buckles onto the
anchorages.
For owners in Canada
The symbol on a child restraint system
indicates the presence of a lower connec-
tor system.
If your child restraint system has a top
strap, it should be anchored. (For the
installation of the top strap, see “—Using
a top strap” on page 98.) For installation details, refer to the instruc-
tion manual equipped with each product.
CAUTION
�When using the lower anchorages
for the child restraint system, be
sure that there are no irregular ob-
jects around the anchorages or that
the seat belt is not caught.
�Push and pull the child restraint
system in different directions to be
sure it is secure. Follow all the
installation instructions provided by
its manufacturer.
�Do not install a child restraint sys-
tem on the rear seat if it interferes
with the lock mechanism of the
front seats. Otherwise, the child or
front seat occupant(s) may be killed
or seriously injured in case of sud-
den braking or a collision.
Page 104 of 455

104
22p058f
To change the steering wheel angle,
hold the steering wheel, push down the
lock release lever, tilt the steering
wheel to the desired angle and push
the lever up to lock the steering wheel
in position.
CAUTION
�Do not adjust the steering wheel
while the vehicle is moving. Doing
so may cause the driver to mishan-
dle the vehicle and an accident may
occur resulting in death or serious
injuries.
�After adjusting the steering wheel,
try moving it up and down to make
sure it is locked in position.
When you move the steering wheel, an
electrical motor noise may be heard. This
is the power steering motor noise, and is
not a malfunction.
22p059a
Adjust the mirror so that you can just
see the side of your vehicle in the mir-
ror.
Be careful when judging the size or dis-
tance of any object seen in the outside
rear view mirror on the passenger ’s side
because it is a convex mirror. Any object
seen in a convex mirror will look smaller
and farther away than when seen in a flat
mirror.
When you touch the rear window defogger
switch, the heater panels in the outside
rear view mirrors will quickly clear the
mirror surface. (See “Rear window and
outside rear view mirror defoggers” on
page 118.)
Tilt steering wheelOutside rear view mirrors—
Page 110 of 455

11 0
23p137a
HEADLIGHTS
To turn on the following lights: Twist
the headlight/turn signal lever knob.
Position 1—Parking, tail, license plate,
side marker and instrument panel lights
Position 2—Headlights and all of the
above
Position 3 (“AUTO”)—Headlights and/or all
of the lights in position 1
They automatically turn on or off depend-
ing on the darkness of the surroundings.*
Manually twist the knob to the position 2
to turn on the headlights if they are need-
ed immediately when entering a dark tun-
nel, parking structure, etc.NOTE: *The operating condition or sensi-
tivity can be changed. Ask your Toyota
dealer for details.
23p124_1
The automatic light control sensor is on
the top of the driver’s side instrument
panel.
Do not place anything on the instrument
panel, and/or do not affix anything on the
windshield to block this sensor.
Automatic light cut off system
The lights automatically turn off when the
driver ’s door is opened with the hybrid
system off. To turn them on again, press
the “POWER” switch twice from the off
setting to select the “IG
−ON” mode with-
out depressing the brake pedal or actuate
the headlight switch. If you are going to
park for over one week, make sure the
headlight switch is off.
Headlights and turn signals
(with automatic light control system)
Page 115 of 455

11 5
23p111
To turn on the fog lights, twist the
band of the headlight switch lever to
the position of the fog light. The fog
lights come on only when the head-
lights are on low beam.
The band automatically returns to the
“OFF” position after you release it.
23p126
Front
Rear
To turn on the interior light, slide the
switch.
The interior light switch has the following
positions:
“ON”—Keeps the light on all the time.
“OFF”—Turns the light off.
“DOOR”—Turns the light on when any
door is opened. The light remains on for
15 seconds when all the doors are closed.
ILLUMINATED ENTRY SYSTEM
With the switch in the “DOOR” position,
the light comes on when any of the doors
is opened or when you get close to the
front door, carrying the smart key. After all
the doors are closed, the light remains on
for about 15 seconds and then fades out.
However, in the following cases, the light
goes off immediately.
�All the doors are closed when the hy-
brid system is in “ACC” or “IG−ON”.
�All the doors are closed and locked.
When all the doors are unlocked, the light
comes on for about 15 seconds and then
fades out, even if the door is not opened.
Front fog lights
(some models) Interior lights