Page 170 of 428

’06 HIGHLANDER_U (L/O 0508)
160
LOW TIRE PRESSURE WARNING LIGHT
This light comes on when the ignition key
is turned to the “ON” position. It goes off
after a few seconds. This indicates that
the tire pressure warning system is func-
tioning properly.
If the low tire pressure warning light
comes on or blinks while driving, do
the following. If the warning light comes on:
1. Adjust the tire inflation pressure to the specified level as soon as pos-
sible. (See “Tires” on page 408 in
Section 8.)
2. Push the tire pressure warning sys- tem reset switch for a few seconds
and make sure the warning light
goes off.
If the light remains on after the reset
switch has been pushed, have the tire
pressure warning system checked at your
Toyota dealer.
If you have a flat tire, replace it with the
spare tire. For details, see “If you have
a flat tire” on page 337 in Section 4.
If the warning light blinks once every
second:
The low tire pressure warning system may
be malfunctioning. Contact your Toyota
dealer.
If the warning light blinks twice every
second:
The low tire pressure warning system
needs to be initialized. Reset the system
with the tire pressure warning system re-
set switch. (To reset the system, see
“TIRE PRESSURE WARNING SYSTEM
RESET SWITCH”.) The tire pressure warning system does
not function properly under certain cir-
cumstances. In the following cases, the
low tire pressure warning light may not
come on even if the tire inflation pres-
sure is low, or it may come on when
the tire inflation pressure is actually
normal.
�A compact spare tire, snow tires, or
tire chains are used.
�The tire inflation pressure is excessive-
ly higher than specified, or tire inflation
pressure suddenly drops due to burst-
ing or other causes.
�The vehicle is driven on a slippery
road surface such as rough or frozen
roads.
�The vehicle speed is less than 30 km/h
(19 mph) or more than 100 km/h (62
mph), and the driving duration is less
than 5 minutes.
�The tires differ in tread pattern or
manufacturer.
�The tires are not the specified size.
�The tread wear is very different among
the installed tires.
�Rapid acceleration/deceleration or
sharp turns is continued.
�Towing a trailer.
Page 348 of 428

’06 HIGHLANDER_U (L/O 0508)
338�
Make sure to set the jack prop-
erly in the jack point. Raising
the vehicle with jack improper-
ly positioned will damage the
vehicle or may allow the ve-
hicle to fall off the jack and
cause personal injury.
� Never get under the vehicle
when the vehicle is supported
by the jack alone.
� Use the jack only for lifting
your vehicle during wheel
changing.
� Do not raise the vehicle with
someone in the vehicle.
� When raising the vehicle, do
not place any objects on top
of or underneath the jack.
� Raise the vehicle only high
enough to remove and change
the tire.
NOTICE
Do not continue driving with a
deflated tire. Driving even a
short distance can damage a
tire and wheel beyond repair.
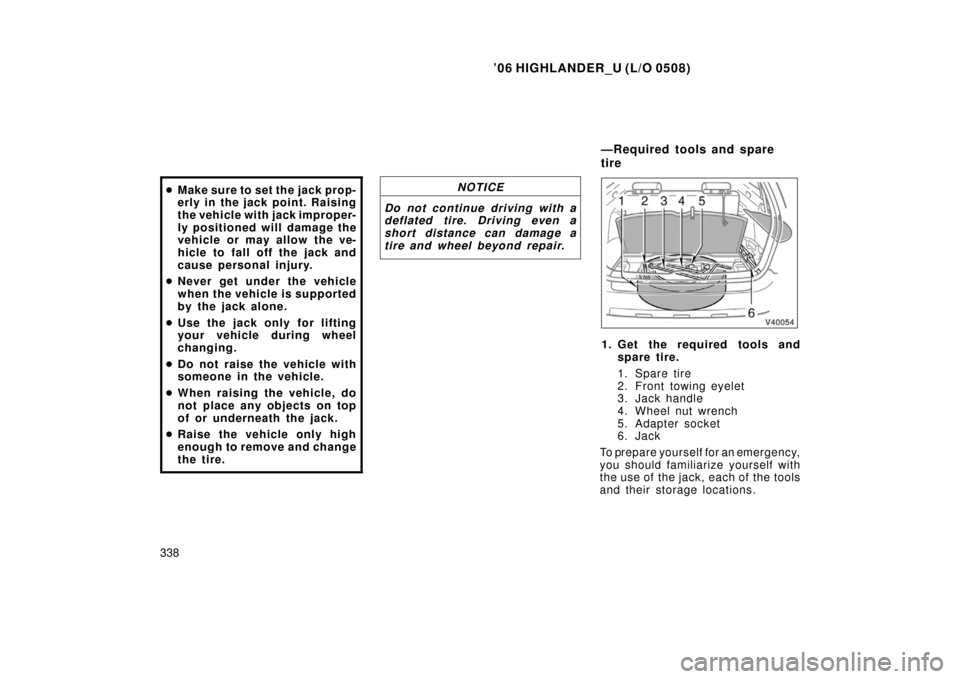
1. Get the required tools and
spare tire.
1. Spare tire
2. Front towing eyelet
3. Jack handle
4. Wheel nut wrench
5. Adapter socket
6. Jack
To prepare yourself for an emergency,
you should familiarize yourself with
the use of the jack, each of the tools
and their storage locations.
— R eq u ired to o ls an d sp are
tire
Page 350 of 428
’06 HIGHLANDER_U (L/O 0508)
340
To detach the spare tire:
1. Vehicles with aluminium wheels— Remove the inside spare tire cov-
er by turning it counterclockwise.2. Pull the strap and open the centerdeck board.3. Vehicles with third seat—
If the third seat is upright, hang
the center deck board on the
right −side head restraint.
Page 351 of 428
’06 HIGHLANDER_U (L/O 0508)
341
4. Remove the cover as shown in the
illustration.5. Put the adapter socket (for remov-ing a spar e tir e) on the spar e tir e
clamp bolt.6. Threading the jack handle throughthe adapter socket, turn the jack
handle counterclockwise. Contin-
ue until the spare tire is lowered
completely to the ground.
Page 352 of 428
’06 HIGHLANDER_U (L/O 0508)
342
7. Pull out the spare tire and stand
it up against the bumper.8. Remove the holding bracket.
Vehicles with aluminium wheels—
Remove the spare tire cover.2. Block the wheel diagonally op-posite the flat tire to keep the
vehicle from rolling when it is
jacked up.
When blocking the wheel, place a
wheel block in front of one of the front
wheels or behind one of the rear
wheels.
—Blocking the wheel
Page 354 of 428
’06 HIGHLANDER_U (L/O 0508)
344
CAUTION
Never use oil or grease on the
bolts or nuts. The nuts may loose
and the wheels may fall off,
which could cause a serious ac-
cident.
5. Position the jack at the correct
jack point as shown.
Make sure the jack is positioned on
a level and solid place.6. After making sure that no one is in the vehicle, raise it high
enough so that the spare tire
can be installed.
Remember you will need more ground
clearance when putting on the spare
tire than when removing the flat tire.
To raise the vehicl e, insert the jack
handle into the jack (it is a loose fit)
and turn it clockwise. As the jack
touches the vehicle and begins to lift,
double −check that it is properly posi-
tioned.
—Positioning the jack —Raising your vehicle
Page 355 of 428
’06 HIGHLANDER_U (L/O 0508)
345
CAUTION
Never get under the vehicle when
the vehicle is supported by the
jack alone.
7. Remove the wheel nuts and
change tires.
Lift the flat tire straight off and put it
aside.
Roll the spare wheel into position and
align the holes in the wheel with the
bolts. Then lift up the wheel and get
at least the top bolt started through
its hole. Wiggle the tire and press it
back over the other bolts.Before putting on wheels, remove any
corrosion on the mounting surfaces
with a wire brush or such. Installation
of wheels without good metal− to−met-
al contact at the mounting surface can
cause wheel nuts to loosen and
eventually cause a wheel to come off
while driving.
—Changing wheels
Page 358 of 428

’06 HIGHLANDER_U (L/O 0508)
348 11. Check the air pressure of the re-
placed tire.
Adjust the air pressu re to the specifi-
cation designated on page 408 in
Section 8. If the pressure is lower,
drive slowly to the nearest service
station and fill to the correct pressure.
Do not forget to reinstall the tire infla-
tion valve cap as dirt and moisture
could get into th e valve core and
possibly cause air leakage. If the cap
is missing, have a new one put on as
soon as possible.
12.Restow all the tools, jack and flat tire securely.
As soon after changing wheels as
possible, tighten the wheel nuts to the
torque specified on page 408 in Sec-
tion 8 with a torque wrench. Have a
technician repair the flat tire and re-
place the spare tire with it.
Initial adjustment of the tire pres-
sure warning system is necessary
after you have replaced your tires
or wheels. See “Tire pressure
warning system” on page 159 in
Section 1�7.
CAUTION
Before driving, make sure all the
tools, jack and flat tire are se-
curely in place in their storage
location to reduce the possibility
of personal injury during a colli-
sion or sudden braking.
If your vehicle becomes stuck in snow,
mud, sand, etc., then you may attempt
to rock the vehicle free by moving it
forward and backward.
Two�wheel drive models—
Turn off the traction control system to
become unstuck to allow the tires to
spin enough to remove the vehicle from
the obstruction. (For details, see “Trac-
tion control system (two�wheel drive
models)” on page 154 in Section 1�7.)
CAUTION
Do not attempt to rock the vehicle
free by moving it forward and back-
ward if people or objects are any-
where near the vehicle. During the
rocking operation the vehicle may
suddenly move forward or backward
as it becomes unstuck, causing injury
or damage to nearby people or ob-
jects.
—After changing wheels If your vehicle becomes stuck