Page 59 of 428
’06 HIGHLANDER_U (L/O 0508)
49
�Avoid reclining the seatback any
more than needed. The seat belts
provide maximum protection in a
frontal or rear collision when the
passengers are sitting up straight
and well back in the seats. If you
are reclined, the lap belt may slide
past your hips and apply restraint
forces directly to the abdomen or
your neck may contact the shoulder
belt. In the event of a frontal colli-
sion, the more the seat is reclined,
the greater the risk of death or per-
sonal injury.
�After adjusting the seatback, push
your body back against the seat to
make sure the seat is locked in
position.
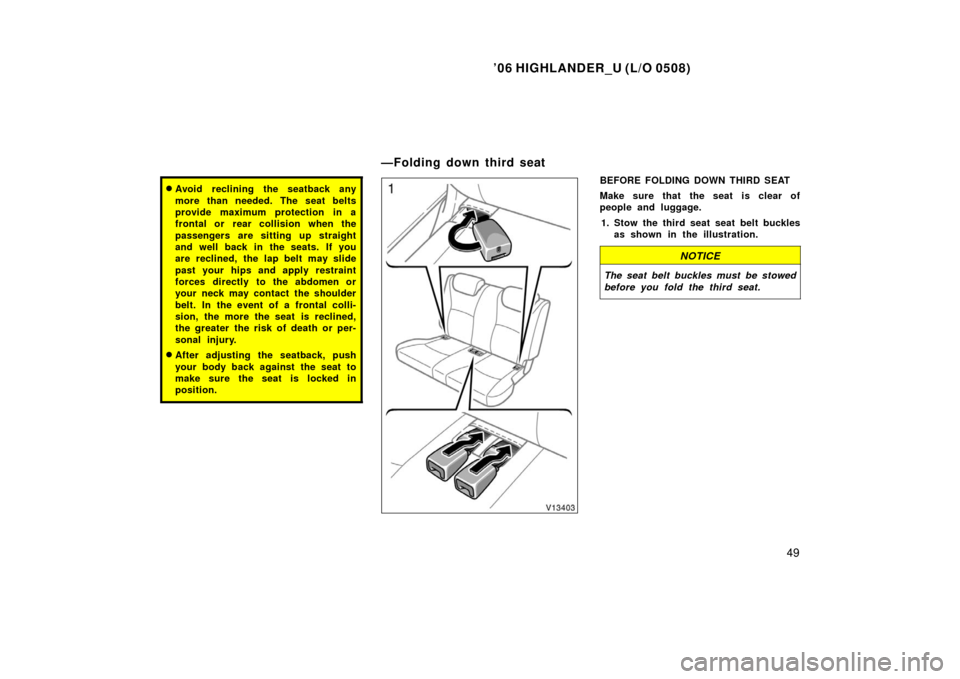
BEFORE FOLDING DOWN THIRD SEAT
Make sure that the seat is clear of
people and luggage.
1. Stow the third seat seat belt buckles as shown in the illustration.
NOTICE
The seat belt buckles must be stowed
before you fold the third seat.
—Folding down third seat
Page 60 of 428
’06 HIGHLANDER_U (L/O 0508)
50
2. To stow the seat belt, insert the tabs
into the slot as shown above. Make
sure the tabs are securely locked in
the slot.
NOTICE
The seat belt must be stowed before
you fold the seatback.
From front
From rearFOLDING DOWN THIRD SEAT
Lower the head restraints to the lowest
position. Pull the seatback angle adjust-
ing strap toward you or pull down the
seatback angle adjusting lever to un-
lock the seatback and fold the seatback
down until it locks.
CAUTION
Be careful that the seat does not hit
a passenger or luggage.
Folding down the third seat will enlarge
the luggage compartment. See “—Stowage
precautions” on page 313 in Section 2 for
precautions when loading luggage.
Page 72 of 428
’06 HIGHLANDER_U (L/O 0508)
62
CAUTION
Do not use the third seat seat belt
with either buckle released. Fastening
only the shoulder belt or lap belt may
cause severe personal injury in case
of sudden braking or a collision.
Second seat (vehicles with third seat)
Second seat (vehicles without third seat)Third seats
—Stowing the second and
third seat seat belt buckles
Page 73 of 428

63
The second and third seat seat belt
buckles can be stowed when not in
use.
Seat belt buckles must be stowed before
you fold the seatback. (See “—Folding
down seco")
’06 HIGHLANDER_U (L/O 0508)
63
The second and third seat seat belt
buckles can be stowed when not in
use.
Seat belt buckles must be stowed before
you fold the seatback. (See “—Folding
down second seats” on page 45 and
“—Folding down third seat” on page 49 in
this Section.)
To stow the third seat seat belt, insert
the tabs into the slot as shown above.
Make sure the tabs are securely locked
in the slot.
Seat belt must be stowed before you fold
the seatback. (See “—Folding down third
seat” on page 49 in this Section.)
NOTICE
Stow the third seat seat belt when
not in use.
If your seat belts cannot be fastened se-
curely because they are not long enough,
a personalized seat belt extender is avail-
able from your Toyota dealer free of
charge.
Please contact your local Toyota dealer to
order the proper required length for the
extender. Bring the heaviest coat you ex-
pect to wear for proper measurement and
selection of length. Additional ordering in-
formation is available at your Toyota deal-
er.
CAUTION
When using the seat belt extender,
observe the following precautions.
Failure to follow these instructions
could reduce the effectiveness of the
seat belt restraint system in case of
an accident, increasing the chance of
personal injury.
�Remember that the extender pro-
vided for you may not be safe when
used on a different vehicle, for
another person, or at a different
seating position than the one origi-
nally intended.
—Stowing the third seat seat
belt
—Seat belt extender
Page 135 of 428

125
To turn on the windshield wipers, move
the lever to the desired setting.
The key must be in the “ON” position.
Lever position
Speed setting
Position 1Intermittent")
’06 HIGHLANDER_U (L/O 0508)
125
To turn on the windshield wipers, move
the lever to the desired setting.
The key must be in the “ON” position.
Lever position
Speed setting
Position 1Intermittent
Position 2Slow
Position 3Fast
For a single sweep of the windshield,
push the lever up and release it. The “INT” band lets you adjust the wiping
time interval when the wiper lever is in
the intermittent position (position 1). Twist
the band upward to increase the time be-
tween sweeps, and downward to decrease
it.
To squirt washer fluid, pull the lever
toward you.
If the windshield wipers are off, they will
operate a couple of times after the washer
squirts.
For instructions on adding washer fluid,
see “Adding washer fluid” on page 397 in
Section 7
−3.
In freezing weather, warm the windshield
with the defroster before using the washer.
This will help prevent the washer fluid
from freezing on your windshield, which
can block your vision.
NOTICE
Do not operate the wipers if the wind-
shield is dry. It may scratch the
glass.
When waxing your vehicle, make sure that
the washer nozzles do not become
blocked. If a nozzle becomes blocked,
contact your Toyota dealer to have the
vehicle serviced.
NOTICE
If a nozzle becomes blocked, do not
try to clear it with a pin or other
object. The nozzle will be damaged.
Windshield wipers and washer
Page 141 of 428

131
�
Towing a trailer.
NOTICE
�
Do not remove the thermostat in
the engine cooling system as this
may cause the engine to overheat.
The thermostat is designed to con-
tr")
’06 HIGHLANDER_U (L/O 0508)
131
�
Towing a trailer.
NOTICE
�
Do not remove the thermostat in
the engine cooling system as this
may cause the engine to overheat.
The thermostat is designed to con-
trol the flow of coolant to keep the
temperature of the engine within
the specified operating range.
� Do not continue driving with an
overheated engine. See “If your ve-
hicle overheats” on page 336 in
Section 4.
The tachometer indicates engine speed
in thousands of rpm (revolutions per
minute). Use it while driving to select
correct shift points and to prevent en-
gine lugging and over�revving.
Driving with the engine running too fast
causes excessive engine wear and poor
fuel economy. Remember, in most cases
the slower the engine speed, the greater
the fuel economy.
NOTICE
Do not let the indicator needle get
into the red zone. This may cause
severe engine damage.
This meter displays the odometer and
two trip meters.
1. Odometer—Shows the total distance the vehicle has been driven.
2. Two trip meters—Show two different distances independently driven since
the last time each trip meter was set
to zero.
You can use one trip meter to calculate
the fuel economy and the other to
measure the distance on each trip. All
trip meter data is cancelled if the elec-
trical power source is disconnected.
Tachometer Odometer and two trip meters
Page 156 of 428

146
(b) Overdrive switch
You can select either third gear (with
overdrive off) or fourth gear (with over-
drive on) by pushing this switch.
To turn the overdrive off, pu")
’06 HIGHLANDER_U (L/O 0508)
146
(b) Overdrive switch
You can select either third gear (with
overdrive off) or fourth gear (with over-
drive on) by pushing this switch.
To turn the overdrive off, push the switch.
The “O/D OFF” indicator light should come
on. To turn the overdrive on again, push
the switch again. The “O/D OFF” indicator
light should go off.
Always drive your vehicle with the over-
drive on for better fuel economy and
quieter driving.
If the engine is turned off when the over-
drive is off and restarted, the overdrive
will be on automatically. When the cruise control is being used,
even if you downshift the transmission by
pushing and releasing the overdrive
switch, engine braking will not be enabled
because the cruise control is not can-
celled.
For ways to decrease the vehicle speed,
see “Cruise control” on page 163 in this
Section.
(c) Normal driving
1. Start the engine as instructed in “How to start the engine” on page 318 in
Section 3. The transmission must be in
“P” or “N”.
2. With your foot holding down the brake pedal, shift the selector lever to “D”.
When the lever is in the “D” position, the
automatic transmission system will select
the most suitable gear for running condi-
tions such as normal cruising, hill climb-
ing, hard towing, etc.
Always turn the overdrive on for better
fuel economy and quieter driving. If the
engine coolant temperature is low, the
transmission will not shift into the over-
drive gear even with the overdrive on.
CAUTION
Never put your foot on the accelera-
tor pedal while shifting.
3. Release the parking brake and brake pedal. Depress the accelerator pedal
slowly for smooth starting.
(d) Using engine braking
To use engine braking, you can downshift
the transmission as follows:
�Push the overdrive switch. The “O/D
OFF” indicator light will come on and
the transmission will downshift to third
gear.
�Shift into the “2” position. The trans-
mission will downshift to second gear
when the vehicle speed drops down to
or lower than the following speed, and
stronger engine braking will be en-
abled. Tw o −wheel drive models
103 km/h (63 mph)
. . . . . . . . . . . . . . .
Four −wheel drive models
93 km/h (57 mph)
. . . . . . . . . . . . . . . .
Page 157 of 428

147
�
Shift into the “L” position. The trans-
mission will downshift to first gear
when the vehicle speed drops down to
or lower than the following speed, and
maxim")
’06 HIGHLANDER_U (L/O 0508)
147
�
Shift into the “L” position. The trans-
mission will downshift to first gear
when the vehicle speed drops down to
or lower than the following speed, and
maximum engine braking will be en-
abled.
Tw o −wheel drive models
45 km/h (28 mph)
. . . . . . . . . . . . . . . .
Four −wheel drive models
46 km/h (28 mph)
. . . . . . . . . . . . . . . .
When the cruise control is being used,
even if you downshift the transmission by
pushing and releasing the overdrive
switch, engine braking is not enabled be-
cause the cruise control is not cancelled.
For ways to decrease the vehicle speed,
see “Cruise control” on page 163 in this
Section.
CAUTION
Be careful when downshifting on a
slippery surface. Abrupt shifting
could cause the vehicle to spin or
skid.
(e) Using “2” and “L” positions
The “2” and “L” positions are used for
strong engine braking as described pre-
viously.
With the selector lever in “2” or “L”, you
can start the vehicle in motion as with the
lever in “D”.
With the selector lever in “2”, the vehicle
will start in first gear and automatically
shift to second gear.
With the selector lever in “L”, the trans-
mission is engaged in first gear.
NOTICE
� Be careful not to over�rev the en-
gine. Watch the tachometer to keep
engine rpm from going into the red
zone. The approximate maximum al-
lowable speed for each position is
given below for your reference:
Two�wheel drive models“2” 123 km/h (76 mph) . . . . . . . . .
“L” 69 km/h (43 mph) . . . . . . . . . .
Four�wheel drive models “ 2 ” 111 k m / h ( 6 9 m p h ) . . . . . . . . .
“L” 62 km/h (38 mph) . . . . . . . . . .
�Do not continue hill climbing or
hard towing for a long time in the
“2” or “L” position. This may cause
severe automatic transmission dam-
age from overheating. To prevent
such damage, “D” position should
be used in hill climbing or hard
towing.
(f) Backing up
1. Bring the vehicle to a complete stop.
2. With the brake pedal held down with your foot, shift the selector lever to the
“R” position.
NOTICE
Never shift into reverse while the ve-
hicle is moving.
(g) Parking
1. Bring the vehicle to a complete stop.
2. With the brake pedal pressed down, fully depress the parking brake pedal
to apply the parking brake securely.
3. With the brake pedal pressed down, shift the selector lever to the “P” posi-
tion.

50
2. To stow the seat belt, insert the tabs
into the slot as shown above. Make
sure the tabs are securely locked in
the slot.
NOTICE
The seat belt must be stowed before")

62
CAUTION
Do not use the third seat seat belt
with either buckle released. Fastening
only the shoulder belt or lap belt may
cause severe personal injury in case
of sudde")