Page 43 of 428

33
TESTING THE SYSTEM
1. Open all the windows.
2. Set the system as described above. The side doors and back door should
be locked with the key or wireless re-
mote contr")
’06 HIGHLANDER_U (L/O 0508)
33
TESTING THE SYSTEM
1. Open all the windows.
2. Set the system as described above. The side doors and back door should
be locked with the key or wireless re-
mote control transmitter. Be sure to
wait until the indicator light starts flash-
ing.
3. Unlock any door from the inside. The system s hould activate the alarm.
4. Stop the alarm as described above.
5. Repeat this operation for the other doors and hood. When testing the
hood, also check that the system is
activated when the battery terminal is
disconnected and then reconnected.
If the system does not work properly,
have it checked by your Toyota dealer.
This indicates that the fuel filler door
is on the left side of your vehicle.1. To open the fuel filler door, pull the lever up.
When refueling, turn off the engine.
CAUTION
�Do not smoke, cause sparks or al-
low open flames when refueling.
The fumes are flammable.
�When opening the cap, do not re-
move the cap quickly. In hot weath-
er, fuel under pressure could cause
injury by spraying out of the filler
neck if the cap is suddenly re-
moved.
Fuel tank cap
Page 65 of 428
’06 HIGHLANDER_U (L/O 0508)
55
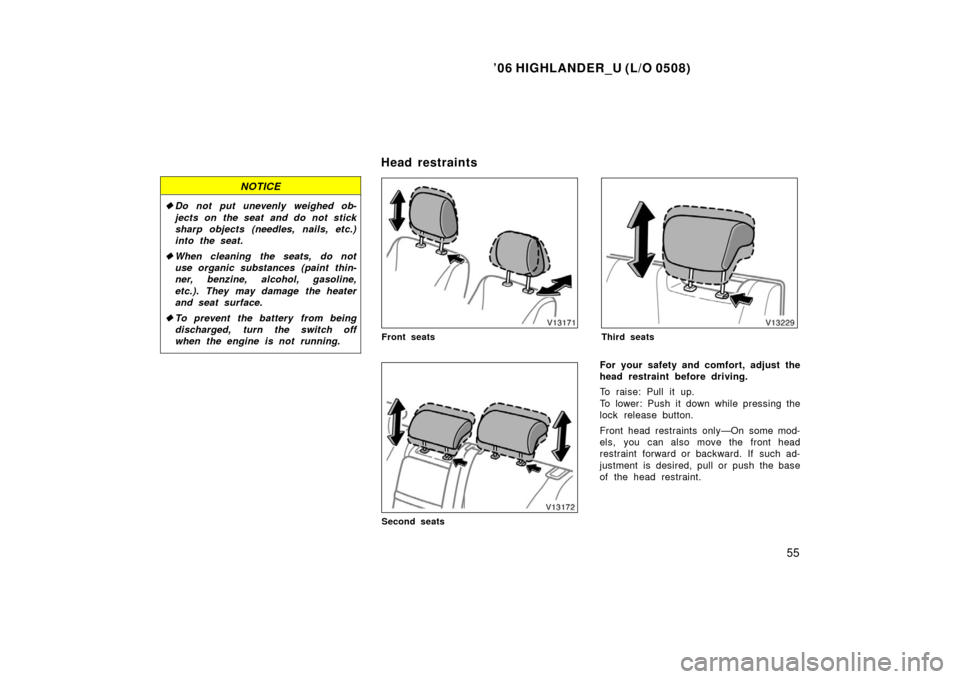
NOTICE
�Do not put unevenly weighed ob-
jects on the seat and do not stick
sharp objects (needles, nails, etc.)
into the seat.
� When cleaning the seats, do not
use organic substances (paint thin-
ner, benzine, alcohol, gasoline,
etc.). They may damage the heater
and seat surface.
� To prevent the battery from being
discharged, turn the switch off
when the engine is not running.
Front seats
Second seats
Third seats
For your safety and comfort, adjust the
head restraint before driving.
To raise: Pull it up.
To lower: Push it down while pressing the
lock release button.
Front head restraints only—On some mod-
els, you can also move the front head
restraint forward or backward. If such ad-
justment is desired, pull or push the base
of the head restraint.
Head restraints
Page 85 of 428

75
NOTICE
Do not disconnect the battery cables
before contacting your Toyota dealer.
The SRS (Supplemental Restraint Sys-
tem) side airbags and curtain shield air-
bags a")
’06 HIGHLANDER_U (L/O 0508)
75
NOTICE
Do not disconnect the battery cables
before contacting your Toyota dealer.
The SRS (Supplemental Restraint Sys-
tem) side airbags and curtain shield air-
bags are designed to provide further
protection for the driver, front passen-
ger and second outside passengers in
addition to the primary safety protec-
tion provided by the seat belts. In response to a severe side impact, the
SRS side airbags and curtain shield air-
bags work with the seat belts to help
reduce injury by inflating. The SRS side
airbags help reduce injuries mainly to the
driver ’s or front passenger ’s chest and the
SRS curtain shield airbags help reduce
injuries mainly to the driver’s, front pas-
senger ’s or second outside passenger ’s
head.
The SRS side airbag on the passenger
seat will not activate if there is no pas-
senger sitting in the front passenger seat.
However, the side airbag on the passen-
ger seat may deploy if luggage is put in
the seat, or the seat belt is buckled up
regardless of the presence of the occu-
pant in the seat. (As for the front passen-
ger occupant classification system, see
“—Front passenger occupant classification
system” on page 85 in this Section.)
The SRS curtain shield airbag on the pas-
senger side are activated even with no
passenger in the front seat or second out-
side seat.
—SRS side airbags and curtain
shield airbags
Page 94 of 428

84
If the light stays on, it indicates that the
SRS driver and front passenger airbag
system and/or front passenger occupant
classification system and “AIRBAG ON”
and")
’06 HIGHLANDER_U (L/O 0508)
84
If the light stays on, it indicates that the
SRS driver and front passenger airbag
system and/or front passenger occupant
classification system and “AIRBAG ON”
and “AIRBAG OFF” indicator lights have a
problem. If the light flashes, the SRS side
airbag system and/or curtain shield airbag
system have a problem.
The SRS warning light and “AIRBAG OFF”
indicator light will come on if there is a
malfunction in the front passenger occu-
pant classification system.In the following cases, contact your Toyota
dealer as soon as possible:
�Any of the SRS side airbags and cur-
tain shield airbags have been inflated.
�The portion of the doors (shaded in the
illustration) was involved in an accident
that was not severe enough to cause
the SRS side airbags and curtain
shield airbags to inflate.
�The surface of the seats with the side
airbag (shaded in the illustration) is
scratched, cracked, or otherwise dam-
aged.
�The portion of the front pillars, rear
pillars or roof side rail garnishes (pad-
ding) containing the curtain shield air-
bags inside (shaded in the illustration)
is scratched, cracked, or otherwise
damaged.
NOTICE
Do not disconnect the battery cables
before contacting your Toyota dealer.
Page 128 of 428

11 8
HEADLIGHTS
To turn on the following lights: Twist
the headlight/turn signal lever knob.
Position 1—Parking, tail, license plate,
side marker and instrument panel l")
’06 HIGHLANDER_U (L/O 0508)
11 8
HEADLIGHTS
To turn on the following lights: Twist
the headlight/turn signal lever knob.
Position 1—Parking, tail, license plate,
side marker and instrument panel lights
Position 2—Headlights and all of the
above
Position 3 (“AUTO”)—Headlights and/or all
of the lights in position 1
They automatically turn on or off depend-
ing on the darkness of the surroundings.
Manually twist the knob to the position 2
to turn on the headlights if they are need-
ed immediately when entering a dark tun-
nel, parking structure, etc.The automatic light control sensor is on
the top of the driver’s side instrument
panel.
Do not place anything on the instrument
panel, and/or do not affix anything on the
windshield to block this sensor. The lights automatically turn off when the
driver ’s door is opened with the ignition
key in the “ACC” or “LOCK” position. To
turn them on again, turn the key to the
“ON” position or actuate the headlight
switch. If you are going to park for over
one week, make sure the headlight switch
is off.
NOTICE
To prevent the battery from being dis-
charged, do not leave the lights on
for a long period when the engine is
not running.
Daytime running light system
(on some models)
The headlights turn on at reduced intensi-
ty when the parking brake is released with
the engine started, even with the light
switch in the “OFF” position. They will not
go off until the ignition switch is turned
off.
To turn on the other exterior lights and
instrument panel lights, twist the knob to
position 1.
Twist the knob to position 2 to turn the
headlights to full intensity for driving at
night.
Headlights and turn signals
(with automatic light control
system)
Page 130 of 428

120
NOTICE
To prevent the battery from being dis-
charged, do not leave the lights on
for a long period when the engine is
not running.
Daytime running light system
(on s")
’06 HIGHLANDER_U (L/O 0508)
120
NOTICE
To prevent the battery from being dis-
charged, do not leave the lights on
for a long period when the engine is
not running.
Daytime running light system
(on some models)
The headlights turn on at reduced intensi-
ty when the parking brake is released with
the engine started, even with the light
switch in the “OFF” position. They will not
go off until the ignition switch is turned
off.
To turn on the other exterior lights and
instrument panel lights, twist the knob to
position 1.
Twist the knob to position 2 to turn the
headlights to full intensity for driving at
night.
High�Low beams—For high beams, turn
the headlights on and push the lever away
from you (position 1). Pull the lever to-
ward you (position 2) for low beams.
The headlight high beam indicator light
(blue light) on the instrument panel will
tell you that the high beams are on.
Flashing the high beam headlights
(position 3)—Pull the lever all the way
back. The high beam headlights turn off
when you release the lever.
You can flash the high beam headlights
with the knob turned to “OFF”.TURN SIGNALS
To signal a turn, push the headlight/
turn signal lever up or down to position
1.
The key must be in the “ON” position.
The lever automatically returns after you
make a turn, but you may have to return
it by hand after you change lanes.
To signal a lane change, move the lever
up or down to the pressure point (position
2) and hold it.
If the turn signal indicator lights (green
lights) on the instrument panel flash faster
than normal, a front or rear turn signal
bulb is burned out. See “Replacing light
bulbs” on page 398 in Section 7 −3.
Page 131 of 428
’06 HIGHLANDER_U (L/O 0508)
121
To turn on the emergency flashers,
push the switch.
All the turn signal lights will flash. To turn
them off, push the switch once again.
Turn on the emergency flashers to warn
other drivers if your vehicle must be
stopped where it might be a traffic hazard.
Always pull as far off the road as pos-
sible.
The turn signal light switch will not work
when the emergency flashers are operat-
ing.
NOTICE
To prevent the battery from being dis-
charged, do not leave the switch on
longer than necessary when the en-
gine is not running.
To adjust the brightness of the instru-
ment panel lights, turn the knob.
Emergency flashers Instrument panel light control
Page 137 of 428

127
With navigation system
To defog or defrost the rear window,
push the switch.
The key must be in the “ON” position.
The thin heater wires on the inside of the
rear")
’06 HIGHLANDER_U (L/O 0508)
127
With navigation system
To defog or defrost the rear window,
push the switch.
The key must be in the “ON” position.
The thin heater wires on the inside of the
rear window will quickly clear the window
surface. An indicator light will illuminate to
indicate the defogger is operating. On some models, the outside rear view
mirror defoggers and/or the windshield
wiper de
−icer is also operating simulta-
neously by this switch. Vehicles with the
outside rear view mirror defoggers, the
heater panel in the outside rear view mir-
rors will quickly clear the surfaces. Ve-
hicles with the windshield wiper de −icer,
the windshield wiper blades will be de −
iced.
Push the switch once again to turn the
defoggers off.
The system will automatically shut off af-
ter the defogger has operated about 15
minutes.CAUTION
Vehicles with outside rear view mirror
defoggers, since the mirror surfaces
can get hot, do not touch them when
the defogger switch is on.
Make sure you turn the defoggers off
when the surfaces are clear or the wiper
blades have de −iced. Leaving the defog-
gers on for a long time could cause the
battery to discharge, especially during
stop −and− go driving. The defoggers are
not designed for drying rain water or for
melting snow.
If the outside rear view mirrors are heavi-
ly coated with ice, use a spray de −icer
before operating the switch.
NOTICE
When cleaning the inside of the rear
window, be careful not to scratch or
damage the heater wires or connec-
tors.

121
To turn on the emergency flashers,
push the switch.
All the turn signal lights will flash. To turn
them off, push the switch once again.
Turn on the emergency flasher")