Page 221 of 436

’06 HIGHLANDER HB_U (L/O 0503)
209
2006 HIGHLANDER (Hybrid) from Mar. ’05 Prod. (OM48530U)
Cassette tape player
Push the “
” or “” side of the “DISC/
CH/PROG” button to select the other side
of a cassette tape. The screen indicates
which side is currently selected. (“
” indi-
cates the top side, “
” indicates the bot-
tom side.)
Auto −reverse feature: After the cassette
player reaches the end of a tape side, it
automatically reverses and begins to play
the other side. This is true whether the
cassette was playing or fast forwarding.
Compact disc player with changer
Use these buttons to select a disc you
want to listen to.
Push the “
” or “” side of the “DISC/
CH/PROG” button until the number of the
disc you want to listen appears on the
display. 2. “TUNE/TRACK” button
Radio
Push the “
” or “” side of the “TUNE/
TRACK” button to tune or seek.
Tuning:
Quickly push and release the “
” or “”
side of the “TUNE/TRACK” button. Each
time you push the button, the radio will
step up or down to another frequency. If
you push and hold the button, and the
radio will go into the seek mode.
Seeking:
Push and hold the “
” or “” side of the
“TUNE/TRACK” button. The radio will seek
up or down for a station of the nearest
frequency and will stop on reception. Each
time you push the button, the stations will
be searched one after another.
Cassette tape player
To fast forward a cassette tape, push and
hol d the “
” side of the “TUNE/TRACK”
button until “FF” appears on the screen.
Push and hold the “
” side of the “TUNE/
TRACK” button until “REW” appears on
the screen to rewind a tape.
Use this button to skip up or down to
locate a song or recording. You can select up to nine recordings (in-
cluding current one).
Push the “
” or “” side of the “TUNE/
TRACK” button. “FF 1” or “REW 1” will
appear on the screen.
Next, push either side of the track button
until the number on the screen reaches
the number of tracks you want to skip. If
you push the button 10 times, the skip
feature will be turned off.
For the skip feature to work correctly a
blank space of at least 3 seconds is con-
sidered to be a start of a recording.
When a beginning of a tape is reached,
the player automatically resumes play.
When the end of the tape is reached, the
player automatically reverses sides and
resumes normal play.
In addition, the feature may not work well
with some spoken, live, or classical re-
cordings.
Page 230 of 436

’06 HIGHLANDER HB_U (L/O 0503)
218
2006 HIGHLANDER (Hybrid) from Mar. ’05 Prod. (OM48530U)
To turn off the switches on the screen,
push the “CURSOR” button on the control-
ler once again or push the “Hide Buttons”
on the screen. NOTE:
The playback condition of some
DVD video discs may be determined by
the DVD video software producer. This
DVD player plays discs as the software
producer intended. Therefore, some
functions may not work properly. Be
sure to read the instruction manual for
the DVD video disc separately provided.
For detailed information about DVD vid-
eo discs, see “—DVD video disc infor-
mation” on page 242 in this Section.
Precautions for DVD video discs
When recording on a DVD video, DVD
audio, video CD or audio tracks may not
record in some cases while the menu is
displayed. As audio will not play in this
case, verify that the video tracks are play-
ing and then activate playback.
The title/chapter number and playback
time display may not appear while playing
back certain DVD video discs.CAUTION
Conversational speech on some DVDs
is recorded at a low volume to em-
phasize the impact of sound effects.
If you adjust the volume assuming
that the conversations represent the
maximum volume level available for
the DVD, you may be startled by
louder sound effects or when you
change to a different audio source.
Loud sounds may have a significant
impact on the human body or pose a
driving hazard. Keep this in mind
when you adjust the volume.
—DVD player operation
(DVD video/DVD audio)
Page 233 of 436

’06 HIGHLANDER HB_U (L/O 0503)
221
2006 HIGHLANDER (Hybrid) from Mar. ’05 Prod. (OM48530U)
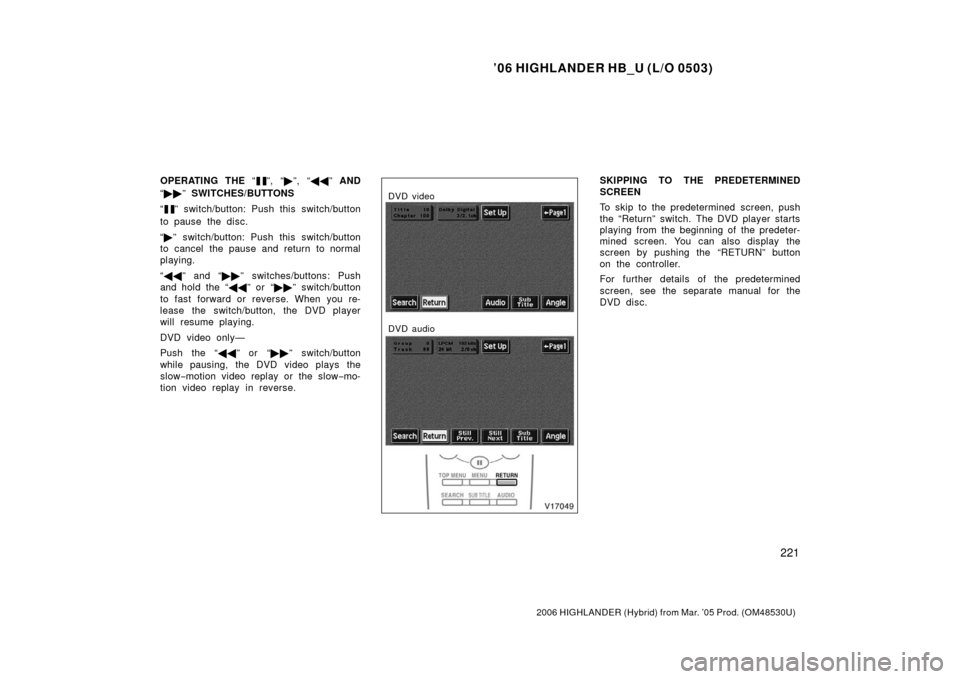
OPERATING THE “”, “�”, “ �� ” AND
“ �� ” SWITCHES/BUTTONS
“
” switch/button: Push this switch/button
to pause the disc.
“ � ” switch/button: Push this switch/button
to cancel the pause and return to normal
playing.
“ �� ” and “�� ” switches/buttons: Push
and hold the “ ��” or “�� ” switch/button
to fast forward or reverse. When you re-
lease the switch/button, the DVD player
will resume playing.
DVD video only—
Push the “�� ” or “��” switch/button
while pausing, the DVD video plays the
slow −motion video replay or the slow −mo-
tion video replay in reverse.
DVD video
DVD audio
SKIPPING TO THE PREDETERMINED
SCREEN
To skip to the predetermined screen, push
the “Return” switch. The DVD player starts
playing from the beginning of the predeter-
mined screen. You can also display the
screen by pushing the “RETURN” button
on the controller.
For further details of the predetermined
screen, see the separate manual for the
DVD disc.
Page 235 of 436

’06 HIGHLANDER HB_U (L/O 0503)
223
2006 HIGHLANDER (Hybrid) from Mar. ’05 Prod. (OM48530U)
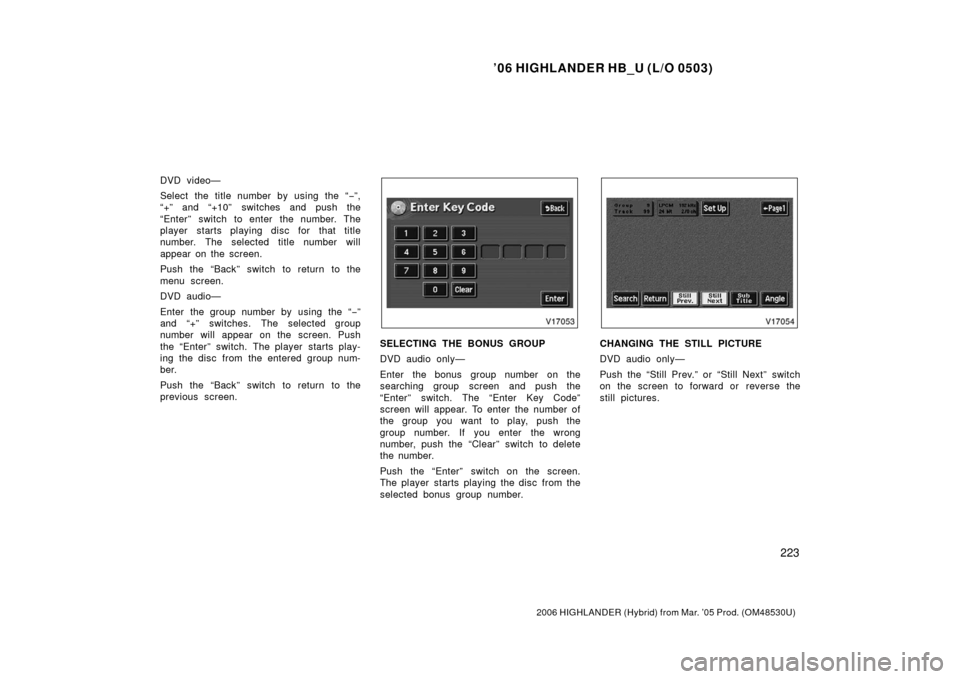
DVD video—
Select the title number by using the “ −”,
“+” and “+10” switches and push the
“Enter” switch to enter the number. The
player starts playing disc for that title
number. The selected title number will
appear on the screen.
Push the “Back” switch to return to the
menu screen.
DVD audio—
Enter the group number by using the “− ”
and “+” switches. The selected group
number will appear on the screen. Push
the “Enter” switch. The player starts play-
ing the disc from the entered group num-
ber.
Push the “Back” switch to return to the
previous screen.
SELECTING THE BONUS GROUP
DVD audio only—
Enter the bonus group number on the
searching group screen and push the
“Enter” switch. The “Enter Key Code”
screen will appear. To enter the number of
the group you want to play, push the
group number. If you enter the wrong
number, push the “Clear” switch to delete
the number.
Push the “Enter” switch on the screen.
The player starts playing the disc from the
selected bonus group number.CHANGING THE STILL PICTURE
DVD audio only—
Push the “Still Prev.” or “Still Next” switch
on the screen to forward or reverse the
still pictures.
Page 249 of 436

’06 HIGHLANDER HB_U (L/O 0503)
237
2006 HIGHLANDER (Hybrid) from Mar. ’05 Prod. (OM48530U)
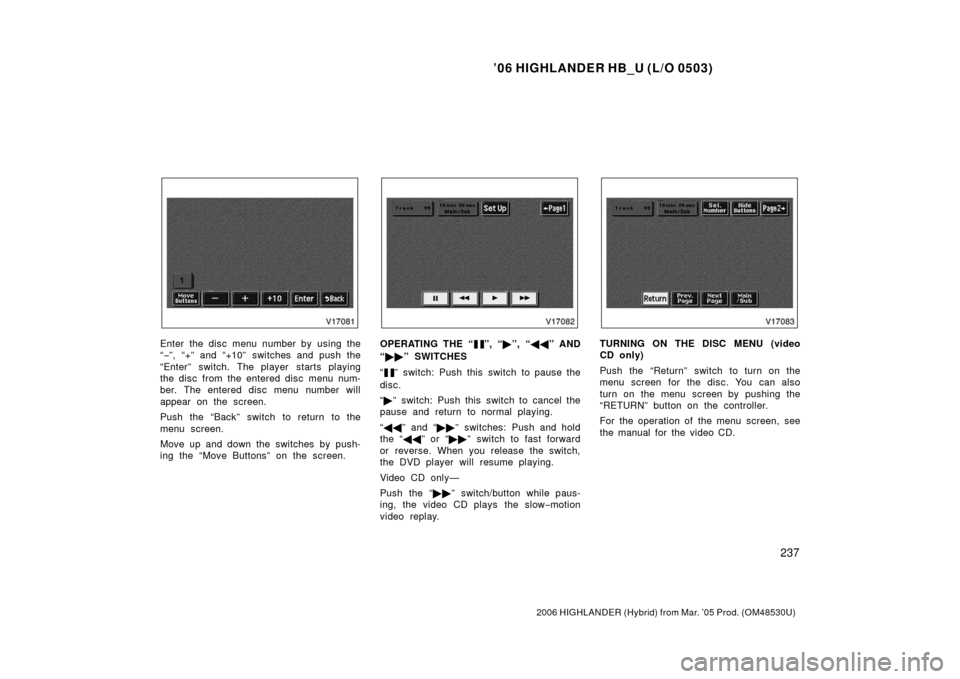
Enter the disc menu number by using the
“− ”, “+” and “+10” switches and push the
“Enter” switch. The player starts playing
the disc from the entered disc menu num-
ber. The entered disc menu number will
appear on the screen.
Push the “Back” switch to return to the
menu screen.
Move up and down the switches by push-
ing the “Move Buttons” on the screen.OPERATING THE “”, “ �”, “ �� ” AND
“ �� ” SWITCHES
“
” switch: Push this switch to pause the
disc.
“ � ” switch: Push this switch to cancel the
pause and return to normal playing.
“ �� ” and “�� ” switches: Push and hold
the “�� ” or “�� ” switch to fast forward
or reverse. When you release the switch,
the DVD player will resume playing.
Video CD only—
Push the “�� ” switch/button while paus-
ing, the video CD plays the slow −motion
video replay.
TURNING ON THE DISC MENU (video
CD only)
Push the “Return” switch to turn on the
menu screen for the disc. You can also
turn on the menu screen by pushing the
“RETURN” button on the controller.
For the operation of the menu screen, see
the manual for the video CD.
Page 293 of 436
’06 HIGHLANDER HB_U (L/O 0503)
281
2006 HIGHLANDER (Hybrid) from Mar. ’05 Prod. (OM48530U)
CAUTION
�When doing the circling calibration,
be sure to secure a wide space,
and watch out for people and ve-
hicles in the neighborhood. Do not
violate any local traffic rules while
performing circling calibration.
�Do not adjust the display while the
vehicle is moving. Be sure to adjust
the display only when the vehicle is
stopped.
Cigarette lighter
Front ashtray
Rear ashtray
CIGARETTE LIGHTER
To use the cigarette lighter, press it in.
After it finishes heating up, it automati-
cally pops out ready for use.
If the hybrid system is not started, the
key must be in the “ACC” position.
Do not hold the cigarette lighter pressed
in.
Use a Toyota genuine cigarette lighter or
equivalent for replacement.
Cigarette lighter and ashtrays
Page 295 of 436

’06 HIGHLANDER HB_U (L/O 0503)
283
2006 HIGHLANDER (Hybrid) from Mar. ’05 Prod. (OM48530U)
This power outlet (115 VAC) is designed
for use as a power supply for electric
appliances in the vehicle.
The key must be in the “ON” position for
the power outlet to be used.
The maximum capacity for this power out-
let is 115 VAC/100W. If you attempt to
use an appliance that requires more than
115 VAC or 100W, the protection circuit
will activate and cut the power supply.
The power supply will restart automatically
when you use an appliance that operates
within the 115 VAC/100W limits.To use the power outlet, push the main
switch on the instrument panel.
An indicator light will illuminate to indicate
that the power outlet is ready for use.
Push the main switch once again to turn
the power outlet off. When the power out-
let is not in use, make sure that the main
switch is turned off.
NOTICE
�To prevent the auxiliary battery
from being discharged, do not use
the power outlet longer than neces-
sary when the hybrid system is off.
� Close the power outlet lid when the
power outlet is not in use. Inserting
anything other than an appropriate
plug that fits the outlet may cause
electrical failure or short circuits.
The power outlet is not designed for
the following electric appliances even
though their power consumption is un-
der 115 VAC/100W. These appliances
may not operate properly.
Power outlet (115 VAC)
Page 309 of 436

’06 HIGHLANDER HB_U (L/O 0503)
297
2006 HIGHLANDER (Hybrid) from Mar. ’05 Prod. (OM48530U)
Follow the manufacture’s instructions and
precautions when installing the attach-
ments or their equivalent.
CAUTION
When you load cargo on the roof lug-
gage carrier, observe the following:
�Place the cargo so that its weight
is distributed evenly between the
front and rear axles.
�If loading long or wide cargo, never
exceed the vehicle overall length or
width. (See “Dimensions and
weights” on page 410 in Section 8
for information on your vehicle
overall length and width.)
�Before driving, make sure the cargo
is securely fastened on the roof
luggage carrier.
�Loading cargo on the roof luggage
carrier will make the center of the
vehicle gravity higher. Avoid high
speeds, sudden starts, sharp turns,
sudden braking or abrupt maneu-
vers, otherwise it may result in loss
of control or vehicle rollover due to
failure to operate this vehicle cor-
rectly.
�If driving for a long distance, on
rough roads, or at high speeds,
stop the vehicle now and then dur-
ing the trip to make sure the cargo
remains in its place.
�Do not exceed 75 kg (165 lb.) cargo
weight on the roof luggage carrier.
NOTICE
When loading the luggages, be careful
not to scratch the surface of the
moonroof.
Use a floor mat of the correct size.
If the floor carpet and floor mat have 2
holes, then they are designed for use with
locking clips. Fix the floor mat with lock-
ing clips into the holes in the floor carpet.
Floor mat