Page 390 of 470

’06 4Runner_U (L/O 0508)
380�
Make sure to set the jack prop-
erly in the jack point. Raising
the vehicle with jack improper-
ly positioned will damage the
vehicle or may allow the ve-
hicle to fall off the jack and
cause personal injury.
� Never get under the vehicle
when the vehicle is supported
by the jack alone.
� Use the jack only for lifting
your vehicle during wheel
changing.
� Do not raise the vehicle with
someone in the vehicle.
� When raising the vehicle, do
not place any objects on top
of or underneath the jack.
� Raise the vehicle only high
enough to remove and change
the tire.
NOTICE
� Do not continue driving with
a deflated tire. Driving even a
short distance can damage a
tire and wheel beyond repair.
� Vehicles with rear height con-
trol air suspension: When
jacking up or insta lling the
tire chains, be sure to turn
off the rear height control
and stop the engine. Other-
wise, the vehicle height may
change in the automatic lev-
eling function, resulting in
accident.
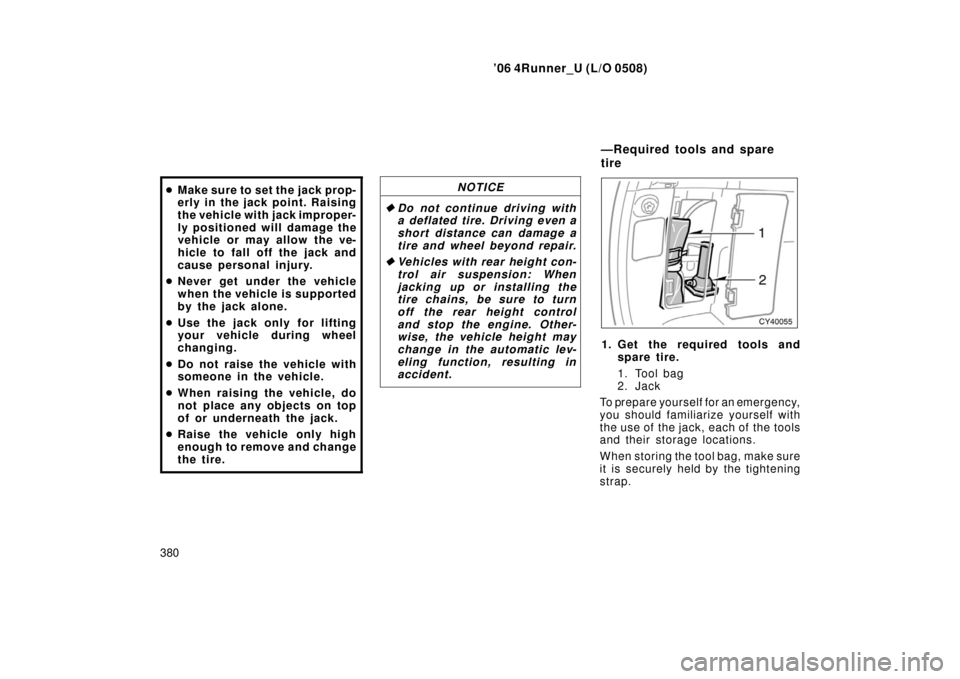
1. G et th e req u i red to o l s an d
spare tire.
1. Tool bag
2. Jack
To prepare yourself for an emergency,
you should familiarize yourself with
the use of the jack, each of the tools
and their storage locations.
When storing the tool bag, make sure
it is securely held by the tightening
strap.
—Required tools and spare
tire
Page 392 of 470

’06 4Runner_U (L/O 0508)
382
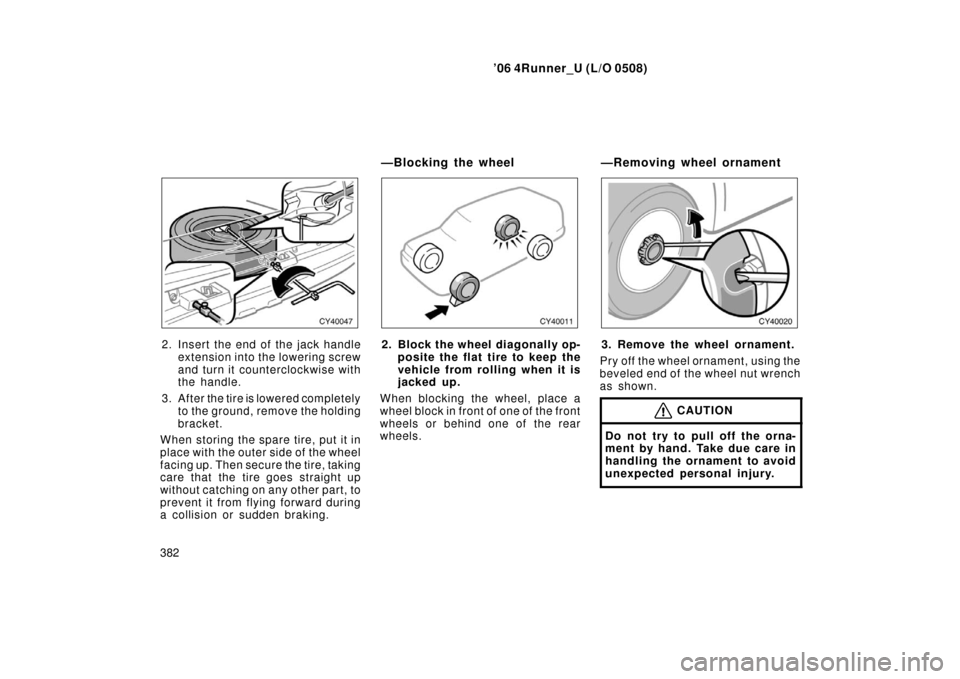
2. Insert the end of the jack handle
extension into the lowering screw
and turn it counterclockwise with
the handle.
3. After the tire is lowered completely to the ground, remove the holding
bracket.
When storing the spare tire, put it in
place with the outer side of the wheel
facing up. Then secure the tire, taking
care that the tire goes straight up
without catching on any other part, to
prevent it from flying forward during
a collision or sudden braking.2. Block the wheel diagonally op- posite the flat tire to keep the
vehicle from rolling when it is
jacked up.
When blocking the wheel, place a
wheel block in front of one of the front
wheels or behind one of the rear
wheels.3. Remove the wheel ornament.
Pry off the wheel ornament, using the
beveled end of the wheel nut wrench
as shown.
CAUTION
Do not try to pull off the orna-
ment by hand. Take due care in
handling the ornament to avoid
unexpected personal injury.
—Blocking the wheel —Removing wheel ornament
Page 393 of 470
’06 4Runner_U (L/O 0508)
383
4. Loosen all the wheel nuts.
Always loosen the wheel nuts before
raising the vehicle.
Turn the wheel nuts counterclockwise
to loosen. To get maximum leverage,
fit the wrench to the nut so that the
handle is on the right side, as shown
above. Grab the wrench near the end
of the handle and pull up on the han-
dle. Be careful that the wrench does
not slip off the nut.
Do not remove the nuts yet—just un-
screw them about one −half turn.
CAUTION
Never use oil or grease on the
bolts or nuts. The nuts may loose
and the wheels may fall off,
which could cause a serious ac-
cident.
Front Rear
5. Position the jack at the correct jack point as shown.
Make sure the jack is positioned on
a level and solid place.
JACK POINTS:
Front—Under the frame side rail
Rear—Under the rear axle housing
—Loosening wheel nuts —Positioning the jack
Page 395 of 470
’06 4Runner_U (L/O 0508)
385
7. Raise the vehicle high enough
so that the spare tire can be
installed.
Remember you will need more ground
clearance when putting on the spare
tire than when removing the flat tire.
To raise the vehicl e, insert the jack
handle end into the jack (it is a loose
fit) and turn it clockwise with the han-
dle.
CAUTION
Never get under the vehicle when
the vehicle is supported by the
jack alone.
8. Remove the wheel nuts and
change tires.
Lift the flat tire straight off and put it
aside.
Roll the spare wheel into position and
align the holes in the wheel with the
bolts. Then lift up the wheel and get
at least the top bolt started through
its hole. Wiggle the tire and press it
back over the other bolts.
—Changing wheels
Page 396 of 470
’06 4Runner_U (L/O 0508)
386
Before putting on wheels, remove any
corrosion on the mounting surfaces
with a wire brush or such. Installation
of wheels without good metal− to−met-
al contact at the mounting surface can
cause wheel nuts to loosen and
eventually cause a wheel to come off
while driving.9. Reinstall all the wheel nuts fin- ger tight.
Reinstall the wheel nuts (tapered end
inward) and tighten them as much as
you can by hand. Press back on the
tire back and see if you can tighten
them more.
CAUTION
Never use oil or grease on the
bolts or nuts. Doing so may lead
to overtightening the nuts and
damaging the bolts. The nuts
may loose and the wheels may
fall off, which could cause a seri-
ous accident. If there is oil or
grease on any bolt or nut, clean
it.
—Reinstalling wheel nuts
Page 397 of 470

’06 4Runner_U (L/O 0508)
387
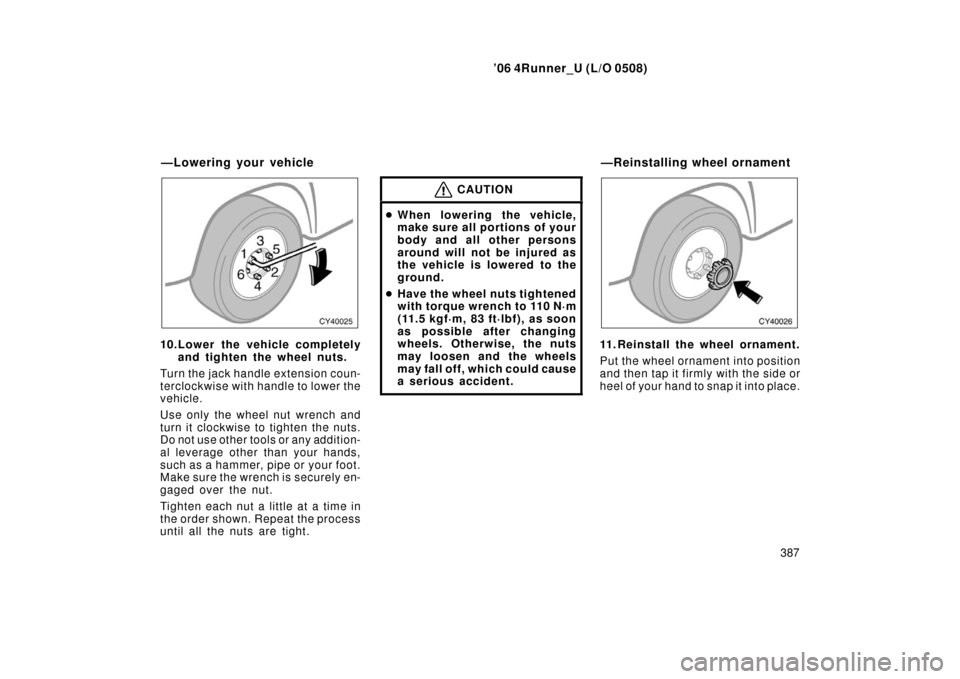
10.Lower the vehicle completely
and tighten the wheel nuts.
Turn the jack handle extension coun-
terclockwise with handle to lower the
vehicle.
Use only the wheel nut wrench and
turn it clockwise to tighten the nuts.
Do not use other tools or any addition-
al leverage other than your hands,
such as a hammer, pipe or your foot.
Make sure the wrench is securely en-
gaged over the nut.
Tighten each nut a little at a time in
the order shown. Repeat the process
until all the nuts are tight.
CAUTION
� When lowering the vehicle,
make sure all portions of your
body and all other persons
around will not be injured as
the vehicle is lowered to the
ground.
� Have the wheel nuts tightened
with torque wrench to 110 N·m
(11.5 kgf·m, 83 ft·lbf), as soon
as possible after changing
wheels. Otherwise, the nuts
may loosen and the wheels
may fall off, which could cause
a serious accident.
11. Reinstall the wheel ornament.
Put the wheel ornament into position
and then tap it firmly with the side or
heel of your hand to snap it into place.
—Lowering your vehicle —Reinstalling wheel ornament
Page 398 of 470

’06 4Runner_U (L/O 0508)
388
CAUTION
�Take due care in handling the
ornament to avoid unexpected
personal injury.
� Do not attach a heavily dam-
aged plastic wheel ornament.
It may fly off the wheel and
cause accidents while the ve-
hicle is moving.
12.Check the air pressure of the re-
placed tire.
Adjust the air pressu re to the specifi-
cation designated on page 451 in
Section 8. If the pressure is lower,
drive slowly to the nearest service
station and fill to the correct pressure.
Do not forget to reinstall the tire infla-
tion valve cap as dirt and moisture
could get into th e valve core and
possibly cause air leakage. If the cap
is missing, have a new one put on as
soon as possible.
13.Restow all the tools, jack and flat tire securely.
As soon after changing wheels as
possible, tighten the wheel nuts to the
torque specified on page 451 in Sec-
tion 8 with a torque wrench. Have a
technician repair the flat tire.CAUTION
Before driving, make sure all the
tools, jack and flat tire are se-
curely in place in their storage
location to reduce the possibility
of personal injury during a colli-
sion or sudden braking.
—After changing wheels
Page 399 of 470

’06 4Runner_U (L/O 0508)
389
If your vehicle becomes stuck in snow,
mud, sand, etc., then you may attempt
to rock the vehicle free by moving it
forward and backward.
Turn off the traction control system to
become unstuck to allow the tires to
spin enough to remove the vehicle from
the obstruction. (For details, see “Trac-
tion control system” on page 170 in
Section 1�7.)
CAUTION
Do not attempt to rock the vehicle
free by moving it forward and back-
ward if people or objects are any-
where near the vehicle. During the
rocking operation the vehicle may
suddenly move forward or backward
as it becomes unstuck, causing injury
or damage to nearby people or ob-
jects.
NOTICE
If you rock your vehicle, observe the
following precautions to prevent dam-
age to the transmission and other
parts.
�Do not depress the accelerator ped-
al while shifting the selector lever
or before the transmission is com-
pletely shifted to forward or reverse
gear.
� Do not race the engine and avoid
spinning the wheels.
� If your vehicle remains stuck after
rocking the vehicle several times,
consider other ways such as tow-
ing.
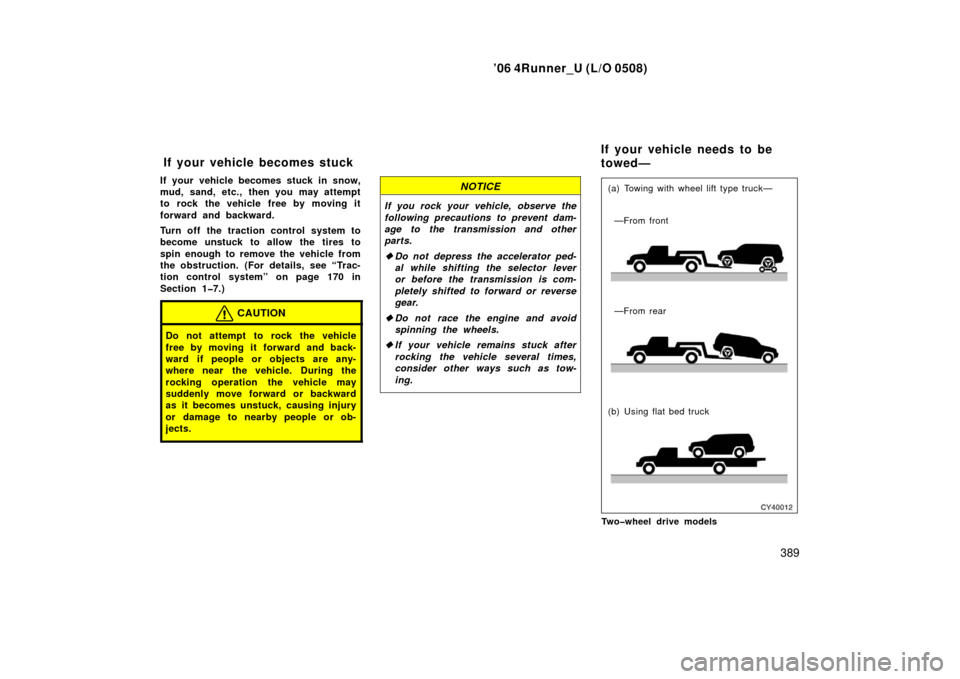
—From front
—From rear
(b) Using flat bed truck (a) Towing with wheel lift type truck—
Two�wheel drive models
If your vehicle becomes stuck If your vehicle needs to be
towed—