2006 SUZUKI SX4 clock
[x] Cancel search: clockPage 1371 of 1556
Downloaded from www.Manualslib.com manuals search engine Instrumentation / Driver Info. / Horn: 9C-19
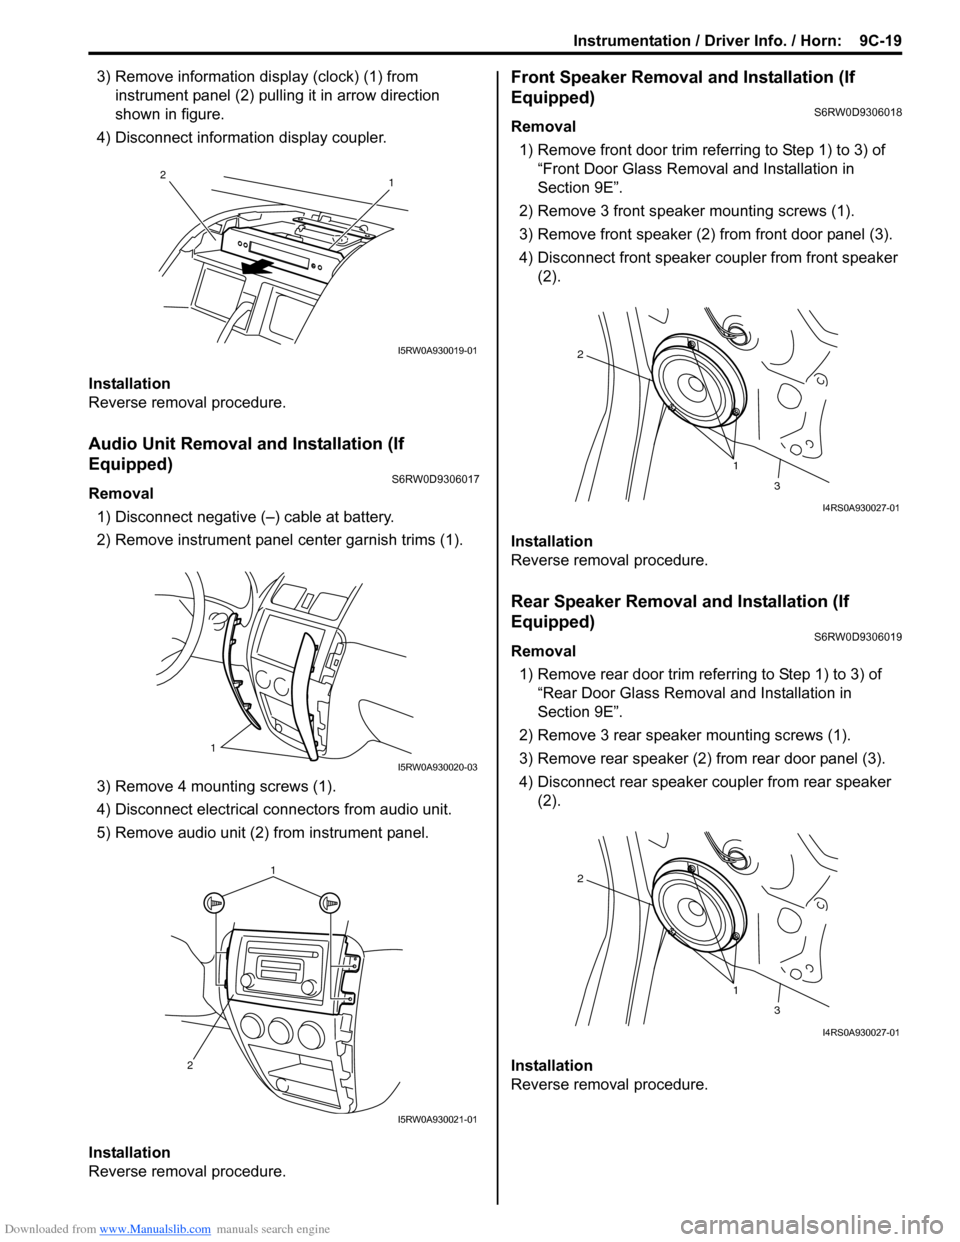
3) Remove information display (clock) (1) from
instrument panel (2) pulling it in arrow direction
shown in figure.
4) Disconnect information display coupler.
Installation
Reverse removal procedure.
Audio Unit Removal and Installation (If
Equipped)
S6RW0D9306017
Removal
1) Disconnect negative (–) cable at battery.
2) Remove instrument panel center garnish trims (1).
3) Remove 4 mounting screws (1).
4) Disconnect electrical connectors from audio unit.
5) Remove audio unit (2) from instrument panel.
Installation
Reverse removal procedure.
Front Speaker Removal and Installation (If
Equipped)
S6RW0D9306018
Removal
1) Remove front door trim referring to Step 1) to 3) of
“Front Door Glass Removal and Installation in
Section 9E”.
2) Remove 3 front speaker mounting screws (1).
3) Remove front speaker (2) from front door panel (3).
4) Disconnect front speaker coupler from front speaker
(2).
Installation
Reverse removal procedure.
Rear Speaker Removal and Installation (If
Equipped)
S6RW0D9306019
Removal
1) Remove rear door trim referring to Step 1) to 3) of
“Rear Door Glass Removal and Installation in
Section 9E”.
2) Remove 3 rear speaker mounting screws (1).
3) Remove rear speaker (2) from rear door panel (3).
4) Disconnect rear speaker coupler from rear speaker
(2).
Installation
Reverse removal procedure.
1 2
I5RW0A930019-01
1
I5RW0A930020-03
1
2
I5RW0A930021-01
1 2
3
I4RS0A930027-01
1 2
3
I4RS0A930027-01
Page 1475 of 1556
Downloaded from www.Manualslib.com manuals search engine Body Electrical Control System: 10B-2
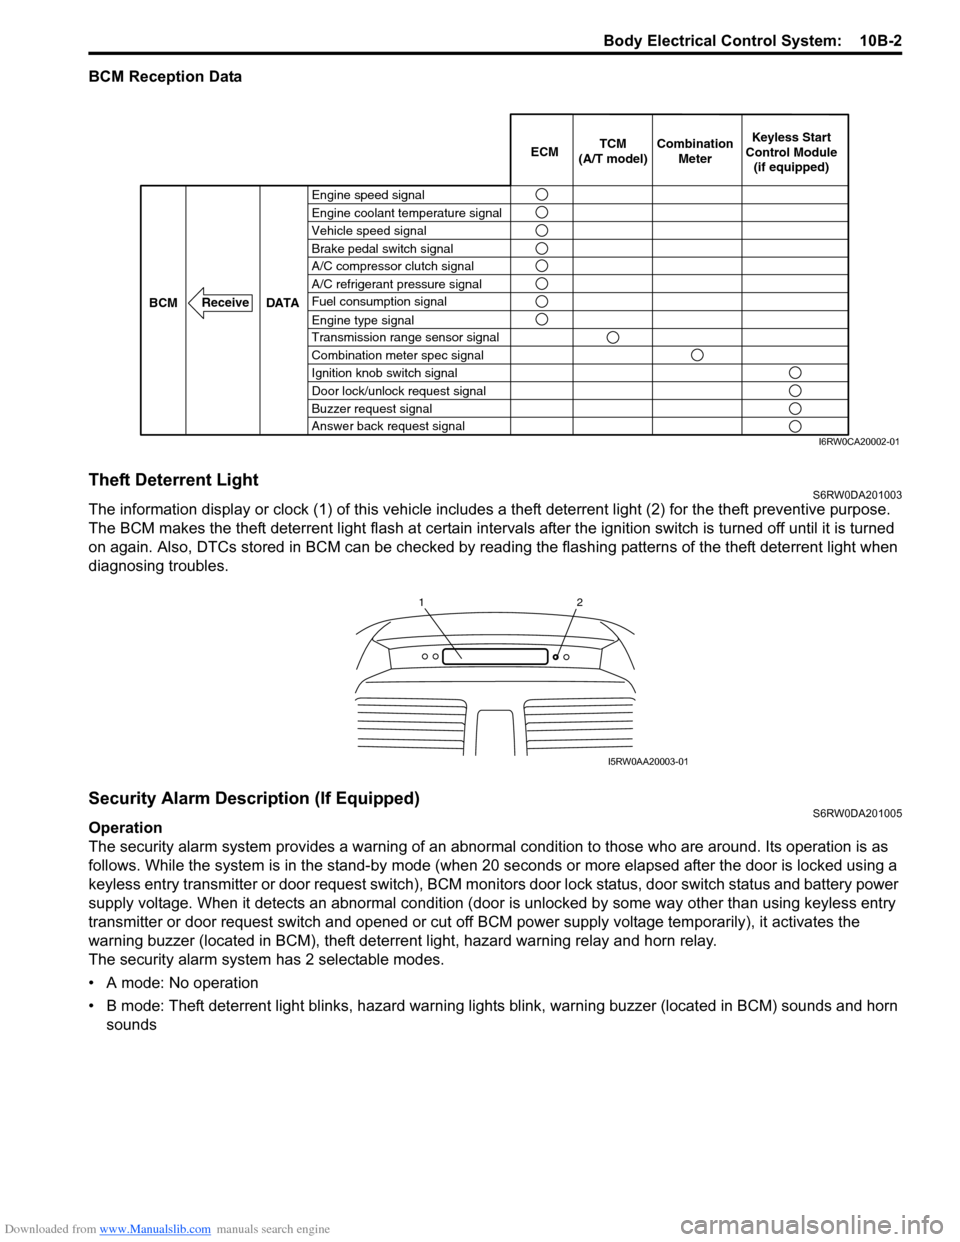
BCM Reception Data
Theft Deterrent LightS6RW0DA201003
The information display or clock (1) of this vehicle includes a theft deterrent light (2) for the theft preventive purpose.
The BCM makes the theft deterrent light flash at certain intervals after the ignition switch is turned off until it is turned
on again. Also, DTCs stored in BCM can be checked by reading the flashing patterns of the theft deterrent light when
diagnosing troubles.
Security Alarm Description (If Equipped)S6RW0DA201005
Operation
The security alarm system provides a warning of an abnormal condition to those who are around. Its operation is as
follows. While the system is in the stand-by mode (when 20 seconds or more elapsed after the door is locked using a
keyless entry transmitter or door request switch), BCM monitors door lock status, door switch status and battery power
supply voltage. When it detects an abnormal condition (door is unlocked by some way other than using keyless entry
transmitter or door request switch and opened or cut off BCM power supply voltage temporarily), it activates the
warning buzzer (located in BCM), theft deterrent light, hazard warning relay and horn relay.
The security alarm system has 2 selectable modes.
• A mode: No operation
• B mode: Theft deterrent light blinks, hazard warning lights blink, warning buzzer (located in BCM) sounds and horn
sounds
Engine speed signal
Vehicle speed signal Engine coolant temperature signal
Brake pedal switch signal
A/C refrigerant pressure signal
Fuel consumption signal A/C compressor clutch signal
Engine type signal
Transmission range sensor signal
Combination meter spec signal
Ignition knob switch signal
Door lock/unlock request signal
Buzzer request signal
Answer back request signal DATA BCM
Receive
Combination
Meter TCM
(A/T model)Keyless Start
Control Module
(if equipped) ECM
I6RW0CA20002-01
12
I5RW0AA20003-01
Page 1482 of 1556
Downloaded from www.Manualslib.com manuals search engine 10B-9 Body Electrical Control System:
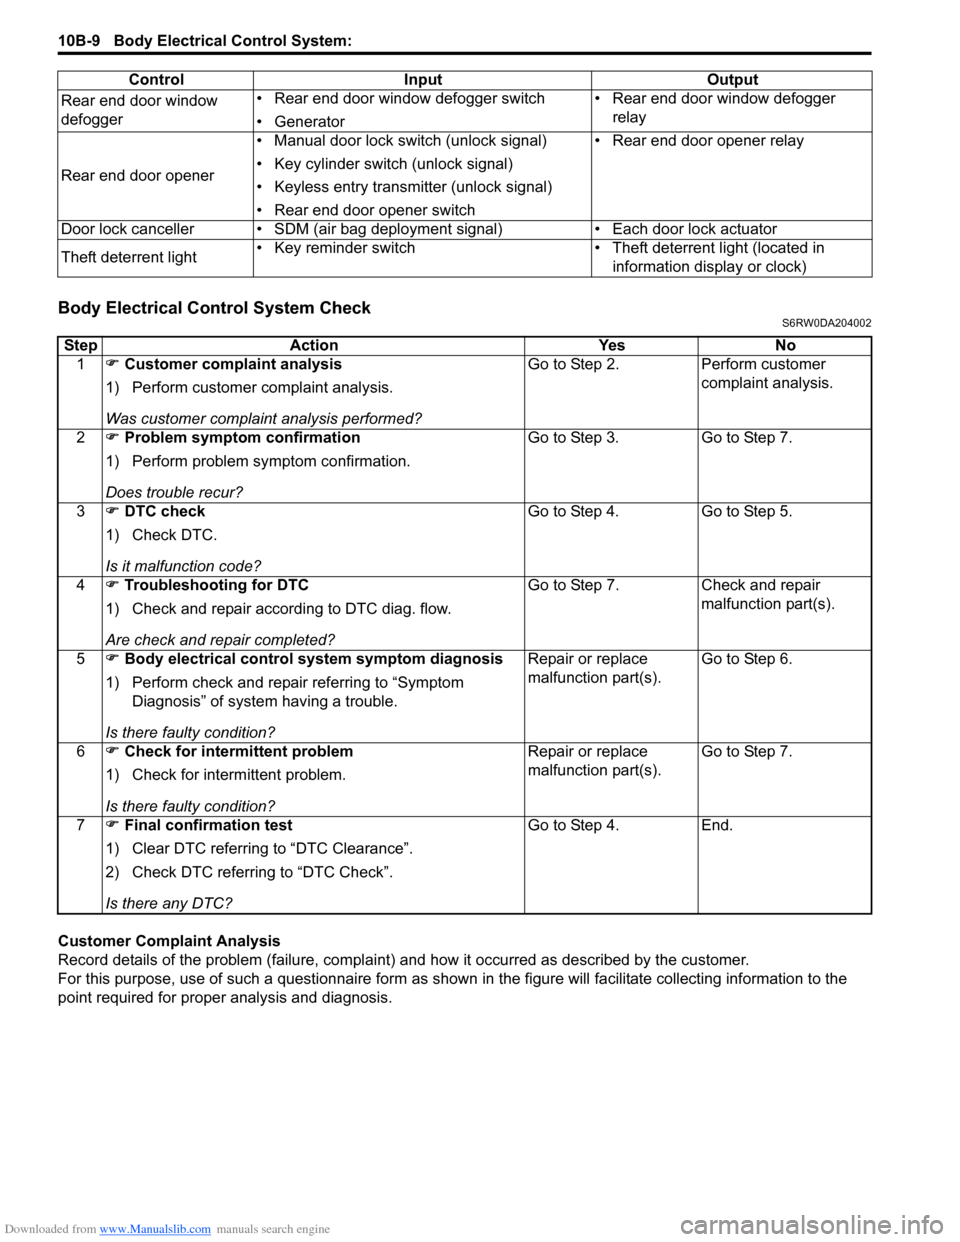
Body Electrical Control System CheckS6RW0DA204002
Customer Complaint Analysis
Record details of the problem (failure, complaint) and how it occurred as described by the customer.
For this purpose, use of such a questionnaire form as shown in the figure will facilitate collecting information to the
point required for proper analysis and diagnosis.Rear end door window
defogger• Rear end door window defogger switch
• Generator• Rear end door window defogger
relay
Rear end door opener• Manual door lock switch (unlock signal)
• Key cylinder switch (unlock signal)
• Keyless entry transmitter (unlock signal)
• Rear end door opener switch• Rear end door opener relay
Door lock canceller • SDM (air bag deployment signal) • Each door lock actuator
Theft deterrent light• Key reminder switch • Theft deterrent light (located in
information display or clock) Control Input Output
Step Action Yes No
1�) Customer complaint analysis
1) Perform customer complaint analysis.
Was customer complaint analysis performed?Go to Step 2. Perform customer
complaint analysis.
2�) Problem symptom confirmation
1) Perform problem symptom confirmation.
Does trouble recur?Go to Step 3. Go to Step 7.
3�) DTC check
1) Check DTC.
Is it malfunction code?Go to Step 4. Go to Step 5.
4�) Troubleshooting for DTC
1) Check and repair according to DTC diag. flow.
Are check and repair completed?Go to Step 7. Check and repair
malfunction part(s).
5�) Body electrical control system symptom diagnosis
1) Perform check and repair referring to “Symptom
Diagnosis” of system having a trouble.
Is there faulty condition?Repair or replace
malfunction part(s).Go to Step 6.
6�) Check for intermittent problem
1) Check for intermittent problem.
Is there faulty condition?Repair or replace
malfunction part(s).Go to Step 7.
7�) Final confirmation test
1) Clear DTC referring to “DTC Clearance”.
2) Check DTC referring to “DTC Check”.
Is there any DTC?Go to Step 4. End.
Page 1485 of 1556
Downloaded from www.Manualslib.com manuals search engine Body Electrical Control System: 10B-12
Scan Tool Data Definitions
Vehicle Speed (km/h, mph): This parameter indicates the vehicle speed computed by ECM.
Outside air Temp (°C, °F): It is detected by outside air temperature sensor.
Battery Voltage (V): This parameter indicates battery positive voltage inputted to BCM.
Coolant Temp (Engine coolant temperature) (°C, °F): It is detected by engine coolant temperature sensor.
Engine Speed (RPM): It is computed by reference pulse signals from CMP sensor.
Fuel Consumption (km/l): This parameter indicates the fuel consumption computed by ECM.
Key Reminder Sw (Key reminder switch) (Pulled / Key in): This parameter indicates the state of the key reminder
switch.
Rear Wiper Sw (Rear wiper switch) (ON / INT / OFF): This parameter indicates the state of the rear wiper switch.
Door key Sw (Door key cylinder switch) (Lock / Neutral / Unlock): This parameter indicates the state of the door
key cylinder switch.
Door Lock Sw (Manual door lock switch) (Lock / Neutral / Unlock): This parameter indicates the state of the
manual door lock switch.
Driv Door Sw (Driver side door switch) (Open / Close): This parameter indicates the state of the driver side door
switch.
Pass Door Sw (Other than driver side door switch) (Open / Close): This parameter indicates the state of the door
switches other than driver side door switch.
Brake Fluid Level (Low / Normal): Low: Brake fluid level is lower than specified level.
Normal: Brake fluid level is higher than MIN level.
Parking Brake Sw (Parking brake switch) (ON / OFF): ON: Parking brake lever is pulled up.
OFF: Parking lever is released.
Rear Defogger Sw (Rear end door window defogger switch) (ON / OFF): This parameter indicates the state of
the rear end door window defogger switch.
Headlight Sw (Headlight switch) (ON / OFF) (Junction block without BCM type): This parameter indicates the
state of the lighting switch.
Tail Light Sw (Lighting switch) (ON / OFF): This parameter indicates the state of the lighting switch.
Front Fog Light Sw (Front fog light switch) (ON / OFF) (Junction block without BCM type): This parameter
indicates the state of the front fog light switch.
Driv Seatbelt Sw (Driver seat belt switch) (Fasten / Unfasten): This parameter indicates the state of the driver
side seat belt buckle switch.
Rear end door opener (Rear end door opener switch) (ON / OFF): This parameter indicates the state of the rear
end door opener switch.
Charge light (ON / OFF): This parameter indicates the state of the charge system monitor switch.
Oil pressure switch (ON / OFF): This parameter indicates the state of the oil pressure switch.
A/C Switch (ON / OFF): This parameter indicates the state of the air conditioning switch.
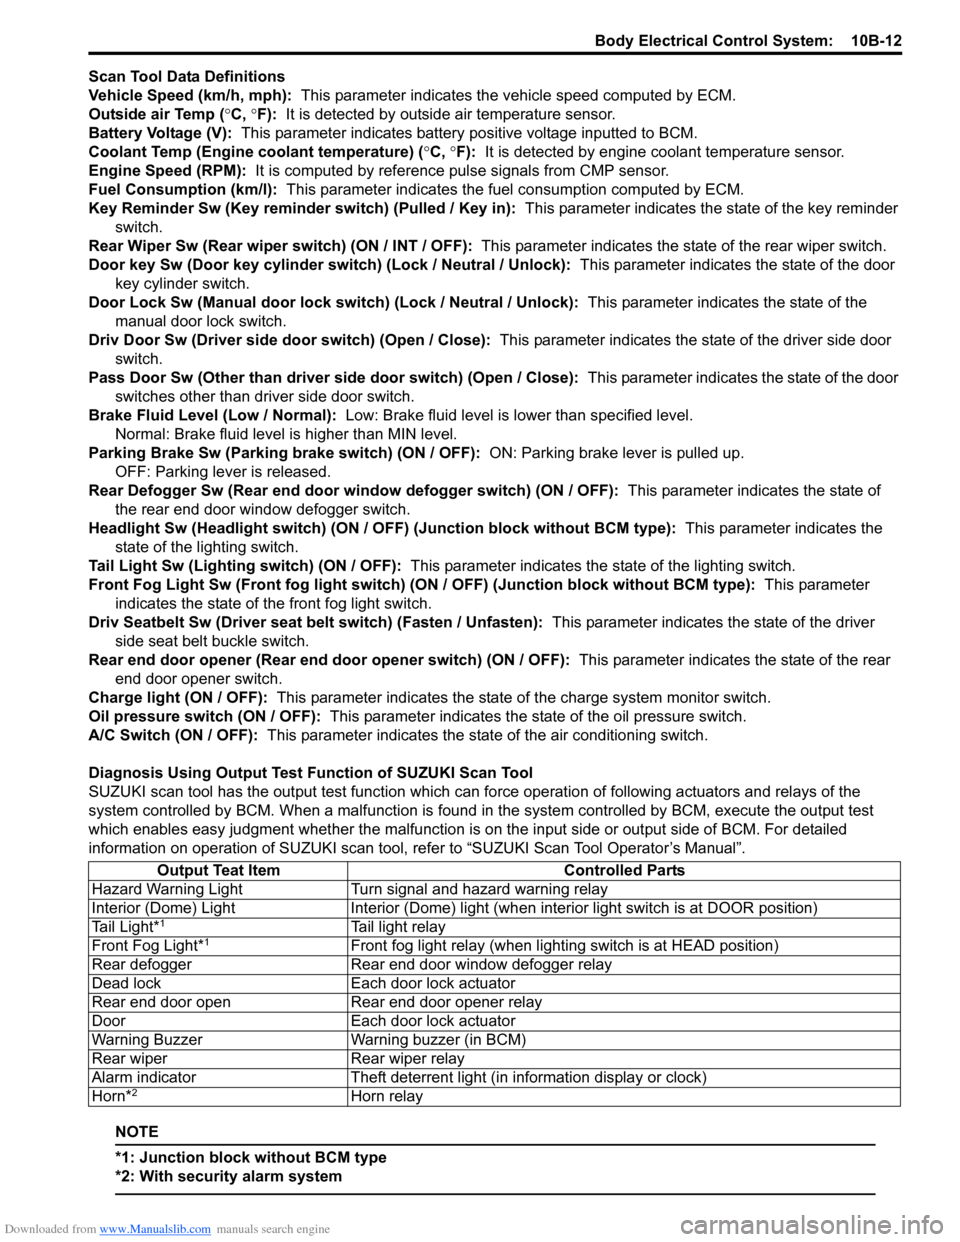
Diagnosis Using Output Test Function of SUZUKI Scan Tool
SUZUKI scan tool has the output test function which can force operation of following actuators and relays of the
system controlled by BCM. When a malfunction is found in the system controlled by BCM, execute the output test
which enables easy judgment whether the malfunction is on the input side or output side of BCM. For detailed
information on operation of SUZUKI scan tool, refer to “SUZUKI Scan Tool Operator’s Manual”.
NOTE
*1: Junction block without BCM type
*2: With security alarm system
Output Teat Item Controlled Parts
Hazard Warning Light Turn signal and hazard warning relay
Interior (Dome) Light Interior (Dome) light (when interior light switch is at DOOR position)
Tail Light*
1Tail light relay
Front Fog Light*1Front fog light relay (when lighting switch is at HEAD position)
Rear defogger Rear end door window defogger relay
Dead lock Each door lock actuator
Rear end door open Rear end door opener relay
Door Each door lock actuator
Warning Buzzer Warning buzzer (in BCM)
Rear wiper Rear wiper relay
Alarm indicator Theft deterrent light (in information display or clock)
Horn*
2Horn relay
Page 1515 of 1556
Downloaded from www.Manualslib.com manuals search engine Immobilizer Control System: 10C-13
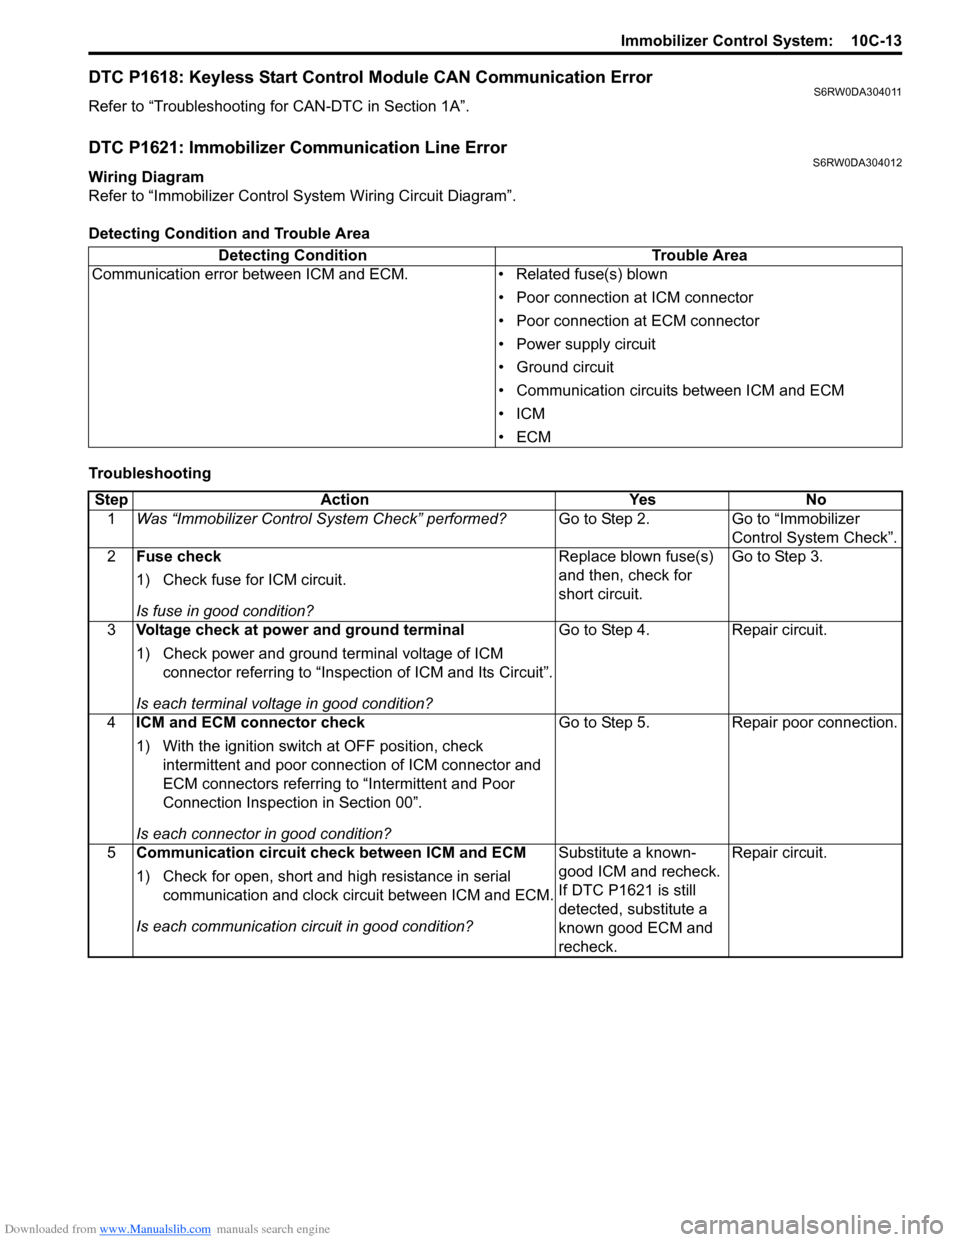
DTC P1618: Keyless Start Control Module CAN Communication ErrorS6RW0DA304011
Refer to “Troubleshooting for CAN-DTC in Section 1A”.
DTC P1621: Immobilizer Communication Line ErrorS6RW0DA304012
Wiring Diagram
Refer to “Immobilizer Control System Wiring Circuit Diagram”.
Detecting Condition and Trouble Area
TroubleshootingDetecting Condition Trouble Area
Communication error between ICM and ECM. • Related fuse(s) blown
• Poor connection at ICM connector
• Poor connection at ECM connector
• Power supply circuit
• Ground circuit
• Communication circuits between ICM and ECM
•ICM
•ECM
Step Action Yes No
1Was “Immobilizer Control System Check” performed?Go to Step 2. Go to “Immobilizer
Control System Check”.
2Fuse check
1) Check fuse for ICM circuit.
Is fuse in good condition?Replace blown fuse(s)
and then, check for
short circuit.Go to Step 3.
3Voltage check at power and ground terminal
1) Check power and ground terminal voltage of ICM
connector referring to “Inspection of ICM and Its Circuit”.
Is each terminal voltage in good condition?Go to Step 4. Repair circuit.
4ICM and ECM connector check
1) With the ignition switch at OFF position, check
intermittent and poor connection of ICM connector and
ECM connectors referring to “Intermittent and Poor
Connection Inspection in Section 00”.
Is each connector in good condition?Go to Step 5. Repair poor connection.
5Communication circuit check between ICM and ECM
1) Check for open, short and high resistance in serial
communication and clock circuit between ICM and ECM.
Is each communication circuit in good condition?Substitute a known-
good ICM and recheck.
If DTC P1621 is still
detected, substitute a
known good ECM and
recheck.Repair circuit.
Page 1520 of 1556
Downloaded from www.Manualslib.com manuals search engine 10C-18 Immobilizer Control System:
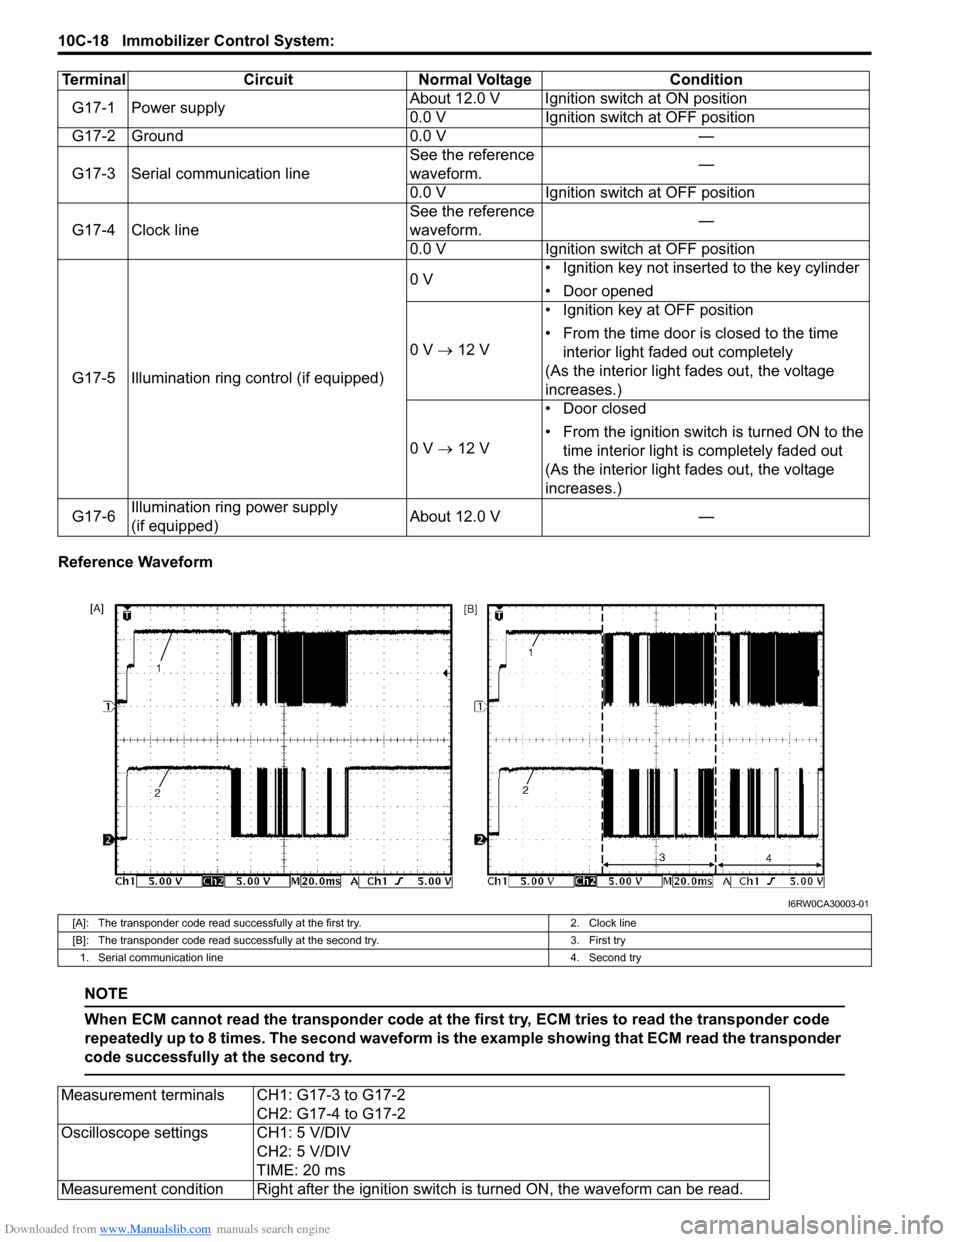
Reference Waveform
NOTE
When ECM cannot read the transponder code at the first try, ECM tries to read the transponder code
repeatedly up to 8 times. The second waveform is the example showing that ECM read the transponder
code successfully at the second try.
Terminal Circuit Normal Voltage Condition
G17-1 Power supplyAbout 12.0 V Ignition switch at ON position
0.0 V Ignition switch at OFF position
G17-2 Ground 0.0 V —
G17-3 Serial communication lineSee the reference
waveform.—
0.0 V Ignition switch at OFF position
G17-4 Clock lineSee the reference
waveform.—
0.0 V Ignition switch at OFF position
G17-5 Illumination ring control (if equipped)0 V• Ignition key not inserted to the key cylinder
• Door opened
0 V → 12 V• Ignition key at OFF position
• From the time door is closed to the time
interior light faded out completely
(As the interior light fades out, the voltage
increases.)
0 V → 12 V• Door closed
• From the ignition switch is turned ON to the
time interior light is completely faded out
(As the interior light fades out, the voltage
increases.)
G17-6Illumination ring power supply
(if equipped)About 12.0 V —
I6RW0CA30003-01
[A]: The transponder code read successfully at the first try. 2. Clock line
[B]: The transponder code read successfully at the second try. 3. First try
1. Serial communication line 4. Second try
Measurement terminals CH1: G17-3 to G17-2
CH2: G17-4 to G17-2
Oscilloscope settings CH1: 5 V/DIV
CH2: 5 V/DIV
TIME: 20 ms
Measurement condition Right after the ignition switch is turned ON, the waveform can be read.