Page 828 of 1556

Downloaded from www.Manualslib.com manuals search engine 5B-16 Manual Transmission/Transaxle:
Manual Transaxle Assembly ComponentsS6RW0D5206014
I5RW0A520018-03
1. Transaxle right case 22. Shift fork bolt
: Apply thread lock 99000-32110 to all around thread part of bolt.
2. Transaxle left case
: Apply sealant 99000-31260 to mating surface of left case and right
case.23. 5th gear shift fork
3. Gear shift and select shaft assembly
: Apply sealant 99000-31260 to mating surface of guide case and left
case.24. Needle bearing
4. Transaxle left case plate 25. Input shaft 5th gear
5. Transaxle side cover
: Apply sealant 99000-31260 to mating surface of side cover and left
case.26. Reverse gear shift lever
6. Back up light switch 27. Reverse gear shift lever bolt
: Apply thread lock 99000-32110 to all around thread part of bolt.
7. O-ring28. Reverse gear shaft
8. Differential assembly 29. Washer
9. Oil level / filler plug
: Apply sealant 99000-31260 to all around thread part of plug.30. Reverse idler gear
Page 832 of 1556

Downloaded from www.Manualslib.com manuals search engine 5B-20 Manual Transmission/Transaxle:
2) Remove bearing set shim.
3) Remove snap ring (1) using special tool.
Special tool
(A): 09900–06107
4) Remove gear shift locating bolts (1), then take out
locating springs and steel balls.
5) Remove reverse shaft bolt (2) with washer.
6) Remove transaxle case bolts (1) from outside and
another bolts from clutch housing side.
7) Tapping left case flanges with plastic hammer,
remove left case.8) Pull out reverse gear shaft (1) with washer (2), then
take off reverse idler gear (3).
9) Remove reverse gear shift lever bolts (4) and
reverse gear shift lever (5).
10) Pull out 5th & reverse gear shift guide shaft (6)
together with 5th & reverse gear shift shaft (7).
NOTE
When removing 5th & reverse gear shift shaft
(7) and guide shaft (6), push up high speed
gear shift shaft and shift it to 4th to facilitate
removal of 5th & reverse shift shaft.
11) Tapping input shaft end with plastic hammer, push it
out as assembly from case a little, then take out
input shaft assembly (1), countershaft assembly (2),
high speed gear shift shaft (3) and low speed gear
shift shaft (4) all at once.
12) Remove countershaft left bearing outer race from left
case.
13) Remove differential assembly from right case.
2. Input shaft
3. Input shaft left bearing
1 (A)
2
3
I4RH01520019-01
1I5RW0A520021-01
I4RH01520020-01
I3RH0A520012-01
I2RH01520035-01
Page 833 of 1556

Downloaded from www.Manualslib.com manuals search engine Manual Transmission/Transaxle: 5B-21
Reassembly
1) Install differential assembly into right case.
2) Join input shaft (5), countershaft (4), low speed gear
shift shaft (2) and high speed gear shift shaft (3)
assemblies all together, then install them into right
case (1) so as not to damage oil seal by input shaft
spline.
NOTE
• Input shaft right bearing on shaft can be
installed into right case (1) by tapping shaft
with plastic hammer.
• Make sure that countershaft is engaged
with final gear while installing.
3) Install 5th & reverse gear shift shaft (1) with 5th &
reverse gear shift guide shaft (2) into right case (5).
Reverse gear shift arm (4) has to be joined with
reverse gear shift lever (3) at the same time.4) Make reverse idler gear (1) with reverse gear shift
lever (2), insert reverse gear shaft (3) and washer (6)
into case (4) through idler gear and then align bolt
hole “a” in shaft with notch “b” in case.
5) Fasten reverse gear shift lever bolts (5) after
applying thread lock cement.
“A”: Thread lock cement 99000–32110 (Thread
Lock Cement Super 1322)
Tightening torque
Reverse gear shift lever bolt (a): 23 N·m (2.3 kgf-
m, 17.0 lb-ft)
NOTE
Check to confirm that reverse gear shift lever
end has clearance “c” to idler gear groove.
Distance between lever end and idler gear shaft
“c”: 0.5 – 1.0 mm (0.02 – 0.04 in.)
I2RH01520080-01
I3RH0A520013-01
I5RW0A520022-02
Page 836 of 1556

Downloaded from www.Manualslib.com manuals search engine 5B-24 Manual Transmission/Transaxle:
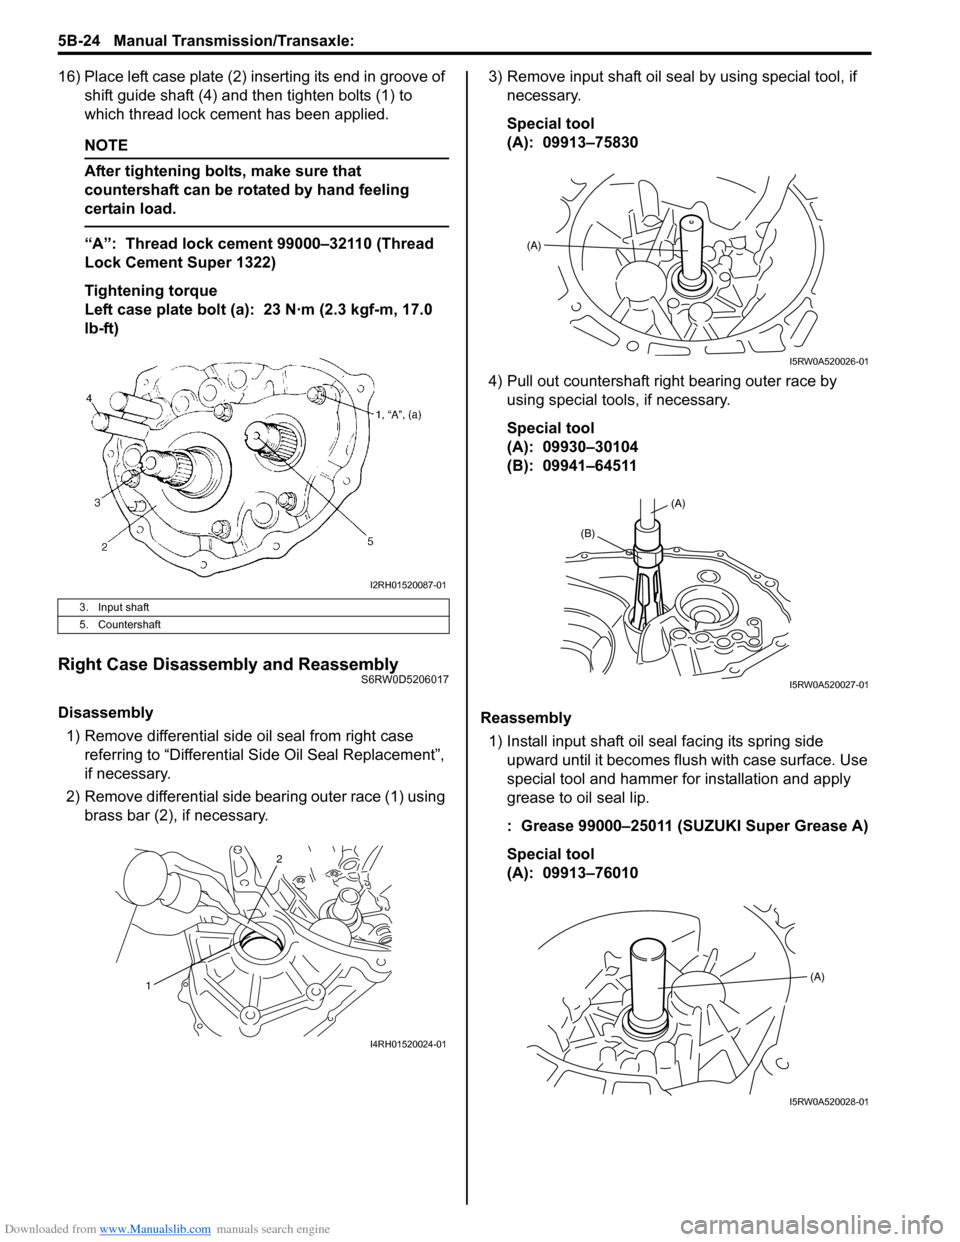
16) Place left case plate (2) inserting its end in groove of
shift guide shaft (4) and then tighten bolts (1) to
which thread lock cement has been applied.
NOTE
After tightening bolts, make sure that
countershaft can be rotated by hand feeling
certain load.
“A”: Thread lock cement 99000–32110 (Thread
Lock Cement Super 1322)
Tightening torque
Left case plate bolt (a): 23 N·m (2.3 kgf-m, 17.0
lb-ft)
Right Case Disassembly and ReassemblyS6RW0D5206017
Disassembly
1) Remove differential side oil seal from right case
referring to “Differential Side Oil Seal Replacement”,
if necessary.
2) Remove differential side bearing outer race (1) using
brass bar (2), if necessary.3) Remove input shaft oil seal by using special tool, if
necessary.
Special tool
(A): 09913–75830
4) Pull out countershaft right bearing outer race by
using special tools, if necessary.
Special tool
(A): 09930–30104
(B): 09941–64511
Reassembly
1) Install input shaft oil seal facing its spring side
upward until it becomes flush with case surface. Use
special tool and hammer for installation and apply
grease to oil seal lip.
: Grease 99000–25011 (SUZUKI Super Grease A)
Special tool
(A): 09913–76010
3. Input shaft
5. Countershaft
I2RH01520087-01
2
1
I4RH01520024-01
(A)
I5RW0A520026-01
(A)
(B)
I5RW0A520027-01
(A)
I5RW0A520028-01
Page 837 of 1556
Downloaded from www.Manualslib.com manuals search engine Manual Transmission/Transaxle: 5B-25
2) Install countershaft right bearing outer race (1) by
using special tools and hammer.
Special tool
(A): 09913–75821
(B): 09924–84510–004
3) Install differential side bearing outer race by using
special tool and hammer.
Special tool
(A): 09924–74510
(B): 09925–14520Left Case Disassembly and ReassemblyS6RW0D5206018
Disassembly
1) Removal oil gutter (1), if necessary.
2) Remove oil seal using flat end rod or the like.
3) Remove differential side bearing outer race (1) using
special tools.
Special tool
(A): 09942–15511
(B): 09944–96011
I5RW0A520029-02
(A)
(B)
I5RW0A520030-01
I4RH01520028-01
(A)
(B)
1I5RW0A520031-01
Page 838 of 1556

Downloaded from www.Manualslib.com manuals search engine 5B-26 Manual Transmission/Transaxle:
Reassembly
1) If oil gutter has been removed, install it with bolt to
which thread lock cement has been applied.
“A”: Thread lock cement 99000–32110 (Thread
Lock Cement Super 1322)
Tightening torque
Oil gutter bolt (a): 10 N·m (1.0 kgf-m, 7.5 lb-ft)
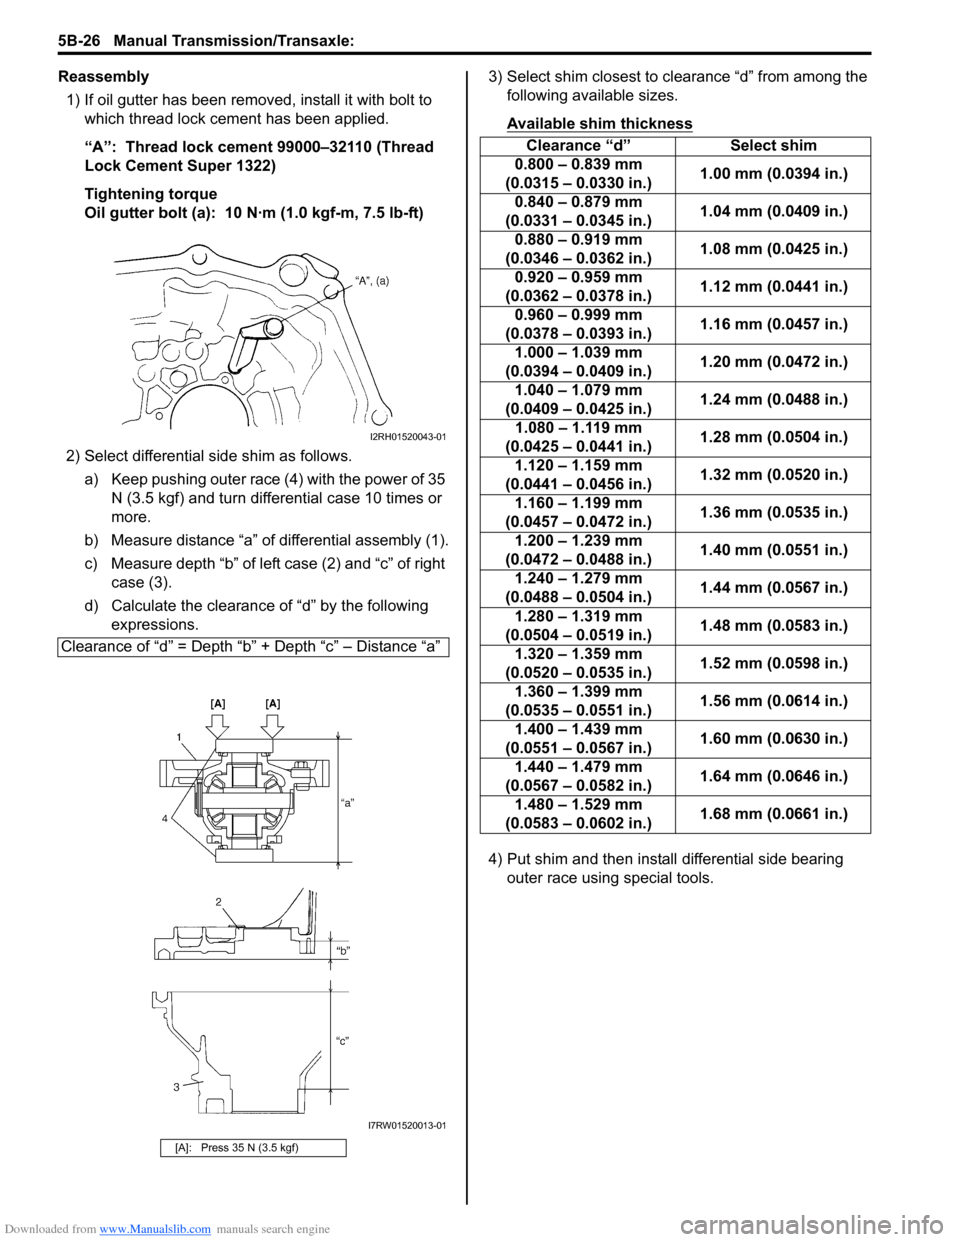
2) Select differential side shim as follows.
a) Keep pushing outer race (4) with the power of 35
N (3.5 kgf) and turn differential case 10 times or
more.
b) Measure distance “a” of differential assembly (1).
c) Measure depth “b” of left case (2) and “c” of right
case (3).
d) Calculate the clearance of “d” by the following
expressions.3) Select shim closest to clearance “d” from among the
following available sizes.
Available shim thickness
4) Put shim and then install differential side bearing
outer race using special tools. Clearance of “d” = Depth “b” + Depth “c” – Distance “a”
[A]: Press 35 N (3.5 kgf)
I2RH01520043-01
I7RW01520013-01
Clearance “d” Select shim
0.800 – 0.839 mm
(0.0315 – 0.0330 in.)1.00 mm (0.0394 in.)
0.840 – 0.879 mm
(0.0331 – 0.0345 in.)1.04 mm (0.0409 in.)
0.880 – 0.919 mm
(0.0346 – 0.0362 in.)1.08 mm (0.0425 in.)
0.920 – 0.959 mm
(0.0362 – 0.0378 in.)1.12 mm (0.0441 in.)
0.960 – 0.999 mm
(0.0378 – 0.0393 in.)1.16 mm (0.0457 in.)
1.000 – 1.039 mm
(0.0394 – 0.0409 in.)1.20 mm (0.0472 in.)
1.040 – 1.079 mm
(0.0409 – 0.0425 in.)1.24 mm (0.0488 in.)
1.080 – 1.119 mm
(0.0425 – 0.0441 in.)1.28 mm (0.0504 in.)
1.120 – 1.159 mm
(0.0441 – 0.0456 in.)1.32 mm (0.0520 in.)
1.160 – 1.199 mm
(0.0457 – 0.0472 in.)1.36 mm (0.0535 in.)
1.200 – 1.239 mm
(0.0472 – 0.0488 in.)1.40 mm (0.0551 in.)
1.240 – 1.279 mm
(0.0488 – 0.0504 in.)1.44 mm (0.0567 in.)
1.280 – 1.319 mm
(0.0504 – 0.0519 in.)1.48 mm (0.0583 in.)
1.320 – 1.359 mm
(0.0520 – 0.0535 in.)1.52 mm (0.0598 in.)
1.360 – 1.399 mm
(0.0535 – 0.0551 in.)1.56 mm (0.0614 in.)
1.400 – 1.439 mm
(0.0551 – 0.0567 in.)1.60 mm (0.0630 in.)
1.440 – 1.479 mm
(0.0567 – 0.0582 in.)1.64 mm (0.0646 in.)
1.480 – 1.529 mm
(0.0583 – 0.0602 in.)1.68 mm (0.0661 in.)
Page 848 of 1556
Downloaded from www.Manualslib.com manuals search engine 5B-36 Manual Transmission/Transaxle:
Differential ComponentsS6RW0D5206025
Differential Disassembly and ReassemblyS6RW0D5206026
Disassembly
1) Using special tool, remove left bearing (1).
Special tool
(A): 09913–65135
(B): 09913–852302) Using special tool, remove right bearing (1).
Special tool
(A): 09913–65135
(B): 09913–85230
(C): 09940–54950
I5RW0A520043-02
1. Differential pinion washer 6. Differential case : 90 N⋅m (9.0 kgf-m, 65.0 lb-ft)
2. Differential pinion 7. Final gear : Do not reuse.
3. Differential side gear 8. Final gear bolt : Apply transaxle oil.
4. Side gear washer 9. Differential pinion shaft
5. Differential side bearing 10. Differential pinion shaft pin
(B)
(A)
1
I5RW0A520044-01
(A)
1
(B)
(C)
I5RW0A520045-01
Page 849 of 1556

Downloaded from www.Manualslib.com manuals search engine Manual Transmission/Transaxle: 5B-37
3) Support differential case (1) with soft jawed vise and
remove final gear bolts then take out final gear.
4) Drive out differential pinion shaft (3) pin by using
special tool and hammer and then disassemble
components parts.
Special tool
(A): 09922–85811
Reassembly
Judging from abnormality noted before disassembly and
what is found through visual check of component parts
after disassembly, prepare replacing parts and proceed
to reassembly. Make sure that all parts are clean.
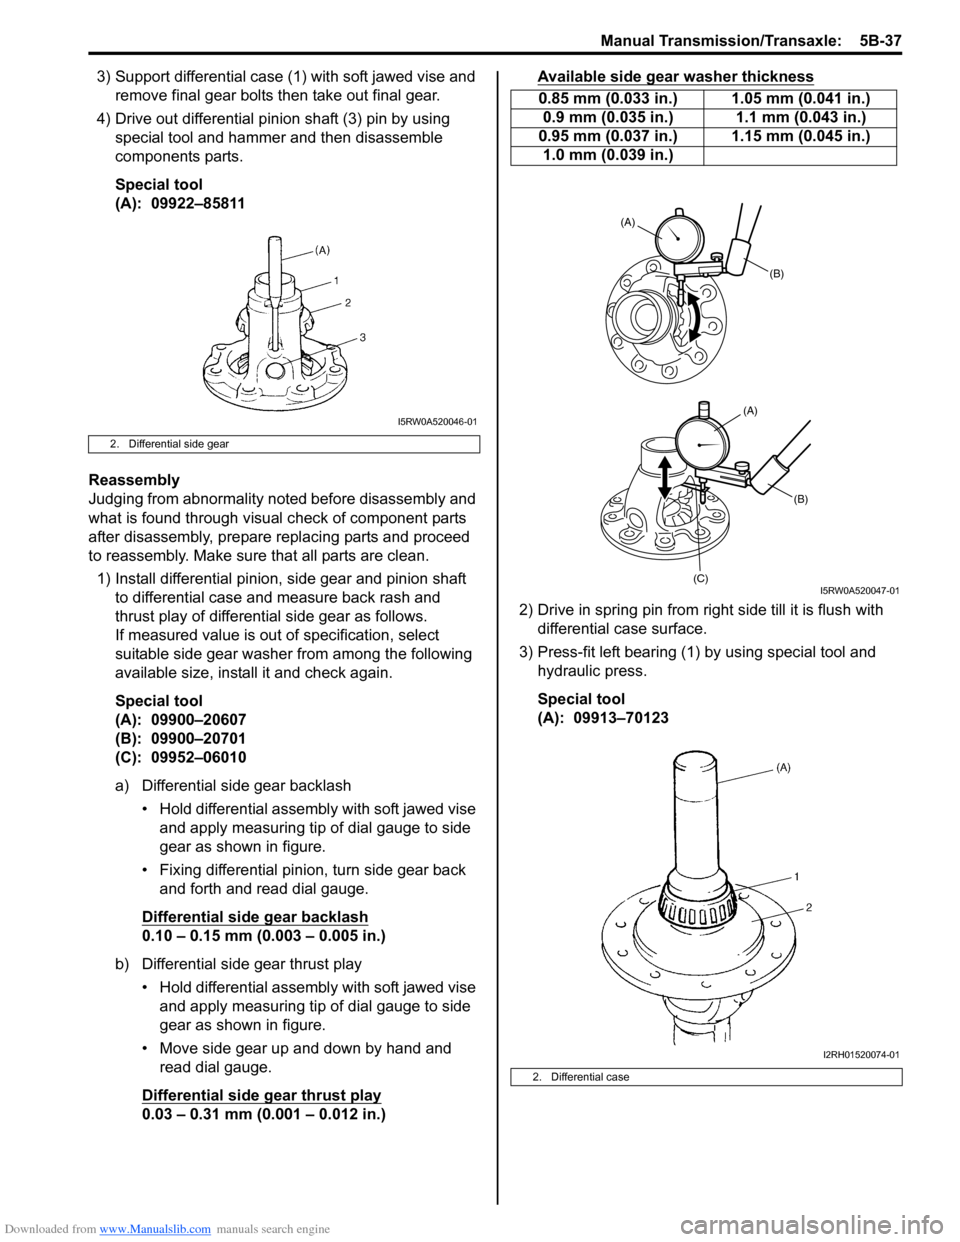
1) Install differential pinion, side gear and pinion shaft
to differential case and measure back rash and
thrust play of differential side gear as follows.
If measured value is out of specification, select
suitable side gear washer from among the following
available size, install it and check again.
Special tool
(A): 09900–20607
(B): 09900–20701
(C): 09952–06010
a) Differential side gear backlash
• Hold differential assembly with soft jawed vise
and apply measuring tip of dial gauge to side
gear as shown in figure.
• Fixing differential pinion, turn side gear back
and forth and read dial gauge.
Differential side gear backlash
0.10 – 0.15 mm (0.003 – 0.005 in.)
b) Differential side gear thrust play
• Hold differential assembly with soft jawed vise
and apply measuring tip of dial gauge to side
gear as shown in figure.
• Move side gear up and down by hand and
read dial gauge.
Differential side gear thrust play
0.03 – 0.31 mm (0.001 – 0.012 in.)Available side gear washer thickness
2) Drive in spring pin from right side till it is flush with
differential case surface.
3) Press-fit left bearing (1) by using special tool and
hydraulic press.
Special tool
(A): 09913–70123
2. Differential side gear
I5RW0A520046-01
0.85 mm (0.033 in.) 1.05 mm (0.041 in.)
0.9 mm (0.035 in.) 1.1 mm (0.043 in.)
0.95 mm (0.037 in.) 1.15 mm (0.045 in.)
1.0 mm (0.039 in.)
2. Differential case
(B)
(B)
(C)
(A)
(A)
I5RW0A520047-01
I2RH01520074-01