2006 SUBARU IMPREZA WRX keyless
[x] Cancel search: keylessPage 88 of 365

2
Keys and doors
Keys ..................................................................... 2-2
Key number ........................................ ..................... 2-2
Immobilizer (Turbo models) ......................... ..... 2-3
Security ID plate ................................. .................... 2-3
Security indicator light .......................... ................. 2-3
Key replacement ................................... .................. 2-4
Door locks ........................................ ................... 2-4
Locking and unlocking from the outside ............ . 2-4
Locking and unlocking from the inside ............. ... 2-5
Key lock-in prevention function ................... ......... 2-5
Power door locking switches ....................... ..... 2-6
Remote keyless entry system ....................... .... 2-7
Locking the doors ................................. ................. 2-7
Unlocking the doors ............................... ................ 2-8
Illuminated entry ................................. .................... 2-8
Vehicle finder function ........................... ................ 2-8
Sounding a panic alarm ............................ ............. 2-8
Selecting audible signal operation ................ ....... 2-8
Replacing the battery ............................. ................ 2-9
Replacing lost transmitters ....................... ............ 2-10
Alarm system ...................................... ................ 2-13
System alarm operation ............................ ............. 2-13
Activating and deactivating the alarm system ..... 2 -13
If you have accidentally triggered the alarm
system ............................................ ....................... 2-14
Arming the system ................................. ................ 2-14
Disarming the system .............................. .............. 2-15
Valet mode ........................................ ...................... 2-16
Passive arming .................................... ................... 2-16Tripped sensor identification .....................
........... 2-17
Shock sensors (dealer option) ..................... ......... 2-17
Child safety locks ................................ ............... 2-18
Windows ........................................... ................... 2-18
Power windows ..................................... .................. 2-18
Trunk lid (Sedan) ................................. ............... 2-20
To open and close the trunk lid from outside ...... 2-20
To open the trunk lid from inside ................. ......... 2-21
To cancel the trunk lid release ................... ........... 2-21
Internal trunk lid release handle ................. ........... 2-21
Rear gate (Wagon) ................................. ............. 2-23
Moonroof (if equipped) ............................ .......... 2-24
Tilt function ..................................... ........................ 2-24
Sliding function .................................. ..................... 2-24
Sun shades ........................................ ...................... 2-25
Page 94 of 365
Keys and doors 2-7
CONTINUED
Remote keyless entry sys-
tem
Two transmitters are provided for your ve-
hicle.
The remote keyless entry system has the
following functions.
Locking and unlocking the doors (and
rear gate on the Wagon) without a key
Sounding a panic alarm
Arming and disarming the alarm sys-
tem. See the next section Alarm system
for detailed information.
This device complies with Part 15 of
the FCC Rules and with RSS-210 of In-
dustry Canada. Operation is subject to
the following two conditions: (1) This
device may not cause harmful interfer-
ence, and (2) this device must accept
any interference received, including in-
terference that may cause undesired
operation.
Changes or modifications not express-
ly approved by the party responsible
for compliance could void the user s
authority to operate the equipment.
The operable distance of the keyless entry
system is approximately 30 feet (10
meters). However, this distance will vary
depending on environmental conditions. The system
s operable distance will be
shorter in areas near a facility or electronic
equipment emitting strong radio waves
such as a power plant, broadcast station,
TV tower, or remote controller of home
electronic appliances.
The remote keyless entry system does not
operate when the key is inserted in the ig-
nition switch to prevent accidental lockout.
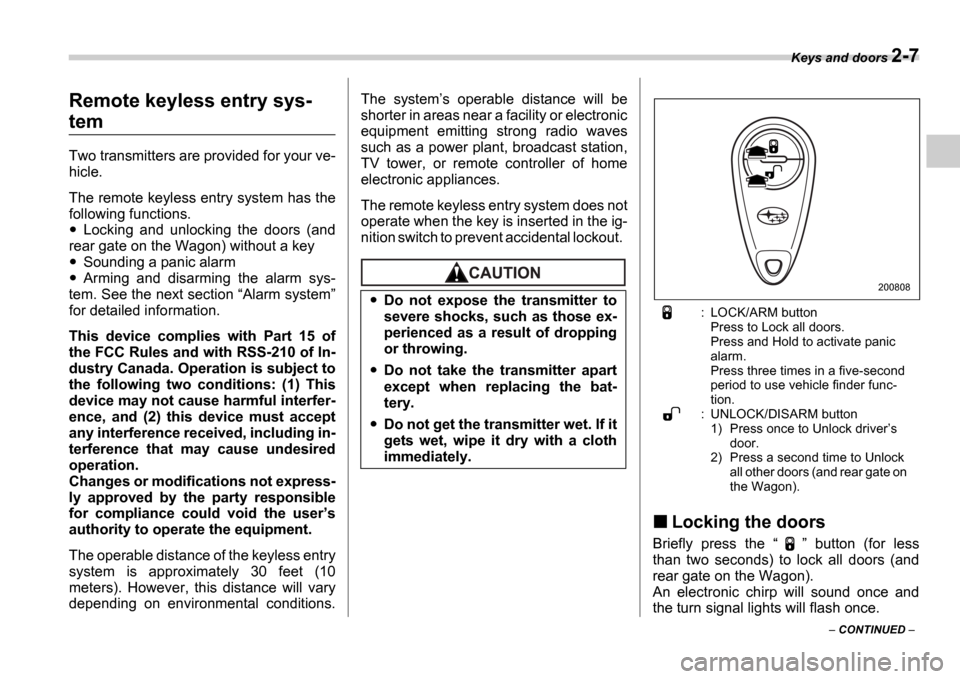
: LOCK/ARM button Press to Lock all doors.
Press and Hold to activate panic
alarm.
Press three times in a five-second
period to use vehicle finder func-
tion.
: UNLOCK/DISARM button 1) Press once to Unlock driver s
door.
2) Press a second time to Unlock
all other doors (and rear gate on
the Wagon).
Locking the doors
Briefly press the button (for less
than two seconds) to lock all doors (and
rear gate on the Wagon).
An electronic chirp will sound once and
the turn signal lights will flash once.
Do not expose the transmitter to
severe shocks, such as those ex-
perienced as a result of dropping
or throwing.
Do not take the transmitter apart
except when replacing the bat-
tery.
Do not get the transmitter wet. If it
gets wet, wipe it dry with a cloth
immediately.
200808
Page 96 of 365
Keys and doors 2-9
CONTINUED
seconds after Step 3.
5. While still holding down the
UNLOCK
side of the power door locking switch,
close the driver s door once within 10 sec-
onds after Step 4.
6. The turn signal lights flashes 3 times to
indicate completion of the setting.
NOTE
If you do not close the driver s door
within 10 seconds after Step 4, a flash
of the turn signal lights will signal time-
out. If this happens, repeat the whole
procedure from Step 1.
You may have the above settings done by
your SUBARU dealer.
Replacing the battery
When the transmitter battery begins to get
weak, transmitter range will begin to de-
crease. Replace the battery as soon as
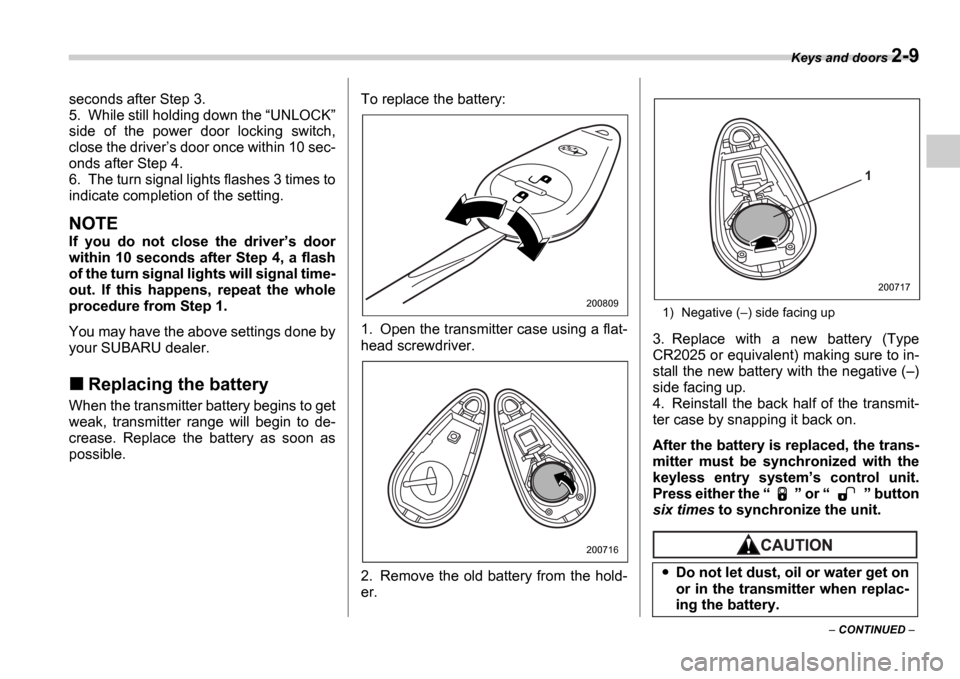
possible. To replace the battery:
0
1. Open the transmitter case using a flat-
head screwdriver.
2. Remove the old battery from the hold-
er.
1) Negative (
) side facing up
3. Replace with a new battery (Type
CR2025 or equivalent) making sure to in-
stall the new battery with the negative ( )
side facing up.
4. Reinstall the back half of the transmit-
ter case by snapping it back on.
After the battery is replaced, the trans-
mitter must be synchronized with the
keyless entry system s control unit.
Press either the or button
six times to synchronize the unit.
200809
200716
Do not let dust, oil or water get on
or in the transmitter when replac-
ing the battery.
1
200717
Page 97 of 365
2-10 Keys and doors
Replacing lost transmitters
If you lose a transmitter or want to pur-
chase additional transmitters (up to four
can be programmed), you should re-pro-
gram all of your transmitters for security
reasons. It is recommended that you have
your dealer program all of your transmit-
ters into your system.
Programming the transmitters
The keyless entry system is equipped with
a special code learning feature that allows
you to program new transmitter codes into
the system or to delete old ones. The sys-
tem can learn up to four unique transmitter
codes. The four transmitter codes may be
the same or different. Programming transmitter codes into
system:
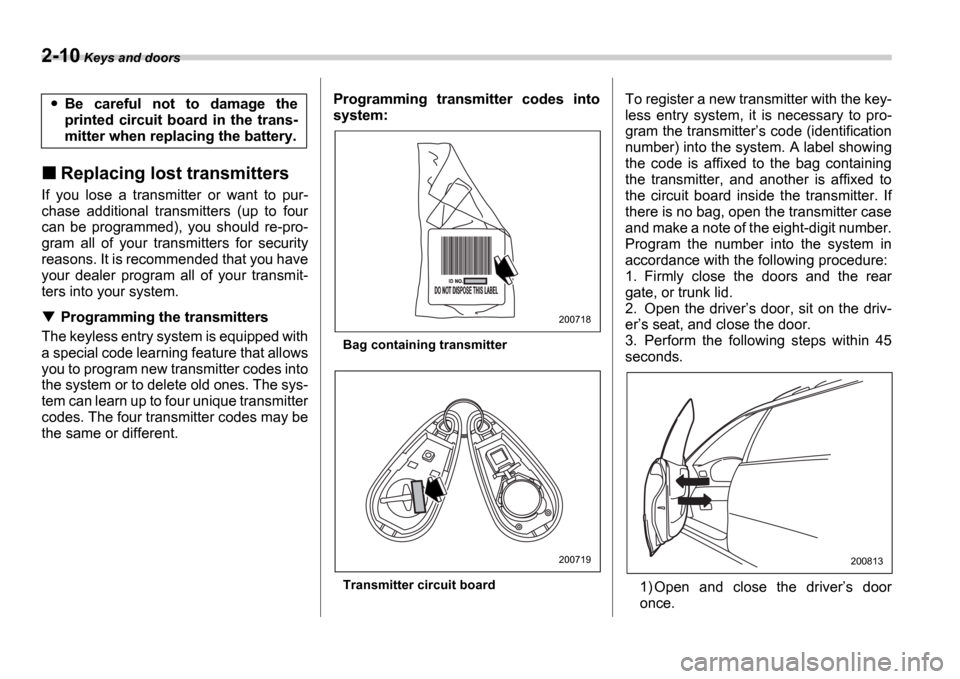
Bag containing transmitter
Transmitter circuit board
To register a new transmitter with the key-
less entry system, it is necessary to pro-
gram the transmitter
s code (identification
number) into the system. A label showing
the code is affixed to the bag containing
the transmitter, and another is affixed to
the circuit board inside the transmitter. If
there is no bag, open the transmitter case
and make a note of the eight-digit number.
Program the number into the system in
accordance with the following procedure:
1. Firmly close the doors and the rear
gate, or trunk lid.
2. Open the driver s door, sit on the driv-
er s seat, and close the door.
3. Perform the following steps within 45
seconds.
1) Open and close the driver s door
once.Be careful not to damage the
printed circuit board in the trans-
mitter when replacing the battery.
200718
200719200813
Page 99 of 365
2-12 Keys and doors
number, push the unlock side of the lock
switch within five seconds.
NOTE
An electronic tone will sound.
If you push the unlock side of the
lock switch when more than five sec-
onds have passed, an error will occur.
In this event, perform the procedure
again beginning with part 4. If an error
occurs six times, perform the proce-
dure again starting with part 3.
7. Perform parts 5 and 6 of the procedure
for each of the remaining digits of the
transmitter code beginning with the sec-
ond digit (counting from the left) and fin-
ishing with the eighth digit.
NOTE
When you finish entering the eighth
digit, an electronic tone will sound for
30 seconds.
If the interval between one push of
the switch and the next exceeds five
seconds, an error will occur. In this
event, perform the procedure again be-
ginning with part 4. If an error occurs
six times, perform the procedure again
starting with part 3.
8. Before the electronic tone stops sound-
ing, use the power door lock switch to
again enter the transmitter code beginning with the leftmost digit.
NOTE
If you do not start entering the number
using the lock switch before the elec-
tronic tone stops sounding, an error
will occur. In this event, perform the
procedure again beginning with part 3.
9. When you have finished entering the
code a second time, an electronic tone will
sound for one second and automatic door
locking and unlocking operation will take
place once to indicate completion of regis-
tration, provided the code entered the sec-
ond time is identical to that entered the
first time.
NOTE
If the code entered the second time is
not identical to the code entered the
first time, an error will occur. In this
event, perform the procedure again be-
ginning with part 5. If an error occurs
five times, perform the procedure
again starting with part 3.
10.If you wish to program another trans-
mitter code into the system (up to four
transmitter codes can be programmed
into the system), perform the procedure
beginning with part 4. When you have fin-
ished programming all of the necessary
transmitter codes into the system, removethe key from the ignition switch.
11.Test every registered transmitter to
confirm correct operation.
Deleting old transmitter codes
The control unit of the keyless entry sys-
tem has four memory locations to store
transmitter codes, giving it the ability to
operate with up to four transmitters. When
you lose a transmitter, the lost transmit-
ter s code remains in the memory. For se-
curity reasons, lost transmitter codes
should be deleted from the memory.
To delete old transmitter codes, program
four transmitter codes into the system. If
you have only one current transmitter,
program it four times. If you have two cur-
rent transmitters, program each one twice.
If you have three current transmitters, pro-
gram two of them once and the third one
twice. This process will leave only current
transmitter codes in the system s memory.
NOTE
Make sure no one else is operating
their keyless entry system within range
of your vehicle when programming
transmitters. If someone else were to
operate their remote transmitter while
you are programming your transmit-
ters, it is possible that their transmitter
code will be programmed into your
system, allowing them unauthorized
Page 110 of 365
Keys and doors 2-23
CONTINUED
SUBARU dealer.
In that case, use the key to release the
latch, then close the trunk lid.
Also, if the movement of the release han-
dle feels restricted or not entirely smooth
during operation, or the handle and/or
handle base is cracked, contact your
SUBARU dealer.
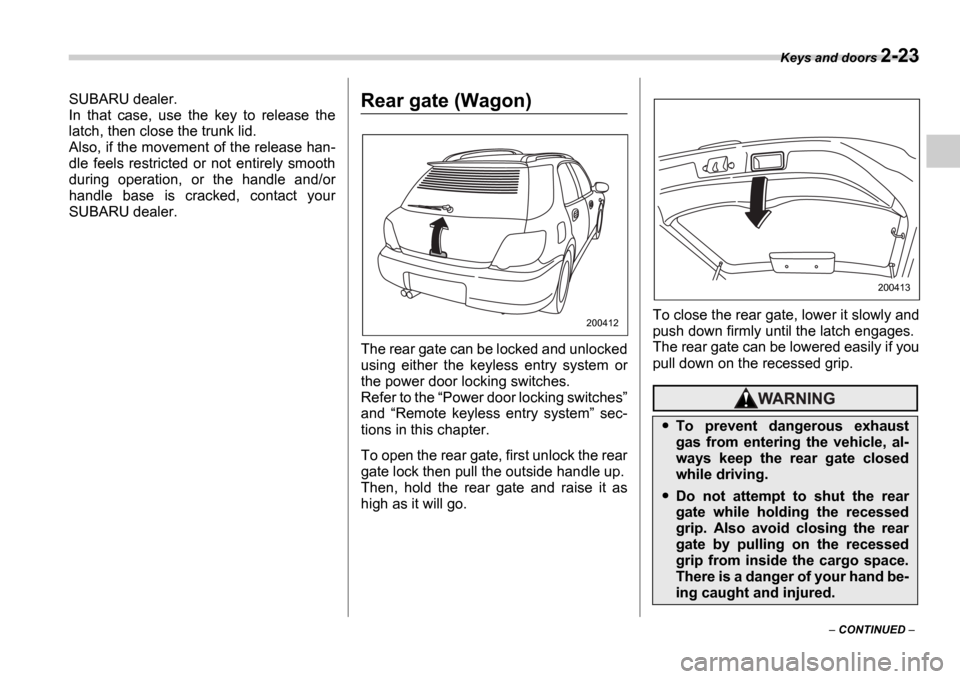
Rear gate (Wagon)
The rear gate can be locked and unlocked
using either the keyless entry system or
the power door locking switches.
Refer to the
Power door locking switches
and Remote keyless entry system sec-
tions in this chapter.
To open the rear gate, first unlock the rear
gate lock then pull the outside handle up.
Then, hold the rear gate and raise it as
high as it will go. To close the rear gate, lower it slowly and
push down firmly until the latch engages.
The rear gate can be lowered easily if you
pull down on the recessed grip.
200412
To prevent dangerous exhaust
gas from entering the vehicle, al-
ways keep the rear gate closed
while driving.
Do not attempt to shut the rear
gate while holding the recessed
grip. Also avoid closing the rear
gate by pulling on the recessed
grip from inside the cargo space.
There is a danger of your hand be-
ing caught and injured.
200413
Page 187 of 365
6-2 Interior equipment
Interior equipm entInterior light
When leaving your vehicle, make sure the
light goes out to avoid battery discharge.
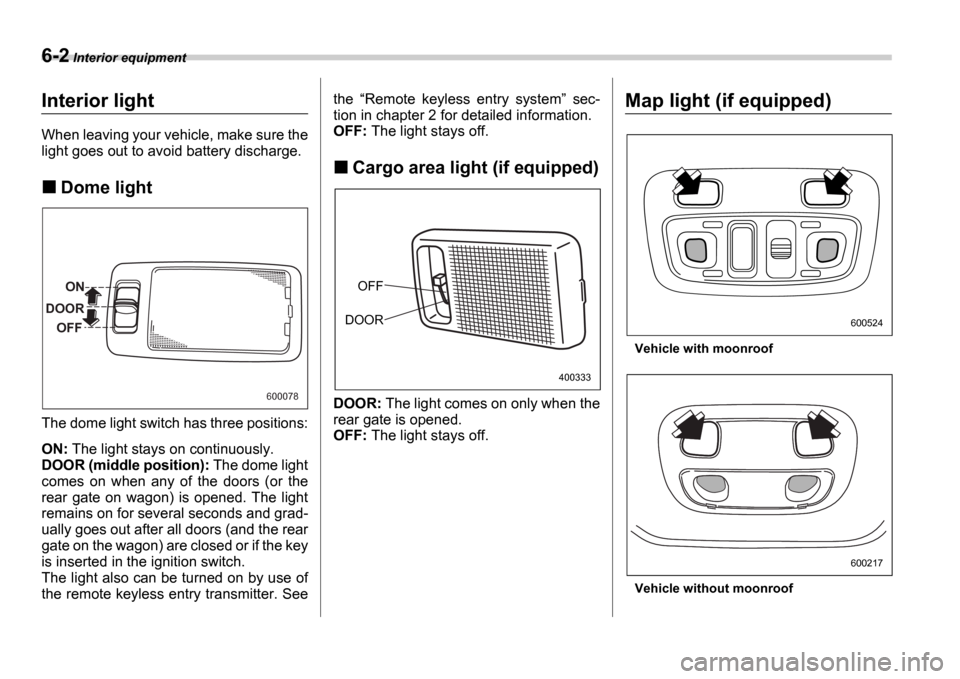
Dome light
The dome light switch has three positions:
ON: The light stays on continuously.
DOOR (middle position): The dome light
comes on when any of the doors (or the
rear gate on wagon) is opened. The light
remains on for several seconds and grad-
ually goes out after all doors (and the rear
gate on the wagon) are closed or if the key
is inserted in the ignition switch.
The light also can be turned on by use of
the remote keyless entry transmitter. See the
Remote keyless entry system sec-
tion in chapter 2 for detailed information.
OFF: The light stays off.
Cargo area light (if equipped)
DOOR: The light comes on only when the
rear gate is opened.
OFF: The light stays off.
Map light (if equipped)
Vehicle with moonroof
Vehicle without moonroof
ON
DOOR OFF
600078
OFF
DOOR
400333
600524
600217
Page 270 of 365
In case of emergency 9-15
CONTINUED
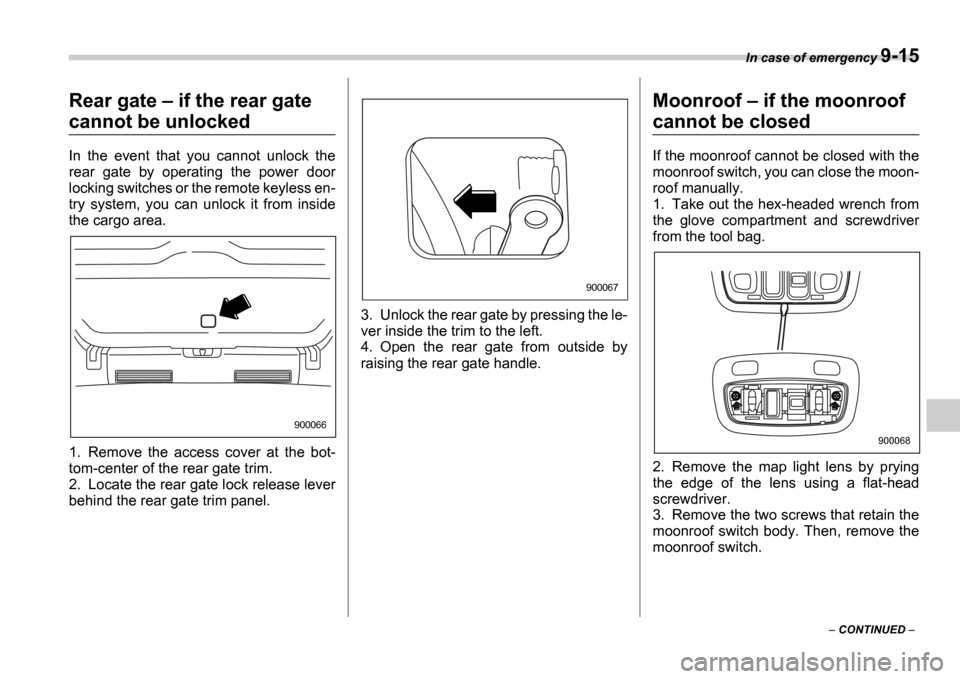
Rear gate if the rear gate
cannot be unlocked
In the event that you cannot unlock the
rear gate by operating the power door
locking switches or the remote keyless en-
try system, you can unlock it from inside
the cargo area.
0
1. Remove the access cover at the bot-
tom-center of the rear gate trim.
2. Locate the rear gate lock release lever
behind the rear gate trim panel. 3. Unlock the rear gate by pressing the le-
ver inside the trim to the left.
4. Open the rear gate from outside by
raising the rear gate handle.
Moonroof
if the moonroof
cannot be closed
If the moonroof cannot be closed with the
moonroof switch, you can close the moon-
roof manually.
1. Take out the hex-headed wrench from
the glove compartment and screwdriver
from the tool bag.
2. Remove the map light lens by prying
the edge of the lens using a flat-head
screwdriver.
3. Remove the two screws that retain the
moonroof switch body. Then, remove the
moonroof switch.
900066
900067
900068