2006 SUBARU IMPREZA WRX adding
[x] Cancel search: addingPage 161 of 365
4-12 Climate control
any problem with the air conditioning sys-
tem.
Air conditioner compressor
shut-off when engine is
heavily loaded
To improve acceleration and gas mileage,
the air conditioner compressor is de-
signed to temporarily shut off during air
conditioner operation whenever the accel-
erator is fully depressed such as during
rapid acceleration or when driving on a
steep upgrade.
Refrigerant for your climate
control system
Your air conditioner uses ozone friendly
refrigerant HFC134a. Therefore, the
method of adding, changing or checking
the refrigerant is different from the method
for CFC12 (Freon). Consult your
SUBARU dealer for service. Repairs
needed as a result of using the wrong re-
frigerant are not covered under warranty.
Air filtration system
If your vehicle s air conditioning system is
equipped with an air filtration system, re-
place the filter element according to the
replacement schedule shown in the fol-
lowing. This schedule should be followed
to maintain the filter s dust collection abili-
ty. Under extremely dusty conditions, the
filter should be replaced more frequently.
It is recommended that you have your fil-
ter checked or replaced by your SUBARU
dealer. For replacement, use only a genu-
ine SUBARU air filter kit.
Replacement schedule:
Every 12 months or 7,500 miles (12,000
km) whichever comes first
Replacing an air filter
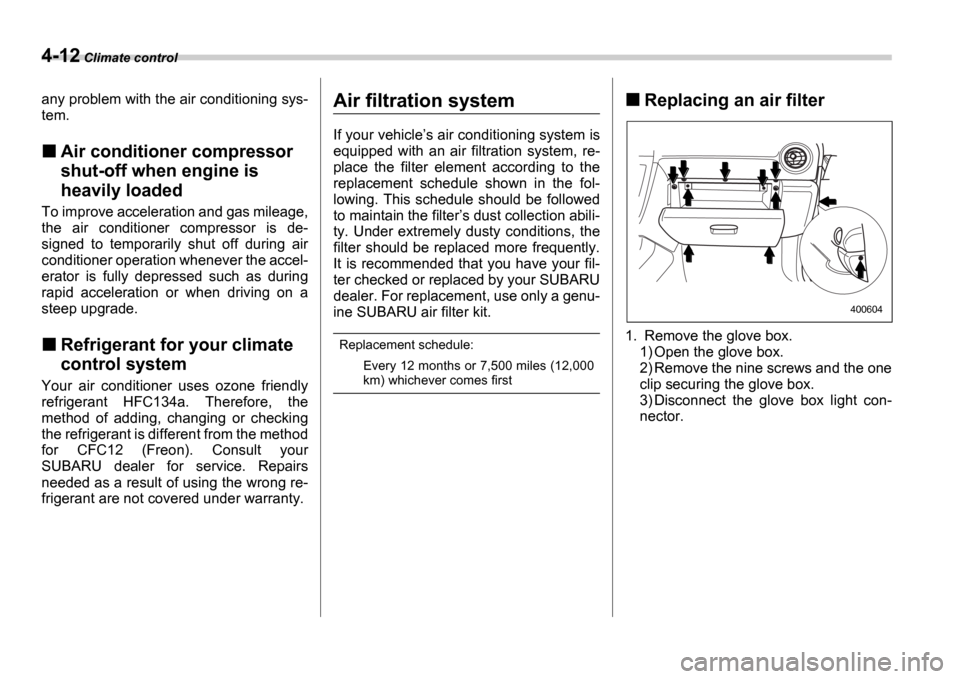
1. Remove the glove box.1) Open the glove box.
2) Remove the nine screws and the one
clip securing the glove box.
3) Disconnect the glove box light con-
nector.
400604
Page 287 of 365
11-8 Maintenance and service
Engine oil
Checking the oil level
Check the engine oil level at each fuel
stop.
1. Park the vehicle on a level surface and
stop the engine.
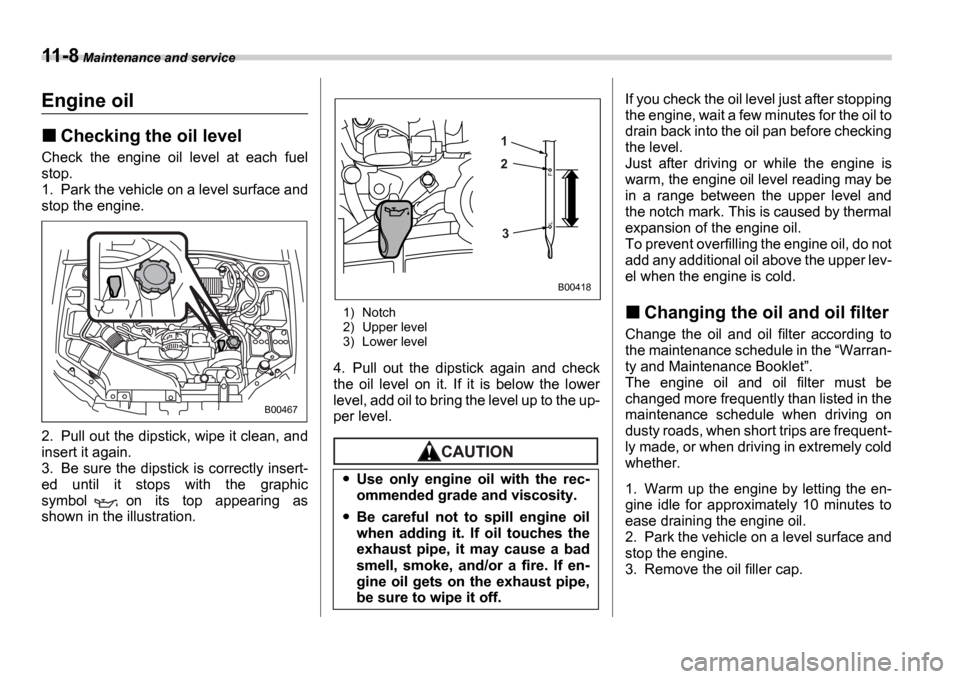
2. Pull out the dipstick, wipe it clean, and
insert it again.
3. Be sure the dipstick is correctly insert-
ed until it stops with the graphic
symbol on its top appearing as
shown in the illustration.
1) Notch
2) Upper level
3) Lower level
4. Pull out the dipstick again and check
the oil level on it. If it is below the lower
level, add oil to bring the level up to the up-
per level.
If you check the oil level just after stopping
the engine, wait a few minutes for the oil to
drain back into the oil pan before checking
the level.
Just after driving or while the engine is
warm, the engine oil level reading may be
in a range between the upper level and
the notch mark. This is caused by thermal
expansion of the engine oil.
To prevent overfilling the engine oil, do not
add any additional oil above the upper lev-
el when the engine is cold.
Changing the oil and oil filter
Change the oil and oil filter according to
the maintenance schedule in the Warran-
ty and Maintenance Booklet .
The engine oil and oil filter must be
changed more frequently than listed in the
maintenance schedule when driving on
dusty roads, when short trips are frequent-
ly made, or when driving in extremely cold
whether.
1. Warm up the engine by letting the en-
gine idle for approximately 10 minutes to
ease draining the engine oil.
2. Park the vehicle on a level surface and
stop the engine.
3. Remove the oil filler cap.
B00467
Use only engine oil with the rec-
ommended grade and viscosity.
Be careful not to spill engine oil
when adding it. If oil touches the
exhaust pipe, it may cause a bad
smell, smoke, and/or a fire. If en-
gine oil gets on the exhaust pipe,
be sure to wipe it off.
1 2
3
B00418
Page 289 of 365
11-10 Maintenance and service
11.Reinstall under cover.
12.Pour engine oil through the filler neck.
Oil capacity (guideline):
4.2 US qt (4.0 liters, 3.5 Imp qt)
The oil quantity indicated above is only
guideline.
The necessary quantity of oil depends on
the quantity of oil that has been drained.
The quantity of drained oil differs slightly
depending on the temperature of the oil
and the time the oil is left flowing out. After refilling the engine with oil, therefore, you
must the dipstick to confirm that the level
is correct.
13.Start the engine and make sure that no
oil leaks appear around the filter
s rubber
seal and drain plug.
14.Run the engine until it reaches the nor-
mal operating temperature. Then stop the
engine and wait a few minutes to allow the
oil drain back. Check the oil level again
and if necessary, add more engine oil.
Recommended grade and
viscosity
Oil grade:
ILSAC GF-4, which can be identified
with the ILSAC certification mark
(Starburst mark)
or API classification SM with the
words ENERGY CONSERVING
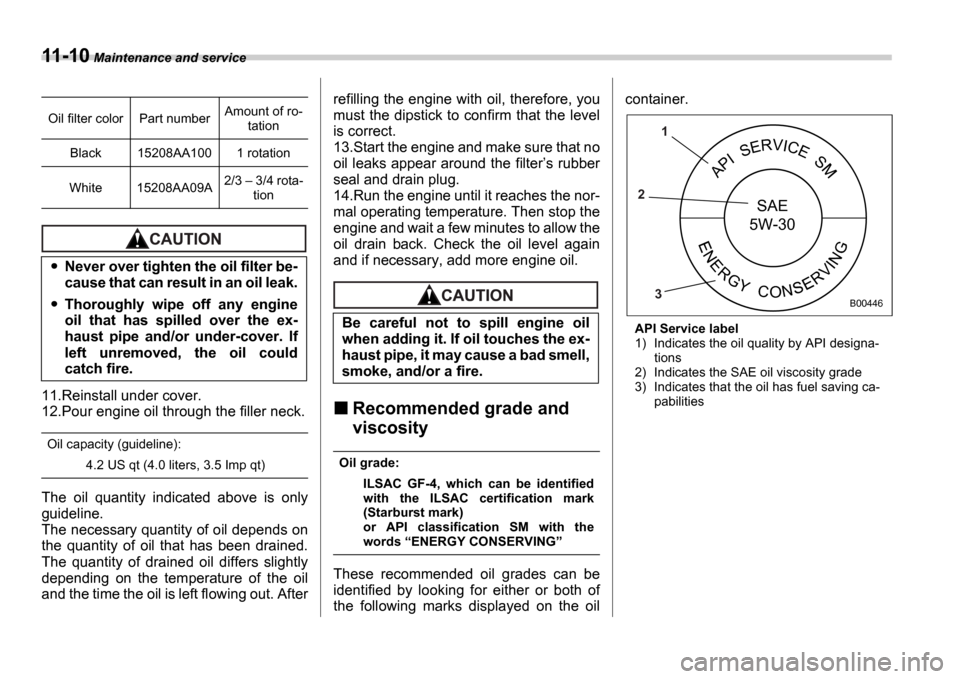
These recommended oil grades can be
identified by looking for either or both of
the following marks displayed on the oil container.
API Service label
1) Indicates the oil quality by API designa-
tions
2) Indicates the SAE oil viscosity grade
3) Indicates that the oil has fuel saving ca- pabilities
Oil filter color Part number
Amount of ro-
tation
Black 15208AA100 1 rotation
White 15208AA09A 2/3
3/4 rota-
tion
Never over tighten the oil filter be-
cause that can result in an oil leak.
Thoroughly wipe off any engine
oil that has spilled over the ex-
haust pipe and/or under-cover. If
left unremoved, the oil could
catch fire.
Be careful not to spill engine oil
when adding it. If oil touches the ex-
haust pipe, it may cause a bad smell,
smoke, and/or a fire.
APISERVICES
NERGYCONRVING
SAE
5W-30
1
2
3
B00446
Page 290 of 365
Maintenance and service 11-11
ILSAC Certification Mark (Starburst
Mark)
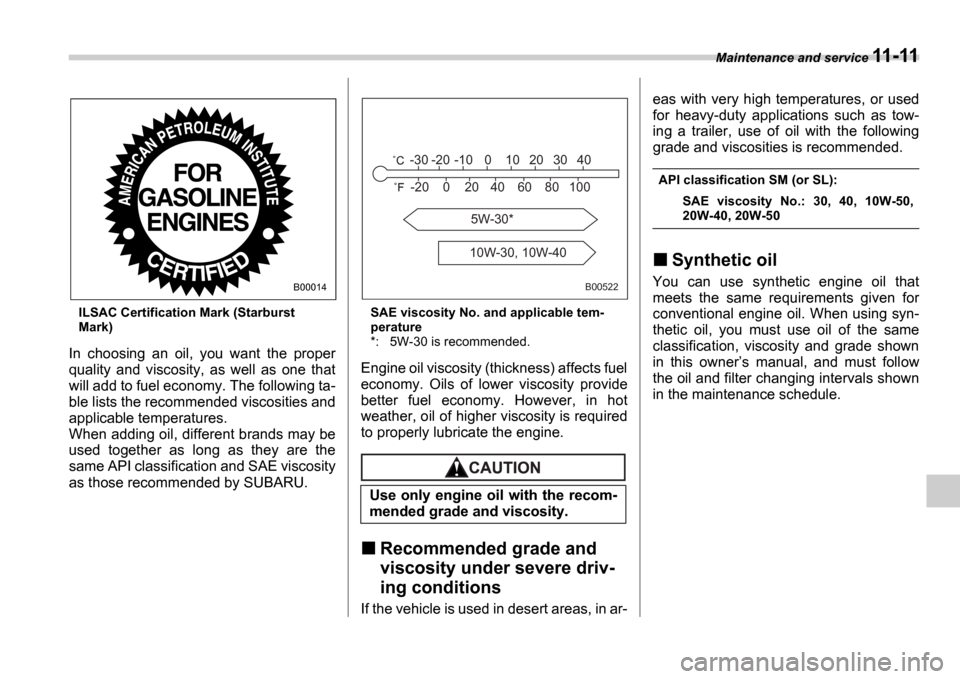
In choosing an oil, you want the proper
quality and viscosity, as well as one that
will add to fuel economy. The following ta-
ble lists the recommended viscosities and
applicable temperatures.
When adding oil, different brands may be
used together as long as they are the
same API classification and SAE viscosity
as those recommended by SUBARU.
SAE viscosity No. and applicable tem-
perature
*: 5W-30 is recommended.
Engine oil viscosity (thickness) affects fuel
economy. Oils of lower viscosity provide
better fuel economy. However, in hot
weather, oil of higher viscosity is required
to properly lubricate the engine.
Recommended grade and
viscosity under severe driv-
ing conditions
If the vehicle is used in desert areas, in ar- eas with very high temperatures, or used
for heavy-duty applications such as tow-
ing a trailer, use of oil with the following
grade and viscosities is recommended.
API classification SM (or SL):
SAE viscosity No.: 30, 40, 10W-50,
20W-40, 20W-50
Synthetic oil
You can use synthetic engine oil that
meets the same requirements given for
conventional engine oil. When using syn-
thetic oil, you must use oil of the same
classification, viscosity and grade shown
in this owner s manual, and must follow
the oil and filter changing intervals shown
in the maintenance schedule.B00014
Use only engine oil with the recom-
mended grade and viscosity.
B00522
5W-30*
10W-30, 10W-40
-30 -20 -10 0 10 20 30 40
-20 0 60 20 80 10040
Page 291 of 365
11-12 Maintenance and service
Cooling system
Cooling fan, hose and con-
nections
Your vehicle employs an electric cooling
fan which is thermostatically controlled to
operate when the engine coolant reaches
a specific temperature.
If the radiator cooling fan does not operate
even when the engine coolant tempera-
ture gauge exceeds the normal operating
range, the cooling fan circuit may be de-
fective. Check the fuse and replace it if
necessary. If the fuse is not blown, have
the cooling system checked by your
SUBARU dealer.
If frequent addition of coolant is neces-
sary, there may be a leak in the engine
cooling system. It is recommended that
the cooling system and connections be
checked for leaks, damage, or looseness.
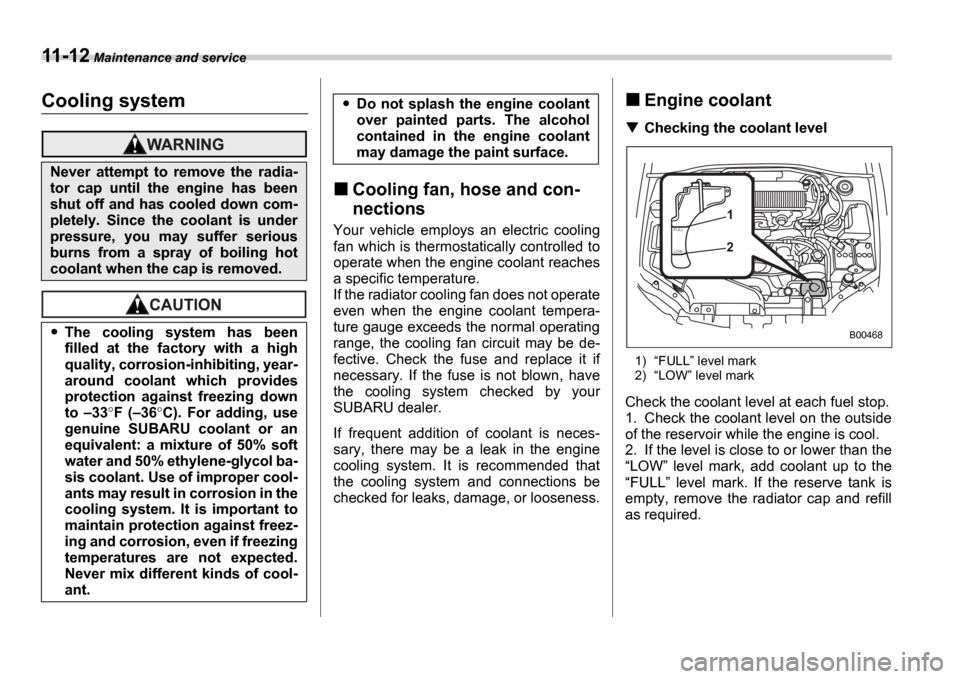
Engine coolant
Checking the coolant level
1)FULL level mark
2) LOW level mark
Check the coolant level at each fuel stop.
1. Check the coolant level on the outside
of the reservoir while the engine is cool.
2. If the level is close to or lower than the LOW level mark, add coolant up to the
FULL level mark. If the reserve tank is
empty, remove the radiator cap and refill
as required.
Never attempt to remove the radia-
tor cap until the engine has been
shut off and has cooled down com-
pletely. Since the coolant is under
pressure, you may suffer serious
burns from a spray of boiling hot
coolant when the cap is removed.
The cooling system has been
filled at the factory with a high
quality, corrosion-inhibiting, year-
around coolant which provides
protection against freezing down
to 33 F ( 36 C). For adding, use
genuine SUBARU coolant or an
equivalent: a mixture of 50% soft
water and 50% ethylene-glycol ba-
sis coolant. Use of improper cool-
ants may result in corrosion in the
cooling system. It is important to
maintain protection against freez-
ing and corrosion, even if freezing
temperatures are not expected.
Never mix different kinds of cool-
ant.
Do not splash the engine coolant
over painted parts. The alcohol
contained in the engine coolant
may damage the paint surface.
F U L L
L OW1 2
B00468
Page 292 of 365
Maintenance and service 11-13
CONTINUED
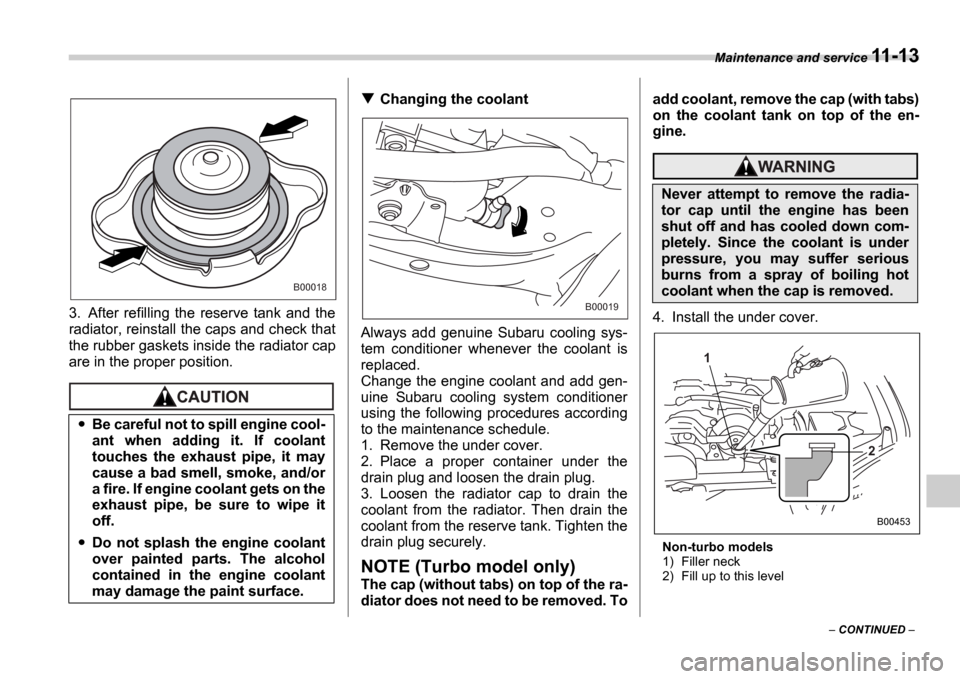
3. After refilling the reserve tank and the
radiator, reinstall the caps and check that
the rubber gaskets inside the radiator cap
are in the proper position.
Changing the coolant
Always add genuine Subaru cooling sys-
tem conditioner whenever the coolant is
replaced.
Change the engine coolant and add gen-
uine Subaru cooling system conditioner
using the following procedures according
to the maintenance schedule.
1. Remove the under cover.
2. Place a proper container under the
drain plug and loosen the drain plug.
3. Loosen the radiator cap to drain the
coolant from the radiator. Then drain the
coolant from the reserve tank. Tighten the
drain plug securely.
NOTE (Turbo model only)
The cap (without tabs) on top of the ra-
diator does not need to be removed. To add coolant, remove the cap (with tabs)
on the coolant tank on top of the en-
gine.
4. Install the under cover.
Non-turbo models
1) Filler neck
2) Fill up to this level
Be careful not to spill engine cool-
ant when adding it. If coolant
touches the exhaust pipe, it may
cause a bad smell, smoke, and/or
a fire. If engine coolant gets on the
exhaust pipe, be sure to wipe it
off.
Do not splash the engine coolant
over painted parts. The alcohol
contained in the engine coolant
may damage the paint surface.
B00018
B00019
Never attempt to remove the radia-
tor cap until the engine has been
shut off and has cooled down com-
pletely. Since the coolant is under
pressure, you may suffer serious
burns from a spray of boiling hot
coolant when the cap is removed.
1
2
B00453
Page 293 of 365
11-14 Maintenance and service
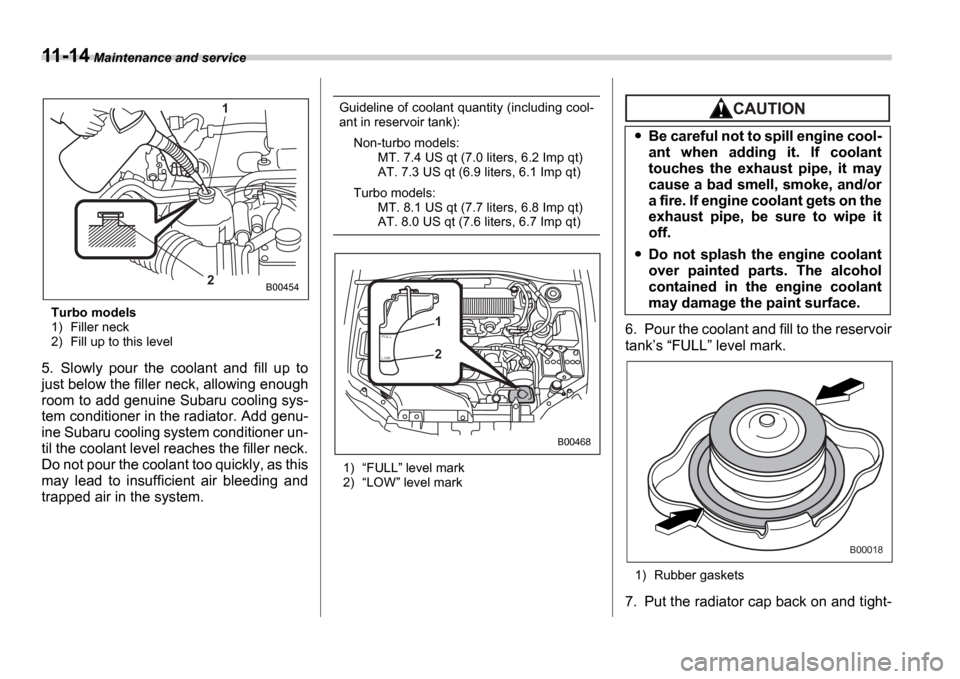
Turbo models
1) Filler neck
2) Fill up to this level
5. Slowly pour the coolant and fill up to
just below the filler neck, allowing enough
room to add genuine Subaru cooling sys-
tem conditioner in the radiator. Add genu-
ine Subaru cooling system conditioner un-
til the coolant level reaches the filler neck.
Do not pour the coolant too quickly, as this
may lead to insufficient air bleeding and
trapped air in the system.
Guideline of coolant quantity (including cool-
ant in reservoir tank):
Non-turbo models: MT. 7.4 US qt (7.0 liters, 6.2 Imp qt)
AT. 7.3 US qt (6.9 liters, 6.1 Imp qt)
Turbo models: MT. 8.1 US qt (7.7 liters, 6.8 Imp qt)
AT. 8.0 US qt (7.6 liters, 6.7 Imp qt)
1) FULL level mark
2) LOW level mark
6. Pour the coolant and fill to the reservoir
tank s FULL level mark.
1) Rubber gaskets
7. Put the radiator cap back on and tight-
1
2
B00454
F U L L
L OW1 2
B00468
Be careful not to spill engine cool-
ant when adding it. If coolant
touches the exhaust pipe, it may
cause a bad smell, smoke, and/or
a fire. If engine coolant gets on the
exhaust pipe, be sure to wipe it
off.
Do not splash the engine coolant
over painted parts. The alcohol
contained in the engine coolant
may damage the paint surface.
B00018
Page 298 of 365
Maintenance and service 11-19
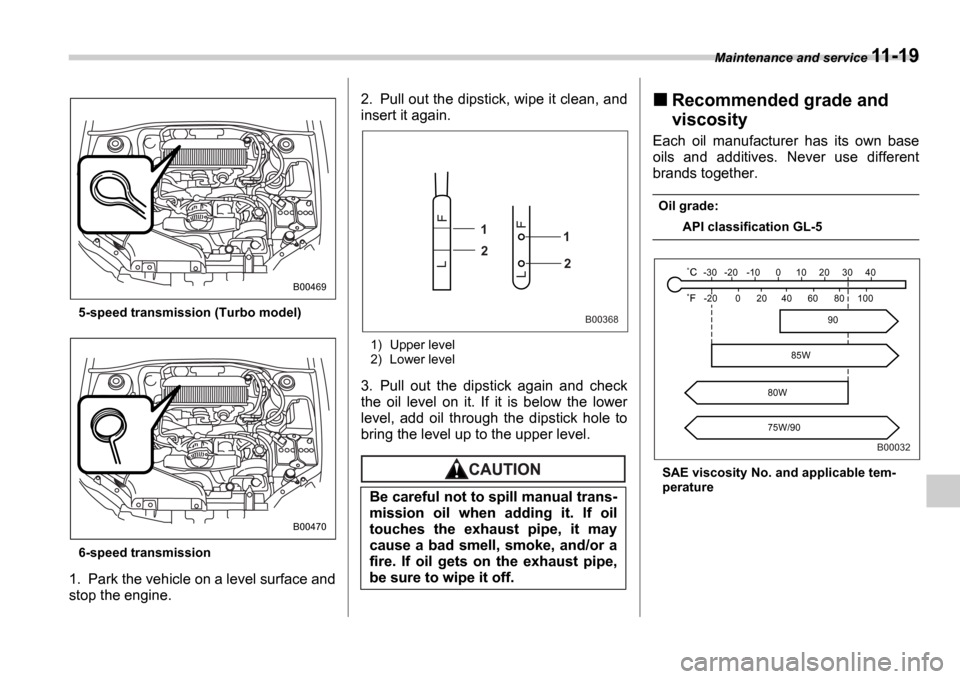
5-speed transmission (Turbo model)
6-speed transmission
1. Park the vehicle on a level surface and
stop the engine. 2. Pull out the dipstick, wipe it clean, and
insert it again.
1) Upper level
2) Lower level
3. Pull out the dipstick again and check
the oil level on it. If it is below the lower
level, add oil through the dipstick hole to
bring the level up to the upper level.
Recommended grade and
viscosity
Each oil manufacturer has its own base
oils and additives. Never use different
brands together.
Oil grade:
API classification GL-5
SAE viscosity No. and applicable tem-
perature
B00469
B00470
Be careful not to spill manual trans-
mission oil when adding it. If oil
touches the exhaust pipe, it may
cause a bad smell, smoke, and/or a
fire. If oil gets on the exhaust pipe,
be sure to wipe it off.
L F
F
L1
2 1
2
B00368
-30 -20 -10 0 10 20 30 40-20 0 60 20
80W
75W/90 80 100
40
85W 90
B00032