2006 SUBARU BAJA change wheel
[x] Cancel search: change wheelPage 128 of 487

3-1
3
Instruments and controls
Ignition switch .............................................. 3-2 LOCK .................................................................. 3-3
ACC .................................................................... 3-4
ON ....................................................................... 3-4
START ................................................................ 3-4
Key reminder chime .......................................... 3-4
Ignition switch light (if equipped) .................... 3-4
Key interlock release (AT vehicles) ................. 3-5
Hazard warning flasher ................................ 3-6
Meters and gauges ....................................... 3-6 Speedometer ..................................................... 3-6
Odometer/Trip meter ........................................ 3-6
Tachometer ........................................................ 3-8
Outside temperature indicator (if equipped) .. 3-8
Fuel gauge ......................................................... 3-8
Temperature gauge ........................................... 3-9
Warning and indicator lights ....................... 3-11 Seatbelt warning light and chime .................... 3-11
SRS airbag system warning light .................... 3-11
CHECK ENGINE warning light/Malfunction indicator lamp ................................................. 3-12
Charge warning light ........................................ 3-13
Oil pressure warning light ................................ 3-13
AT OIL TEMPerature warning light (AT vehicles) ................................................... 3-13
ABS warning light ............................................. 3-14
Brake system warning light ............................. 3-15
Door ajar warning lights ................................... 3-15
Switchback door indicator light ...................... 3-15
Low fuel warning light ...................................... 3-16
All-Wheel Drive warning light (AT vehicles) ... 3-16 Security system status indicator light
(if equipped) .................................................... 3-17
Selector lever position indicator (AT vehicles) ................................................... 3-17
Gear position indicator (Turbo-AT vehicles) .. 3-17
Turn signal indicator lights .............................. 3-17
High beam indicator light ................................. 3-18
Cargo lamp indicator light ............................... 3-18
Cruise control set indicator light .................... 3-18
Clock .............................................................. 3-19
Light control switch ...................................... 3-19 Headlights ......................................................... 3-20
High/low beam change (dimmer) .................... 3-20
Headlight flasher ............................................... 3-21
Daytime running light system ......................... 3-21
Turn signal lever ........................................... 3-22
Illumination brightness control ................... 3-23
Parking light switch ...................................... 3-23
Front fog light button ................................... 3-24
Wiper and washer ......................................... 3-25 Windshield wiper and washer switches ......... 3-26
Rear window defogger button ..................... 3-28
Windshield wiper deicer (if equipped) ........ 3-29
Mirrors ............................................................ 3-30 Inside mirror ...................................................... 3-30
Outside mirrors ................................................. 3-32
Tilt steering wheel ......................................... 3-34
Horn ................................................................ 3-35
Page 323 of 487

8-30
Driving tips
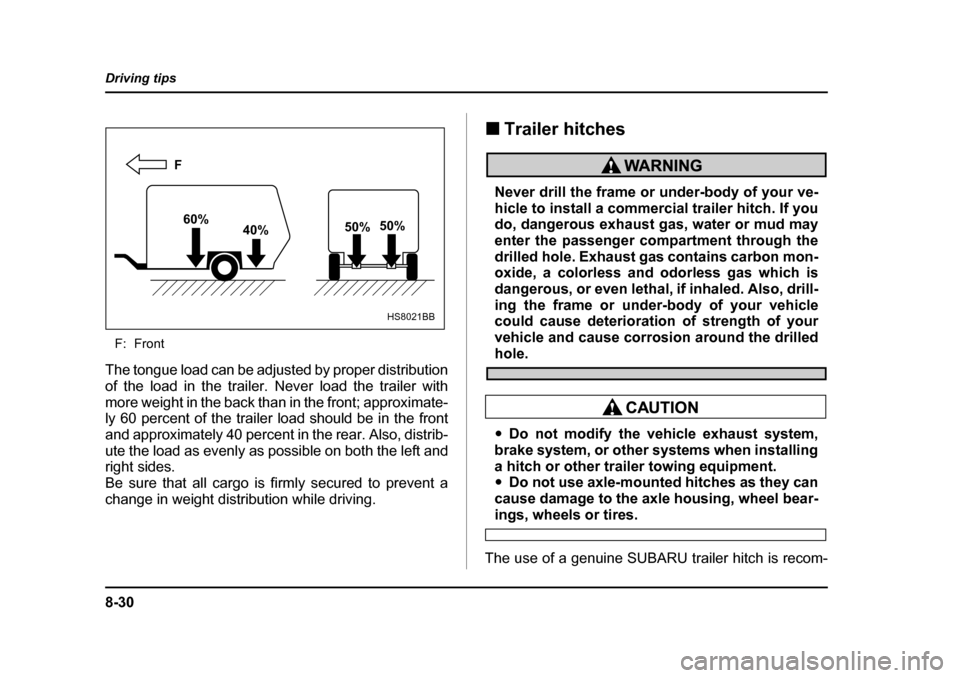
F: Front
The tongue load can be adjusted by proper distribution
of the load in the trailer. Never load the trailer with
more weight in the back than in the front; approximate-
ly 60 percent of the trailer load should be in the front
and approximately 40 percent in the rear. Also, distrib-
ute the load as evenly as possible on both the left and
right sides.
Be sure that all cargo is firmly secured to prevent a
change in weight distribution while driving. �„
Trailer hitches
Never drill the frame or under-body of your ve-
hicle to install a commercial trailer hitch. If you
do, dangerous exhaust gas, water or mud may
enter the passenger compartment through the
drilled hole. Exhaust gas contains carbon mon-
oxide, a colorless and odorless gas which is
dangerous, or even lethal, if inhaled. Also, drill-
ing the frame or under-body of your vehicle
could cause deterioration of strength of your
vehicle and cause corrosion around the drilled
hole.
�yDo not modify the vehicle exhaust system,
brake system, or other systems when installing
a hitch or other trailer towing equipment. �y Do not use axle-mounted hitches as they can
cause damage to the axle housing, wheel bear-
ings, wheels or tires.
The use of a genuine SUBARU trailer hitch is recom-
F
60% 40% 50%
50%
HS8021BB
Page 327 of 487

8-34
Driving tips
– the trailer tongue is connected properly to the
hitch ball.
– the trailer lights connector is connected properly
and trailer’s brake lights illuminate when the vehi-
cle’s brake pedal is pressed, and that the trailer’s
turn signal lights flash when the vehicle’s turn signal
lever is operated.
– the safety chains are connected properly.
– all cargo in the trailer is secured safety in position.
– the side mirrors provide a good rearward field of
view without a significant blind spot.
�y Sufficient time should be taken to learn the “feel” of
the vehicle/trailer combination before starting out on a
trip. In an area free of traffic, practice turning, stopping
and backing up. �T Driving with a trailer
�y You should allow for considerably more stopping
distance when towing a trailer. Avoid sudden braking
because it may result in skidding or jackknifing and
loss of control. �y Avoid abrupt starts and sudden accelerations. If
your vehicle has a manual transmission, always start
out in first gear and release the clutch at moderate en-
gine revolution.�y Avoid uneven steering, sharp turns and rapid lane
changes.�y Slow down before turning. Make a longer than nor- mal turning radius because the trailer wheels will be
closer than the vehicle wheels to the inside of the turn.
In a tight turn, the trailer could hit your vehicle. �y
Crosswinds will adversely affect the handling of
your vehicle and trailer, causing sway. Crosswinds
can be due to weather conditions or the passing of large trucks or buses. If sway ing occurs, firmly grip the
steering wheel and slow down immediately but gradu-
ally. �y When passing other vehicles, considerable dis-
tance is required because of the added weight and
length caused by attaching the trailer to your vehicle.
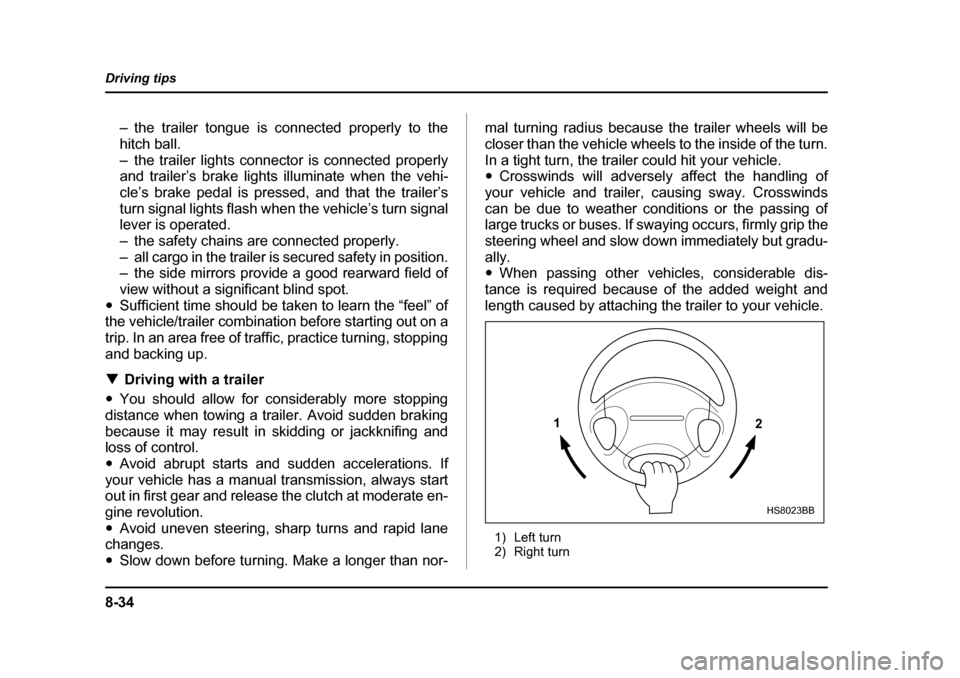
1) Left turn
2) Right turn
1 2
HS8023BB
Page 416 of 487

11 -5 1
Maintenance and service
– CONTINUED –
ible, the tire is worn beyond the acceptable limit
and must be replaced immediately. With a tire
in this condition, driving at high speeds in wet
weather can cause the vehicle to hydroplane.
The resulting loss of vehicle control can lead to
an accident.
NOTE For safety, in spect the tire tread regularly and re-
place the tires before their tread wear indicators
become visible. �„ Tire rotation
�„Tire
�„ Rotation
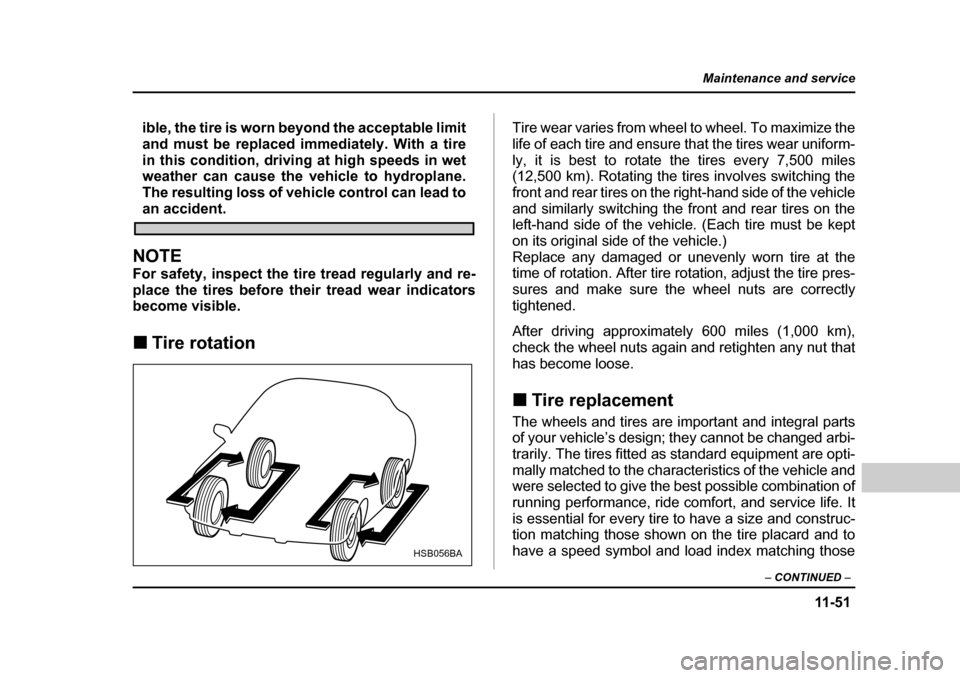
Tire wear varies from wheel to wheel. To maximize the
life of each tire and ensure that the tires wear uniform-
ly, it is best to rotate the tires every 7,500 miles
(12,500 km). Rotating the tires involves switching the
front and rear tires on the right-hand side of the vehicle
and similarly switching the front and rear tires on the
left-hand side of the vehicle. (Each tire must be kept
on its original side of the vehicle.)
Replace any damaged or unevenly worn tire at the
time of rotation. After tire ro tation, adjust the tire pres-
sures and make sure the wheel nuts are correctly
tightened.
After driving approximately 600 miles (1,000 km),
check the wheel nuts again and retighten any nut that
has become loose. �„ Tire replacement
�„Tire
�„ ReplacementThe wheels and tires are important and integral parts
of your vehicle’s design; they cannot be changed arbi-
trarily. The tires fitted as standard equipment are opti-
mally matched to the characteristics of the vehicle and
were selected to give the best possible combination of
running performance, ride co mfort, and service life. It
is essential for every tire to have a size and construc-
tion matching those shown on the tire placard and to
have a speed symbol and load index matching those
HSB056BA
Page 417 of 487

11 - 5 2
Maintenance and service
shown on the tire placard.
Using tires of a non-specified size detracts from con-
trollability, ride comfort, braking performance, speed-
ometer accuracy and odometer accuracy. It also cre-
ates incorrect body-to-tire
clearances and inappropri-
ately changes the vehicle’s ground clearance.
All four tires must be the same in terms of manufactur-
er, brand (tread pattern), construction, and size. You
are advised to replace the ti res with new ones that are
identical to those fitted as standard equipment.
For safe vehicle operation, SUBARU recommends re-
placing all four tires at the same time.
�y All four tires must be the same in terms of
manufacturer, brand (trea d pattern), construc-
tion, degree of wear, speed symbol, load index
and size. Mixing tires of different types, sizes or
degrees of wear can result in damage to the ve-
hicle’s power train. Use of different types or siz-
es of tires can also dangerously reduce control-
lability and braking performance and can lead
to an accident. �y Use only radial tires. Do not use radial tires
together with belted bias tires and/or bias-ply tires. Doing so can dangerously reduce control-
lability, resulting in an accident.
�„ Wheel replacement
�„Wheel
�„ ReplacementWhen replacing wheels due, for example, to damage,
make sure the replacement wheels match the specifi-
cations of the wheels that are fitted as standard equip-
ment. Replacement wheels are available from
SUBARU dealers.
Use only those wheels that are specified for
your vehicle. Wheels not meeting specifica-
tions could interfere with brake caliper opera-
tion and may cause the tires to rub against the
wheel well housing during turns. The resulting
loss of vehicle control could lead to an acci-
dent.
Page 449 of 487

12-2
Specifications
SpecificationsSpecifications
These specifications are subj
ect to change without notice.
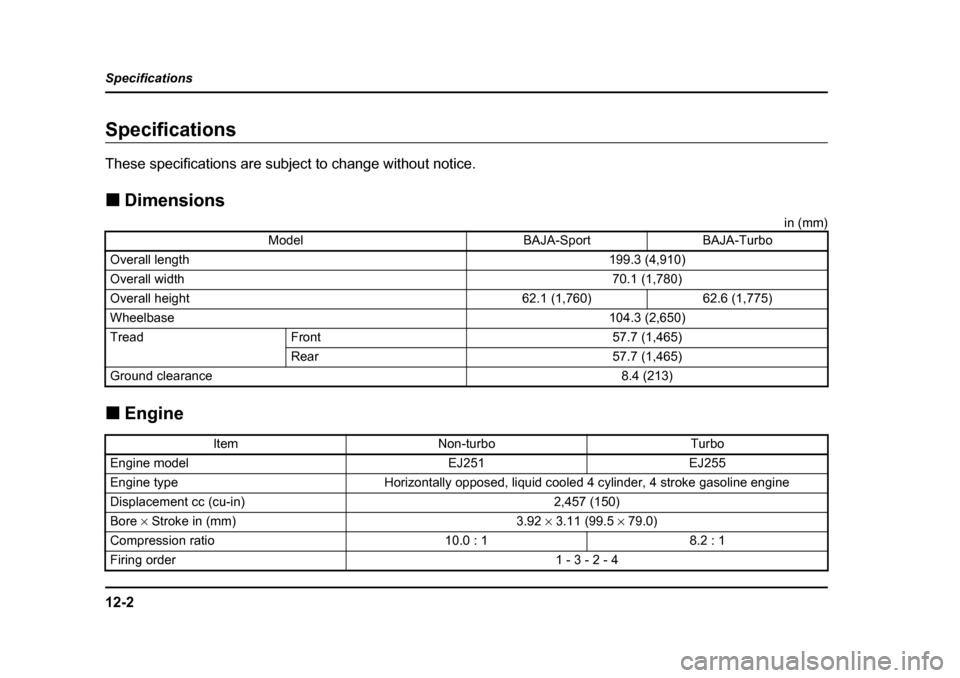
�„ Dimensions
in (mm)
�„ Engine
ModelBAJA-SportBAJA-Turbo
Overall length199.3 (4,910)
Overall width70.1 (1,780)
Overall height62.1 (1,760)62.6 (1,775)
Wheelbase104.3 (2,650)
TreadFront57.7 (1,465)
Rear57.7 (1,465)
Ground clearance8.4 (213)
ItemNon-turboTurbo
Engine modelEJ251EJ255
Engine typeHorizontally opposed, liquid cooled 4 cylinder, 4 stroke gasoline engine
Displacement cc (cu-in)2,457 (150)
Bore