2006 SUBARU BAJA tow
[x] Cancel search: towPage 249 of 487
6-40
Interior and exterior equipments
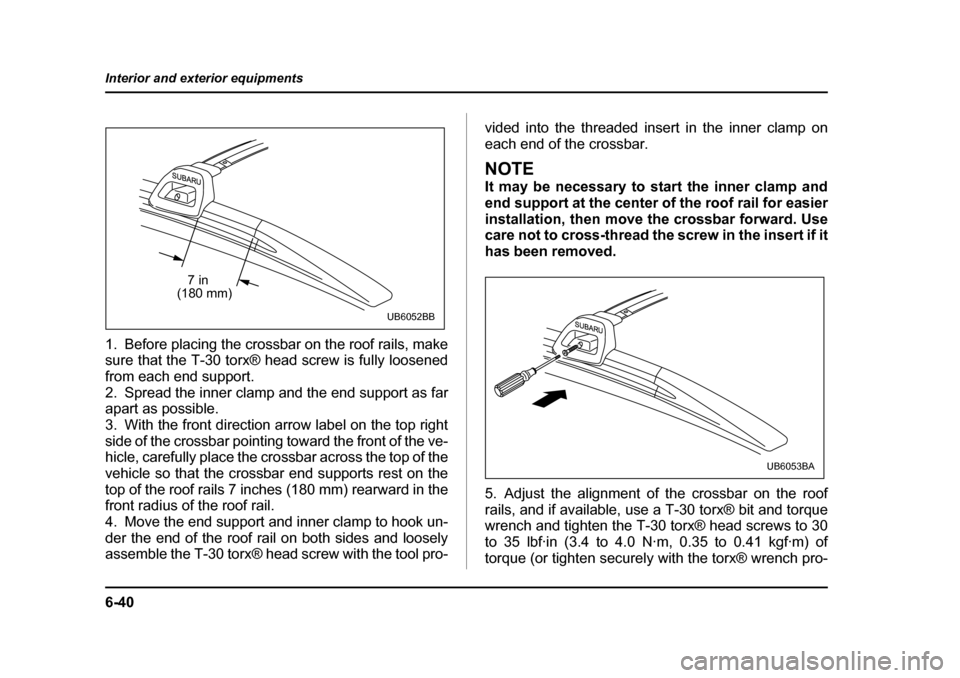
1. Before placing the crossbar on the roof rails, make
sure that the T-30 torx® head screw is fully loosened
from each end support.
2. Spread the inner clamp and the end support as far
apart as possible.
3. With the front direction arrow label on the top right
side of the crossbar pointing toward the front of the ve-
hicle, carefully place the cro
ssbar across the top of the
vehicle so that the crossbar end supports rest on the
top of the roof rails 7 inches (180 mm) rearward in the
front radius of the roof rail.
4. Move the end support and inner clamp to hook un-
der the end of the roof rail on both sides and loosely
assemble the T-30 torx® head screw with the tool pro- vided into the threaded insert in the inner clamp on
each end of the crossbar.
NOTE
It may be necessary to start the inner clamp and
end support at the center of the roof rail for easier
installation, then move the crossbar forward. Use
care not to cross-thread the screw in the insert if it
has been removed.
5. Adjust the alignment of the crossbar on the roof
rails, and if available, use a T-30 torx® bit and torque
wrench and tighten the T-30 torx® head screws to 30
to 35 lbf·in (3.4 to 4.0 N·m, 0.35 to 0.41 kgf·m) of
torque (or tighten securely with the torx® wrench pro-
7 in (180 mm)
UB6052BB
UB6053BA
Page 280 of 487
7-27
Starting and operating
– CONTINUED –
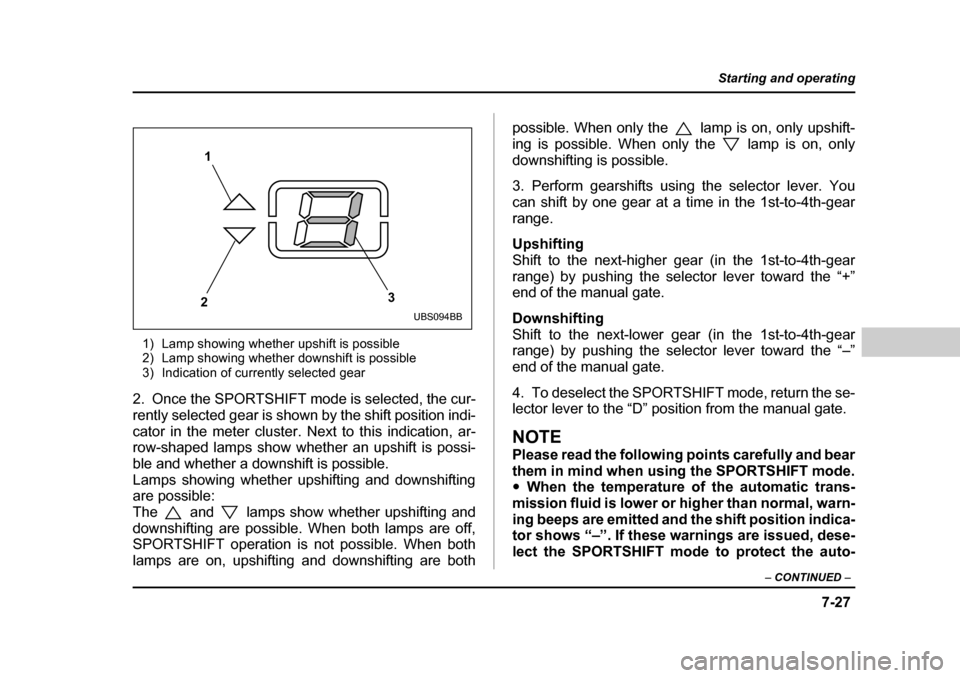
1) Lamp showing whether upshift is possible
2) Lamp showing whether downshift is possible
3) Indication of currently selected gear
2. Once the SPORTSHIFT mode is selected, the cur-
rently selected gear is shown by the shift position indi-
cator in the meter cluster. Ne xt to this indication, ar-
row-shaped lamps show whether an upshift is possi-
ble and whether a downshift is possible.
Lamps showing whether upshifting and downshifting
are possible:
The and lamps show whether upshifting and
downshifting are possible. When both lamps are off,
SPORTSHIFT operation is not possible. When both
lamps are on, upshifting and downshifting are both possible. When only the lamp is on, only upshift-
ing is possible. When only the lamp is on, only
downshifting is possible.
3. Perform gearshifts using the selector lever. You
can shift by one gear at a time in the 1st-to-4th-gear
range. Upshifting
Shift to the next-higher gear (in the 1st-to-4th-gear
range) by pushing the selector lever toward the “+”
end of the manual gate. Downshifting
Shift to the next-lower gear (in the 1st-to-4th-gear
range) by pushing the selector lever toward the “–”
end of the manual gate.
4. To deselect the SPORTSHIFT mode, return the se-
lector lever to the “D” position from the manual gate.
NOTE
Please read the following points carefully and bear
them in mind when using the SPORTSHIFT mode. �y
When the temperature of the automatic trans-
mission fluid is lower or higher than normal, warn-
ing beeps are emitted and the shift position indica-
tor shows “–”. If these warnings are issued, dese-
lect the SPORTSHIFT mode to protect the auto-
1
2 3
UBS094BB
Page 294 of 487

8-1
8
Driving tips
New vehicle break-in driving – the first 1,000 miles (1,600 km) .... ....................... .... 8-2
Fuel economy hints ...................................... 8-2
Engine exhaust gas (Carbon monoxide) .... 8-3
Catalytic converter .......... .............................. 8-4
Periodic inspections ..................................... 8-6
Driving in foreign countrie s ......................... 8-6
Driving tips for AWD vehicles ...................... 8-7
Off road driving ............................................. 8-9
Winter driving ................................................ 8-11 Operation during cold weather ........................ 8-11
Driving on snowy and icy roads ...................... 8-13
Corrosion protection ........................................ 8-15
Snow tires .......................................................... 8-15
Tire chains ......................................................... 8-16
Rocking the vehicle .......................................... 8-16
Loading your vehicle .................................... 8-17 Vehicle capacity weight ................................... 8-19
GVWR and GAWR (Gross Vehicle Weight Rating and Gross Axle Weight Rating) ........ 8-19
Trailer hitch (if equipped) ............................. 8-20 Connecting a trailer .......................................... 8-21
When you do not tow a trailer ......................... 8-24
Trailer towing ................................................ 8-25 Warranties and maintenance ........................... 8-25
Maximum load limits ........................................ 8-25
Trailer hitches ................................................... 8-30
Connecting a trailer .......................................... 8-31
Trailer towing tips ............................................. 8-33
Page 301 of 487

8-8
Driving tips
�y
An AWD vehicle is better able to climb steeper
roads under snowy or slippery conditions than a two
wheel drive vehicle. There is little difference in han-
dling, however, during extremely sharp turns or sud-
den braking. Therefore, when driving down a slope or
turning corners, be sure to reduce your speed and
maintain an ample distance from other vehicles. �y When replacing a tire, make sure you use only the
same size, circumference, construction, brand, and
load range as the original tires listed on the tire plac-
ard. Using other sizes, circumferences or construction
may result in severe mechanical damage to the drive
train of your vehicle and may affect ride, handling,
braking, speedometer/o dometer calibration, and
clearance between the body and tires. It also may be
dangerous and lead to loss of vehicle control. �y If you use a temporary spare tire to replace a flat
tire, be sure to use the original temporary spare tire
stored in the vehicle. Usin g other sizes may result in
severe mechanical damage to the drive train of your
vehicle. �y Always check the cold tire pressure before starting
to drive. The recommended tire pressure is provided
on the tire placard, which is located under the door
latch on the driver’s side. �y Tire chains should always be placed on the front
wheels only. �y
There are some precautions that you must observe
when towing your vehicle. For detail information, see
“Towing” section in chapter 9.
Page 302 of 487
8-9
Driving tips
– CONTINUED –
Off road driving
�yAlways maintain a safe driving speed accord-
ing to the road and weather conditions in order
to avoid having an accident on a sharp turn,
during sudden braking or under other similar
conditions.�y Always use the utmost care in driving – over-
confidence because you are driving an All-
Wheel Drive vehicle could easily lead to a seri-
ous accident.
Because of the AWD feature and higher ground clear-
ance, your SUBARU can be driven on ordinary roads
or off-road. But please keep in mind that an AWD
SUBARU is neither a conventional off-road vehicle nor
an all-terrain vehicle. If you do take your SUBARU off-
road, certain common sense precautions such as the
following should be taken: �y Make certain that you and all of your passengers
are wearing seatbelts. �y Carry some emergency equipment, such as a tow-
ing rope or chain, a shovel, wheel blocks, first aid kit
and cell phone or citizens band radio. �y
Drive carefully. Do not take unnecessary risks by
driving in dangerous areas or over rough terrain.�y Slow down and employ extra caution at all times.
When driving off-road, you will not have the benefit of
marked traffic lanes, banked curves, traffic signs and
the like. �y Do not drive across steep slopes. Instead, drive ei-
ther straight up or straight down the slopes. A vehicle
can much more easily tip over sideways than it can
end over end. Avoid driving straight up or down slopes
that are too steep.�y Avoid sharp turning maneuvers, especially at higher
speeds. �y Do not grip the inside or spokes of the steering
wheel. A bad bump could jerk the wheel and injure
your hands. Instead dr ive with your fingers and
thumbs on the outside of the rim. �y If driving through water, such as when crossing
shallow streams, first check the depth of the water and
the bottom of the stream bed for firmness and ensure
that the bed of the stream is flat. Drive slowly and com-
pletely through the stream. The water should be shal-
low enough that it does not reach the vehicle’s under-
carriage. Water entering the engine air intake or the
exhaust pipe or water splashing onto electrical parts
may damage your vehicle and may cause it to stall.
Never attempt to drive through rushing water; regard-
Page 313 of 487
8-20
Driving tips
door shows GVWR (Gross Vehicle Weight Rating)
and GAWR (Gross Axle Weight Rating).
The GVW (Gross Vehicle Weight) must never exceed
the GVWR. GVW is the combined total of weight of the
vehicle, fuel, driver, all
passengers, luggage, any op-
tional equipment and trailer tongue load. Therefore,
the GVW changes depending on the situation.
In addition, the total weight applied to each axle
(GAW) must never exceed the GAWR. The front and
rear GAWs can be adjusted by relocating luggage in- side the vehicle.
Even if the total weight of your luggage is lower than
the vehicle capacity weight, either front or rear GAW
may exceed the GAWR, depending on the distribution
of the luggage.
When possible, the load should be evenly distributed
throughout the vehicle.
If you carry heavy loads in the vehicle, you should con-
firm that GVW and front and rear GAWs are within the
GVWR and GAWR by putting your vehicle on a vehi-
cle scale, found at a commercial weighing station.
Do not use replacement tires with a lower load range
than the originals because they may lower the GVWR
and GAWR limitations. Replacement tires with a high-
er load range than the originals do not increase the
GVWR and GAWR limitations.Trailer hitch (if equipped)
�y Never exceed the maximum weight specified
for the trailer hitch. Exceeding the maximum
weight could cause an accident resulting in se-
rious personal injuries. Permissible trailer
weight changes depending on the situation. Re-
fer to the next section “Trailer towing” for pos-
sible recommendations and limitations. �y Trailer brakes are required when the towing
load exceeds 1,000 lbs (453 kg). Be sure your
trailer has safety chains and that each chain
will hold the trailer’s maximum gross weight.
Towing trailers without safety chains could cre-
ate a traffic safety hazard if the trailer separates
from the hitch due to coupling damage or hitch
ball damage. �y Be sure to check the hitch pin and safety pin
for positive locking placement before towing a
trailer. If the ball moun t comes off the hitch re-
ceiver, the trailer could get loose and create a
traffic safety hazard.�y Use only the ball mount supplied with this
hitch. Use the hitch only as a weight carrying
hitch. Do not use with any type of weight dis-
Page 314 of 487
8-21
Driving tips
– CONTINUED –
tributing hitch.
The trailer hitch is designed to tow a Class 1 rated
load. A maximum of 2,400 lbs (1,087 kg) gross trailer
weight and a maximum of 200 lbs (90 kg) gross
tongue weight are permissible for the trailer hitch.
When you tow a trailer, follow the instructions in the
next section “Trailer towing”. �„ Connecting a trailer
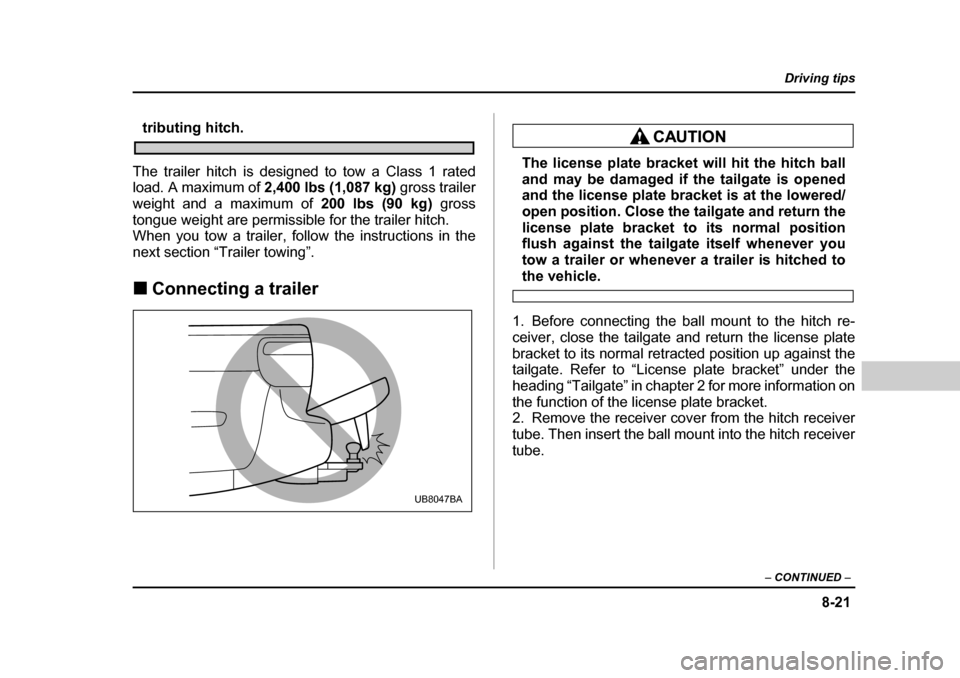
The license plate bracket will hit the hitch ball
and may be damaged if the tailgate is opened
and the license plate bracket is at the lowered/
open position. Close the tailgate and return the
license plate bracket to its normal position
flush against the tailgate itself whenever you
tow a trailer or whenever a trailer is hitched to
the vehicle.
1. Before connecting the ball mount to the hitch re-
ceiver, close the tailgate and return the license plate
bracket to its normal retracted position up against the
tailgate. Refer to “License plate bracket” under the
heading “Tailgate” in chapter 2 for more information on
the function of the license plate bracket.
2. Remove the receiver cover from the hitch receiver
tube. Then insert the ball mount into the hitch receiver
tube.
UB8047BA
Page 317 of 487

8-24
Driving tips
Hitch harness connector
9. Connect the hitch wire harness’s black four-pin
wire connector to the towing trailer’s wire harness.
10.Confirm proper function of the hitch wire harness
by individually activating the brake, right turn signal,
left turn signal, stop, and parking lights on the trailer.
NOTE
Always disconnect the trailer wire harness before
launching or retrieving a watercraft. �„
When you do not tow a trailer
Remove the ball mount from the hitch receiver
tube when the tailgate is open and the bed ex-
tender is used. The rear license plate will not be
visible because the license plate bracket can
not be used at the lowered/open position when
the ball mount is connected.
In addition, the license plate bracket will hit the
hitch ball and may be da maged if the tailgate is
opened and the license plate bracket is at the
lowered/open position.
�y Remove the ball mount from the hitch receiver tube
and insert the receiver cover onto the hitch receiver tube.�y Place the dust cap over the four-pin connector of the
hitch wire harness to protect against possible damage.�y Occasionally lubricate terminals of the four-pin con-
nector using the terminal grease, and cover with the
attached rubber cap.
HS8015BA