2006 SKODA ROOMSTER heating
[x] Cancel search: heatingPage 82 of 274

Seats and Stowage81
Using the systemSafetyDriving TipsGeneral MaintenanceBreakdown assistanceTechnical Data
WARNING
No objects should be placed on the luggage compartment cover,
the vehicle occupants could be endangered if there is sudden
braking or the vehicle co llides with something.
Caution
Please ensure that the heating elements of the rear window heater are not
damaged as a result of objects placed in this area.
Note
When opening the tailgate, lift the luggage compartment cover - risk that
objects placed in this area can slip forward!
Bicycle carrier*
Install cross member
– Remove the rear seats or fold the seats fully forwards, in order
to make available the necessary space in the luggage
compartment ⇒page 74.
– Release the fixture at the ends of the cross member by slightly pulling up the securing screw .
– Position the cross member with the fixed part onto the right (in direction of travel) lashing eye and then the pull out part
onto the left lashing eye.
– Secure the fixture to both sides and lock the fixing screws in place.
– Tighten the fixing screws up to the stop.
Fig. 66 Install cross
member
AB
AC
AA
AB
AC
AC
NKO 20 A05.book Page 81 Wednesday, June 21, 2006 1:42 PM
Page 92 of 274

Seats and Stowage91
Using the systemSafetyDriving TipsGeneral MaintenanceBreakdown assistanceTechnical Data
Cooling of storage compar tment on front passenger
side*
The storage compartment can be fitted for vehicles with an
air-conditioning system with a closable inlet for cooled air.
– You can switch the cooling system on or off using the control
dial ⇒fig. 81 .
Opening the air inlet when the air conditioning system is on causes fresh
or interior air to flow into the storage compartment.
The storage compartment is only cooled in the cooling mode. We recom-
mend that you switch off the cooling (opening concealed) if it is operating
in the heating mode or if you are not using the cooling system for the
storage compartment.
Storage compartment on the driver's side
Unlockable compartment below the steering wheel on the left.Fig. 81 Storage
compartment: Using
cooling system
Fig. 82 Dash panel:
Storage compartment
on the driver's side
NKO 20 A05.book Page 91 Wednesday, June 21, 2006 1:42 PM
Page 97 of 274

Heating and air conditioning system
96
Heating and air conditioning system
Heating
Using the system
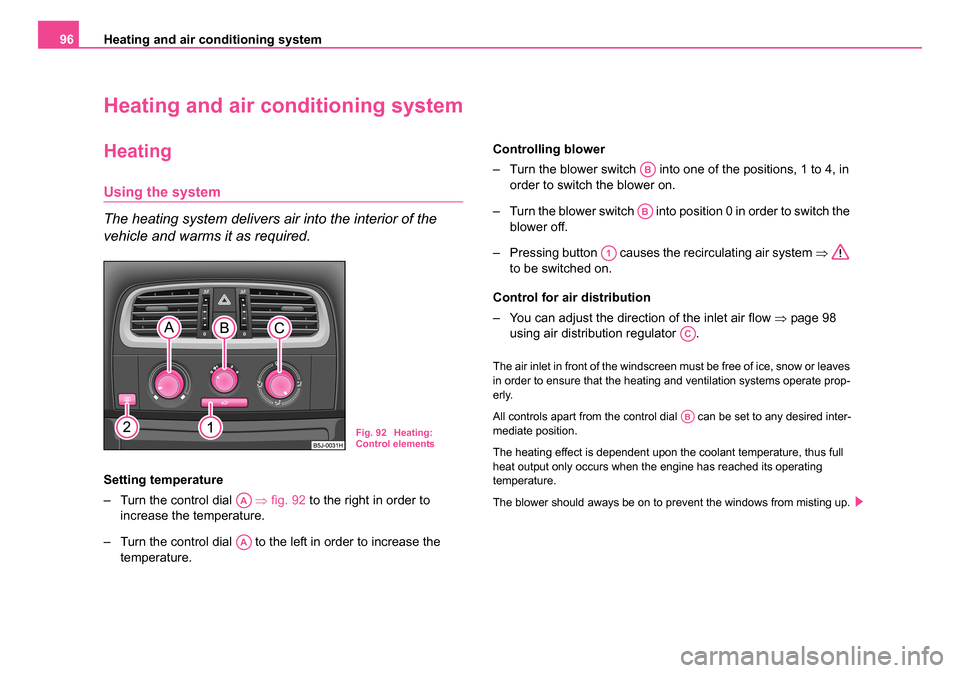
The heating system delivers air into the interior of the
vehicle and warms it as required.
Setting temperature
– Turn the control dial ⇒fig. 92 to the right in order to
increase the temperature.
– Turn the control dial to the left in order to increase the temperature. Controlling blower
– Turn the blower switch into one of the positions, 1 to 4, in
order to switch the blower on.
– Turn the blower switch into position 0 in order to switch the blower off.
– Pressing button causes the recirculating air system ⇒
to be switched on.
Control for air distribution
– You can adjust the direction of the inlet air flow ⇒page 98
using air distribution regulator .
The air inlet in front of the windscreen must be free of ice, snow or leaves
in order to ensure that the heating and ventilation systems operate prop-
erly.
All controls apart from the control dial can be set to any desired inter-
mediate position.
The heating effect is dependent upon the coolant temperature, thus full
heat output only occurs when the engine has reached its operating
temperature.
The blower should aways be on to prevent the windows from misting up.
Fig. 92 Heating:
Control elements
AA
AA
AB
AB
A1
AC
AB
NKO 20 A05.book Page 96 Wednesday, June 21, 2006 1:42 PM
Page 98 of 274

Heating and air conditioning system 97
Using the systemSafetyDriving TipsGeneral MaintenanceBreakdown assistanceTechnical Data
WARNING
You should not leave recirculated air mode on over a longer period
of time, as “stale” air may result in fatigue in the driver and occu-
pants, divert your attention and also cause the windows to mist up.
The risk of having an accident increases. Switch recirculated air
mode off as soon as the windows begin misting up.
Note
•If the air distribution is positioned towards the windows, the total
amount of air is used to defrost the windows and thus no air will be fed to
the footwell. This can lead to restriction of the heating comfort.
•The used air streams out through the air removal openings in the
luggage compartment.
•Have the air conditioning system cleaned by a specialist workshop
Set heating
Recommended settings of heating controls for:
Defrosting the windscreen and side windows
•Turn control dial ⇒page 96, fig. 92 to the right up to the stop,
•Blower switch in position 3,
•Turn the air distribution control into the position ,
•Open air outlet vents 4 ⇒ page 98, fig. 93 and point towards the side
window.
Keeping windscreen and side windows demisted
We recommend that you use the following setting in cases where the
windows are misted up more than usual (e.g. when it is raining):
•Control dial where necessary to the heating range,
•Blower switch in position 2 or 3,
•Control dial to or as required or to any desired position
between these symbols,
•Open air outlet vents 4 and point towards the side window.
Warming up the inside of the vehicle as rapidly as possible
•Turn control dial to the right up to the stop,
•Blower switch in position 3 or 4,
•Turn the air distribution control into the position ,
•Open the air outlet vents 4,
•We recommend that you briefly switch on the recirculated air mode
with the pushbutton . The windows can steam up in this position
however.
Heating the vehicle to a comfortable temperature
We recommend the following setting once the windows are no longer
misted up and the desired temperature has been reached:
•Control dial at the desired heat output,
•Blower switch in position 2 or 3,
•Turn the air distribution control into the position between and ,
•Open the air outlet vents 4,
•Set the air distribution regulator as required between positions
and , if the windscreen gets misted up again.
Fresh air mode - ventilation
Non pre-warmed fresh air streams through the air inlet nozzles 3 and 4 for
the following settings.
Recirculated air mode must not be switched on.
•Turn the control dial ⇒page 96, fig. 92 to the left up to the stop,
AA
AB
AC
AA
AB
AC
AA
AB
AC
A1
AA
AB
AC
AC
AA
NKO 20 A05.book Page 97 Wednesday, June 21, 2006 1:42 PM
Page 99 of 274

Heating and air conditioning system
98
•Blower switch in the desired position,
•Turn the air distribution control into the position ,
•Open air outlet vents 3 and 4 ⇒ page 98, fig. 93
The control dial can be set to other positions as required.
Recirculated air mode
In recirculated air mode air is sucked out of the interior of
the vehicle and then fed back into the interior.
Recirculated air mode prevents polluted air outside the vehicle
from getting into the vehicle, for example when driving through a
tunnel or when standing in a traffic jam.
Switching recircul ated air mode on
– Press button , the button symbol
lights up ⇒page 96,
fig. 92 .
Switching recirculat ed air mode off
– Press button again, the button symbol
goes out.
The recirculated air mode is switched off automatically if the air distribu-
tion control is in position ⇒ page 96, fig. 92 . You can also switch
recirculated air mode on again from this setting by repeatedly pressing
button .
WARNING
You should not leave recirculated air mode on over a longer period
of time, as “stale” air may result in fatigue in the driver and occu-
pants, divert your attention and al so cause the windows to mist up.
The risk of having an accident increases. Switch recirculated air
mode off as soon as the windows begin misting up.
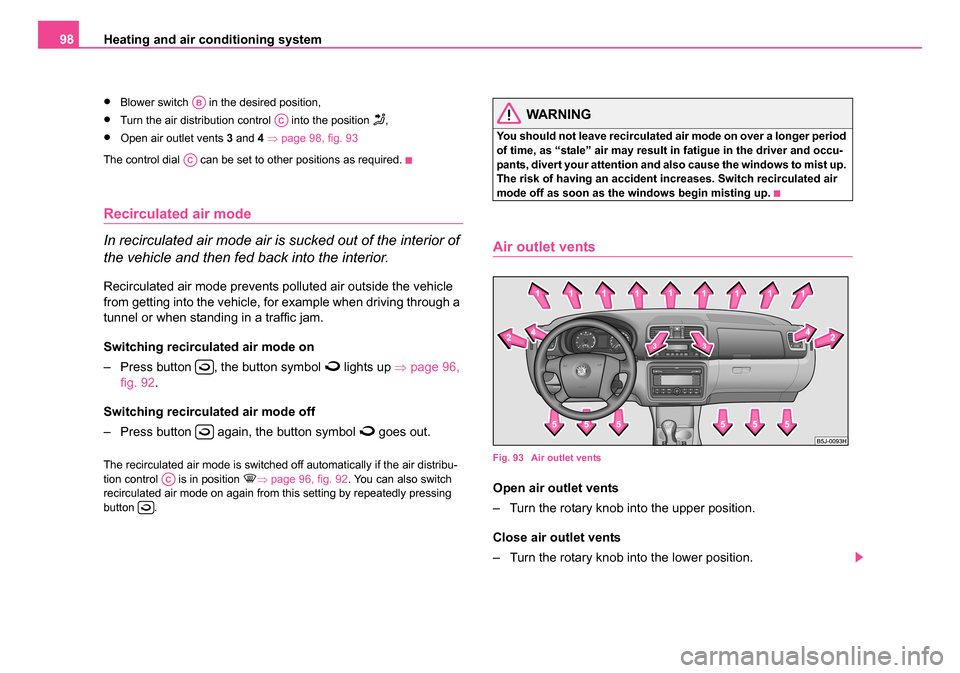
Air outlet vents
Fig. 93 Air outlet vents
Open air outlet vents
– Turn the rotary knob into the upper position.
Close air outlet vents
– Turn the rotary knob into the lower position.
AB
AC
AC
AC
NKO 20 A05.book Page 98 Wednesday, June 21, 2006 1:42 PM
Page 100 of 274

Heating and air conditioning system 99
Using the systemSafetyDriving TipsGeneral MaintenanceBreakdown assistanceTechnical Data
Redirecting air flow
– The horizontal as well as the vertical direction of the air flow is
set with the handle in the middle of the air outlet vents.
You can set the air supply to the individual vents with the air distribution
control ⇒page 96, fig. 92 . Air outlet vents 3 and 4 can also be opened
or closed individually.
Unwarmed or cooled air will flow out of the opened air outlet vents
according to the setting of the control dial ⇒page 96, fig. 92 and
according to atmospheric conditions.
Climatic (semi-automatic air
conditioning system)*
Description
Climatic is a combined cooling and heating system with
electronic control of the convenience temperature in the
vehicle interior. It makes it possible to optimally control the
air temperature at any season of the year.
Description of the Climatic
It is important for your safety and for your driving comfort that the Climatic
is operating properly.
The air conditioning system operates when switch ⇒page 100,
fig. 94 is pressed and the following conditions are met:
•engine running,
•outside temperature above +2 °C and
•blower switch switched on (positions 1 to 4).
If the cooling system is switched on, the temperature and air humidity
drops in the vehicle. The wellbeing of the occupants of the car is enhanced
as a result of this particularly at high outside temperatures and a high air
humidity. The system prevents the windows misting up during the cold
season of the year.
The heating effect is dependent upon the coolant temperature, thus full
heat output only occurs when the engine has reached its operating
temperature.
It is possible to briefly activate recirculated air mode in order to enhance
the cooling effect ⇒.
Air at a temperature of about 5°C may flow out of the vents under certain
circumstances when the cooling system is operating. Lengthy and uneven
distribution of the air flow out of the vents (in particular at the leg area) and
large differences in temperature, for example when getting out of the
vehicle, can result in chills in sensitive persons.
The air inlet in front of the windscreen must be free of ice, snow or leaves
in order to ensure that the heating and cooling systems operate properly.
After switching on the cooling Condensation from the evaporator of the
air conditioning may drip down and form a puddle below the vehicle. This
is quite normal and not an indication of a leak!
WARNING
•For your own safety and that of other road users, ensure that all
the windows are free of ice, snow and misting. Please familiarize
yourself about how to correctly operate the heating and ventilation
systems, how to demist and defrost the windows, as well as with
the cooling mode.
•You should not leave recirculated air mode on over a longer
period of time, as “stale” air may result in fatigue in the driver and
occupants, divert your attention and also cause the windows to
AC
AA
ACAE
NKO 20 A05.book Page 99 Wednesday, June 21, 2006 1:42 PM
Page 101 of 274

Heating and air conditioning system
100
mist up. The risk of having an accident increases. Switch recircu-
lated air mode off as soon as the windows begin misting up.
Note
•We recommend that you do not smoke in the vehicle when the recir-
culating air mode is operating since the smoke which is drawn at the evap-
orator from the interior of the vehicle forms deposits in the evaporator of
the air conditioning system. This produces a permanent odour when the
Climatic is operating which can only be eliminated through considerable
effort and expense (replacement of compressor).
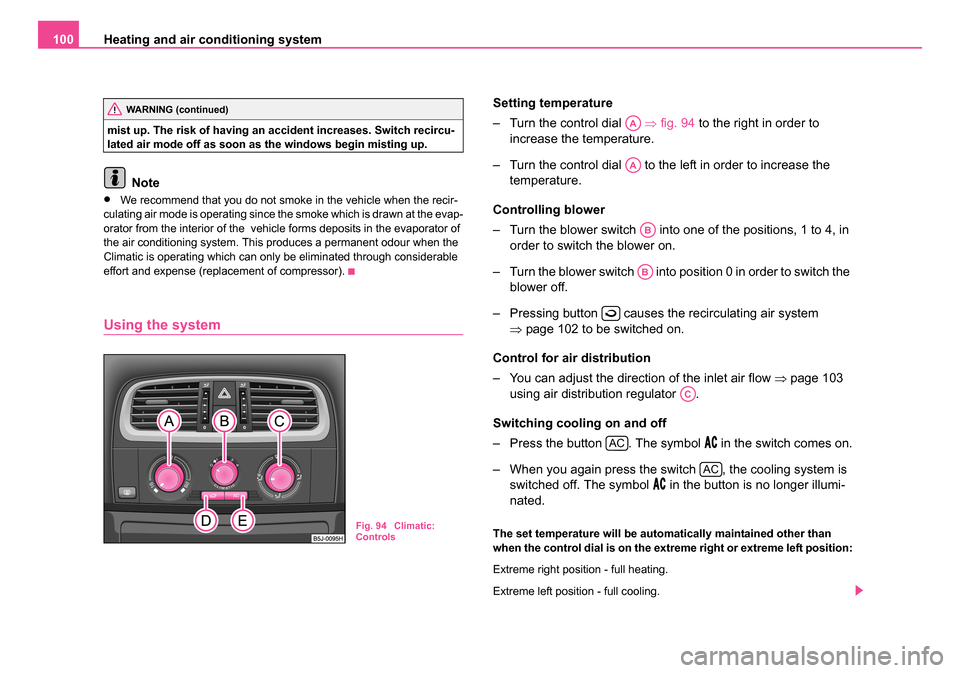
Using the system
Setting temperature
– Turn the control dial ⇒fig. 94 to the right in order to
increase the temperature.
– Turn the control dial to the left in order to increase the temperature.
Controlling blower
– Turn the blower switch into one of the positions, 1 to 4, in order to switch the blower on.
– Turn the blower switch into position 0 in order to switch the blower off.
– Pressing button causes the recirculating air system ⇒page 102 to be switched on.
Control for air distribution
– You can adjust the direction of the inlet air flow ⇒page 103
using air distribution regulator .
Switching cooling on and off
– Press the button . The symbol
in the switch comes on.
– When you again press the switch , the cooling system is switched off. The symbol
in the button is no longer illumi-
nated.
The set temperature will be automatically maintained other than
when the control dial is on the extreme right or extreme left position:
Extreme right position - full heating.
Extreme left position - full cooling.
WARNING (continued)
Fig. 94 Climatic:
Controls
AA
AA
AB
AB
AC
AC
AC
NKO 20 A05.book Page 100 Wednesday, June 21, 2006 1:42 PM
Page 102 of 274

Heating and air conditioning system 101
Using the systemSafetyDriving TipsGeneral MaintenanceBreakdown assistanceTechnical Data
The controls and can be set to any desired intermediate position.
The blower should aways be on to prevent the windows from misting up.
Note
•The whole heat output will be needed to unfrost the windscreen and
side windows. No warm air will be fed to the footwell. This can lead to
restriction of the heating comfort.
•The used air streams out through the air removal openings in the
luggage compartment.
•If the cooling system has not been switched on for a lengthy period,
odours may be produced at the evaporator because of deposits. Switch
the air conditioning system on at least once a month for approximately 5
minutes at the highest blower stage - also during the cold season of the
year - in order to remove such odours. Also open a window for a short
time.
•Please refer to the information regarding recirculated air mode
⇒ page 102.
•Have the air conditioning system cleaned by a specialist workshop.
Set Climatic
Recommended settings of Climatic controls for the respective operating
modes:
Defrosting the windscreen and side windows
•Put the control dial ⇒page 100, fig. 94 to the temperature selected
as usual by you (we recommend 22 °C)
•Blower switch in position 3 or 4
•Turn the air distribution control into the position
•Open air outlet vents 4 ⇒ page 103, fig. 95 and point towards the side
window.
Keeping windscreen and side windows demisted
We recommend that you use the following setting in cases where the
windows are misted up more than usual (e.g. when it is raining):
•Blower switch in position 2
•Turn the air distribution control into the position between and
•Open air outlet vents 4 ⇒ page 103, fig. 95 and point towards the side
window.
•Switch on the cooling system by pressing button .
Warming up the inside of the vehicle as rapidly as possible
•Control dial at the desired heat temperature
•Blower switch in position 3
•Turn the air distribution control into the position
•Open the air outlet vents 4
•We recommend that you briefly switch on the recirculated air mode
with the pushbutton . The windows can steam up in this position
however.
Heating the vehicle to a comfortable temperature
We recommend the following setting once the windows are no longer
misted up and the desired temperature has been reached:
•Control dial at the desired heat temperature
•Blower switch in position 2
•Turn the air distribution control into the position between and
•Open the air outlet vents 4
•Set the air distribution regulator as required between positions
and , if the windscreen gets misted up again.
AAAC
AA
AB
AC
AB
AC
AC
AA
AB
AC
AA
AB
AC
AC
NKO 20 A05.book Page 101 Wednesday, June 21, 2006 1:42 PM