2006 SKODA OCTAVIA run flat
[x] Cancel search: run flatPage 144 of 218

Avoid short distances
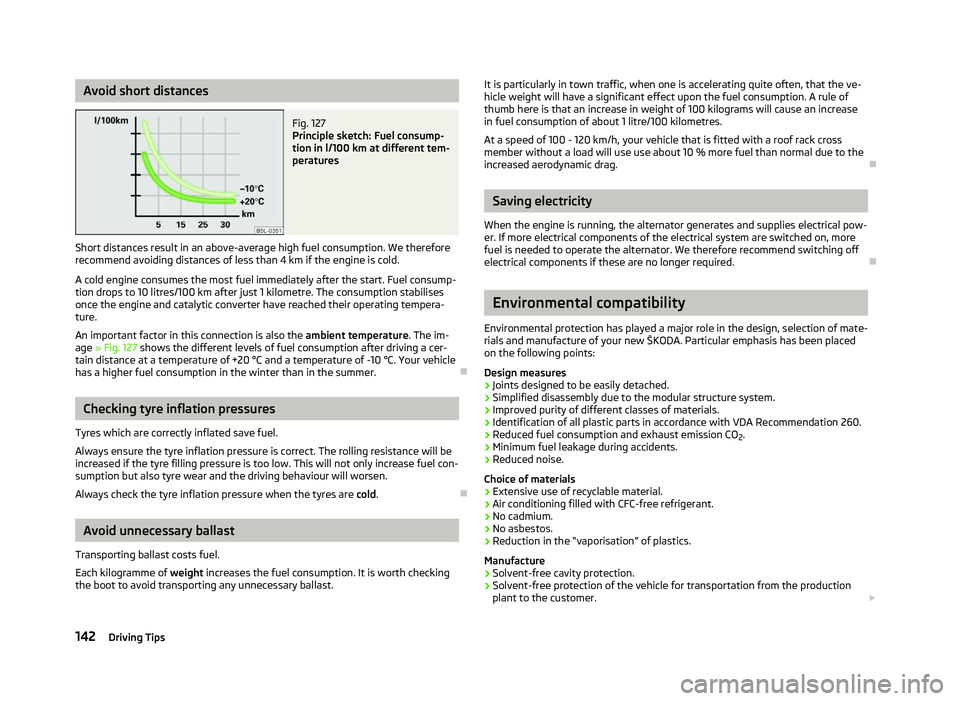
Fig. 127
Principle sketch: Fuel consump-
tion in l/100 km at different tem-
peratures
Short distances result in an above-average high fuel consumption. We therefore
recommend avoiding distances of less than 4 km if the engine is cold.
A cold engine consumes the most fuel immediately after the start. Fuel consump-
tion drops to 10 litres/100 km after just 1 kilometre. The consumption stabilises
once the engine and catalytic converter have reached their operating tempera-
ture.
An important factor in this connection is also the ambient temperature. The im-
age » Fig. 127 shows the different levels of fuel consumption after driving a cer-
tain distance at a temperature of +20 °C and a temperature of -10 °C. Your vehicle
has a higher fuel consumption in the winter than in the summer. ÐChecking tyre inflation pressures
Tyres which are correctly inflated save fuel.
Always ensure the tyre inflation pressure is correct. The rolling resistance will be
increased if the tyre filling pressure is too low. This will not only increase fuel con-
sumption but also tyre wear and the driving behaviour will worsen.
Always check the tyre inflation pressure when the tyres are cold. ÐAvoid unnecessary ballast
Transporting ballast costs fuel.
Each kilogramme of weight increases the fuel consumption. It is worth checking
the boot to avoid transporting any unnecessary ballast. It is particularly in town traffic, when one is accelerating quite often, that the ve-
hicle weight will have a significant effect upon the fuel consumption. A rule of
thumb here is that an increase in weight of 100 kilograms will cause an increase
in fuel consumption of about 1 litre/100 kilometres.
At a speed of 100 - 120 km/h, your vehicle that is fitted with a roof rack cross
member without a load will use use about 10 % more fuel than normal due to the
increased aerodynamic drag.
Ð Saving electricity
When the engine is running, the alternator generates and supplies electrical pow-
er. If more electrical components of the electrical system are switched on, more
fuel is needed to operate the alternator. We therefore recommend switching off
electrical components if these are no longer required. Ð Environmental compatibility
Environmental protection has played a major role in the design, selection of mate-
rials and manufacture of your new
ŠKODA. Particular emphasis has been placed
on the following points:
Design measures
› Joints designed to be easily detached.
› Simplified disassembly due to the modular structure system.
› Improved purity of different classes of materials.
› Identification of all plastic parts in accordance with VDA Recommendation 260.
› Reduced fuel consumption and exhaust emission CO
2.
› Minimum fuel leakage during accidents.
› Reduced noise.
Choice of materials › Extensive use of recyclable material.
› Air conditioning filled with CFC-free refrigerant.
› No cadmium.
› No asbestos.
› Reduction in the “vaporisation” of plastics.
Manufacture › Solvent-free cavity protection.
› Solvent-free protection of the vehicle for transportation from the production
plant to the customer. £
142 Driving Tips
Page 175 of 218

Unidirectional tyres
First read and observe the introductory information and safety warn-
ings on page 170.
The direction of rotation of the tyres is marked by arrows on the wall of the tyre
.
The so specified running direction must absolutely be complied with. Only then
are the tyres able to provide the optimal properties in terms of grip, low noise,
wear-and-tear and aquaplaning.
If, in the event of a puncture, it is necessary to fit a spare wheel with a tyre with-
out a dedicated running direction or the opposite running direction, drive carefully
as the optimum characteristics of the tyre are no longer applicable in this situa-
tion. ÐSpare wheel
Fig. 142
Boot: Spare wheel
First read and observe the introductory information and safety warn-
ings on page 170.
The spare wheel is located in a well under the floor covering in the boot and is
fixed in place with a special bolt
» Fig. 142.
Before removing the spare wheel, the box containing the vehicle tool kit must be
removed.
It is important to check the inflation pressure in the spare wheel (preferably every
time the tyre air pressure is checked - see sticker on the fuel filler flap »
page 171)
to ensure it is always ready to use.
ä
ä
If the dimensions or design of the spare wheel differ from the tyres fitted to the
vehicle (e.g. winter tyres or low-profile tyres), it must only be used briefly in the
event of a puncture and if an appropriately cautious style of driving is adop-
ted » .
Replace it with a wheel having the appropriate mode and dimensions as soon as
possible
Temporary spare wheel
A warning label is displayed on the wheel rim of the spare wheel to indicate that
your vehicle is equipped with a temporary spare wheel.
Please observe the following when driving with a temporary spare wheel.
› The warning label must not be covered after installing the wheel.
› Do not drive faster than 80
km/h with the temporary spare wheel and pay par-
ticular attention while driving. Avoid accelerating at full throttle, sharp braking
and fast cornering.
› The inflation pressure for this spare wheel is identical to the maximum inflation
pressure of the standard tyres. The temporary spare wheel R 18 must have an
inflation pressure of 420 kPa!
› Only use this temporary spare wheel to reach the nearest ŠKODA specialist ga-
rage as it is not intended for continuous use.
› No other summer or winter tyres must be mounted on the rim of the temporary
spare wheel R 18. WARNING
■ Never use the temporary spare wheel if it is damaged.
■ If the dimensions or design of the temporary spare wheel differ from the fit-
ted tyres, never drive faster than 80
km/h (or 50 mph). Avoid accelerating at
full throttle, sharp braking and fast cornering. CAUTION
Observe the instructions on the sticker on the temporary spare wheel. Note
The tyre pressure should be at the highest pressure specified for your vehicle at
all times. Ð
173
Wheels and Tyres
Page 186 of 218

Preparing to use the breakdown kit
First read and observe the introductory information and safety warn-
ings on page 182.
The following preparatory work must be carried out before using the breakdown
kit.
›
In the event of a puncture, park the vehicle as far away as possible from the
flow of traffic. Park on as flat and firm a surface as possible.
› Let all of the occupants get out.
While changing a tyre, the occupants of the
vehicle should not stand on the road (instead they should remain behind a crash
barrier).
› Switch off the engine and move the gearshift lever into
Neutral or move the
selector lever for the automatic gearbox into position P .
› Firmly apply the
handbrake.
› Check that you can carry out the repairs with the breakdown kit
» page 182.
› If a trailer is connected, remove it.
› Remove the breakdown kit
from the boot.
› Stick the sticker 2
»
Fig. 152
on page 183 on the dash panel in view of the driv-
er.
› Do not remove the foreign body, e.g. screw or nail, from the tyre.
› Unscrew the valve cap.
› Use the valve remover 1
to unscrew the valve core and place it on a clean sur-
face (rag, paper, etc.). ÐSealing and inflating tyres
First read and observe the introductory information and safety warn-
ings on page 182.
Sealing
›
Forcefully shake the tyre inflator bottle 10
» Fig. 152 on page 183 several times.
› Firmly screw the inflation hose 3
onto the tyre inflator bottle 10
in a clockwise
direction. The film on the cap is pierced automatically.
› Remove the plug from the inflation hose 3
and plug the open end fully onto
the tyre valve.
› Hold the bottle 10
with the bottom facing upwards and fill all of the sealing
agent from the tyre inflator bottle into the tyre.
› Remove the empty tyre inflator bottle from the valve.
› Screw the valve core back into the tyre valve using the valve remover 1
.
ä
ä
Inflating
› Screw the tyre inflation hose 5
» Fig. 152 on page 183 of the air compressor
firmly onto the tyre valve.
› Check that the air release valve 7
is closed.
› Start the engine and run it in idle.
› Plug the connector 9
into 12 Volt socket »
page 69.
› Switch on the air compressor with the ON and OFF switch 8
.
› Allow the air compressor to run until a pressure of 2.0 - 2.5 bar is achieved.
Maximum run time of 8 minutes » !
› Switch off the air compressor.
› If you cannot reach an air pressure of 2.0 – 2.5 bar, unscrew the tyre inflation
hose 5
from the tyre valve.
› Drive the vehicle 10 metres forwards or backwards to allow the sealing agent to
“distribute” in the tyre.
› Firmly screw the tyre inflation hose 5
back onto the tyre valve and repeat the
inflation process.
› If you cannot reach the required tyre inflation pressure here either, this means
the tyre has sustained too much damage. You cannot seal with tyre with the
breakdown kit » .
› Switch off the air compressor.
› Remove the tyre inflation hose 5
from the tyre valve.
Once a tyre inflation pressure of 2.0
– 2.5 bar is achieved, continue the journey at
a maximum speed of 80 km/h (50 mph).
Check the tyre inflation pressure after driving for 10 minutes » page 185. WARNING
■ During inflation, the tyre inflation hose and air compressor may get hot- risk
of injury!
■ Do not place the hot tyre inflation hose or hot air compressor on flammable
materials - risk of fire!
■ If you cannot inflate the tyre to at least 2.0 bar, this means the damage sus-
tained was too serious. The sealing agent cannot be used to seal the tyre. Do
not drive the vehicle. Get professional assistance! CAUTION
Switch off the air compressor after running 8 minutes at the latest - danger of
overheating! Allow the air compressor to cool a few minutes before switching it
on again. Ð
184 Do-it-yourself