2006 Seat Altea Rear lights
[x] Cancel search: Rear lightsPage 113 of 288

Lights and visibility111
Safety First
Operating instructions
Tips and Maintenance
Te c h n i c a l D a t a
Lights and visibilityLightsSwitch ing ligh ts on and off
Switching on the side lights
– Turn the light switch ⇒ fig. 74 to position
.
Switching on dipped headlights
– Turn the light switch to position
.
Switching off the lights
– Turn the light switch to position 0. Switching on the fog lights*
– Pull the switch out of position
or
to the first stop. The
symbol
in the light switch lights up.
Switching on the rear fog lights (vehicles with front fog lights)
– Pull the switch out of position
or
to the second stop
⇒ . A warning lamp lights up in the control panel.
Switching on the rear fog lights (vehicles with no front fog lights)
– Pull the switch out of position
to the last stop. A warning lamp
lights up in the instrument panel.
WARNING
Never drive with just the side lights on . Risk of accident. The side lights are
not bright enough to illuminate the road ahead and to ensure that other
road users are able to see you. Always use your dipped headlights if it is
dark or if visibility is poor.
Note
•
The dipped beam headlights will only work with the ignition on. The side
lights come on automatically when the ignition is turned off.
•
If the lights are left on after the key has been taken out of the ignition lock,
a buzzer sounds when the driver door is opened. This is a reminder to switch
off the lights.
Fig. 74 Detail of the dash
panel: Switch for lights,
fog lights and rear fog
light
altea_ingles Seite 111 Dienstag, 4. Oktober 2005 6:57 18
Page 114 of 288

Lights and visibility
112•
If the coming home* feature is activated, the acoustic signal for the
dipped beam headlights will not sound, it will sound if the position lights are
activated.
•
The rear fog light is so bright that it can dazzle drivers behind you. You
should use the rear fog light only when visibility is very poor.
•
If you are towing a trailer equipped with a rear fog light on a vehicle with
a factory-fitted towing bracket, the rear fog light on the car will automatically
be switched off.
•
The use of the lighting described here is subject to the relevant statutory
requirements.
Automatic lightingActivation
– Rotate the switch to the position “Auto”, this indication will light up.
When the switch is in this position, as soon as visibility conditions are
reduced, the lights are automaticall y activated. The indication “Auto”,
changes to red.
Automatic lighting
If the automatic headlight control is switched on, dipped headlights are auto-
matically switched on by a light-sensitive sensor if you drive into a tunnel, for
example.
The rain function switches on the headlights if the continuous wipe function
is switched on for longer than 5 seconds. The dipped beam headlights are
switched off if the continuous wipe or the intermittent wipe functions are
swit ched off for longer than 255 seconds.
WARNING
•
If automatic headlight control is switched on, the headlights will not be
switched on in fog or heavy rain. Therefore, the dipped beam must be
switched on.Note
•
For those vehicles with the automatic headlight system, when the key is
removed from the ignition, the acoustic signal will only sound if the light
control is in the position
or if the vehicle is not fitted with the coming
home function.
•
If the daylight driving automatic light function is switched on, the fog
lights or rear fog light cannot be switched on in addition.
•
The use of the lighting described here is subject to the relevant statutory
requirements.
•
Do not put stickers on the windscreen in front of the sensor. This may
cause disruptions or faults in the automatic lighting system.
Fig. 75 Automatic
lighting
altea_ingles Seite 112 Dienstag, 4. Oktober 2005 6:57 18
Page 115 of 288
Lights and visibility113
Safety First
Operating instructions
Tips and Maintenance
Te c h n i c a l D a t a
Coming home / leaving home function*
After dark the area around the car is lit up with the aid of the
coming home / leaving home function.Coming home function*
To activate the function
– Put the light switch into the position
or in the “Auto” position
for those vehicles fitted with the automatic lighting function.
– Remove key from ignition switch.
To deactivate the function
– Turn light switch to position 0
When the system is activated and it is dark, the coming home function will
illuminate the vehicle and its surroundings by switching on the dipped head-
lights, rear lights and nu mber plate lights when the driver's door is opened.
While one of the doors or the tailgate are open, the dipped headlights, the
rear lights and the registration plate lighting remain on for about 90 seconds.
If, before this time is up, all of the doors and the tailgate are closed, another
40 seconds of lighting is given. However, if all of the doors and the tailgate
are closed after the 90 seconds have passed, the system will be deactivated
and the lights will not come on.
If you wish to reactivate the system, you must start from the beginning.
The lighting time is defined at the time of manufacture.
Leaving home function*
The function is activated when the vehicle is unlocked using the remote
control. In the dark, the leaving home function will light the dipped beam
lights, the rear lights and the registration plate lighting for about 40 seconds.
Note
•
If the vehicle is used often during the night for short trips using the
coming home function, this will place a heavy demand on the battery. To
avoid this, make longer journeys whenever possible.
•
Observe all relevant statutory requirements when using the lighting
systems described here.
•
For those vehicles fitted with the “Dot Matrix” display, the delay in turning
off the headlights (about 40 seconds) can be adjusted using the “Configura-
tion, lights and visibility” menu.
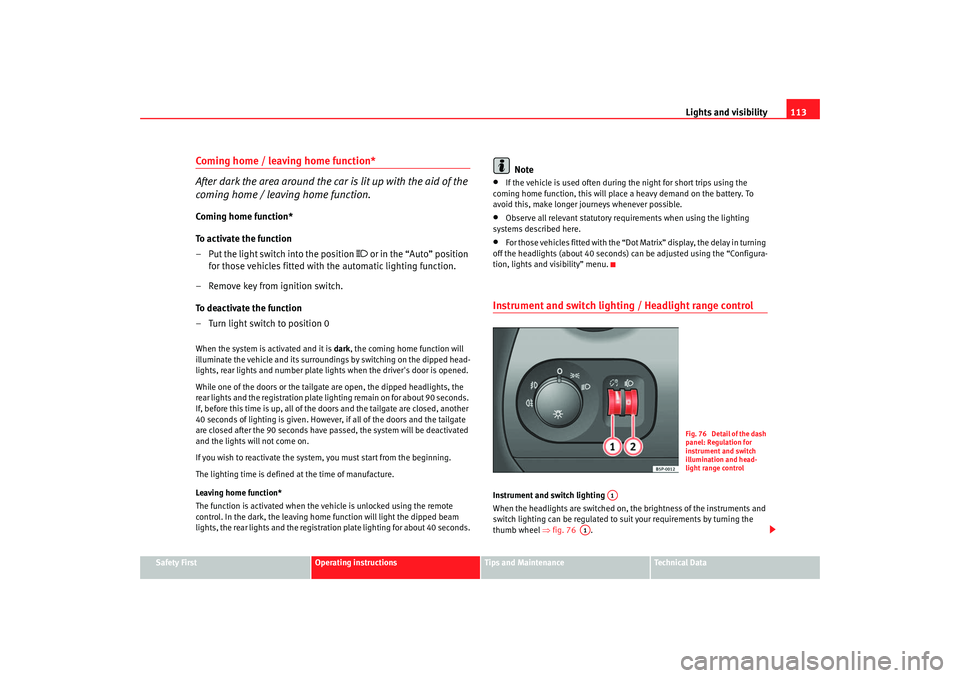
Instrument and switch lighting / Headlight range controlInstrument and switch lighting
When the headlights are switched on, the brightness of the instruments and
switch lighting can be regulated to su it your requirements by turning the
thumb wheel ⇒fig. 76 .
Fig. 76 Detail of the dash
panel: Regulation for
instrument and switch
illumination and head-
light range control
A1
A1
altea_ingles Seite 113 Dienstag, 4. Oktober 2005 6:57 18
Page 118 of 288

Lights and visibility
116
WARNING
The main beam can dazzle other drivers. Risk of accident! Never use the
main beam headlights or the headlight flasher if they could dazzle other
drivers.
Note
•
The turn signals only work when the ignition is switched on. The corre-
sponding warning lamp
or flashes in the combi-instrument. The
warning lamp
flashes when the turn signals are operated, provided a
trailer is correctly attached and connected to the vehicle. If a turn signal bulb
is defective, the warning lamp flashes at double speed. If the trailer turn
signal bulbs are damaged, warning lamp
does not light up. You should
have the bulb replaced.
•
The main beam headlights can only be switched on if the dipped beam
headlights are already on. The warning lamp
then comes on in the combi-
instrument.
•
The headlight flasher comes on for as long as you pull the lever – even if
no other lights are switched on. The warning lamp
then comes on in the
combi-instrument.
•
When the parking lights are switched on, the headlight and the rear light
on the corresponding side of the vehicle light up. The parking lights will only
work if the key is removed from the ignition. If the lights are switched on, a
buzzer gives an audible warning while the driver door is open.
•
If the turn signal lever is left on after the key has been taken out of the
ignition lock, an acoustic signal sounds when the driver door is opened. This
is a reminder to switch off the turn signal, unless of course you wish to leave
the parking light on.
Interior lightsInterior front light, type 1 The switch ⇒ fig. 79 is used to select the following positions:
Courtesy light position
Rocker switch in flat position (not activated). The interior lights are automat-
ically switched on when the vehicle is unlocked or the key removed from the
ignition lock. and turn off about 20 seconds after the closure of the doors. The
interior lights are switched off when the vehicle is locked or when the ignition
is switched on.
Interior light switched on
Turn the knob to the po sition
.
Interior light switched off O
Turn the knob to the position O ⇒fig. 79 .
Fig. 79 Detail of the roof:
Front reading light
AA
altea_ingles Seite 116 Dienstag, 4. Oktober 2005 6:57 18
Page 120 of 288

Lights and visibility
118Front reading lights Switching on the reading light
Press the corresponding button ⇒ fig. 81 and ⇒ fig. 82 to switch on
the reading light. Switching off the reading lights
Press the corresponding button to switch off the reading light.Rear interior and reading lights* The switch ⇒
fig. 83 is used to select the following positions:
Interior light switched off 0
In switch position ⇒fig. 83 , the interior and reading lights are switched
off.
Switching on the reading light
Turn the switch to position (left re ading light) or to position (right
reading light).
Courtesy light position
Turn the control to position . The interior lights are automatically switched
on when the vehicle is unlocked or the key removed from the ignition lock.
Fig. 81 Detail of the roof:
Front reading light type 1Fig. 82 Detail of the roof:
Front reading light type 2
AB
AB
Fig. 83 Detail of the roof:
Rear interior light and
reading lights
AC
A1A2
A4
A3
altea_ingles Seite 118 Dienstag, 4. Oktober 2005 6:57 18
Page 122 of 288

Lights and visibility
120Windscreen washersFront windscreen wipers
The windscreen wiper lever controls the windscreen wipers
and the automatic wash and wipe.
The windscreen wiper lever ⇒fig. 85 has the following positions:
Switching off the wipers
– Move the lever to position .
Intermittent wipe
– Move the lever up to position . – Move the control to the left or right to set the length of the
intervals. Control to the left - longer wipe pause, control to the
right - shor ter wipe pauses. Four wiper inter val stages can be set
using switch .
Slow wipe
– Move the lever up to position .
Continuous wipe
– Move the lever up to position .
Brief wipe
– Move the lever down to position to give the windscreen a brief
wipe. The wiper will start to move faster if you keep the lever
pressed down for longer than 2 seconds.
Wash and wipe automatic system
– Pull the lever towards the steering wheel - Position . The wash function will start immediately and the wipers will start with a
slight delay. The wash and wiper systems will function at the
same time at speeds of over 120 km/h.
– Then release the lever. The wipers will keep running for approxi- mately four seconds.Optional heated windscreen in the wiper blade* area (page
In some countries and with some versions, there is the possibility of heating
the windscreen in the area of the windscreen wiper blades in order to aid de-
icing in the zone.
This function is activated by turning the exterior heated rearview mirror*
control fo rwards ⇒ page 125.
Fig. 85 Windscreen wiper
and windscreen wash
lever
A0A1
AA
AA
A2A3A4
A5
altea_ingles Seite 120 Dienstag, 4. Oktober 2005 6:57 18
Page 125 of 288

Lights and visibility123
Safety First
Operating instructions
Tips and Maintenance
Te c h n i c a l D a t a
Rear window wiper
The windscreen wiper lever operates the windscreen wiper
and the wash and wipe system for the rear window.Switching on the interval wipe
– Press the lever forwards to position ⇒fig. 88 . The wiper will
wipe the window approximately every 6 seconds.
Switching off the interval wipe function
– Pull the lever back from positi on towards the steering wheel.
The wiper will continue to function for a short period if you switch
off whilst the wipers are in motion. Switching on the windscreen wiper and washer system
– Press the lever fully forwards to position
⇒fig. 88 . The wash
function will start immediately and the wiper will start with a
slight delay. The windscreen wash system will function as long as
you hold the lever in this position.
– Then release the lever. The wiper then wipes for approximately 4 seconds, and then in intervals again.
– Then release the lever. The washer system stops and the wipers function.
WARNING
•
A worn or dirty wiper blade will obstruct visibility and reduce safety.
•
Always note the corresponding warnings on ⇒page 214.Caution
In icy conditions, always check that the wiper blade is not frozen to the glass
before using the wiper for the first time. If you switch on the wiper when the
wiper blade is frozen to the glass, this could damage both the wiper blade
and the wiper motor.
Note
•
The windscreen wiper will only function when the ignition is switched on
and the tailgate is closed.
•
In reverse gear, with the windscreen wipers switched on, the rear wind-
screen wiper will make one wipe.
F i g . 8 8 W i n d o w w a s h a n d
wipe lever: Rear window
wiper
A6
A6
A7
altea_ingles Seite 123 Dienstag, 4. Oktober 2005 6:57 18
Page 126 of 288

Lights and visibility
124Headlight washer system
The headlight washers clean the headlight lenses.The headlight washers are activated automatically when the windscreen
washer is used and the windscreen wiper lever is pulled towards the steering
wheel for at least 1.5 seconds – provided the dipped headlights or main
beams are switched on. Clean off stubborn dirt (insects, etc.) from the head-
lights at regular intervals, for in stance when filling the fuel tank.
Note
•
To ensure that the headlight washers work properly in winter, keep the
nozzle holders in the bumper free of snow and remove any ice with a de-icer
spray.
•
To remove water, the windscreen wiper s will be activated from time to
time, the headlight wipers will be activated every three cycles.
MirrorsInterior mirror
It is dangerous to drive if you cannot see clearly through the
rear window.Manual anti-dazzle function for interior mirror
In the basic mirror position, the lever at the bottom edge of the mirror should
be at the front. Pull the lever to the back to select the anti-dazzle function.
Automatic anti-dazzle interior mirror*
The automatic anti-dazzle function can be switched on and off
as desired.Switching off anti-dazzle function
– Press button ⇒fig. 89 . Warning lamp goes out:
Switching on anti-dazzle function
– Press button ⇒fig. 89 . Warning lamp is lit.Anti-dazzle function
The anti-dazzle function is activated every time the ignition is switched on.
The green indicator lamp ligh ts up in the mirror housing.
When the anti-dazzle function is acti vated the interior mirror will darken auto-
matically according to the amount of light it receives (for example from the
headlights of a vehicle behind). The anti-dazzle function is cancelled if
reverse gear is engaged.
Fig. 89 Automatic anti-
dazzle interior mirror.
AA
AB
AA
altea_ingles Seite 124 Dienstag, 4. Oktober 2005 6:57 18