2006 Seat Alhambra child restraint
[x] Cancel search: child restraintPage 55 of 299
Child safety53
Safety FirstOperating instructionsTips and MaintenanceTe c h n i c a l D a t a
– Pull the loop in the direction of the arrow and push the seat
cushion down until it engages.
Fitting the slumber roll
– Remove the head restraint.
– Fit the head restraint onto the slumber roll
– Reinsert the head restraint and push down until it can be heard
to engage.
Removing the slumber roll
– Remove the head restraint.
– Pull the slumber roll off the head restraint.
– Reinsert the head restraint and push down until it can be heard
to engage.
For safety reasons, we recommend that the child seat for children in Group 1
is installed facing against the direction of travel.
Adjusting the belt routing for larger children in Group1
A correctly adjusted seat belt helps to protect your child!
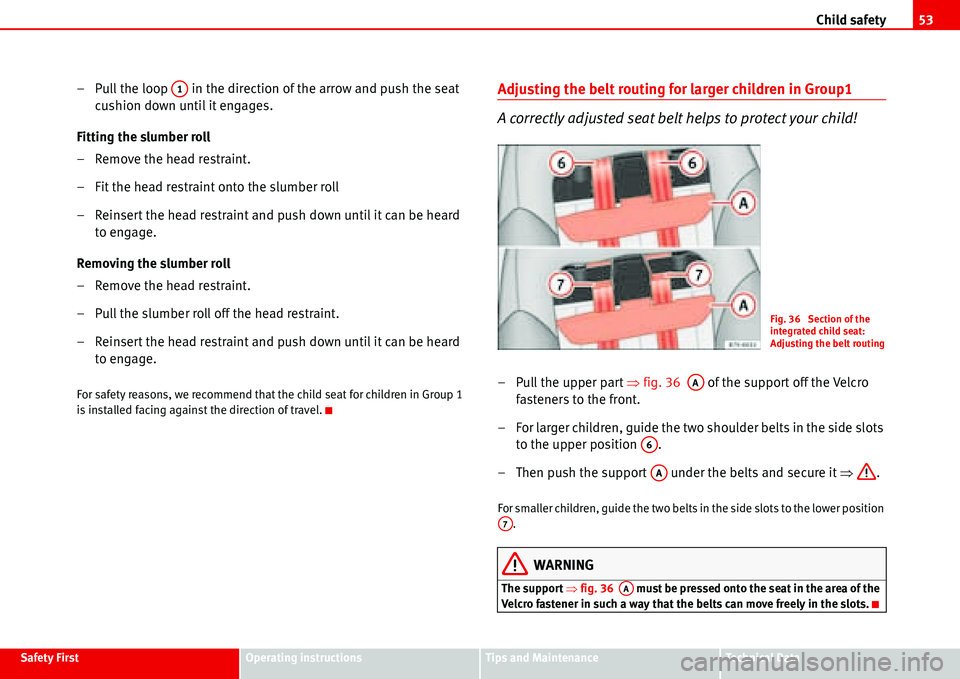
– Pull the upper part �Ÿfig. 36 of the support off the Velcro
fasteners to the front.
– For larger children, guide the two shoulder belts in the side slots
to the upper position .
– Then push the support under the belts and secure it �Ÿ.
For smaller children, guide the two belts in the side slots to the lower position
.
WARNING
The support �Ÿfig. 36 must be pressed onto the seat in the area of the
Velcro fastener in such a way that the belts can move freely in the slots.
A1
Fig. 36 Section of the
integrated child seat:
Adjusting the belt routing
AA
A6
AA
A7
AA
Page 57 of 299
Child safety55
Safety FirstOperating instructionsTips and MaintenanceTe c h n i c a l D a t a
Releasing the harness belt for children in Group 1
A correctly adjusted seat belt helps to protect your child!
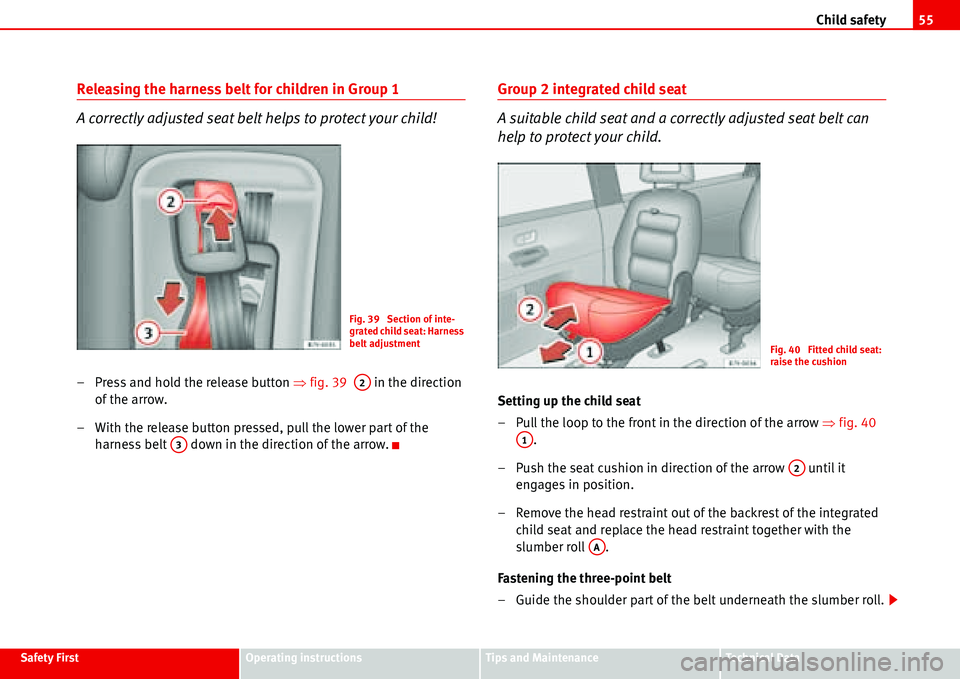
– Press and hold the release button �Ÿfig. 39 in the direction
of the arrow.
– With the release button pressed, pull the lower part of the
harness belt down in the direction of the arrow.
Group 2 integrated child seat
A suitable child seat and a correctly adjusted seat belt can
help to protect your child.
Setting up the child seat
– Pull the loop to the front in the direction of the arrow �Ÿfig. 40
.
– Push the seat cushion in direction of the arrow until it
engages in position.
– Remove the head restraint out of the backrest of the integrated
child seat and replace the head restraint together with the
slumber roll .
Fastening the three-point belt
– Guide the shoulder part of the belt underneath the slumber roll.
Fig. 39 Section of inte-
grated child seat: Harness
belt adjustment
A2
A3
Fig. 40 Fitted child seat:
raise the cushion
A1
A2
AA
Page 58 of 299
Child safety 56
– To fasten the three-point belt, take hold of the tongue and pull it
slowly across the chest and lap.
– Push the tongue of the belt into the lock for that seat so that it
engages audibly (pull to check!)
– Adjust the three-point belt to suit body size �Ÿ.
Restoring the normal seat
– Pull the loop in the direction of the arrow and push the seat
cushion down until it engages.
Removing the slumber roll
– Remove the head restraint.
– Pull the slumber roll off the head restraint.
– Reinsert the head restraint and push down until it can be heard
to engage.
Use the following measures to guarantee the proper routing of the shoulder
belt:
•Seatbelt height setting
•Adjustment of the seat forwards and backwards
•Backrest angle adjustment
WARNING
•For safety reasons, the seat for children in Group 2 may only be fitted in
the direction of travel and in one of the outer positions (not on the centre
seat).
•The risk of injury is increased if the belt is not correctly routed .
•The shoulder part of the belt should be positioned roughly over the
centre of the shoulder, never across the neck, and fit closely against the
upper part of the body.
•The lap belt part must lie across the pelvis, not across the stomach, and
always fit closely. Tighten the lap belt as necessary.
Group 3 integrated child seat
A suitable child seat and a correctly adjusted seat belt can
help to protect your child.
Setting up the child seat
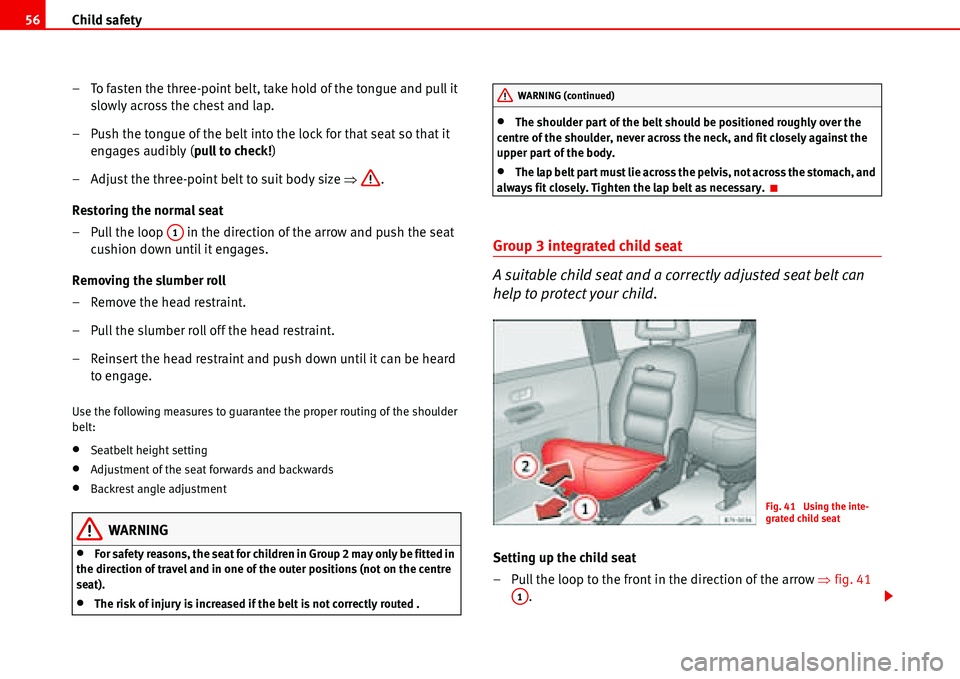
– Pull the loop to the front in the direction of the arrow �Ÿfig. 41
.
A1
WARNING (continued)
Fig. 41 Using the inte-
grated child seat
A1
Page 123 of 299

Seats and stowage121
Safety FirstOperating instructionsTips and MaintenanceTe c h n i c a l D a t a
Seats and stowage
The importance of correct seat adjustment
Proper seat adjustment optimises the level of protection
offered by seat belts and airbags.
The driver seat, front passenger seat, and seats in the passenger compart-
ment, can be adjusted in many ways to suit the physical requirements of the
vehicle occupants. The correct seat position is very important for:
•fast and easy operation of all controls on the instrument panel,
•relaxed posture that does not cause drowsiness,
•safe driving,
•optimum protection from the seat belts and airbag system �Ÿpage 7.
Vehicle seats
Your vehicle has a total of five or seven
24) seats.
•First row of seats: two seats
•Second row of seats: three seats
•Third row of seats24): two seats
Each seat is equipped with a three-point seat belt.
WARNING
If the driver and passengers assume improper sitting positions, they may
sustain critical injuries.
•Never transport more people than there are seats available in the
vehicle.
•Every occupant in the vehicle must properly fasten and wear the seat
belt belonging to his or her seat. Children must be protected with an appro-
priate child restraint system. Section “Child Safety”
•The seats and all head restraints must always be adjusted to body size
and the seat belt must always be properly adjusted to provide you and your
passengers with optimum protection.
•Always keep your feet in the foot well when the vehicle is moving; never
rest them on the dash panel, out of the window or on the seat. This also
applies to passengers. An incorrect sitting position exposes you to an
increased risk of injury in the event of a braking manoeuvre or an accident.
If the airbag is triggered, you could sustain fatal injuries due to an improper
sitting position.
•It is important for the driver and front passenger to maintain a distance
of at least 25 cm from the steering wheel or dash panel. Failure to respect
the minimum distance means that the airbag will not protect you. Risk of
fatal injury. The distance between the driver and the steering wheel or
between the front passenger and the dash panel should always be as great
as possible.
•Adjust the driver or front passenger seat only when the vehicle is
stationary. Otherwise your seat could move unexpectedly while the vehicle
is moving. This could increase the risk of an accident and therefore injury.
In addition, while adjusting your seat, you will assume an incorrect sitting
position. Risk of fatal accidents.
•Special guidelines apply to installing a child seat on the front
passenger seat. When installing a child seat, observe the warning note in
“Child safety”.
•The seats in the third row of seats may, for safety reasons, only be used
if the luggage compartment cover has been removed.
24)Optional equipment
WARNING (continued)
Page 128 of 299

Seats and stowage 126
Rear seats
Characteristics of seat equipment
The seats in the passenger compartment have the following features,
depending on the equipment level:
•Integrated three-point seat belt with adjustable latch plate holder,
•Integrated ISOFIX anchor points for a child seat ,
•Height-adjustable head restraints �Ÿpage 122
•Room for just one person,
•Adjustable armrests26).
•Individual seats can be removed �Ÿpage 129,
•Integrated child seats26).
Seat with integrated child seat
Seats with an integrated child seat have the same functions as the conven-
tional individual seats. The integrated child seat is described in “Safety
first”.
Seat layout
Second row, left seat.
Third row, left seat.
Second row, centre seat.
26)Optional equipment
Fig. 89 Maximum number of seats in the Alhambra
A1
A2
A3
Page 133 of 299
Seats and stowage131
Safety FirstOperating instructionsTips and MaintenanceTe c h n i c a l D a t a
Adjusting the armrest
– Turn the thumb wheel underneath the armrests to adjust the
angle of the armrests to your requirement.
Removable armrest
29)
– Take hold of the armrest at the rear and press the button
�Ÿpage 130, fig. 95 in the direction of the arrow.
– With the button pressed, pull the armrest off to the side out of the
holder.
– When installing, please ensure that the armrest engages
securely in the holder.
The removable armrests for the second row of seats can be found in a trans-
port bag �Ÿpage 130, fig. 96.
The bag hangs from a head restraint of a seat in the last row of seats or, in
vehicles with 4 integrated child seats
29), on the centre seat of the second row
of seats.
WARNING
•The transport bag should always be secured properly when travelling in
the vehicle as it could otherwise be a safety risk in an accident or braking
manoeuvre. We recommend that you keep the bag at home.
•The bag, if you do decide to keep it in the vehicle, may not be secured
to the head restraint of an integrated child seat. The backrest could be
forced forward in an accident or braking manoeuvre due to the weight of the
bag.
Safety instructions for seats
WARNING
•Occupants may travel on the seats in the passenger compartment only
if the following conditions are fulfilled at the same time:
−The seats must always be fitted in the appropriate floor anchors and
must be securely engaged.
−The backrest of all seats must be in the upright position and securely
engaged in this position.
−The seat occupants must have access to the seat belts. The seat
belts must be fitted correctly.
−All the occupants of the vehicle must be correctly seated while
driving.
•A seat which has been removed can cause injury if it is transported in
the vehicle. Each seat must always be fitted in the floor anchors and must
be securely engaged. The backrest must be in an upright position. If a
bench seat is not properly secured, it could become a life-threatening
hazard for all vehicle occupants.
•Make sure that the bases of seats are not soiled or damaged when
removed from the vehicle.
•All adjustment to the seats, including fitting and removal, may be
carried out only when the vehicle is stationary.
29)Optional equipment
Page 140 of 299
Seats and stowage 138
WARNING
The folding tables may not be folded down whilst the vehicle is in motion
and anyone is seated on the second row of seats. There is a risk on injury
during a sudden braking manoeuvre! The table must therefore be closed
and properly secured whilst the vehicle is in motion.
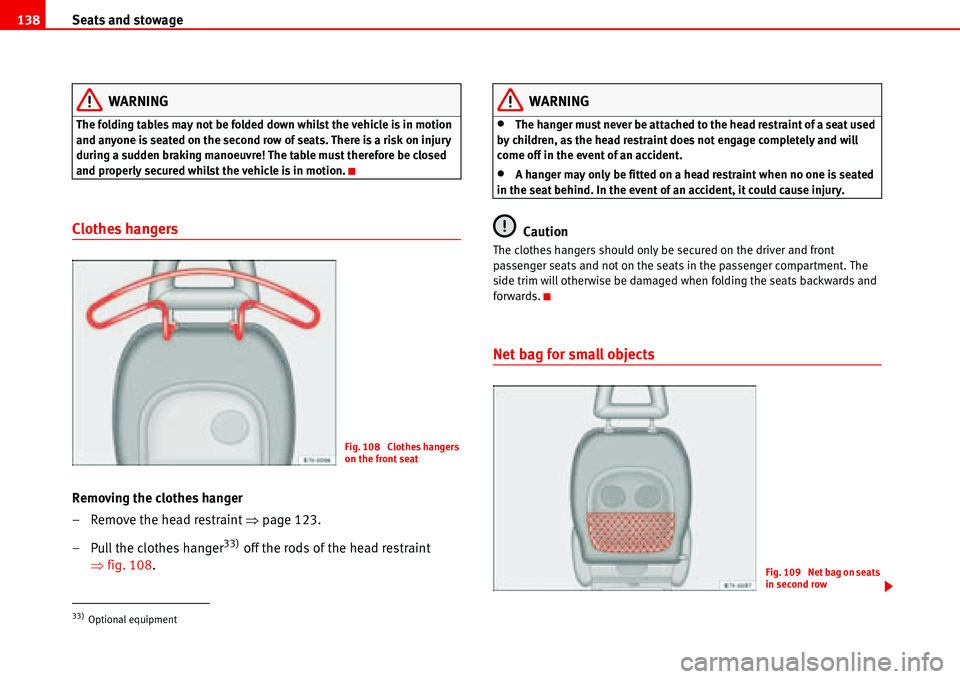
Clothes hangers
Removing the clothes hanger
– Remove the head restraint �Ÿpage 123.
– Pull the clothes hanger
33) off the rods of the head restraint
�Ÿfig. 108.
WARNING
•The hanger must never be attached to the head restraint of a seat used
by children, as the head restraint does not engage completely and will
come off in the event of an accident.
•A hanger may only be fitted on a head restraint when no one is seated
in the seat behind. In the event of an accident, it could cause injury.
Caution
The clothes hangers should only be secured on the driver and front
passenger seats and not on the seats in the passenger compartment. The
side trim will otherwise be damaged when folding the seats backwards and
forwards.
Net bag for small objects
33)Optional equipment
Fig. 108 Clothes hangers
on the front seat
Fig. 109 Net bag on seats
in second row
Page 293 of 299

Index291
Guide lights . . . . . . . . . . . . . . . . . . . . . . . . . . . . 109
H
Hand brake
warning lamp . . . . . . . . . . . . . . . . . . . . . . . . 179
Handbrake . . . . . . . . . . . . . . . . . . . . . . . . . . . . . 172
Warning lamp . . . . . . . . . . . . . . . . . . . . 76, 172
Hazard warning lights . . . . . . . . . . . . . . . . . . . . 110
head restraints
Adjusting . . . . . . . . . . . . . . . . . . . . . . 122, 123
fitting . . . . . . . . . . . . . . . . . . . . . . . . . . . . . . 123
Removing . . . . . . . . . . . . . . . . . . . . . . . . . . . 123
Headlamp washer . . . . . . . . . . . . . . . . . . . . . . . 118
Headlight flasher . . . . . . . . . . . . . . . . . . . . . . . . 112
Headlight range control . . . . . . . . . . . . . . . . . . 109
Headlights
Driving abroad . . . . . . . . . . . . . . . . . . . . . . . 188
Heated rear window
Heating elements . . . . . . . . . . . . . . . . . . . . 143
High pressure cleaners . . . . . . . . . . . . . . . . . . . 195
Hubcaps . . . . . . . . . . . . . . . . . . . . . . . . . . . . . . . 237
I
Identification number . . . . . . . . . . . . . . . . . . . . 258
Ignition key . . . . . . . . . . . . . . . . . . . . . . . . . . . . 161
Ignition lock . . . . . . . . . . . . . . . . . . . . . . . . . . . . 161
Illumination of instruments and switches . . . . 109
Indicator lights
indication lamp . . . . . . . . . . . . . . . . . . . . . . . 73Individual opening of doors . . . . . . . . . . . . . . . . 88
Information messages . . . . . . . . . . . . . . . . . . . . 67
Instrument lighting control . . . . . . . . . . . . . . . . . 61
Instrument panel . . . . . . . . . . . . . . . . . . . . . . . . . 61
Instruments . . . . . . . . . . . . . . . . . . . . . . . . . . . . . 62
Integrated child seat . . . . . . . . . . . . . . . . . . . . . . 52
Adjusting belt routing . . . . . . . . . . . . . . . . . . 53
Cleaning the child seat . . . . . . . . . . . . . . . . . 57
Fastening harness belt . . . . . . . . . . . . . . . . . 54
Group 1 . . . . . . . . . . . . . . . . . . . . . . . . . . . . . . 52
Group 2 . . . . . . . . . . . . . . . . . . . . . . . . . . . . . . 55
Group 3 . . . . . . . . . . . . . . . . . . . . . . . . . . . . . . 56
Releasing harness belt . . . . . . . . . . . . . . . . . 55
Interior light . . . . . . . . . . . . . . . . . . . . . . . . . . . . 114
Interior lights . . . . . . . . . . . . . . . . . . . . . . . . . . . 113
Interior monitoring system . . . . . . . . . . . . . . . . . 96
Intermittent wipe
rear window wiper . . . . . . . . . . . . . . . . . . . . 117
windscreen wiper . . . . . . . . . . . . . . . . . . . . . 116
J
Jack . . . . . . . . . . . . . . . . . . . . . . . . . . . . . . . . . . . 239
Jump leads . . . . . . . . . . . . . . . . . . . . . . . . . . . . . 249
Jump-starting . . . . . . . . . . . . . . . . . . . . . . . . . . . 249
K
Key tab . . . . . . . . . . . . . . . . . . . . . . . . . . . . . . . . . 86
Key with remote control . . . . . . . . . . . . . . . . . . . 93
buttons . . . . . . . . . . . . . . . . . . . . . . . . . . . . . . 93Keys . . . . . . . . . . . . . . . . . . . . . . . . . . . . . . . . . . . 86
Kick-down function . . . . . . . . . . . . . . . . . . . . . . 171
L
Lifting platform . . . . . . . . . . . . . . . . . . . . . . . . . 255
Lifting the vehicle . . . . . . . . . . . . . . . . . . . . . . . 255
Lighting of controls . . . . . . . . . . . . . . . . . . . . . . . 61
Lights . . . . . . . . . . . . . . . . . . . . . . . . . . . . . . . . . 108
Load compartment
SeeLuggage compartment . . . . . . . . . . . . . . 14
Loading area
SeeLuggage compartment . . . . . . . . . . . . . 142
Locks . . . . . . . . . . . . . . . . . . . . . . . . . . . . . . . . . 197
Luggage compartment . . . . . . . . . . . . . . . . 14, 142
See alsoLuggage compartment . . . . . . 14, 142
Luggage compartment cover . . . . . . . . . . . . . . 145
M
Main beam . . . . . . . . . . . . . . . . . . . . . . . . . . . . . 112
Main beam headlights
Indicator lamp . . . . . . . . . . . . . . . . . . . . . . . . 73
Manual gearbox . . . . . . . . . . . . . . . . . . . . . . . . . 165
Manual mode
Climatronic . . . . . . . . . . . . . . . . . . . . . . . . . . 153
Mileage display . . . . . . . . . . . . . . . . . . . . . . . 65, 66
Mirrors
Exterior mirrors . . . . . . . . . . . . . . . . . . . . . . 119
Interior mirror . . . . . . . . . . . . . . . . . . . . . . . . 118
Make-up mirrors . . . . . . . . . . . . . . . . . . . . . 114