Page 125 of 299
Seats and stowage123
Safety FirstOperating instructionsTips and MaintenanceTe c h n i c a l D a t a
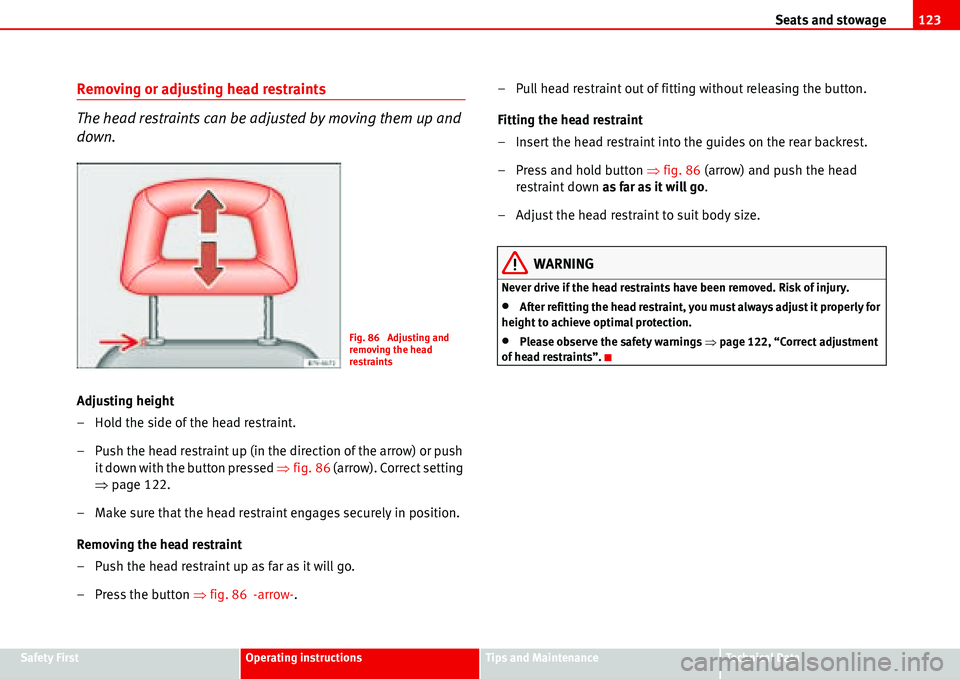
Removing or adjusting head restraints
The head restraints can be adjusted by moving them up and
down.
Adjusting height
– Hold the side of the head restraint.
– Push the head restraint up (in the direction of the arrow) or push
it down with the button pressed �Ÿfig. 86 (arrow). Correct setting
�Ÿpage 122.
– Make sure that the head restraint engages securely in position.
Removing the head restraint
– Push the head restraint up as far as it will go.
– Press the button �Ÿfig. 86 -arrow-.– Pull head restraint out of fitting without releasing the button.
Fitting the head restraint
– Insert the head restraint into the guides on the rear backrest.
– Press and hold button �Ÿfig. 86 (arrow) and push the head
restraint down as far as it will go.
– Adjust the head restraint to suit body size.
WARNING
Never drive if the head restraints have been removed. Risk of injury.
•After refitting the head restraint, you must always adjust it properly for
height to achieve optimal protection.
•Please observe the safety warnings �Ÿpage 122, “Correct adjustment
of head restraints”.Fig. 86 Adjusting and
removing the head
restraints
Page 128 of 299
Seats and stowage 126
Rear seats
Characteristics of seat equipment
The seats in the passenger compartment have the following features,
depending on the equipment level:
•Integrated three-point seat belt with adjustable latch plate holder,
•Integrated ISOFIX anchor points for a child seat ,
•Height-adjustable head restraints �Ÿpage 122
•Room for just one person,
•Adjustable armrests26).
•Individual seats can be removed �Ÿpage 129,
•Integrated child seats26).
Seat with integrated child seat
Seats with an integrated child seat have the same functions as the conven-
tional individual seats. The integrated child seat is described in “Safety
first”.
Seat layout
Second row, left seat.
Third row, left seat.
Second row, centre seat.
26)Optional equipment
Fig. 89 Maximum number of seats in the Alhambra
A1
A2
A3
Page 131 of 299
Seats and stowage129
Safety FirstOperating instructionsTips and MaintenanceTe c h n i c a l D a t a
WARNING
If you do not hold the backrest firmly when you operate the lever for
adjusting the backrest angle, the backrest will be pushed forward by
springs. Risk of injury.
•Always hold the backrest firmly when you adjust the backrest angle.
•Please observe safety recommendations concerning seats
�Ÿpage 131.
Removing and fitting individual seats
The seats can be fitted and removed more easily by two
people than by one person.
Removing an individual seat
– Push the head restraint down as far as it will go �Ÿpage 123.
– Fold down the backrests �Ÿpage 128
– Fold the seat forwards �Ÿpage 128
– When removing a seat in the third row
28), push the seat back as
far as it will go and forwards as far as it will go when removing a
seat in the second row.
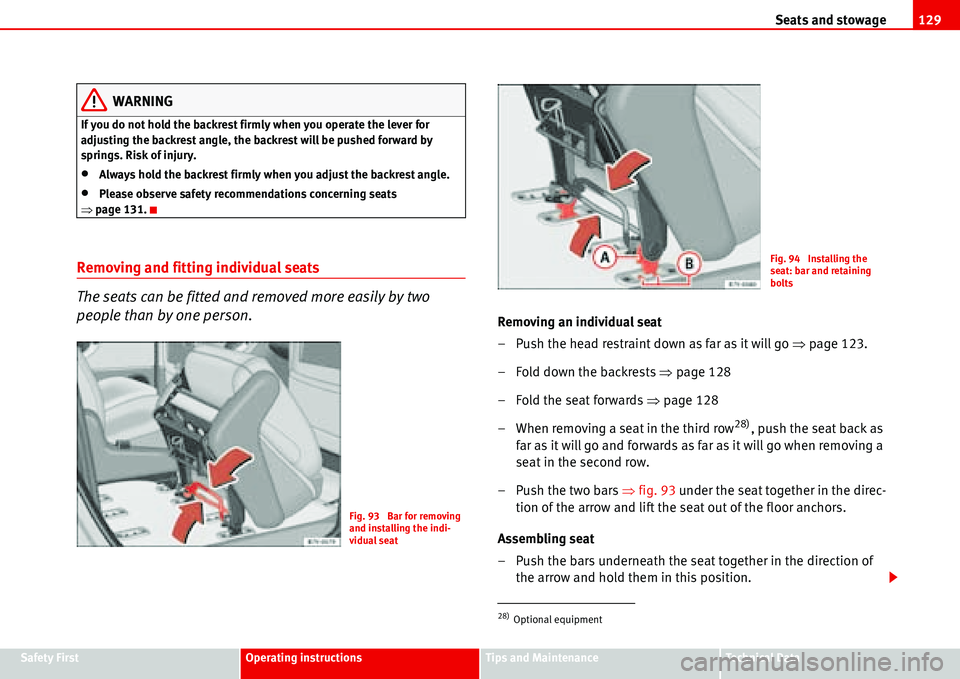
– Push the two bars �Ÿfig. 93 under the seat together in the direc-
tion of the arrow and lift the seat out of the floor anchors.
Assembling seat
– Push the bars underneath the seat together in the direction of
the arrow and hold them in this position.
Fig. 93 Bar for removing
and installing the indi-
vidual seat
28)Optional equipment
Fig. 94 Installing the
seat: bar and retaining
bolts
Page 132 of 299
Seats and stowage 130
– Place the seat frame �Ÿpage 129, fig. 94 between the
retaining bolts in the floor anchors and release both bars.
– Pull the seat up to ensure that it is properly engaged in the front
floor anchors
– Fold the seat back until it engages in the rear floor anchors.
– Fold the backrest back and adjust the head restraint to suit body
size.
Covers for the floor anchors
After removing the seats in the passenger compartment, it is possible to fix
covers to the floor anchors to stop dirt getting into them, for example. You will
receive 12 covers delivered with the vehicle.
Guide the cover into the floor anchoring and press it in.
The covers will have to be removed by levering them off with the vehicle key
before you can install the seats.
WARNING
Please observe safety recommendations concerning seats �Ÿpage 131.
ArmrestsAA
AB
Fig. 95 Removable
armrest: button
Fig. 96 Protective bag for
the removable armrests
Page 133 of 299
Seats and stowage131
Safety FirstOperating instructionsTips and MaintenanceTe c h n i c a l D a t a
Adjusting the armrest
– Turn the thumb wheel underneath the armrests to adjust the
angle of the armrests to your requirement.
Removable armrest
29)
– Take hold of the armrest at the rear and press the button
�Ÿpage 130, fig. 95 in the direction of the arrow.
– With the button pressed, pull the armrest off to the side out of the
holder.
– When installing, please ensure that the armrest engages
securely in the holder.
The removable armrests for the second row of seats can be found in a trans-
port bag �Ÿpage 130, fig. 96.
The bag hangs from a head restraint of a seat in the last row of seats or, in
vehicles with 4 integrated child seats
29), on the centre seat of the second row
of seats.
WARNING
•The transport bag should always be secured properly when travelling in
the vehicle as it could otherwise be a safety risk in an accident or braking
manoeuvre. We recommend that you keep the bag at home.
•The bag, if you do decide to keep it in the vehicle, may not be secured
to the head restraint of an integrated child seat. The backrest could be
forced forward in an accident or braking manoeuvre due to the weight of the
bag.
Safety instructions for seats
WARNING
•Occupants may travel on the seats in the passenger compartment only
if the following conditions are fulfilled at the same time:
−The seats must always be fitted in the appropriate floor anchors and
must be securely engaged.
−The backrest of all seats must be in the upright position and securely
engaged in this position.
−The seat occupants must have access to the seat belts. The seat
belts must be fitted correctly.
−All the occupants of the vehicle must be correctly seated while
driving.
•A seat which has been removed can cause injury if it is transported in
the vehicle. Each seat must always be fitted in the floor anchors and must
be securely engaged. The backrest must be in an upright position. If a
bench seat is not properly secured, it could become a life-threatening
hazard for all vehicle occupants.
•Make sure that the bases of seats are not soiled or damaged when
removed from the vehicle.
•All adjustment to the seats, including fitting and removal, may be
carried out only when the vehicle is stationary.
29)Optional equipment
Page 134 of 299

Seats and stowage 132
Some seat settings for the Alhambra
Examples of how the seating layout can be altered.
Of course, the illustrations show only some of the many seat combinations
possible in the Alhambra. You can, for example, purchase corresponding
retainers for your bicycle from SEAT Service. That means you will be able to
protect your bicycles from both theft and the weather when transporting
them.Or you turn
30) the driver and front passenger seats 180° to use the Alhambra
as a conference room or breakfast room. Or you can easily remove the seats
in the third row
30) in order to travel with a lot of luggage.
WARNING
•Luggage and other items in the luggage or passenger compartment can
be thrown forward in a braking manoeuvre. Please ensure that these items
are secured properly.
•Do not release the backrest of a seat in the second row when folding a
seat in the third row of seats forwards. Serious injuries can occur if a back-
rest has not been properly engaged in position.
Fig. 97 Alhambra loaded
with luggage.
Fig. 98 Alhambra trans-
formed into conference
room
30)Optional equipment
Page 140 of 299
Seats and stowage 138
WARNING
The folding tables may not be folded down whilst the vehicle is in motion
and anyone is seated on the second row of seats. There is a risk on injury
during a sudden braking manoeuvre! The table must therefore be closed
and properly secured whilst the vehicle is in motion.
Clothes hangers
Removing the clothes hanger
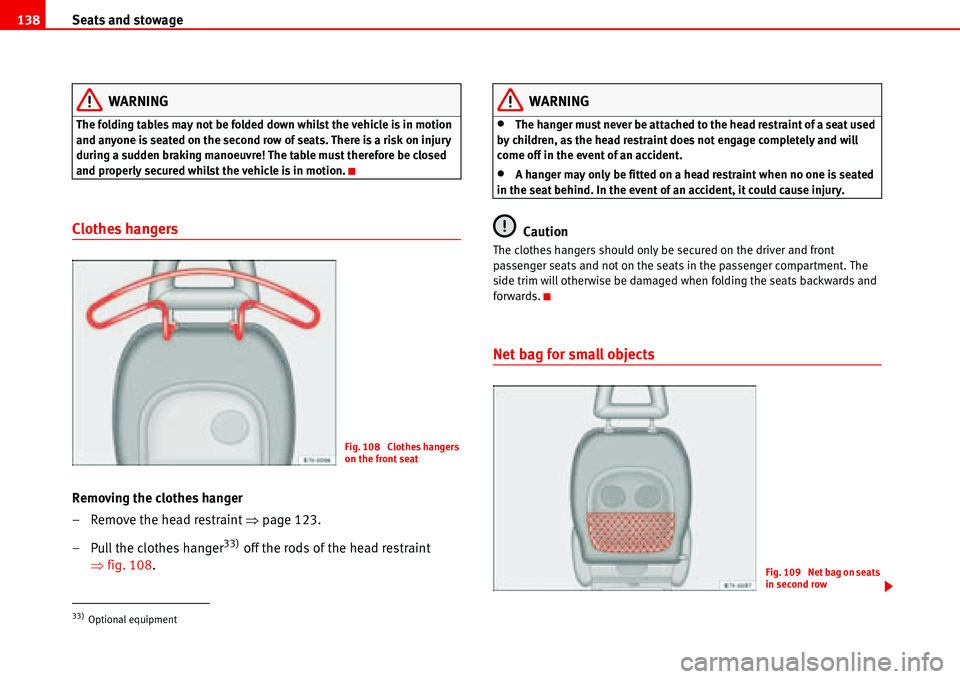
– Remove the head restraint �Ÿpage 123.
– Pull the clothes hanger
33) off the rods of the head restraint
�Ÿfig. 108.
WARNING
•The hanger must never be attached to the head restraint of a seat used
by children, as the head restraint does not engage completely and will
come off in the event of an accident.
•A hanger may only be fitted on a head restraint when no one is seated
in the seat behind. In the event of an accident, it could cause injury.
Caution
The clothes hangers should only be secured on the driver and front
passenger seats and not on the seats in the passenger compartment. The
side trim will otherwise be damaged when folding the seats backwards and
forwards.
Net bag for small objects
33)Optional equipment
Fig. 108 Clothes hangers
on the front seat
Fig. 109 Net bag on seats
in second row
Page 141 of 299
Seats and stowage139
Safety FirstOperating instructionsTips and MaintenanceTe c h n i c a l D a t a The seats in the second row are fitted with a net bag �Ÿpage 138, fig. 109 for
the stowage of small objects.
The bag will hold a newspaper, can or standard bottle of up to a maximum of
0.5 litres �Ÿ.
WARNING
•Ensure, when driving, that no can or other object is dropped in the
driver foot well, as it could get under the pedals and obstruct their working.
In the event of a sudden driving or braking manoeuvre, you will not be able
to operate the brake, clutch or accelerator pedal. Risk of accident!
Ashtrays, cigarette lighter and electrical
sockets
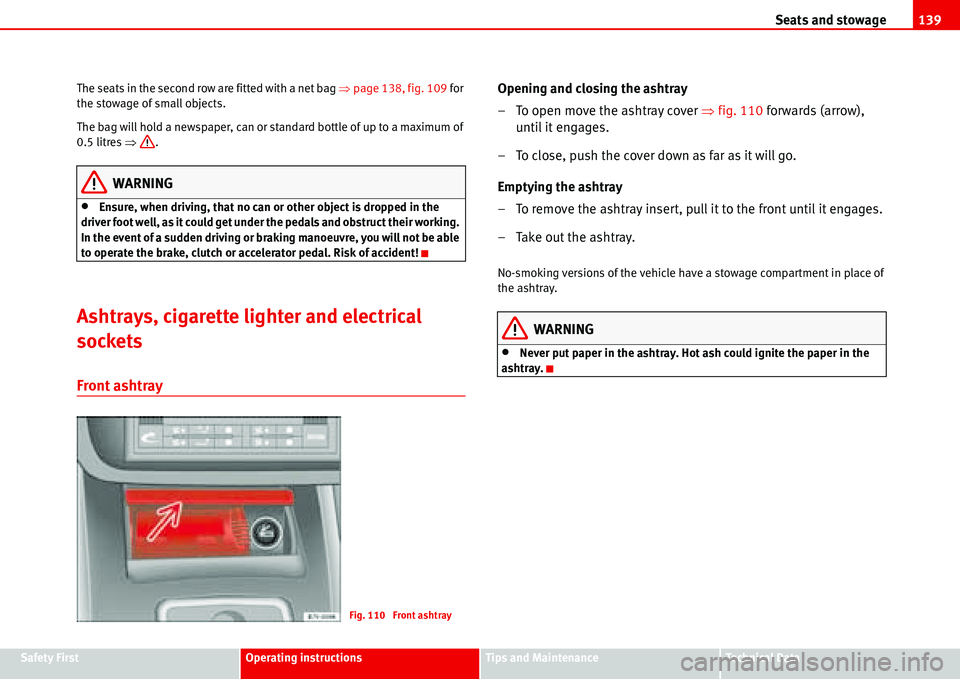
Front ashtray
Opening and closing the ashtray
– To open move the ashtray cover �Ÿfig. 110 forwards (arrow),
until it engages.
– To close, push the cover down as far as it will go.
Emptying the ashtray
– To remove the ashtray insert, pull it to the front until it engages.
– Take out the ashtray.
No-smoking versions of the vehicle have a stowage compartment in place of
the ashtray.
WARNING
•Never put paper in the ashtray. Hot ash could ignite the paper in the
ashtray.
Fig. 110 Front ashtray