Page 130 of 296
130
Controls, Instruments
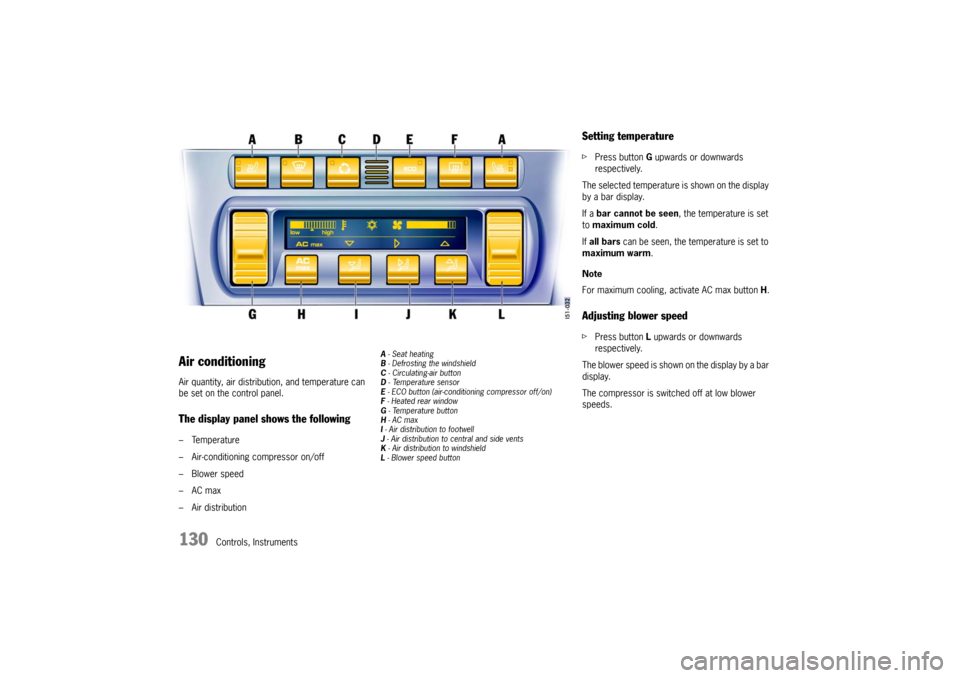
Air conditioningAir quantity, air distribution, and temperature can
be set on the control panel.The display panel shows the following– Temperature
– Air-conditioning compressor on/off
–Blower speed
–AC max
– Air distribution
A - Seat heating
B - Defrosting the windshield
C - Circulating-air button
D - Te m p e r a t u r e s e n s o r
E - ECO button (air-conditioning compressor off/on)
F - Heated rear window
G - Temperature button
H - AC max
I - Air distribution to footwell
J - Air distribution to central and side vents
K - Air distribution to windshield
L - Blower speed button
Setting temperaturefPress button G upwards or downwards
respectively.
The selected temperature is shown on the display
by a bar display.
If a bar cannot be seen, the temperature is set
to maximum cold.
If all bars can be seen, the temperature is set to
maximum warm.
Note
For maximum cooling, activate AC max button H.Adjusting blower speedfPress button L upwards or downwards
respectively.
The blower speed is shown on the display by a bar
display.
The compressor is switched off at low blower
speeds.
Page 133 of 296
Controls, Instruments
133
Automatic air conditioning systemThe automatic air-conditioning system controls
the preselected interior temperature completely
automatically.
If necessary, the automatic system can be
manually influenced.
Automatic modefPress AUTO buttonI.
AUTO will appear on the display panel.
Air quantity and distribution are automatically
controlled and variations are compensated.
All automatic setting functions can be individually
changed.
This setting is retained until the appropriate
function button is pressed again or the AUTO
button is pressed.
A- Seat heating, left
B- Defrosting the windshield
C- Circulating-air button
D-Temperature sensor
E- ECO button (air-conditioning compressor off/on)
F- Heated rear window/door mirror heating
G-Seat heater, right
H-Temperature button
I- AUTO button (automatic mode)
J- Air distribution to footwell
K- Air distribution to central and side vents
L- Air distribution to windshield
M-Blower speed button
Page 140 of 296
140
Controls, Instruments
In storage tray between the front seatsSocketsElectrical accessories should preferably be
connected to the 12 V sockets.
fPlease observe the maximum power
consumption.
Note on operation
The tire filling compressor must be connected to
the cigarette lighter.
In the passenger’s footwellNote on operation
The sockets and thus the connected electrical
accessories function even if the ignition is
switched off or the ignition key is withdrawn.
If the engine is not running and the accessories
are switched on, the vehicle battery will be
discharged.
Do not operate additional accessories for more
than 5 minutes when engine is off.
Maximum power consumption for both
sockets together: 70 W.
fPlease observe the power specifications from
the accessory manufacturer.
Page 142 of 296
142
Controls, Instruments
Storage in the passenger
compartment
Warning!
Danger of injury during braking, rapid
direction changes or in an accident.
fDo not carry items of luggage or objects in the
passenger compartment unsecured.
fDo not transport any heavy objects in the oddments trays.
Additional storage possibilities– in the doors,
– in the door sill next to the passenger's seat,
– in the center console,
– clothes hook on back of seat backrest,
– oddments tray with coin holder between seats,
– glove compartment with CD and pen holder,
– on engine compartment lid.
Oddments tray between the seatsOpening
fPress release button and lift the lid.
There is a coin holder and socket in the
forward part of the oddments tray.
fPlease observe the chapter “SOCKETS” on
Page 140.
Page 147 of 296
Controls, Instruments
147
Fire extinguisherIn cars with a fire extinguisher, the extinguisher is
fitted to the front of the driver’s seat.
Taking out fire extinguisher
1. Hold fire extinguisher with one hand and press
the PRESS button on the fastening strap with
the other hand (arrow).
2. Remove fire extinguisher from mounting.Inserting fire extinguisher
1. Place fire extinguisher in the mounting.
2. Engage fastening strap lug A in the tension
jack and close tension jack (arrow).Notes
fPay attention to the expiration date on the fire
extinguisher.
If the fire extinguisher is used after its expira-
tion date has elapsed, it may not function
properly.
fFollow the operating instructions for the fire
extinguisher.
fThe functional ability of the fire extinguisher
should be checked by a specialist workshop
every 1 - 2 years.
fAfter use, have the fire extinguisher refilled.
Page 150 of 296
150
Controls, Instruments
A - Opening front luggage compartment lid
B - Opening rear luggage compartment lid Luggage compartment lidsUnlocking fOperate the appropriate pull-button next to the
driver’s seat.
The luggage compartment is illuminated when
the respective lid is open.
fPlease observe the chapter “LOAD SWITCH-
OFF AFTER 2 HOURS OR 7 DAYS” on Page
246.The luggage compartment lid can also be un-
locked with the radio remote control.
fPlease observe the chapter “KEYS” on Page
17.
Important Note
If the vehicle battery is discharged, the front lug-
gage compartment lid can be opened only by con-
necting an external electrical power source.
fPlease observe the chapter “ELECTRICAL SYS-
TEM” on Page 246.
or the description inside the fuse box lid.
A warning message in the on-board computer
comes on if the lids are not completely closed.
fFully close the lid.
Warning message
Page 182 of 296
182
Mobile Roofs
Removing the hardtop1. Make sure that the hardtop is placed on a
clean, soft surface.
2. Open doors.
3. Remove cover from the front locking lever.
4. Open front latch.
5. Open rear pivot locks (swivel inwards).
Unplug plug of the hardtop heated rear
window.
6. With one person on each side, grasp the
hardtop.
Lift hardtop at rear and pull out of the sockets
on the windshield frame at front.
Warning!
Danger of pinching fingers or hands.
fEvenly lift the hardtop at both sides.
7. Carefully lift the hardtop up and off the vehicle
to the rear.
8. Close front hardtop latch.
Fit cover on the front latch.
9. Close pivot locks on the vehicle with the plastic
covers.
10.Remove the connector of the convertible top
heated rear window from the empty socket
and insert into the socket.11.Swivel the sash guide of the seat belt forward.
Insert the lower retaining lugs of the cover
from above and clip in the upper retaining lugs
on the bar.
Page 185 of 296
Maintenance, Car Care
185
Wiper BladesfWhen wiper performance deteriorates, replace
the wipers.
fPlease observe the chapter “CAR CARE IN-
STRUCTIONS” on Page 209.
Caution!
Risk of damage if the wiper arm accidentally
falls back on to the window.
fAlways hold the wiper arm securely when re-
placing the wiper blade.
Risk of damage if wiper blades that are fro-
zen in place are loosened improperly.
fThaw the wiper blades before loosening them.
Maintenance note
If the wiper blades rub or squeak, this can be as a
result of the following:
– If the vehicle is washed in an automatic car
wash, residues may adhere to the windshield.
These residues can only be removed using a
special cleaning solution.
Please contact your authorized Porsche dealer
for further information.
– The wiper blades may be damaged.
fReplace damaged wiper blades as soon as
possible.
Changing windshield wiper blades
Caution!
Risk of damage.
If a wiper blade is not changed properly, it
can come loose when the car is moving.
fCheck whether the wiper blade is seated
securely.
The wiper blade must engage the wiper arm properly.
1. Apply the handbrake.
2. Switch the wipers off (position 0) and remove
the ignition key.
3. Fold windshield wiper arm away from the
windshield.
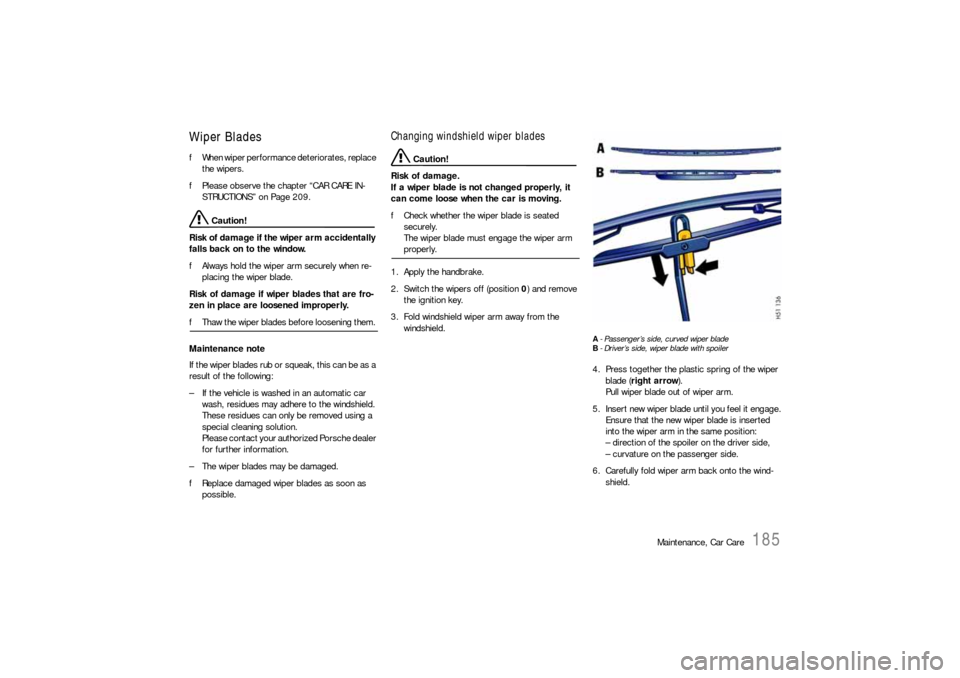
A- Passenger’s side, curved wiper blade
B- Driver’s side, wiper blade with spoiler4. Press together the plastic spring of the wiper
blade (right arrow).
Pull wiper blade out of wiper arm.
5. Insert new wiper blade until you feel it engage.
Ensure that the new wiper blade is inserted
into the wiper arm in the same position:
– direction of the spoiler on the driver side,
– curvature on the passenger side.
6. Carefully fold wiper arm back onto the wind-
shield.


