2006 PONTIAC TORRENT change wheel
[x] Cancel search: change wheelPage 208 of 368

Of course, traction is reduced when water, snow, ice,
gravel, or other material is on the road. For safety,
you will want to slow down and adjust your driving to
these conditions. It is important to slow down on slippery
surfaces because stopping distance will be longer
and vehicle control more limited.
While driving on a surface with reduced traction, try
your best to avoid sudden steering, acceleration,
or braking, including engine braking by shifting to a
lower gear. Any sudden changes could cause the tires
to slide. You may not realize the surface is slippery
until your vehicle is skidding. Learn to recognize warning
clues — such as enough water, ice, or packed snow
on the road to make a mirrored surface — and
slow down when you have any doubt.
If you have the Anti-Lock Brake System (ABS),
remember: It helps avoid only the braking skid. If you
do not have ABS, then in a braking skid, where the
wheels are no longer rolling, release enough pressure
on the brakes to get the wheels rolling again. This
restores steering control. Push the brake pedal down
steadily when you have to stop suddenly. As long as
the wheels are rolling, you will have steering control.Driving at Night
Night driving is more dangerous than day driving. One
reason is that some drivers are likely to be impaired — by
alcohol or drugs, with night vision problems, or by fatigue.
Here are some tips on night driving.
Drive defensively.
Do not drink and drive.
Adjust the inside rearview mirror to reduce the
glare from headlamps behind you.
Since you cannot see as well, you may need to
slow down and keep more space between you
and other vehicles.
Slow down, especially on higher speed roads.
Your vehicle’s headlamps can light up only so
much road ahead.
In remote areas, watch for animals.
If you are tired, pull off the road in a safe place
and rest.
No one can see as well at night as in the daytime.
But as we get older these differences increase.
A 50-year-old driver may require at least twice as much
light to see the same thing at night as a 20-year-old.
4-16
Page 223 of 368
Rocking Your Vehicle to Get It Out
First, turn your steering wheel left and right. That
will clear the area around your front wheels. If your
vehicle has traction control, you should turn your traction
control system off. SeeTraction Control System
(TCS) on page 4-9. Then shift back and forth between
REVERSE (R) and a forward gear, spinning the
wheels as little as possible. Release the accelerator
pedal while you shift, and press lightly on the accelerator
pedal when the transaxle is in gear. By slowly spinning
your wheels in the forward and reverse directions,
you will cause a rocking motion that may free your
vehicle. If that does not get you out after a few tries,
you may need to be towed out. If you do need to
be towed out, seeTowing Your Vehicle on page 4-36.
Loading Your Vehicle
It is very important to know how much weight your vehicle
can carry. Two labels on your vehicle show how much
weight it may properly carry, the Tire and Loading
Information label and the Vehicle Certi�cation label.
{CAUTION:
Do not load your vehicle any heavier than
the Gross Vehicle Weight Rating (GVWR), or
either the maximum front or rear Gross Axle
Weight Rating (GAWR). If you do, parts on
your vehicle can break, and it can change
the way your vehicle handles. These could
cause you to lose control and crash. Also,
overloading can shorten the life of your
vehicle.
4-31
Page 235 of 368
Passing
You will need more passing distance up ahead when
you are towing a trailer. And, because you are a
good deal longer, you will need to go much farther
beyond the passed vehicle before you can return to
your lane.
Backing Up
Hold the bottom of the steering wheel with one hand.
Then, to move the trailer to the left, just move that hand
to the left. To move the trailer to the right, move your
hand to the right. Always back up slowly and, if possible,
have someone guide you.
Making Turns
Notice:Making very sharp turns while trailering
could cause the trailer to come in contact with
the vehicle. Your vehicle could be damaged.
Avoid making very sharp turns while trailering.
When you are turning with a trailer, make wider turns
than normal. Do this so your trailer will not strike
soft shoulders, curbs, road signs, trees or other objects.
Avoid jerky or sudden maneuvers. Signal well in
advance.
Turn Signals When Towing a Trailer
When you tow a trailer, your vehicle has to have
extra wiring.
The arrows on your instrument panel will �ash whenever
you signal a turn or lane change. Properly hooked up,
the trailer lamps will also �ash, telling other drivers
you are about to turn, change lanes or stop.
When towing a trailer, the arrows on your instrument
panel will �ash for turns even if the bulbs on the trailer
are burned out. Thus, you may think drivers behind
you are seeing your signal when they are not. It’s
important to check occasionally to be sure the trailer
bulbs are still working.
Driving On Grades
Reduce speed and shift to a lower gear before you
start down a long or steep downgrade. If you do not
shift down, you might have to use your brakes so
much that they would get hot and no longer work well.
If you are towing a trailer that weighs more than
1,000 lbs (450 kg), drive in L4 instead of AUTOMATIC
OVERDRIVE (D) or, as you need to, a lower gear.
This will minimize heat build-up and extend the life
of your transaxle.
4-43
Page 269 of 368

{CAUTION:
The brake wear warning sound means that soon
your brakes will not work well. That could lead
to an accident. When you hear the brake wear
warning sound, have your vehicle serviced.
Notice:Continuing to drive with worn-out brake
pads could result in costly brake repair.
Some driving conditions or climates may cause a brake
squeal when the brakes are �rst applied or lightly applied.
This does not mean something is wrong with your brakes.
Properly torqued wheel nuts are necessary to help
prevent brake pulsation. When tires are rotated, inspect
brake pads for wear and evenly tighten wheel nuts in
the proper sequence to GM torque speci�cations.
Your rear drum brakes do not have wear indicators, but if
you ever hear a rear brake rubbing noise, have the rear
brake linings inspected immediately. Also, the rear brake
drums should be removed and inspected each time the
tires are removed for rotation or changing. When you
have the front brake pads replaced, have the rear brakes
inspected, too.
Brake linings should always be replaced as complete
axle sets.
Brake Pedal Travel
See your dealer if the brake pedal does not return
to normal height, or if there is a rapid increase in
pedal travel. This could be a sign of brake trouble.
Brake Adjustment
Every time you apply the brakes, with or without the
vehicle moving, your brakes adjust for wear.
Replacing Brake System Parts
The braking system on a vehicle is complex. Its many
parts have to be of top quality and work well together if
the vehicle is to have really good braking. Your vehicle
was designed and tested with top-quality GM brake parts.
When you replace parts of your braking system — for
example, when your brake linings wear down and you
need new ones put in — be sure you get new approved
GM replacement parts. If you do not, your brakes may no
longer work properly. For example, if someone puts in
brake linings that are wrong for your vehicle, the balance
between your front and rear brakes can change — for
the worse. The braking performance you have come to
expect can change in many other ways if someone puts
in the wrong replacement brake parts.
5-33
Page 291 of 368
{CAUTION:
Rust or dirt on a wheel, or on the parts to
which it is fastened, can make wheel nuts
become loose after a time. The wheel could
come off and cause an accident. When you
change a wheel, remove any rust or dirt from
places where the wheel attaches to the vehicle.
In an emergency, you can use a cloth or a
paper towel to do this; but be sure to use a
scraper or wire brush later, if needed, to get
all the rust or dirt off. SeeChanging a Flat
Tire on page 5-62.
When It Is Time for New Tires
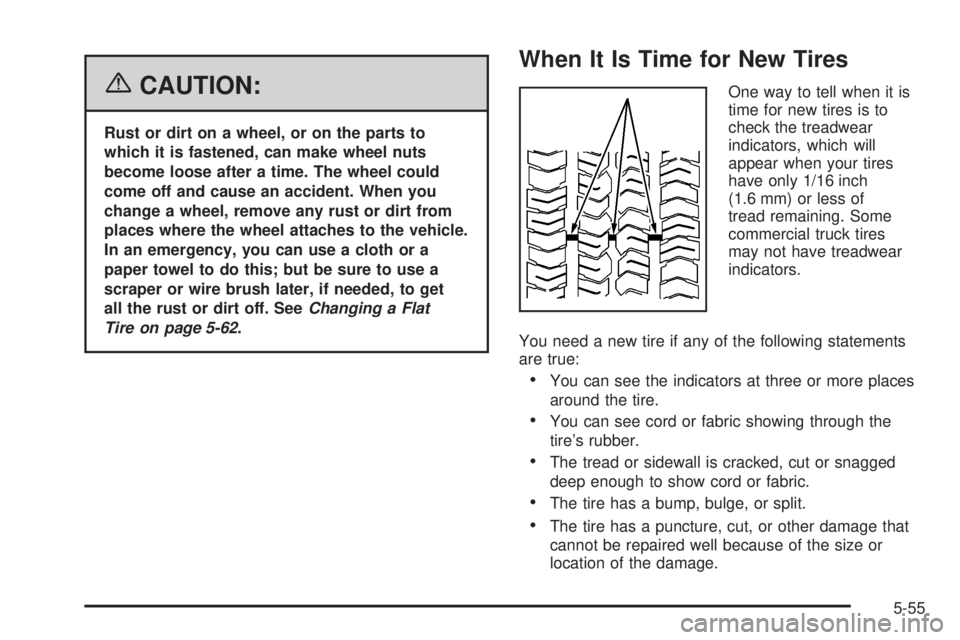
One way to tell when it is
time for new tires is to
check the treadwear
indicators, which will
appear when your tires
have only 1/16 inch
(1.6 mm) or less of
tread remaining. Some
commercial truck tires
may not have treadwear
indicators.
You need a new tire if any of the following statements
are true:
You can see the indicators at three or more places
around the tire.
You can see cord or fabric showing through the
tire’s rubber.
The tread or sidewall is cracked, cut or snagged
deep enough to show cord or fabric.
The tire has a bump, bulge, or split.
The tire has a puncture, cut, or other damage that
cannot be repaired well because of the size or
location of the damage.
5-55
Page 298 of 368
If a Tire Goes Flat
It is unusual for a tire to blowout while you are driving,
especially if you maintain your vehicle’s tires properly.
If air goes out of a tire, it is much more likely to leak
out slowly. But if you should ever have a blowout, here
are a few tips about what to expect and what to do:
If a front tire fails, the �at tire will create a drag that
pulls the vehicle toward that side. Take your foot off
the accelerator pedal and grip the steering wheel �rmly.
Steer to maintain lane position, and then gently brake
to a stop well out of the traffic lane.
A rear blowout, particularly on a curve, acts much like a
skid and may require the same correction you would
use in a skid. In any rear blowout remove your foot from
the accelerator pedal. Get the vehicle under control
by steering the way you want the vehicle to go. It may
be very bumpy and noisy, but you can still steer.
Gently brake to a stop, well off the road if possible.{CAUTION:
Lifting a vehicle and getting under it to do
maintenance or repairs is dangerous without
the appropriate safety equipment and training.
The jack provided with your vehicle is designed
only for changing a �at tire. If it is used for
anything else, you or others could be badly
injured or killed if the vehicle slips off the jack.
Use the jack provided with your vehicle only
for changing a �at tire.
If a tire goes �at, the next part shows how to use the
jacking equipment to change a �at tire safely.
Changing a Flat Tire
If a tire goes �at, avoid further tire and wheel damage
by driving slowly to a level place. Turn on your vehicle’s
hazard warning �ashers. SeeHazard Warning Flashers
on page 3-6for more information.
5-62
Page 299 of 368
{CAUTION:
Changing a tire can be dangerous. The vehicle
can slip off the jack and roll over or fall on you
or other people. You and they could be badly
injured or even killed. Find a level place to
change your tire. To help prevent the vehicle
from moving:
1. Set the parking brake �rmly.
2. Put the shift lever in PARK (P).
3. Turn off the engine and do not restart
while the vehicle is raised.
4. Do not allow passengers to remain in
the vehicle.
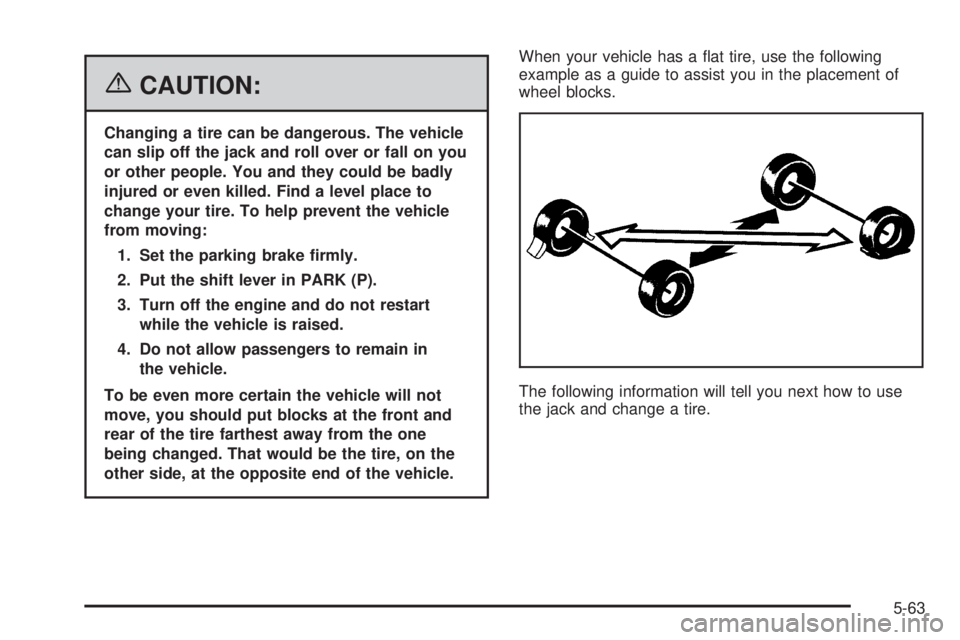
To be even more certain the vehicle will not
move, you should put blocks at the front and
rear of the tire farthest away from the one
being changed. That would be the tire, on the
other side, at the opposite end of the vehicle.When your vehicle has a �at tire, use the following
example as a guide to assist you in the placement of
wheel blocks.
The following information will tell you next how to use
the jack and change a tire.
5-63
Page 305 of 368
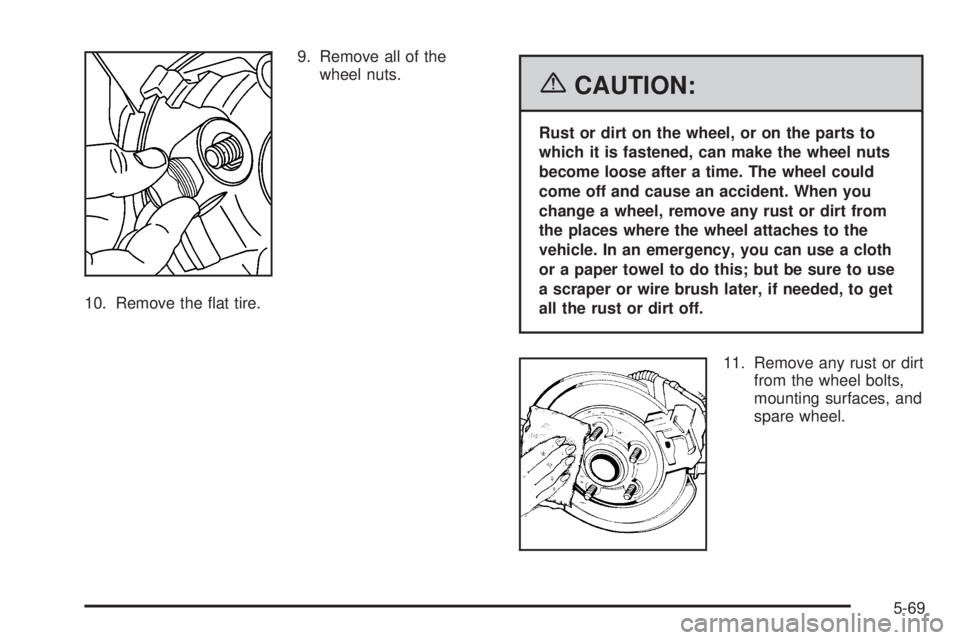
9. Remove all of the
wheel nuts.
10. Remove the �at tire.
{CAUTION:
Rust or dirt on the wheel, or on the parts to
which it is fastened, can make the wheel nuts
become loose after a time. The wheel could
come off and cause an accident. When you
change a wheel, remove any rust or dirt from
the places where the wheel attaches to the
vehicle. In an emergency, you can use a cloth
or a paper towel to do this; but be sure to use
a scraper or wire brush later, if needed, to get
all the rust or dirt off.
11. Remove any rust or dirt
from the wheel bolts,
mounting surfaces, and
spare wheel.
5-69