2006 NISSAN SENTRA clock
[x] Cancel search: clockPage 83 of 256
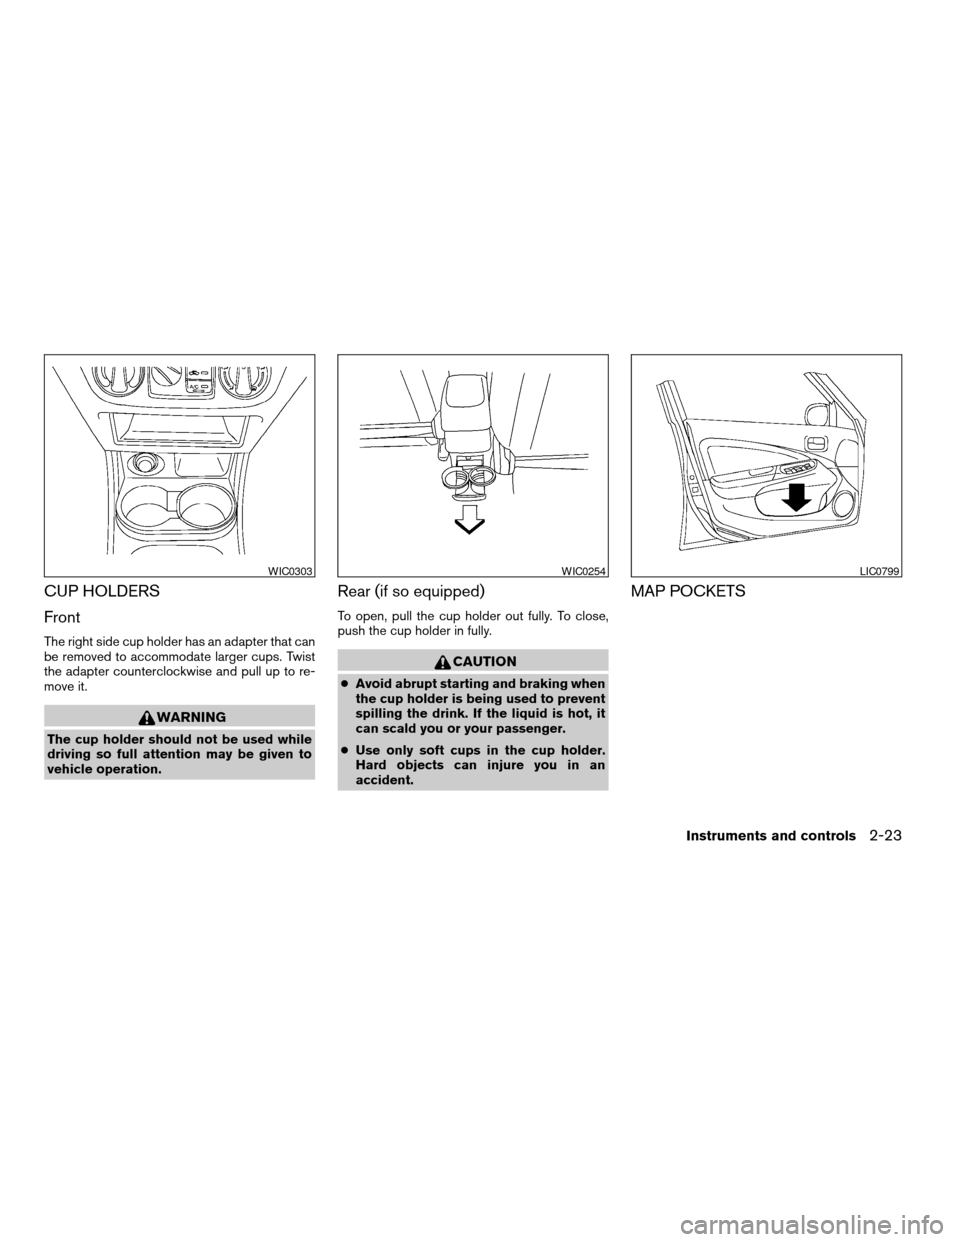
CUP HOLDERS
Front
The right side cup holder has an adapter that can
be removed to accommodate larger cups. Twist
the adapter counterclockwise and pull up to re-
move it.
WARNING
The cup holder should not be used while
driving so full attention may be given to
vehicle operation.
Rear (if so equipped)
To open, pull the cup holder out fully. To close,
push the cup holder in fully.
CAUTION
cAvoid abrupt starting and braking when
the cup holder is being used to prevent
spilling the drink. If the liquid is hot, it
can scald you or your passenger.
cUse only soft cups in the cup holder.
Hard objects can injure you in an
accident.
MAP POCKETS
WIC0303WIC0254LIC0799
Instruments and controls2-23
ZREVIEW COPYÐ2006 Sentra(b15)
Owners ManualÐUSA_English(nna)
09/01/05Ðdebbie
X
Page 101 of 256
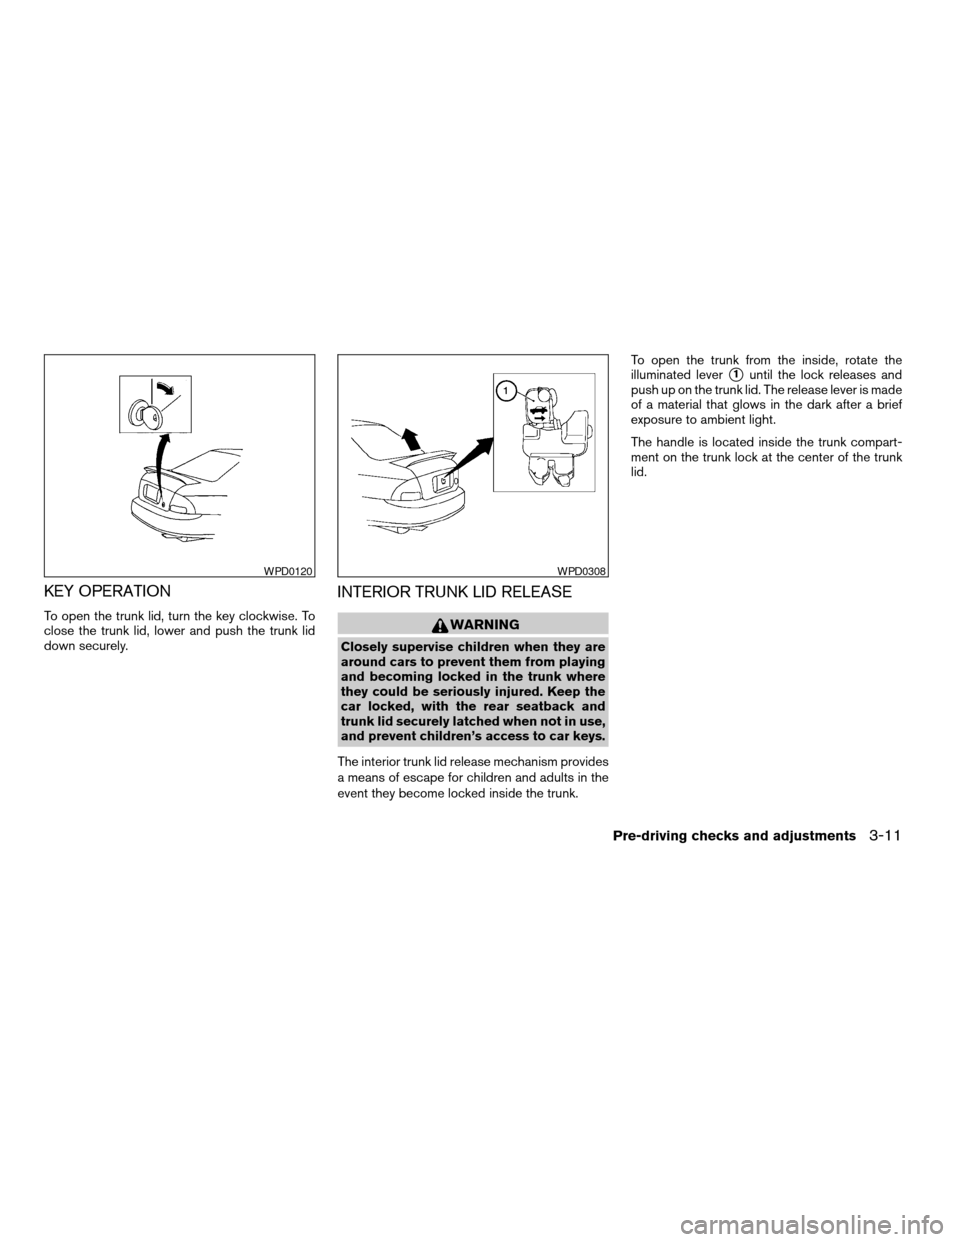
KEY OPERATION
To open the trunk lid, turn the key clockwise. To
close the trunk lid, lower and push the trunk lid
down securely.
INTERIOR TRUNK LID RELEASE
WARNING
Closely supervise children when they are
around cars to prevent them from playing
and becoming locked in the trunk where
they could be seriously injured. Keep the
car locked, with the rear seatback and
trunk lid securely latched when not in use,
and prevent children’s access to car keys.
The interior trunk lid release mechanism provides
a means of escape for children and adults in the
event they become locked inside the trunk.To open the trunk from the inside, rotate the
illuminated lever
s1until the lock releases and
push up on the trunk lid. The release lever is made
of a material that glows in the dark after a brief
exposure to ambient light.
The handle is located inside the trunk compart-
ment on the trunk lock at the center of the trunk
lid.
WPD0120WPD0308
Pre-driving checks and adjustments3-11
ZREVIEW COPYÐ2006 Sentra(b15)
Owners ManualÐUSA_English(nna)
09/01/05Ðdebbie
X
Page 102 of 256
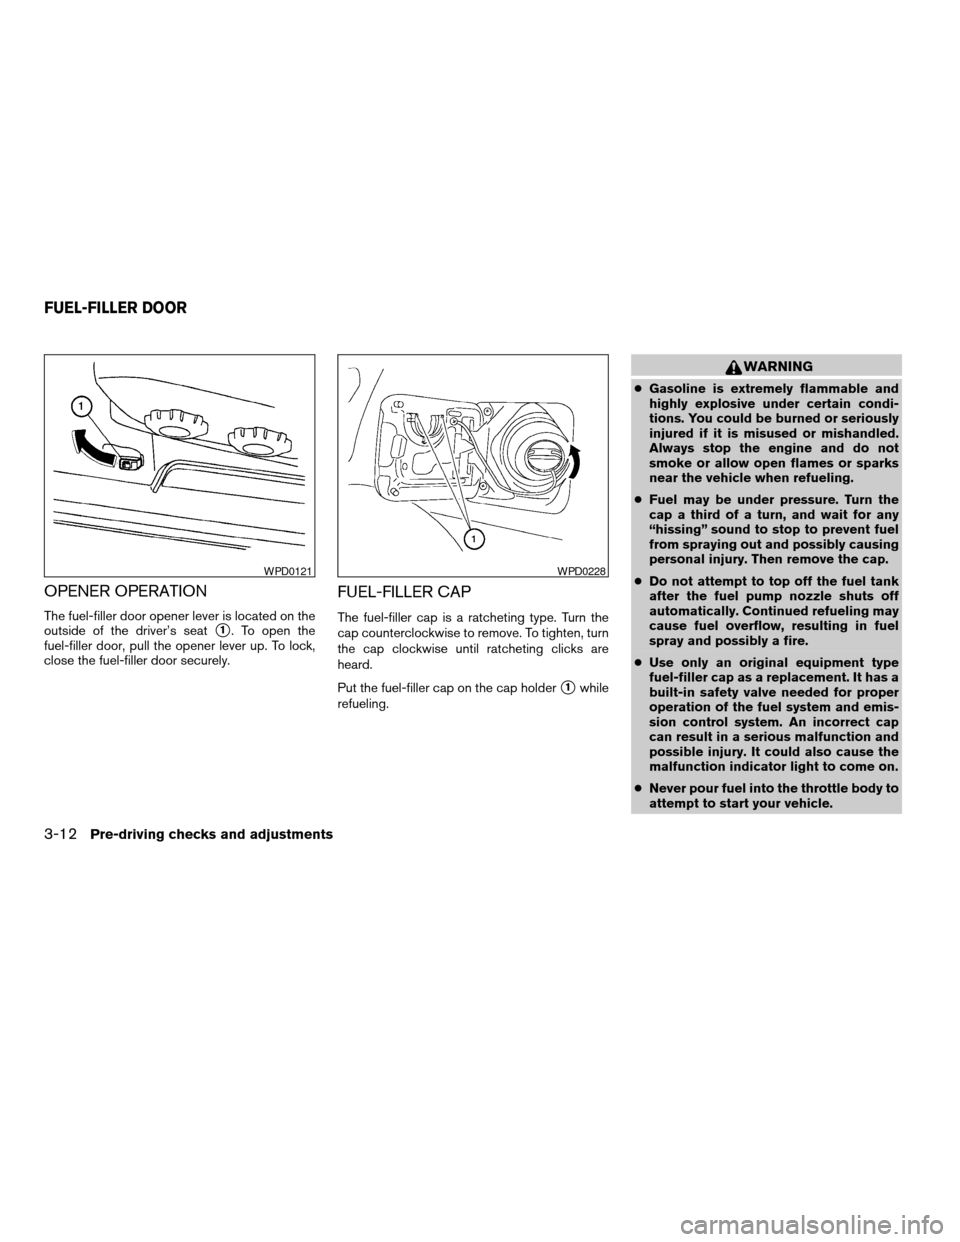
OPENER OPERATION
The fuel-filler door opener lever is located on the
outside of the driver’s seat
s1. To open the
fuel-filler door, pull the opener lever up. To lock,
close the fuel-filler door securely.
FUEL-FILLER CAP
The fuel-filler cap is a ratcheting type. Turn the
cap counterclockwise to remove. To tighten, turn
the cap clockwise until ratcheting clicks are
heard.
Put the fuel-filler cap on the cap holder
s1while
refueling.
WARNING
cGasoline is extremely flammable and
highly explosive under certain condi-
tions. You could be burned or seriously
injured if it is misused or mishandled.
Always stop the engine and do not
smoke or allow open flames or sparks
near the vehicle when refueling.
cFuel may be under pressure. Turn the
cap a third of a turn, and wait for any
“hissing” sound to stop to prevent fuel
from spraying out and possibly causing
personal injury. Then remove the cap.
cDo not attempt to top off the fuel tank
after the fuel pump nozzle shuts off
automatically. Continued refueling may
cause fuel overflow, resulting in fuel
spray and possibly a fire.
cUse only an original equipment type
fuel-filler cap as a replacement. It has a
built-in safety valve needed for proper
operation of the fuel system and emis-
sion control system. An incorrect cap
can result in a serious malfunction and
possible injury. It could also cause the
malfunction indicator light to come on.
cNever pour fuel into the throttle body to
attempt to start your vehicle.
WPD0121WPD0228
FUEL-FILLER DOOR
3-12Pre-driving checks and adjustments
ZREVIEW COPYÐ2006 Sentra(b15)
Owners ManualÐUSA_English(nna)
09/01/05Ðdebbie
X
Page 118 of 256

cDo not use the following CDs as they
may cause the CD player to malfunc-
tion:
c3.1 in (8 cm) discs with an adapter
cCDs that are not round
cCDs with a paper label
cCDs that are warped, scratched, or
have abnormal edges
1. RADIO button
2. Scan button
3. ON·OFF/Volume control knob
4. CD insert slot
5. Audio button
6. CD eject button7. AUX Jack
8. Radio manual tuning buttons/clock set
buttons/seek buttons
9. Clock button
10. CAT (if so equipped) or MUTE (if so
equipped) button
LHA0499
4-12Heater, air conditioner and audio systems
ZREVIEW COPYÐ2006 Sentra(b15)
Owners ManualÐUSA_English(nna)
09/01/05Ðdebbie
X
Page 120 of 256

Adjusting tone quality and speaker balance
To adjust BASS/TREBLE or FADER/BALANCE,
press the AUDIO button until the desired mode
(BASS, TREBLE, FADER, or BALANCE) ap-
pears in the display. Press the
orbutton to adjust BASS and TREBLE to the de-
sired level. Use theorbutton also
to adjust FADER or BALANCE modes. FADER
adjusts the sound level between the front and
rear speakers and BALANCE adjusts the sound
between the right and left speakers.
Clock operation
Pressing the clock button alternates the clock
and the radio/CD player options in the display.
Clock set
1. Press and hold the CLOCK button for more
than 2.0 seconds to enter the clock set
mode.
2. Press the CLOCK button until the hour
flashes in the display screen, then use
the
orbuttons to adjust and
set the hour.
3. Press the CLOCK button again until the
minutes flash in the display screen, then use
the
orbuttons to adjust and
set the minutes.
LHA0330
4-14Heater, air conditioner and audio systems
ZREVIEW COPYÐ2006 Sentra(b15)
Owners ManualÐUSA_English(nna)
09/01/05Ðdebbie
X
Page 121 of 256
4. Press the CLOCK button again to exit the
clock set mode and store the time setting.
Clock priority mode
In this mode the clock is shown in the display. If
any radio or CD functions are activated, the radio
or CD display illuminates for 10 seconds then
returns to the clock mode.
NOTE:
After clock adjustment, the radio is in the
clock priority mode.
FM/AM/SAT radio operation
FM/AM/SAT band select
Push the RADIO button to change from AM to
FM and SAT (Satellite) (if so equipped) recep-
tion.
No Satellite radio reception is available and “NO
SAT” will be displayed when the SAT band option
is selected unless optional satellite receiver and
antenna were factory installed and an XMTor
Sirius™ satellite radio service subscription is ac-
tive. Satellite radio is not available in Alaska,
Hawaii and Guam.
The FM stereo indicator, ST, illuminates during
FM stereo reception. When the stereo broadcast
signal is weak, the radio automatically changes
from stereo to monaural reception.
TUNE/SEEK buttons
WARNING
The radio should not be tuned while driv-
ing so full attention may be given to ve-
hicle operation.
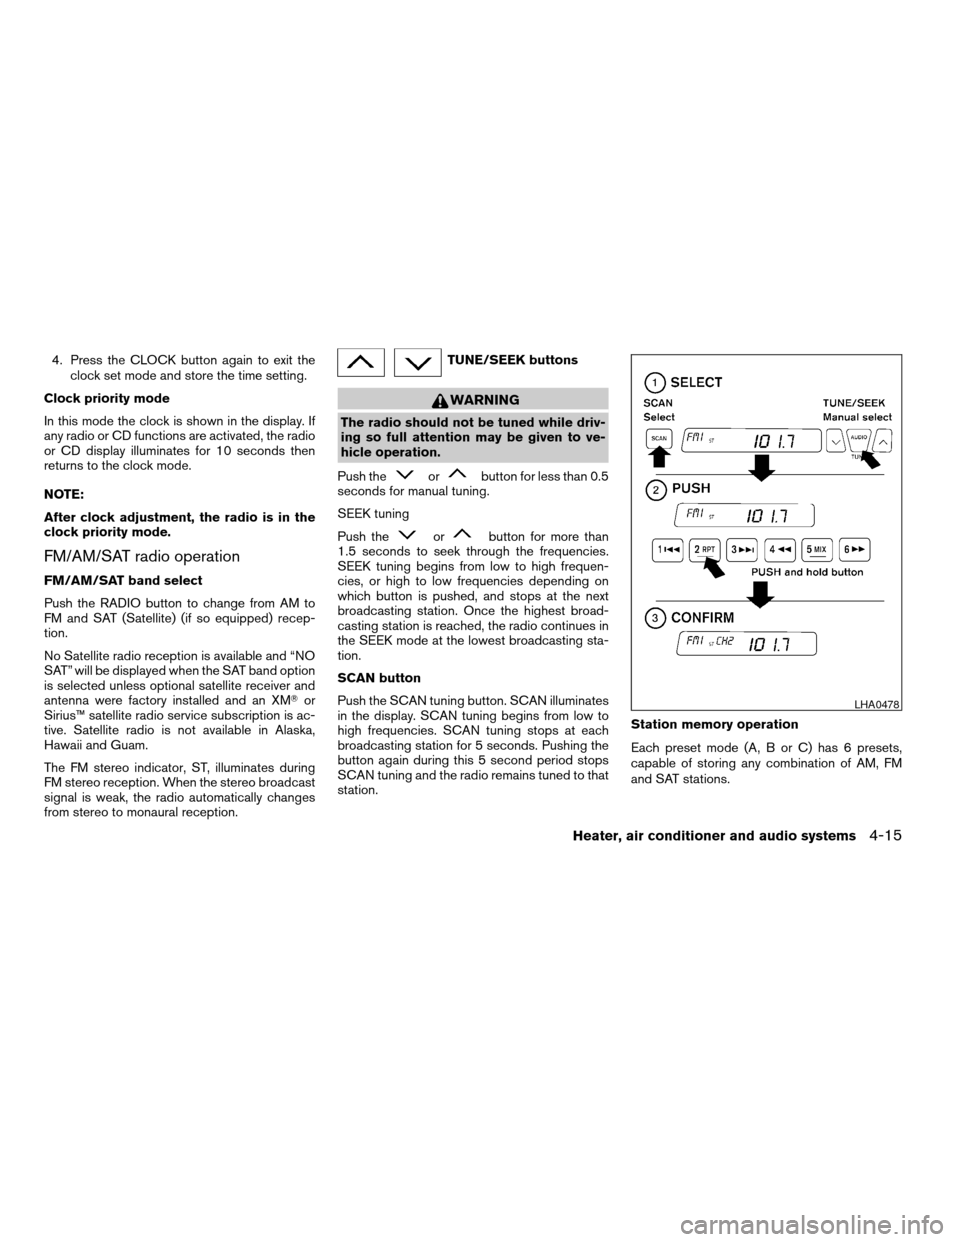
Push the
orbutton for less than 0.5
seconds for manual tuning.
SEEK tuning
Push the
orbutton for more than
1.5 seconds to seek through the frequencies.
SEEK tuning begins from low to high frequen-
cies, or high to low frequencies depending on
which button is pushed, and stops at the next
broadcasting station. Once the highest broad-
casting station is reached, the radio continues in
the SEEK mode at the lowest broadcasting sta-
tion.
SCAN button
Push the SCAN tuning button. SCAN illuminates
in the display. SCAN tuning begins from low to
high frequencies. SCAN tuning stops at each
broadcasting station for 5 seconds. Pushing the
button again during this 5 second period stops
SCAN tuning and the radio remains tuned to that
station.Station memory operation
Each preset mode (A, B or C) has 6 presets,
capable of storing any combination of AM, FM
and SAT stations.
LHA0478
Heater, air conditioner and audio systems4-15
ZREVIEW COPYÐ2006 Sentra(b15)
Owners ManualÐUSA_English(nna)
09/01/05Ðdebbie
X
Page 126 of 256
cA new disc may be rough on the inner and
outer edges. Remove the rough edges by
rubbing the inner and outer edges with the
side of a pen or pencil as illustrated.
ANTENNA
The antenna cannot be shortened, but can be
removed. When you need to remove the antenna,
turn the antenna rod counterclockwise.
To install the antenna rod, turn the antenna clock-
wise. Tighten the antenna rod to specification
using a suitable tool such as an open-end
wrench. The antenna rod tightening specification
is 3.4 – 3.6 N·m (30 – 32 in-lb) . Do not use pliers
to tighten the antenna as they can leave marks on
the antenna surface. The antenna rod cannot be
hand tightened to the proper specification.
CAUTION
Always properly tighten the antenna rod
during installation or the antenna rod may
break during vehicle operation.When installing a CB, ham radio or car phone in
your NISSAN, be sure to observe the following
cautions, otherwise the new equipment may ad-
versely affect the engine control system and
other electronic parts.
WARNING
cA cellular telephone should not be used
while driving so full attention may be
given to vehicle operation. Some juris-
dictions prohibit the use of cellular tele-
phones while driving.
cIf you must make a call while your ve-
hicle is in motion, the hands free cellu-
lar phone operational mode (if so
equipped) is highly recommended. Ex-
ercise extreme caution at all times so
full attention may be given to vehicle
operation.
cIf a conversation in a moving vehicle
requires you to take notes, pull off the
road to a safe location and stop your
vehicle before doing so.
CAUTION
cKeep the antenna as far away as pos-
sible from the electronic control
modules.
cKeep the antenna wire more than 8 in
(20 cm) away from the electronic con-
trol system harnesses. Do not route the
antenna wire next to any harness.
cAdjust the antenna standing-wave ratio
as recommended by the manufacturer.
cConnect the ground wire from the CB
radio chassis to the body.
cFor details, consult a NISSAN dealer.
CAR PHONE OR CB RADIO
4-20Heater, air conditioner and audio systems
ZREVIEW COPYÐ2006 Sentra(b15)
Owners ManualÐUSA_English(nna)
09/01/05Ðdebbie
X
Page 130 of 256
AUTOMATIC TRANSMISSION
The ignition lock is designed so the key cannot be
turned to the LOCK position and removed until
the shift selector lever is moved to the P (Park)
position.
When removing the key from the ignition, make
sure the shift selector lever is in the P (Park)
position.
If the selector lever is not returned to P (Park)
position, the key cannot be moved to the LOCK
position.To remove the key from the ignition switch:
1. Shift the selector lever to the P (Park) posi-
tion with the key in the ON position.
2. Turn the key to the LOCK position.
3. Remove the key from the ignition.
If the selector lever is shifted to the P (Park)
position after the key is turned to the OFF posi-
tion or when the key cannot be turned to the
LOCK position, proceed as follows to remove the
key.
1. Move the shift selector lever into the P (Park)
position.
2. Turn the ignition key slightly toward the ON
position.
3. Turn the key to the LOCK position.
4. Remove the key.
The shift selector lever is designed so it cannot
moved out of P (Park) and into any of the other
gear positions if the ignition key is turned to OFF
position or if the key is removed from the switch.
The shift selector lever can be moved if the
ignition switch is in the ON position and the
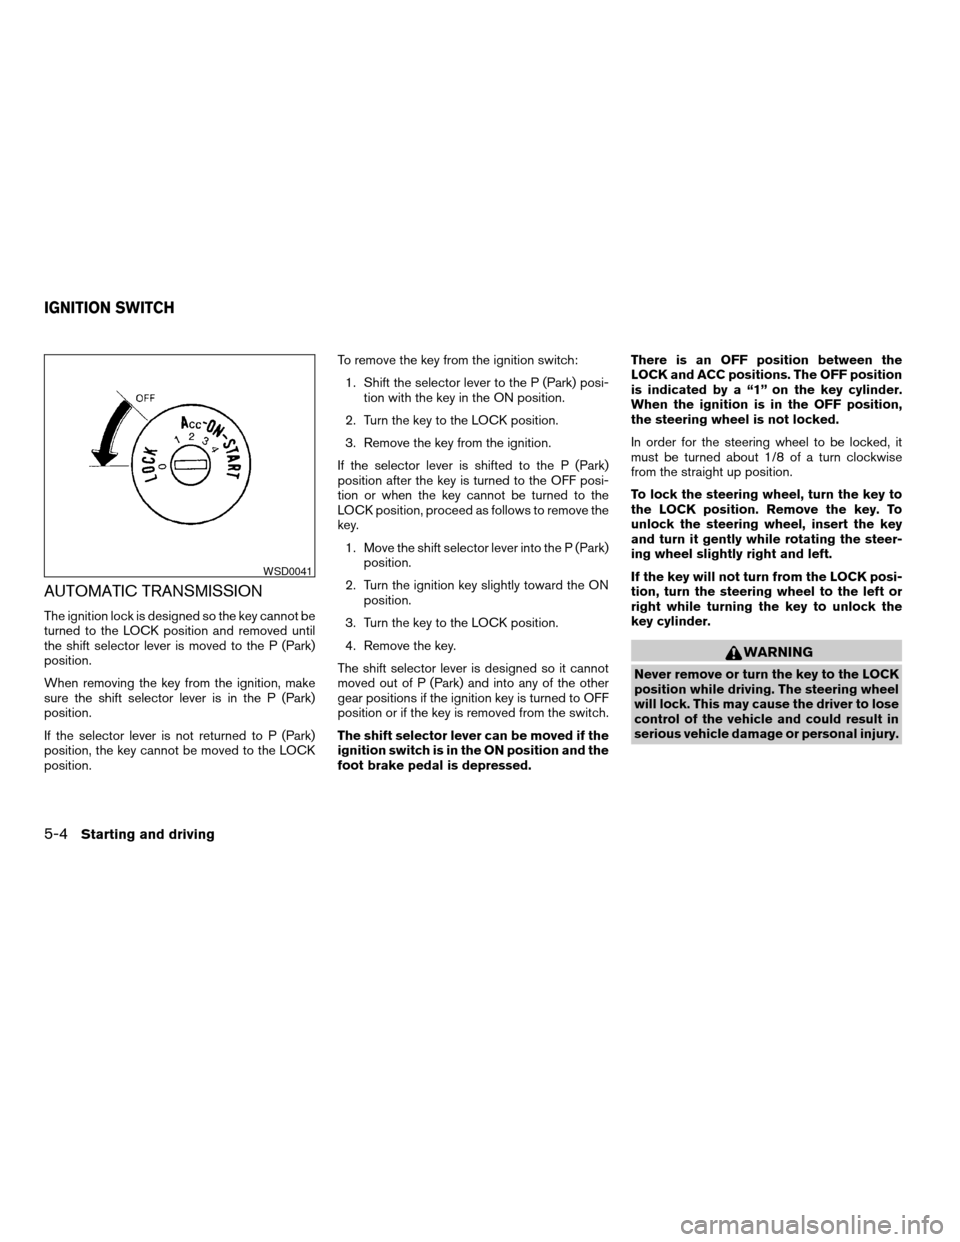
foot brake pedal is depressed.There is an OFF position between the
LOCK and ACC positions. The OFF position
is indicated by a “1” on the key cylinder.
When the ignition is in the OFF position,
the steering wheel is not locked.
In order for the steering wheel to be locked, it
must be turned about 1/8 of a turn clockwise
from the straight up position.
To lock the steering wheel, turn the key to
the LOCK position. Remove the key. To
unlock the steering wheel, insert the key
and turn it gently while rotating the steer-
ing wheel slightly right and left.
If the key will not turn from the LOCK posi-
tion, turn the steering wheel to the left or
right while turning the key to unlock the
key cylinder.
WARNING
Never remove or turn the key to the LOCK
position while driving. The steering wheel
will lock. This may cause the driver to lose
control of the vehicle and could result in
serious vehicle damage or personal injury.
WSD0041
IGNITION SWITCH
5-4Starting and driving
ZREVIEW COPYÐ2006 Sentra(b15)
Owners ManualÐUSA_English(nna)
09/01/05Ðdebbie
X