2006 NISSAN QUEST window
[x] Cancel search: windowPage 136 of 352

Opening and closing windows
The driver’s door key operation allows you to
open and close windows equipped with auto-
matic operation at the same time.
cTo open the windows, turn the driver’s door
key toward the rear of the vehicle forlonger
than 1 secondafter the door is unlocked.
cTo close the windows, turn the driver’s door
key to the front of the vehicle forlonger
than 1 secondafter the door is locked.
Windows stop when the key cylinder is released.
LOCKING WITH INSIDE LOCK
KNOB
To lock the door without the key, move the inside
lock knob to the lock position
s1, then close the
door.
To unlock the door without the key, move the
inside lock knob to the unlock position
s2.
Inside lock for front doors
LPD0208
Inside lock for sliding doors
LPD0224
3-4Pre-driving checks and adjustments
ZREVIEW COPYÐ2006 Quest(van)
Owners ManualÐUSA_English(nna)
05/27/05Ðtbrooks
X
Page 142 of 352

CAUTION
Listed below are conditions or occur-
rences which will damage the keyfob:
cDo not allow the keyfob to become wet.
cDo not drop the keyfob.
cDo not strike the keyfob sharply against
another object.
cDo not place the keyfob for an extended
period in an area where temperatures
exceed 140°F (60°C) .
If a keyfob is lost or stolen, NISSAN rec-
ommends erasing the ID code of that key-
fob. This will prevent the keyfob from un-
authorized use to unlock the vehicle. For
information regarding the erasing proce-
dure, please contact a NISSAN dealer.
HOW TO USE REMOTE KEYLESS
ENTRY SYSTEM
Locking doors
1. Close all windows.
2. Remove the key from the ignition switch.
3. Close the hood and all doors.
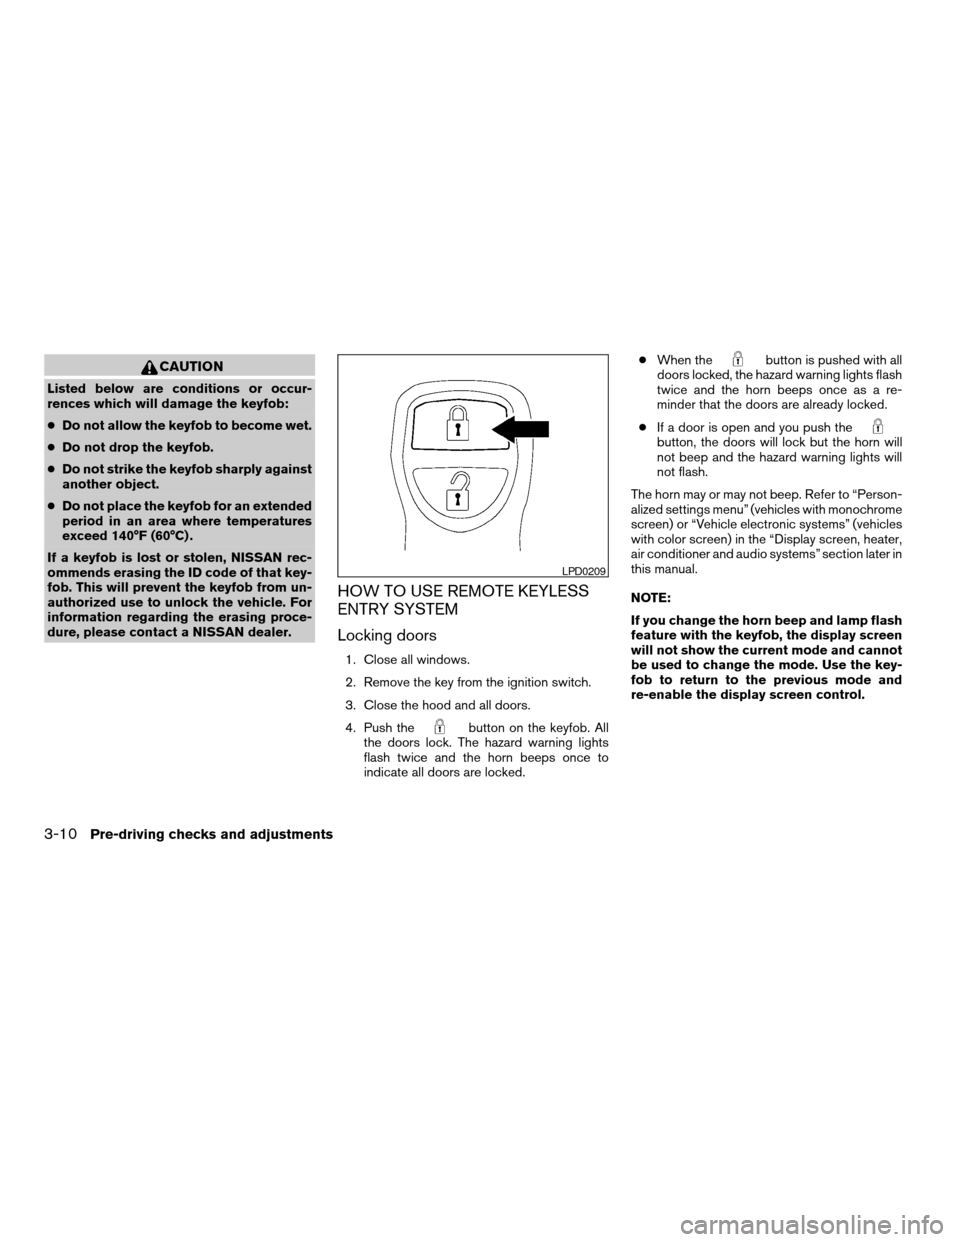
4. Push the
button on the keyfob. All
the doors lock. The hazard warning lights
flash twice and the horn beeps once to
indicate all doors are locked.cWhen the
button is pushed with all
doors locked, the hazard warning lights flash
twice and the horn beeps once as a re-
minder that the doors are already locked.
cIf a door is open and you push the
button, the doors will lock but the horn will
not beep and the hazard warning lights will
not flash.
The horn may or may not beep. Refer to “Person-
alized settings menu” (vehicles with monochrome
screen) or “Vehicle electronic systems” (vehicles
with color screen) in the “Display screen, heater,
air conditioner and audio systems” section later in
this manual.
NOTE:
If you change the horn beep and lamp flash
feature with the keyfob, the display screen
will not show the current mode and cannot
be used to change the mode. Use the key-
fob to return to the previous mode and
re-enable the display screen control.
LPD0209
3-10Pre-driving checks and adjustments
ZREVIEW COPYÐ2006 Quest(van)
Owners ManualÐUSA_English(nna)
05/27/05Ðtbrooks
X
Page 143 of 352

Unlocking doors
Push thebutton on the keyfob once.
cOnly the driver’s door unlocks.
cThe hazard indicator flashes once if all doors
are completely closed with the ignition key in
any position except the ON position.
cThe interior lights and puddle lamps (if so
equipped) turn on and the light timer acti-
vates for 30 seconds when the lights on
demand switch is in the
position with
the ignition key in any position except the
ON position.Push the
button on the keyfob again within
5 seconds.
cAll doors unlock.
cThe hazard indicator flashes once if all doors
are completely closed.
The interior lights and puddle lamps (if so
equipped) can be turned off without waiting 30
seconds by inserting the key into the ignition and
turning to the ON or START position, locking the
doors with the keyfob or pushing the interior light
switch to the OFF position.
Auto relock
When thebutton on the keyfob is pushed,
all doors will lock automatically within 1 minute
unless one of the following operations is per-
formed:
cAny door is opened.
cA key is inserted into the ignition switch and
the key is turned from OFF to ON.
Opening windows
The keyfob allows you to open windows
equipped with automatic operation simulta-
neously.
cTo open the windows, press the
but-
ton on the keyfob forlonger than 3 sec-
ondsafter all doors are unlocked.
The door windows will open while pressing
the
button on the keyfob.
The door windows cannot be closed by
using the keyfob.
Linking the keyfob to automatic drive
positioner memory
If the vehicle is equipped with automatic drive
positioner, the keyfob can be linked to a memory
setting.
See “Automatic driver positioner” later in this
section.
LPD0210
Pre-driving checks and adjustments3-11
ZREVIEW COPYÐ2006 Quest(van)
Owners ManualÐUSA_English(nna)
05/27/05Ðtbrooks
X
Page 155 of 352

For information on HomeLinkTUniversal Trans-
ceiver operation, see the “HomeLinkTUniversal
Transceiver” in the “Instrument and controls” sec-
tion of this manual.
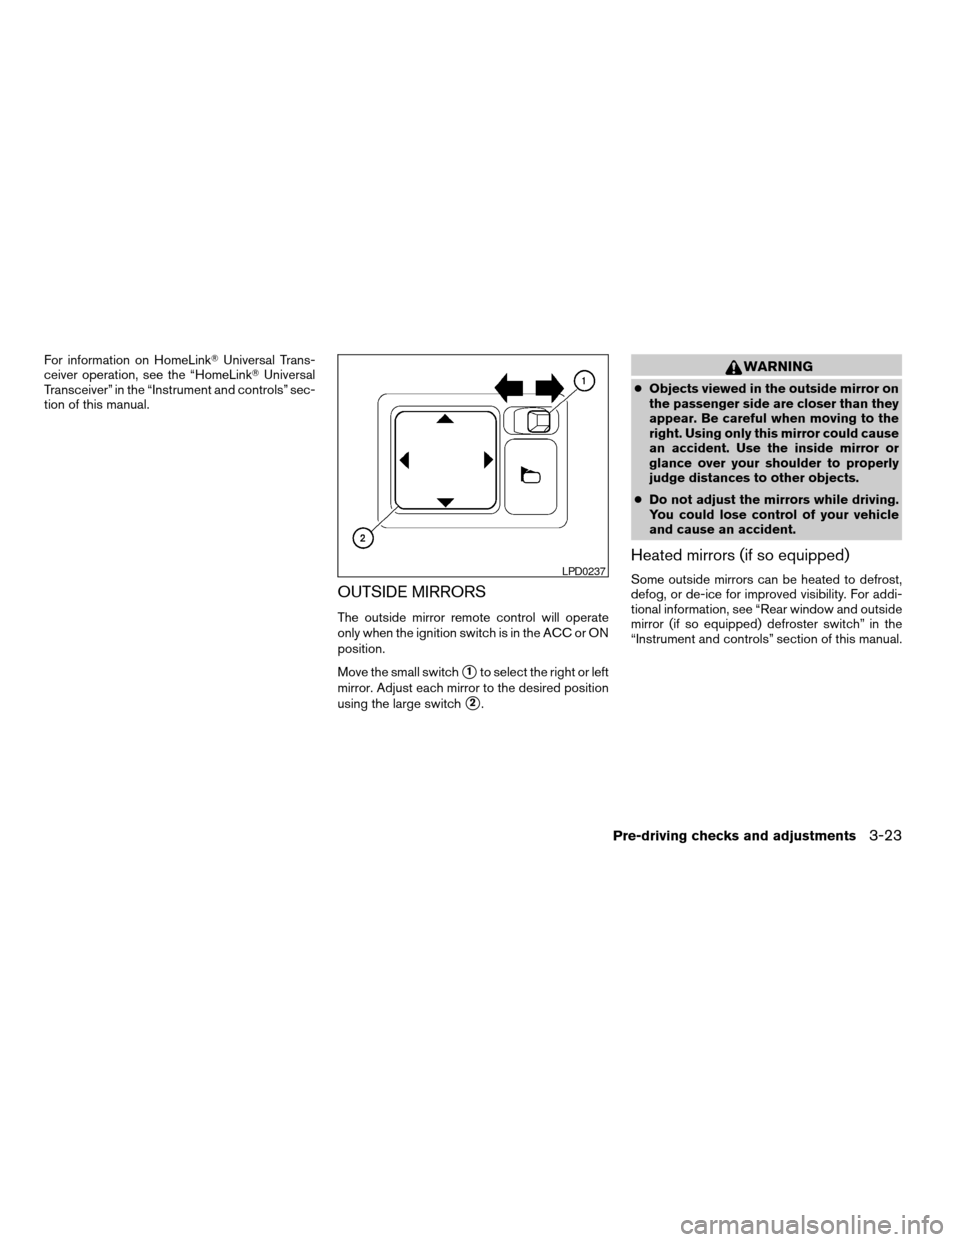
OUTSIDE MIRRORS
The outside mirror remote control will operate
only when the ignition switch is in the ACC or ON
position.
Move the small switch
s1to select the right or left
mirror. Adjust each mirror to the desired position
using the large switch
s2.
WARNING
cObjects viewed in the outside mirror on
the passenger side are closer than they
appear. Be careful when moving to the
right. Using only this mirror could cause
an accident. Use the inside mirror or
glance over your shoulder to properly
judge distances to other objects.
cDo not adjust the mirrors while driving.
You could lose control of your vehicle
and cause an accident.
Heated mirrors (if so equipped)
Some outside mirrors can be heated to defrost,
defog, or de-ice for improved visibility. For addi-
tional information, see “Rear window and outside
mirror (if so equipped) defroster switch” in the
“Instrument and controls” section of this manual.LPD0237
Pre-driving checks and adjustments3-23
ZREVIEW COPYÐ2006 Quest(van)
Owners ManualÐUSA_English(nna)
05/27/05Ðtbrooks
X
Page 166 of 352

In case of low tire pressure, a message (FLAT
TIRE or CHECK ALL TIRE) is displayed on the
screen:
FLAT TIRE — Check All Tires.
WARNING
When a spare tire is mounted or a wheel is
replaced, tire pressure will not be indi-
cated and the low tire pressure warning
system will not function. Contact your
NISSAN dealer as soon as possible for tire
replacement and/or system resetting.
HOW TO USE THE “SETTING”
BUTTON
Pushing the“SETTING”button will change the
settings menu as follows:
DISPLAY ON/OFF
LANGUAGE
BEEP SET
SERVICE ALERT
PERSONALIZED SETTINGS MENU
Display ON/OFF
To turn off the screen, select the OFF key of the
“Display ON/OFF” using the joystick.The screen will change to “CONFIRM DISPLAY
OFF YES or NO”.
If YES key is selected using the joystick, the
screen will turn off after a 2 beep sound and
approximately 1 second.
To turn on the screen, push the“SETTING”, trip
control, air conditioner (except rear window de-
fogger button) or audio button.
Language
The language can be changed to “English” or
“Français” using the joystick.
Beep set
If the beep set “OFF” key is selected using the
joystick, the beep sound will not operate (except
some caution beep sounds) .
Service alert
If the service alert “ON” key is selected, the
information will be displayed when the engine oil
and the tire rotation periods reach the preset
driving distance.
Personalized settings menu
You can set the following electronic systems
operating conditions using the joystick.Slide back DR (driver’s) seat on exit:
The driver’s seat automatically moves back and
returns to the original position for exceptional
ease of exit and entry.
Remote unlock door logic:
This option allows you to select which doors will
unlock first during an unlocking operation:
Only the driver’s doorÃ!All the doors
Horn chirp with remote:
This option allows you to select the horn chirp
mode that occurs when the LOCK or UNLOCK
button on the keyfob is pressed.
NOTE:
If you change the horn beep or the lamp
flash feature with the keyfob, the display
screen will not show the current mode. Use
the keyfob to return to the previous mode
and re-enable the display screen control.
Lamps flash with remote:
This option allows you to select the hazard indi-
cator flash mode that occurs when the LOCK or
UNLOCK button on the keyfob is pressed.
4-6Display screen, heater, air conditioner and audio systems
ZREVIEW COPYÐ2006 Quest(van)
Owners ManualÐUSA_English(nna)
05/27/05Ðtbrooks
X
Page 187 of 352

cDo not damage the camera as the monitor
screen may be adversely affected.
cDo not use body wax on the camera window.
Wipe off the wax with a clean cloth damp-
ened with mild detergent diluted with water.
Adjust air flow direction for the driver and pas-
senger side
s1, centers2, and rear passenger
s3ventilators by moving the ventilator slide
and/or ventilator assemblies.
LHA0328
VENTILATORS
Display screen, heater, air conditioner and audio systems4-27
ZREVIEW COPYÐ2006 Quest(van)
Owners ManualÐUSA_English(nna)
05/27/05Ðtbrooks
X
Page 188 of 352

WARNING
cThe air conditioner cooling function op-
erates only when the engine is running.
cDo not leave children or adults who
would normally require the assistance
of others alone in your vehicle. Pets
should also not be left alone. They
could accidentally injure themselves or
others through inadvertent operation of
the vehicle. Also, on hot, sunny days,
temperatures in a closed vehicle could
quickly become high enough to cause
severe or possibly fatal injuries to
people or animals.
cDo not use the recirculation mode for
long periods as it may cause the interior
air to become stale and the windows to
fog up.
cPositioning of the heater and/or air
conditioner controls should not be
done while driving so full attention may
be given to vehicle operation.
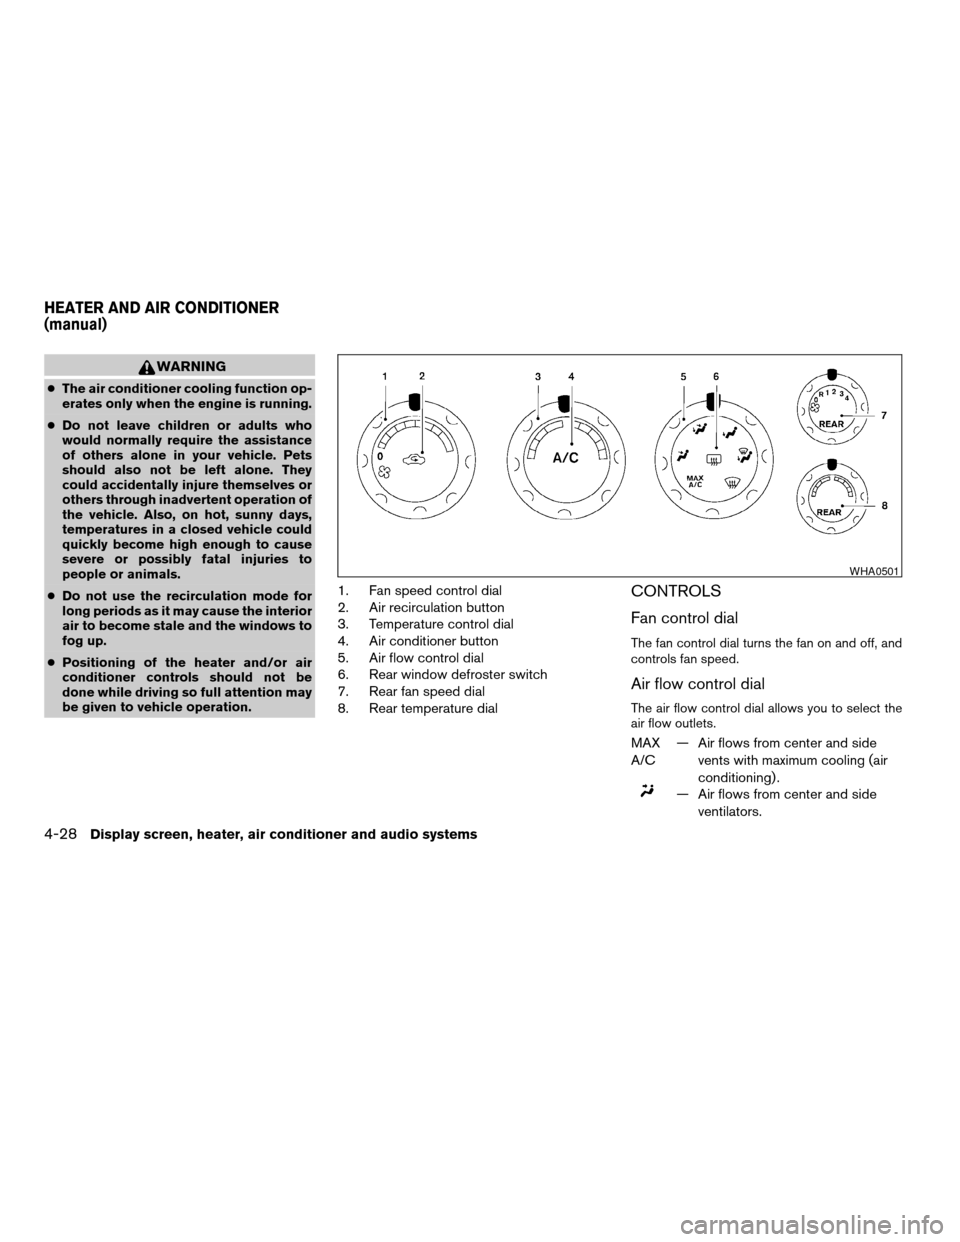
1. Fan speed control dial
2. Air recirculation button
3. Temperature control dial
4. Air conditioner button
5. Air flow control dial
6. Rear window defroster switch
7. Rear fan speed dial
8. Rear temperature dialCONTROLS
Fan control dial
The fan control dial turns the fan on and off, and
controls fan speed.
Air flow control dial
The air flow control dial allows you to select the
air flow outlets.
MAX
A/C— Air flows from center and side
vents with maximum cooling (air
conditioning) .
— Air flows from center and side
ventilators.
WHA0501
HEATER AND AIR CONDITIONER
(manual)
4-28Display screen, heater, air conditioner and audio systems
ZREVIEW COPYÐ2006 Quest(van)
Owners ManualÐUSA_English(nna)
05/27/05Ðtbrooks
X
Page 189 of 352

— Air flows from center and side
ventilators and the front and rear
floor outlets.
— Air flows mainly from the front and
rear floor outlets.
— Air flows from defroster outlets
and the front and rear floor
outlets.
— Air flows mainly from defroster
outlets.
The air flow control dial also has intermediate
positions which allow the air flow to be distrib-
uted between 2 of the icon positions on the air
flow control dial.
Temperature control dial
The temperature control dial allows you to adjust
the temperature of the outlet air. To lower the
temperature, turn the dial to the left. To increase
the temperature, turn the dial to the right.
Air recirculation button
ON position:
Push thebutton to recirculate air inside
the vehicle.
Push the
button to the on position when:
cdriving on a dusty road.cto prevent traffic fumes from entering pas-
senger compartment.
cfor maximum cooling when using the air con-
ditioner.
OFF position:
Push the
button again to turn air recircula-
tion off. Outside air is drawn into the passenger
compartment and distributed through the se-
lected outlet.
Use the off position for normal heater or air con-
ditioner operation.
Air conditioner button
Start the engine, turn the fan control dial to the
desired position and push thebutton to
turn on the air conditioner. A/C will appear on the
display when the air conditioner is operating. To
turn off the air conditioner, push the
button
again, the display will show A/C OFF.
The air conditioner cooling function oper-
ates only when the engine is running.
Rear window defroster switch
For more information about the rear window de-
froster switch, see “Rear window defroster
switch” in the “Instruments and controls” section
of this manual.
HEATER OPERATION
Heating
This mode is used to direct heated air to the foot
outlets. Some air also flows from the defrost
outlets.
1.
Push thebutton to the OFF position for
normal heating (shown on display) .
2. Turn the air flow control dial to theposition.
3.
Turn the fan control dial to the desired position.
4. Turn the temperature control dial to the de-
sired position between the middle and the
hot position.
Ventilation
This mode directs outside air to the side and
center ventilators.
1. Push the
button to the OFF position
(shown on display) .
2. Turn the air flow control dial to the
position.
3.
Turn the fan control dial to the desired position.
4. Turn the temperature control dial to the de-
sired position.
Display screen, heater, air conditioner and audio systems4-29
ZREVIEW COPYÐ2006 Quest(van)
Owners ManualÐUSA_English(nna)
05/27/05Ðtbrooks
X