2006 NISSAN QUEST key fob
[x] Cancel search: key fobPage 157 of 352

MEMORY STORAGE FUNCTION
Two positions for the driver’s seat, accelerator
and brake pedals, and outside mirrors can be
stored in the automatic drive positioner memory.
Follow these procedures to use the memory sys-
tem.
1. Set the automatic transmission selector le-
ver to the P (Park) position.
2. Turn the ignition ON.3. Adjust the driver’s seat, accelerator and
brake pedals, and outside mirrors to the
desired positions by manually operating
each adjusting switch. For additional infor-
mation, see “Seats” in the “Safety—Seats,
seat belts and supplemental restraint sys-
tem” section and “Pedal position adjust-
ment” and “Outside mirrors” earlier in this
section.
During this step, do not turn the ignition to
any position other than ON.
4. Push the SET switch and, within 5 seconds,
push the memory switch (1 or 2) fully for at
least 1 second.
The indicator light for the pushed memory
switch will come on and stay on for approxi-
mately 5 seconds after pushing the switch.
After the indicator light goes off, the se-
lected positions are stored in the selected
memory (1 or 2) .
If a new memory is stored in the same memory
switch, the previous memory will be deleted.
Linking a keyfob to a stored memory
position
Each keyfob can be linked to a stored memory
position (memory switch 1 or 2) with the follow-
ing procedure.
1. Follow the steps for storing a memory posi-
tion.
2. While the indicator light for the memory
switch being set is illuminated for 5 sec-
onds, press the
button on the keyfob.
The indicator light will blink. After the indica-
tor light goes off, the keyfob is linked to that
memory setting.
With the key removed from the ignition switch,
press the
button on the keyfob. The driv-
er’s seat and outside mirrors will move to the
memorized position.
NOTE:
If a new memory position is saved to the
memory switch, the keyfob must be re-
linked.
LPD0219
Pre-driving checks and adjustments3-25
ZREVIEW COPYÐ2006 Quest(van)
Owners ManualÐUSA_English(nna)
05/27/05Ðtbrooks
X
Page 166 of 352
In case of low tire pressure, a message (FLAT
TIRE or CHECK ALL TIRE) is displayed on the
screen:
FLAT TIRE — Check All Tires.
WARNING
When a spare tire is mounted or a wheel is
replaced, tire pressure will not be indi-
cated and the low tire pressure warning
system will not function. Contact your
NISSAN dealer as soon as possible for tire
replacement and/or system resetting.
HOW TO USE THE “SETTING”
BUTTON
Pushing the“SETTING”button will change the
settings menu as follows:
DISPLAY ON/OFF
LANGUAGE
BEEP SET
SERVICE ALERT
PERSONALIZED SETTINGS MENU
Display ON/OFF
To turn off the screen, select the OFF key of the
“Display ON/OFF” using the joystick.The screen will change to “CONFIRM DISPLAY
OFF YES or NO”.
If YES key is selected using the joystick, the
screen will turn off after a 2 beep sound and
approximately 1 second.
To turn on the screen, push the“SETTING”, trip
control, air conditioner (except rear window de-
fogger button) or audio button.
Language
The language can be changed to “English” or
“Français” using the joystick.
Beep set
If the beep set “OFF” key is selected using the
joystick, the beep sound will not operate (except
some caution beep sounds) .
Service alert
If the service alert “ON” key is selected, the
information will be displayed when the engine oil
and the tire rotation periods reach the preset
driving distance.
Personalized settings menu
You can set the following electronic systems
operating conditions using the joystick.Slide back DR (driver’s) seat on exit:
The driver’s seat automatically moves back and
returns to the original position for exceptional
ease of exit and entry.
Remote unlock door logic:
This option allows you to select which doors will
unlock first during an unlocking operation:
Only the driver’s doorÃ!All the doors
Horn chirp with remote:
This option allows you to select the horn chirp
mode that occurs when the LOCK or UNLOCK
button on the keyfob is pressed.
NOTE:
If you change the horn beep or the lamp
flash feature with the keyfob, the display
screen will not show the current mode. Use
the keyfob to return to the previous mode
and re-enable the display screen control.
Lamps flash with remote:
This option allows you to select the hazard indi-
cator flash mode that occurs when the LOCK or
UNLOCK button on the keyfob is pressed.
4-6Display screen, heater, air conditioner and audio systems
ZREVIEW COPYÐ2006 Quest(van)
Owners ManualÐUSA_English(nna)
05/27/05Ðtbrooks
X
Page 167 of 352
NOTE:
If you change the horn beep or the lamp
flash feature with the keyfob, the mode will
not be changed with the display. Use the
keyfob to return to the previous mode and
re-enable the display control.
Auto relock time:
This option allows you to set the length of time
before the doors lock with the auto re-lock func-
tion.
Auto headlamp sensitivity:
This option allows you to set the sensitivity of the
autolights.
Auto headlamp off delay:
This option allows you to select the length of time
before the autolights turn off.
Speed sensing wiper interval:
This option allows you to turn on or turn off the
driving speed dependent intermittent wiper func-
tion.
Confirm reset settings:
This option allows you to reset all options to their
default settings.BUTTON
To change the display brightness, push
thebutton. Pushing the button again will
change the display to DAY or NIGHT display.
Then, adjust the brightness moving the joystick
right or left.
If no operation is done within 10 seconds, or if the
“BACK”button is pushed, the display will return
to the previous display.
WARNING
cPositioning of the heating or air condi-
tioning controls and display controls
should not be done while driving in or-
der that full attention may be given to
the driving operation.
cDo not disassemble or modify this sys-
tem. If you do, it may result in accidents,
fire, or electrical shock.
cDo not use this system if you notice any
abnormality, such as a frozen screen or
lack of sound. Continued use of the
system may result in accident, fire or
electric shock.cIn case you notice any foreign object in
the system hardware, spill liquid on it,
or notice smoke or smell coming from
it, stop using the system immediately
and contact your nearest NISSAN
dealer. Ignoring such conditions may
lead to accidents, fire or electrical
shock.
Display screen, heater, air conditioner and audio systems4-7
ZREVIEW COPYÐ2006 Quest(van)
Owners ManualÐUSA_English(nna)
05/27/05Ðtbrooks
X
Page 173 of 352

Vehicle electronic systems
The VEHICLE ELECTRONIC SYSTEMS screen
will appear when selecting the“Vehicle Elec-
tronic Systems”key with the joystick and push-
ing the“ENTER”button.
To set the various electronic systems operating
conditions, select the applicable item using the
joystick, and push the“ENTER”button. The
indicator light, box at left of selected item, alter-
nately turns on and off each time the“ENTER”
button is pressed.
Indicator light is illuminated — ON
Indicator light is not illuminated — OFFRemote unlock driver’s door first:
This option allows you to select which doors will
unlock first during an unlocking operation:
Only the driver’s doorÃ!All the doors
Keyless remote response — horn:
This key allows you to change the horn chirp
mode that occurs when pressing the LOCK or
UNLOCK button on the keyfob.NOTE:
If you change the horn beep or the lamp
flash feature with the keyfob, the display
screen will not show the current mode. Use
the keyfob to return to the previous mode
and re-enable the display screen control.
Keyless remote response — lights:
This key allows you to change the hazard indica-
tor flash mode that occurs when pressing the
LOCK or UNLOCK button on the keyfob.
NOTE:
If you change the horn beep or the lamp
flash feature with the keyfob, the mode will
not be changed with the display. Use the
keyfob to return to the previous mode and
re-enable the display control.
Auto re-lock time:
This key allows you to set the length of time
before doors auto re-lock.
LHA0601LHA0560
Display screen, heater, air conditioner and audio systems4-13
ZREVIEW COPYÐ2006 Quest(van)
Owners ManualÐUSA_English(nna)
05/27/05Ðtbrooks
X
Page 181 of 352
Display Off:
To turn off the screen, push the“SETTING”
button and select the“Display”key and“Dis-
play Off”key. The indicator of the“Display
Off”will turn to amber. When any mode button is
pushed with the screen off, the screen turns on
for further operation. The screen will turn off
automatically 5 seconds after the operation is
finished on the map display in the Audio, HVAC
(Heater and air conditioner) , SETTING or VE-
HICLE INFO modes.
To turn on the screen, push the“SETTING”
button and select the“Display”key and“Dis-
play Off”key, then set the screen to on by
pushing the“ENTER”button.
Setting Audio or HVAC display:
Choose the“Audio”or“HVAC”(Heater and air
conditioner) key to be displayed at the bottom, by
using the joystick. The audio or HVAC setting
condition will normally appear on the screen. To
return to the setting screen, push the“SET-
TING”button or“BACK”button.
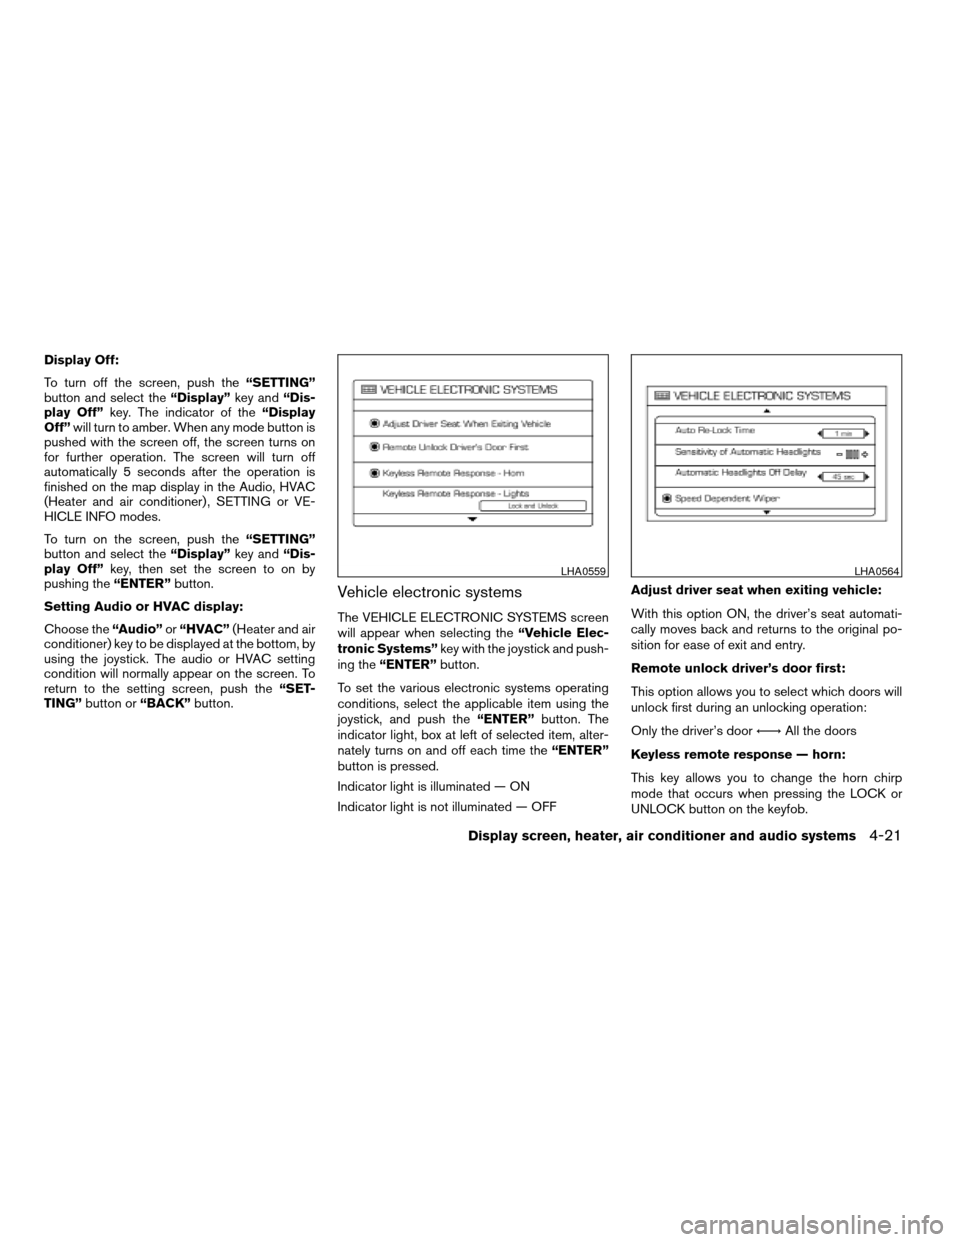
Vehicle electronic systems
The VEHICLE ELECTRONIC SYSTEMS screen
will appear when selecting the“Vehicle Elec-
tronic Systems”key with the joystick and push-
ing the“ENTER”button.
To set the various electronic systems operating
conditions, select the applicable item using the
joystick, and push the“ENTER”button. The
indicator light, box at left of selected item, alter-
nately turns on and off each time the“ENTER”
button is pressed.
Indicator light is illuminated — ON
Indicator light is not illuminated — OFFAdjust driver seat when exiting vehicle:
With this option ON, the driver’s seat automati-
cally moves back and returns to the original po-
sition for ease of exit and entry.
Remote unlock driver’s door first:
This option allows you to select which doors will
unlock first during an unlocking operation:
Only the driver’s doorÃ!All the doors
Keyless remote response — horn:
This key allows you to change the horn chirp
mode that occurs when pressing the LOCK or
UNLOCK button on the keyfob.
LHA0559LHA0564
Display screen, heater, air conditioner and audio systems4-21
ZREVIEW COPYÐ2006 Quest(van)
Owners ManualÐUSA_English(nna)
05/27/05Ðtbrooks
X
Page 182 of 352
NOTE:
If you change the horn beep or the lamp
flash feature with the keyfob, the display
screen will not show the current mode. Use
the keyfob to return to the previous mode
and re-enable the display screen control.Keyless remote response — lights:
This key allows you to change the hazard indica-
tor flash mode that occurs when pressing the
LOCK or UNLOCK button on the keyfob.
NOTE:
If you change the horn beep or the lamp
flash feature with the keyfob, the mode will
not be changed with the display. Use the
keyfob to return to the previous mode and
re-enable the display control.
Auto re-lock time:
This key allows you to set the length of time
before doors auto re-lock.
Sensitivity of automatic headlights:
This key allows you to set the sensitivity of the
automatic headlights:
cLower- less sensitive, automatic headlights
will take longer to come on when the head-
light sensor senses less ambient light.
cHigher- more sensitive, automatic head-
lights will come on quicker when the head-
light sensor senses less ambient light.Automatic headlights off delay:
This key allows you to set the length of time
before the automatic headlights turn off after
exiting the vehicle.
Speed dependent wiper:
This key allows you to turn on or turn off the
driving speed dependent intermittent wiper func-
tion.
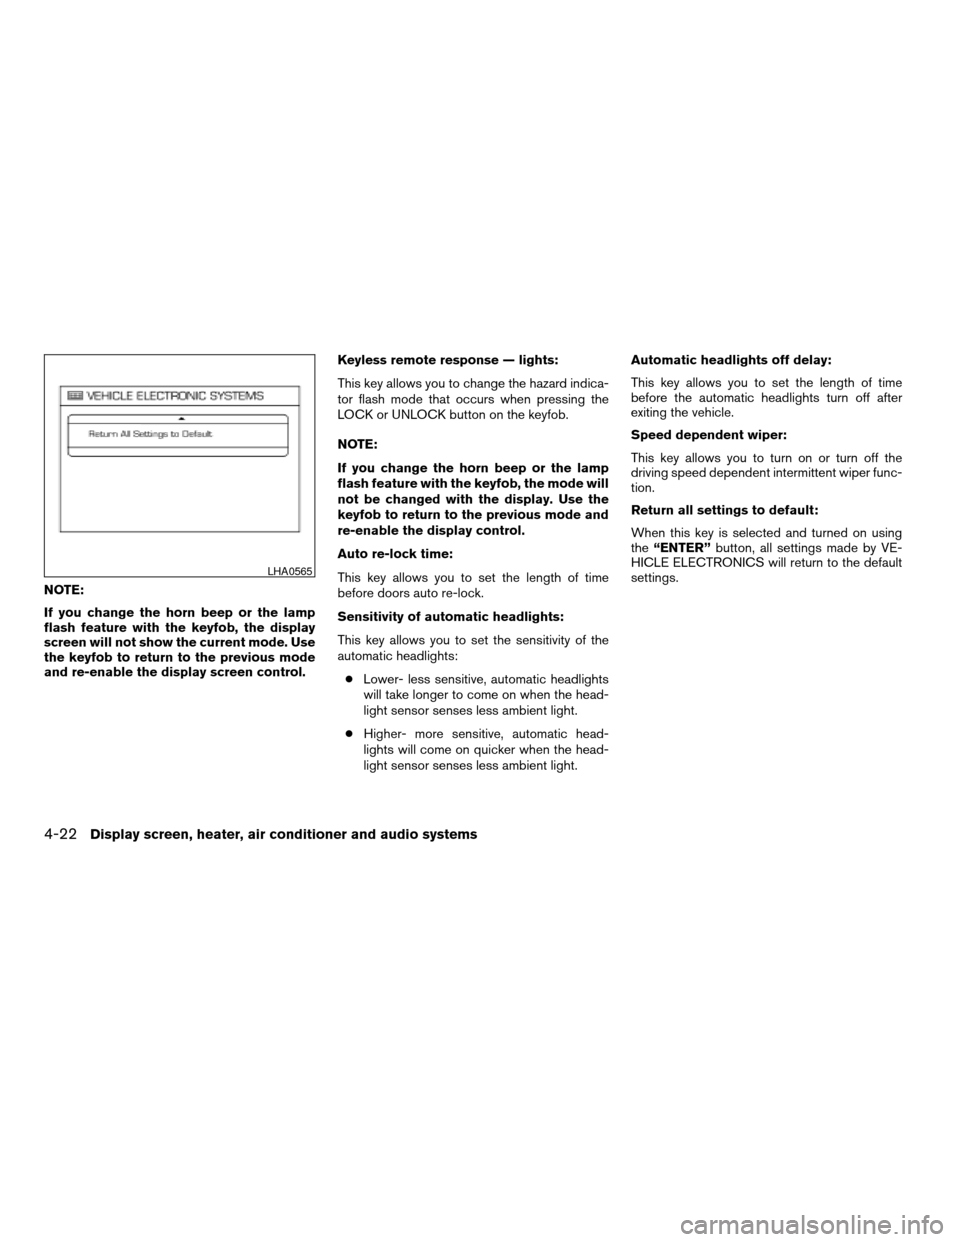
Return all settings to default:
When this key is selected and turned on using
the“ENTER”button, all settings made by VE-
HICLE ELECTRONICS will return to the default
settings.
LHA0565
4-22Display screen, heater, air conditioner and audio systems
ZREVIEW COPYÐ2006 Quest(van)
Owners ManualÐUSA_English(nna)
05/27/05Ðtbrooks
X
Page 271 of 352

8 Maintenance and do-it-yourself
Maintenance requirements..........................8-2
General maintenance..............................8-2
Explanation of general maintenance items.........8-2
Maintenance precautions...........................8-5
Engine compartment check locations................8-6
Engine cooling system.............................8-7
Checking engine coolant level...................8-7
Changing engine coolant........................8-8
Engine oil.........................................8-8
Checking engine oil level........................8-8
Changing engine oil............................8-9
Changing engine oil filter.......................8-10
4-speed automatic transmission fluid...............8-11
Temperature conditions for checking.............8-11
5-speed automatic transmission fluid...............8-12
Power steering fluid...............................8-13
Brake fluid.......................................8-13
Brake fluid....................................8-13
Window washer fluid.............................8-14
Window washer fluid reservoir..................8-14
Battery..........................................8-14
Jump starting.................................8-16
Drive belts.......................................8-16
Spark plugs......................................8-17Replacing spark plugs.........................8-17
Air cleaner.......................................8-17
In-cabin microfilter.............................8-18
Windshield wiper blades..........................8-19
Cleaning.....................................8-19
Replacing....................................8-19
Parking brake and brake pedal.....................8-22
Checking parking brake........................8-22
Checking brake pedal..........................8-22
Brake booster.................................8-23
Fuses...........................................8-23
Engine compartment...........................8-23
Passenger compartment.......................8-24
Keyfob battery replacement........................8-25
Lights...........................................8-26
Headlights....................................8-26
Fog lights (if so equipped)......................8-26
Exterior and interior lights.......................8-28
Wheels and tires.................................8-32
Tire pressure..................................8-32
Tire labeling...................................8-35
Types of tires..................................8-39
Tire chains....................................8-41
Changing wheels and tires.....................8-41
ZREVIEW COPYÐ2006 Quest(van)
Owners ManualÐUSA_English(nna)
05/27/05Ðtbrooks
X
Page 295 of 352
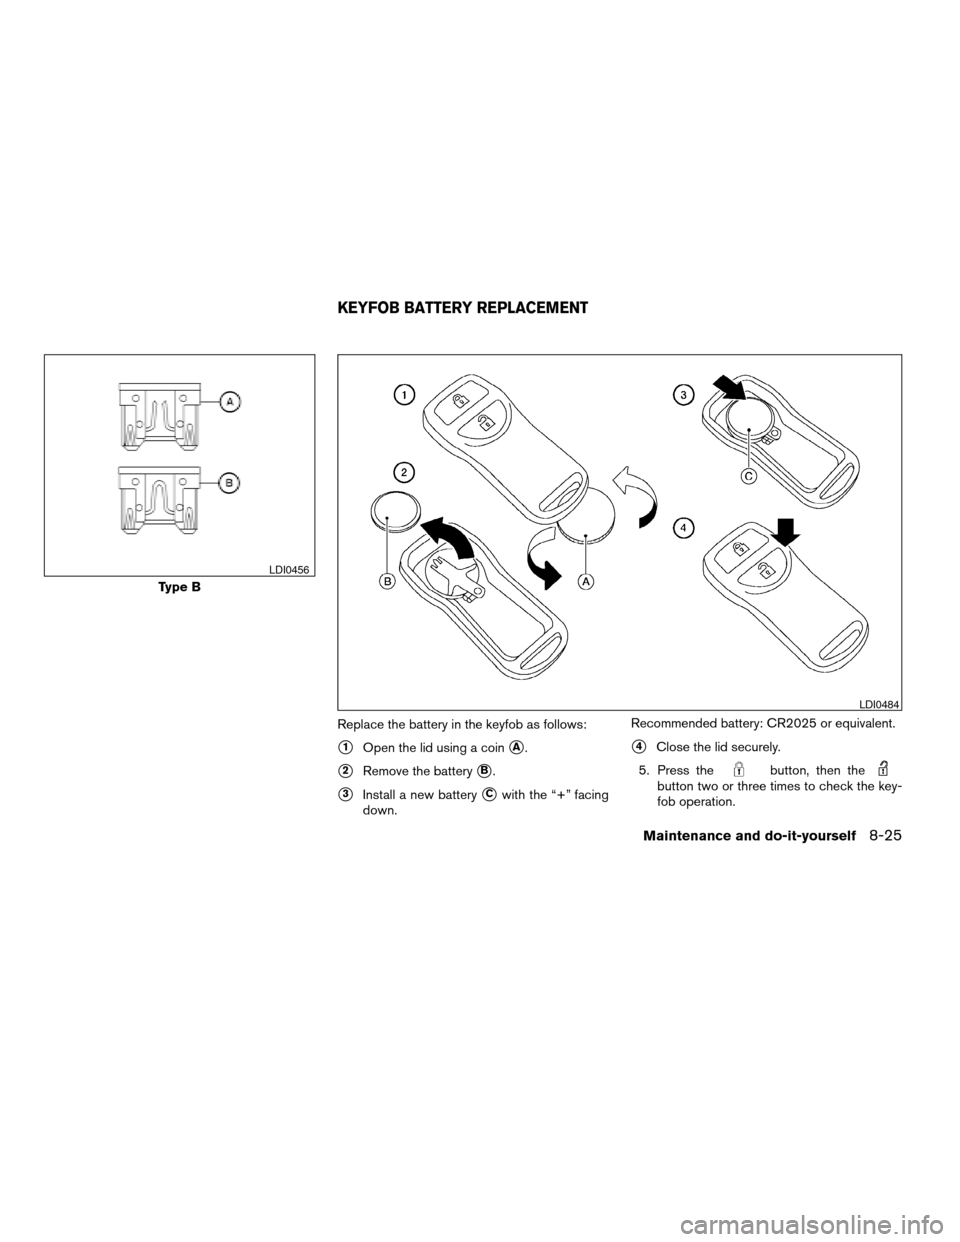
Replace the battery in the keyfob as follows:
s1Open the lid using a coinsA.
s2Remove the batterysB.
s3Install a new batterysCwith the “+” facing
down.Recommended battery: CR2025 or equivalent.
s4Close the lid securely.
5. Press the
button, then thebutton two or three times to check the key-
fob operation.
Type B
LDI0456
LDI0484
KEYFOB BATTERY REPLACEMENT
Maintenance and do-it-yourself8-25
ZREVIEW COPYÐ2006 Quest(van)
Owners ManualÐUSA_English(nna)
05/27/05Ðtbrooks
X