2006 NISSAN QUEST key battery
[x] Cancel search: key batteryPage 147 of 352

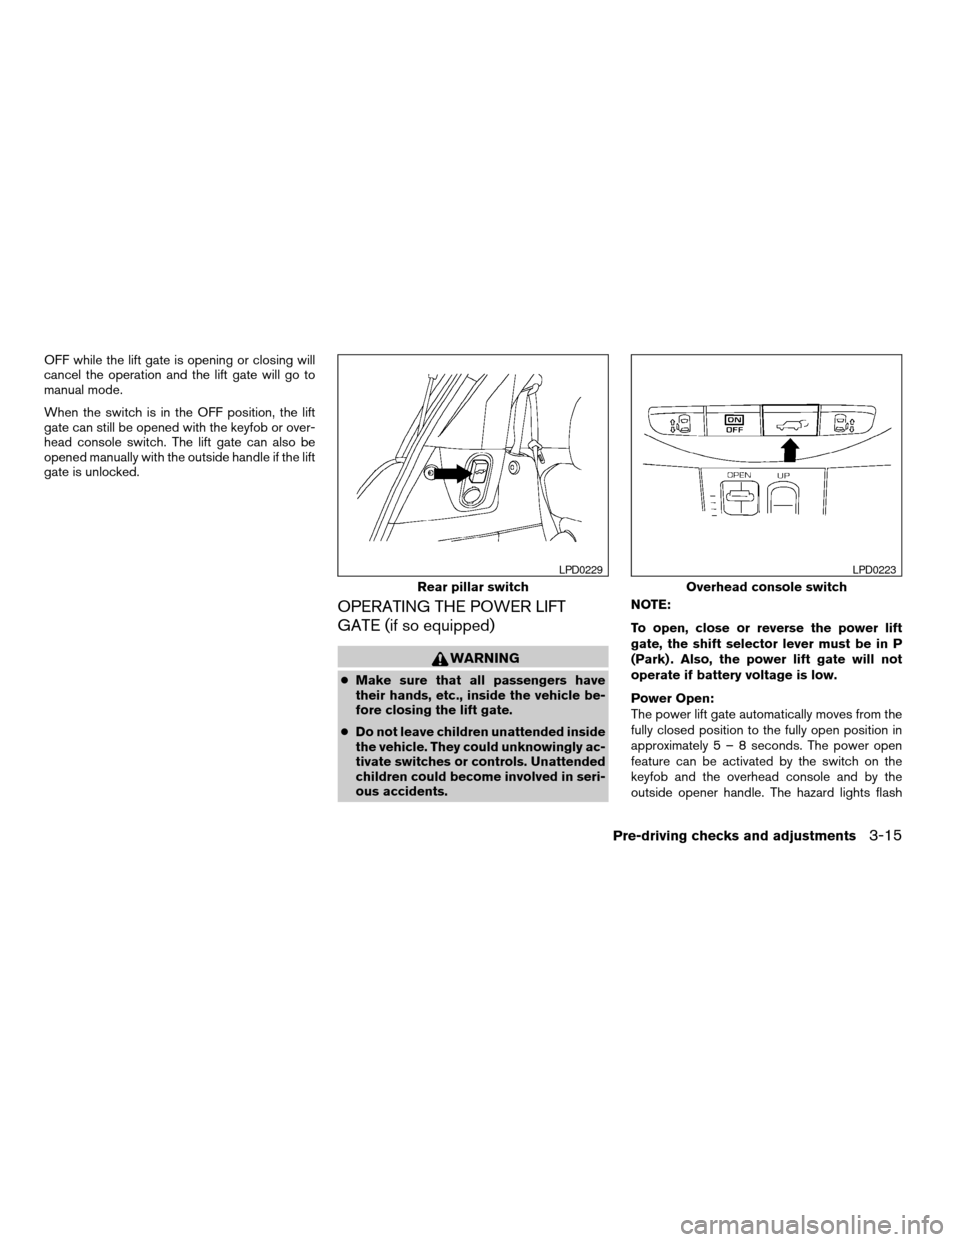
OFF while the lift gate is opening or closing will
cancel the operation and the lift gate will go to
manual mode.
When the switch is in the OFF position, the lift
gate can still be opened with the keyfob or over-
head console switch. The lift gate can also be
opened manually with the outside handle if the lift
gate is unlocked.
OPERATING THE POWER LIFT
GATE (if so equipped)
WARNING
cMake sure that all passengers have
their hands, etc., inside the vehicle be-
fore closing the lift gate.
cDo not leave children unattended inside
the vehicle. They could unknowingly ac-
tivate switches or controls. Unattended
children could become involved in seri-
ous accidents.NOTE:
To open, close or reverse the power lift
gate, the shift selector lever must be in P
(Park) . Also, the power lift gate will not
operate if battery voltage is low.
Power Open:
The power lift gate automatically moves from the
fully closed position to the fully open position in
approximately5–8seconds. The power open
feature can be activated by the switch on the
keyfob and the overhead console and by the
outside opener handle. The hazard lights flash
Rear pillar switch
LPD0229
Overhead console switch
LPD0223
Pre-driving checks and adjustments3-15
ZREVIEW COPYÐ2006 Quest(van)
Owners ManualÐUSA_English(nna)
05/27/05Ðtbrooks
X
Page 148 of 352

and a chime sounds to indicate the power open
sequence has been started.
cThe lift gate can be opened by the overhead
console switch and the keyfob even if the
vehicle is locked. The lift gate will individually
unlock and open. Once the lift gate is
closed, its lock will align to the vehicle’s lock
or unlock status.
cThe keyfob button must be held for 0.5 sec-
ond before the lift gate opens.
cThe lift gate must be unlocked to open it with
the outside opener handle.
cThe switch on the rear pillar cannot be used
to open the lift gate.
A warning chime will sound if the shift selector
lever is moved out of P (Park) during a power
open operation.
Power Close:
The power lift gate automatically moves from the
fully open position to the secondary position.
When the lift gate reaches the secondary posi-
tion, the cinching motor engages and pulls the lift
gate to its primary latch position. Power close
takes approximately7–10seconds. The power
close feature can be activated by the switch on
the keyfob, the overhead console and the rearpillar. The hazard lights flash and a chime sounds
to indicate the power close sequence has been
started.
cIf the outside opener handle is activated
while the cinching motor is engaged, the
cinching motor will disengage and release
the latch.
cThe keyfob button must be held for 0.5 sec-
ond before the lift gate closes.
cThe switch on the rear pillar can only be used
to close the lift gate if the main ON/OFF
switch is ON.
Reverse:
The power lift gate will reverse direction immedi-
ately during power open or power close if the
keyfob, overhead console or rear pillar switch is
pressed. A chime will sound to announce the
reversal.
Auto Reverse:
If an obstacle is detected during power open or
power close, a warning chime will sound and the
lift gate will reverse direction and return to the full
open or full close position. If a second obstacle is
detected, the lift gate motion will stop and the
drive motor will disengage. The lift gate will enter
manual mode.A pinch strip is mounted on each side of the lift
gate. If an obstacle is detected by a pinch strip
during power close, the lift gate will reverse di-
rection and return to the full open position.
NOTE:
If the pinch strip is damaged or removed,
the power close function will not operate.
WARNING
There are some small distances immedi-
ately before the closed position which
cannot be detected. Make sure that all
passengers have their hands, etc., inside
the vehicle before closing the lift gate.
Manual Mode:
If power operation is not available, the lift gate
may be operated manually. Power operation may
not be available if the main ON/OFF switch is in
the OFF position, if multiple obstacles have been
detected in a single power cycle, or if battery
voltage is low.
3-16Pre-driving checks and adjustments
ZREVIEW COPYÐ2006 Quest(van)
Owners ManualÐUSA_English(nna)
05/27/05Ðtbrooks
X
Page 150 of 352

Manual lift gate (if so equipped)
If the lift gate cannot be locked or unlocked with
the door lock switch or the keyfob due to a
discharged battery, follow these steps:
1. Remove the cover on the inside of the lift
gate.
2. Move the lever down to lock or up to unlock.
Power lift gate (if so equipped)
If the lift gate cannot be opened with the door
lock switch or keyfob due to a discharged battery,
follow these steps:
1. Remove the cover on the inside of the lift
gate.
2. Move the lever up to open the lift gate.
OPENER OPERATION
The fuel-filler door release is located on the driv-
er’s door. To open the fuel-filler door, push the
release. To lock, close the fuel-filler door se-
curely.
Manual release
LPD0230
Power release
LPD0236LPD0220
FUEL-FILLER DOOR
3-18Pre-driving checks and adjustments
ZREVIEW COPYÐ2006 Quest(van)
Owners ManualÐUSA_English(nna)
05/27/05Ðtbrooks
X
Page 158 of 352

Procedure for storing the outside
mirror positions for best visibility when
backing up
An outside mirror position for backing up can be
stored for each memory switch (1 and 2) .
1. Set the parking brake.
2. Turn the ignition ON. (Do not start the en-
gine.)
3. Push the memory switch 1 or 2 fully for at
least 1 second to operate the automatic
drive positioner.
4. Turn the outside mirror control switch to L
(left) .
5. Depress the brake pedal.
6. Move the automatic transmission shift lever
to R (Reverse) .
7. Adjust the mirror to the desired viewing po-
sition for backing up by operating the out-
side mirror control switch.
8. Push the SET switch and, within 5 seconds,
push the memory switch 1 or 2 selected in
step 3 fully for at least 1 second.
cThe indicator light for the pushed memory
switch will come on and stay on for approxi-
mately 5 seconds after pushing the switch.After the indicator light goes off, the se-
lected mirror position is stored in the se-
lected memory (1 or 2) .
9. Turn the outside mirror control switch to R
(right) . Repeat the above procedure to ad-
just the right mirror position and store in the
selected memory.
cWhen the driver’s seat, accelerator and
brake pedals, and outside mirrors are not in
the memorized position, the outside mirror
will move with the initial tilt-down angle.
Confirming memory storage
cTurn the ignition ON and push the SET switch.
If the main memory has not been stored, the
indicator light will come on for approximately
0.5 seconds. When the memory has stored
the position, the indicator light will stay on for
approximately 5 seconds.
cIf the battery cable is disconnected, or if the
fuse opens, the memory will be canceled. In
such a case, reset the desired positions
using the following procedures.
1. Open and close the driver’s door more than
two times with the ignition key in the LOCK
position.
2. Reset the desired position using the previ-
ous procedure.
Selecting the memorized position
Set the automatic transmission selector lever to
the P (Park) position, then:
cWithin 45 seconds of opening the driver’s
door, push the memory switch (1 or 2) fully
for at least 1 second, or
cTurn the ignition switch to the ON position
and push the memory switch (1 or 2) fully for
at least 1 second.
The driver’s seat, accelerator and brake pedals,
and outside mirrors will move to the memorized
position with the indicator light blinking, and then
the light will stay on for approximately 5 seconds.
ENTRY/EXIT FUNCTION
This system is designed so that the driver’s seat
will automatically move when the automatic
transmission selector lever is in the P (Park)
position. This allows the driver to get into and out
of the driver’s seat more easily.
The driver’s seat will slide backward:
cWhen the key is removed from the ignition
switch and the driver’s door is opened.
cWhen the driver’s door is opened with the
key turned to LOCK.
3-26Pre-driving checks and adjustments
ZREVIEW COPYÐ2006 Quest(van)
Owners ManualÐUSA_English(nna)
05/27/05Ðtbrooks
X
Page 162 of 352

WARNING
cPositioning of the heating or air condi-
tioning controls and display controls
should not be done while driving in or-
der that full attention may be given to
the driving operation.
cDo not disassemble or modify this sys-
tem. If you do, it may result in accidents,
fire, or electrical shock.
cDo not use this system if you notice any
abnormality, such as a frozen screen or
lack of sound. Continued use of the
system may result in accident, fire or
electric shock.
cIn case you notice any foreign object in
the system hardware, spill liquid on it,
or notice smoke or smell coming from
it, stop using the system immediately
and contact your nearest NISSAN
dealer. Ignoring such conditions may
lead to accidents, fire or electrical
shock.
When you use this system, make sure the engine
is running.
If you use the system with the engine not
running (ignition ON or ACC) for a long
time, it will use up all the battery power,
and the engine will not start.Reference symbols:
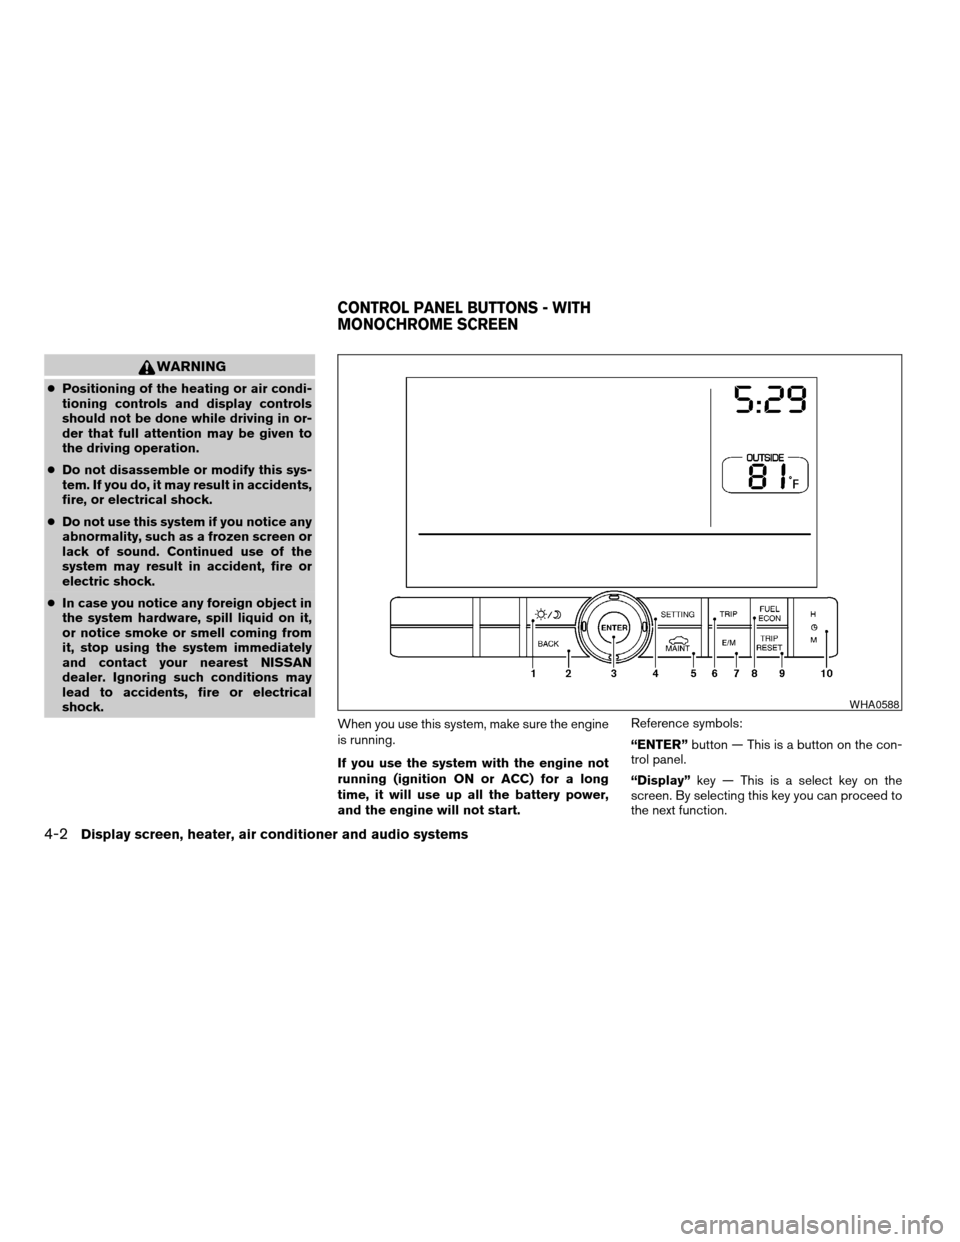
“ENTER”button — This is a button on the con-
trol panel.
“Display”key — This is a select key on the
screen. By selecting this key you can proceed to
the next function.
WHA0588
CONTROL PANEL BUTTONS - WITH
MONOCHROME SCREEN
4-2Display screen, heater, air conditioner and audio systems
ZREVIEW COPYÐ2006 Quest(van)
Owners ManualÐUSA_English(nna)
05/27/05Ðtbrooks
X
Page 164 of 352

HOW TO USE “FUEL ECON”
BUTTON
The average fuel consumption (MPG or L/100
km) and the distance to empty (dte — mi or km)
will appear on the screen when the“FUEL
ECON”button is pushed.
Average fuel consumption (MPG or
L/100 km)
The average fuel consumption mode shows the
average fuel consumption since the last reset.
Resetting is done by pressing the“TRIP RE-
SET”or“FUEL ECON”button for more than
approximately 1.5 seconds.The display is updated every 30 seconds. For
approximately the first 30 seconds and 1/3 miles
(500 m) after a reset or connecting the battery
cables, the display will show (----) .
Distance to empty (dte — mile or km)
The distance to empty (dte) mode provides you
with an estimation of the distance that can be
driven before refueling. The dte is constantly be-
ing calculated based on the amount of fuel in the
fuel tank and the actual fuel consumption.
The display is updated every 30 seconds.
When the fuel level is low, the dte display will
change to (*) .
NOTE:
cIf the amount of fuel added while the ignition
switch is OFF is small, the display just before
the ignition switch is turned OFF may con-
tinue to be displayed.
cWhen driving uphill or rounding curves, the
fuel in the tank shifts, which may momentarily
change the display.
CLOCK
The digital clock displays time when the ignition
key is in ACC or ON.
If the power supply is disconnected, the
clock will not indicate the correct time.
Readjust the time.
Adjusting the time
To adjust the time, push the“H”or“M”button
for more than approximately 1.5 seconds. The
time indicator will flash.
Touch the“H”button to adjust the hour.
Touch the“M”button to adjust the minute.
To finish the adjusting, press the“BACK”button
or the screen will return to normal after 10 sec-
onds.
HOW TO USE “E/M” (English/Metric)
BUTTON
You can change the unit as follows using the
“E/M”button.
Unit: US — mile, °F, MPG
Metric — km, °C, L/100 km
LHA0253
4-4Display screen, heater, air conditioner and audio systems
ZREVIEW COPYÐ2006 Quest(van)
Owners ManualÐUSA_English(nna)
05/27/05Ðtbrooks
X
Page 168 of 352

When you use this system, make sure the engine
is running.
If you use the system with the engine not
running (ignition ON or ACC) for a long
time, it will use up all the battery power,
and the engine will not start.
Reference symbols:
“ENTER”button — This is a button on the con-
trol panel.
“Display”key — This is a select key on the
screen. By selecting this key you can proceed to
the next function.NAMES OF THE COMPONENTS
1.brightness control button (P. 4-25)
2. BACK (previous) button (P. 4-3)
3. Joystick and ENTER push button (P. 4-16)
4. SETTING button (P. 4-20)
5.
(maintenance) button (P. 4-5)
6. TRIP drive computer button (P. 4-3)
7. E/M (English/Metric) button (P. 4-4)
8. FUEL ECON button (P. 4-4)
9. TRIP RESET button (P. 4-3)10. Clock adjust button (hours/minutes) (P. 4-4)
HOW TO USE JOYSTICK AND
“ENTER” BUTTON
Choose an item on the display using the joystick
and push the“ENTER”button for operation.
HOW TO USE “BACK” BUTTON
This button has two functions.
cGo back to the previous display (cancel) .
If you press the“BACK”button during setup, the
setup will be canceled and/or the display will
return to the previous screen.
cFinish setup.
If you press this button after the setup is com-
pleted, the setup will start over, and the display
will return to the climate control or audio mode
and Navigation screen.
Display screen without navigation
LHA0589
CONTROL PANEL BUTTONS —
COLOR SCREEN WITHOUT
NAVIGATION SYSTEM
4-8Display screen, heater, air conditioner and audio systems
ZREVIEW COPYÐ2006 Quest(van)
Owners ManualÐUSA_English(nna)
05/27/05Ðtbrooks
X
Page 176 of 352

When you use this system, make sure the engine
is running.
If you use the system with the engine not
running (ignition ON or ACC) for a long
time, it will use up all the battery power,
and the engine will not start.
Reference symbols:
“ENTER”button — This is a button on the con-
trol panel.
“Display”key — This is a select key on the
screen. By selecting this key you can proceed to
the next function.NAMES OF THE COMPONENTS
1.brightness control button (P. 4-25)
2. BACK (previous) button (P. 4-8)
3. Joystick and ENTER push button (P. 4-8)
4. SETTING button (P. 4-20)
5. TRIP drive computer button (P. 4-17)
6. DEST button*
7. MAP button*
8. ROUTE button*
9. GUIDE VOICE button*10. Zoom in button*
11. Zoom out button*
*For Navigation system control buttons, refer to
the separate Navigation System Owner’s
Manual.
HOW TO USE JOYSTICK AND
“ENTER” BUTTON
Choose an item on the display using the joystick
and push the“ENTER”button for operation.
HOW TO USE “BACK” BUTTON
This button has two functions.
cGo back to the previous display (cancel) .
If you press the“BACK”button during setup, the
setup will be canceled and/or the display will
return to the previous screen.
cFinish setup.
If you press this button after the setup is com-
pleted, the setup will start over, and the display
will return to the climate control or audio mode
and Navigation screen.
Display screen with navigation
LHA0551
CONTROL PANEL BUTTONS —
COLOR SCREEN WITH NAVIGATION
SYSTEM
4-16Display screen, heater, air conditioner and audio systems
ZREVIEW COPYÐ2006 Quest(van)
Owners ManualÐUSA_English(nna)
05/27/05Ðtbrooks
X