2006 NISSAN QASHQAI height
[x] Cancel search: heightPage 24 of 297

Downloaded from www.Manualslib.com manuals search engine ARMRESTS (where fitted)
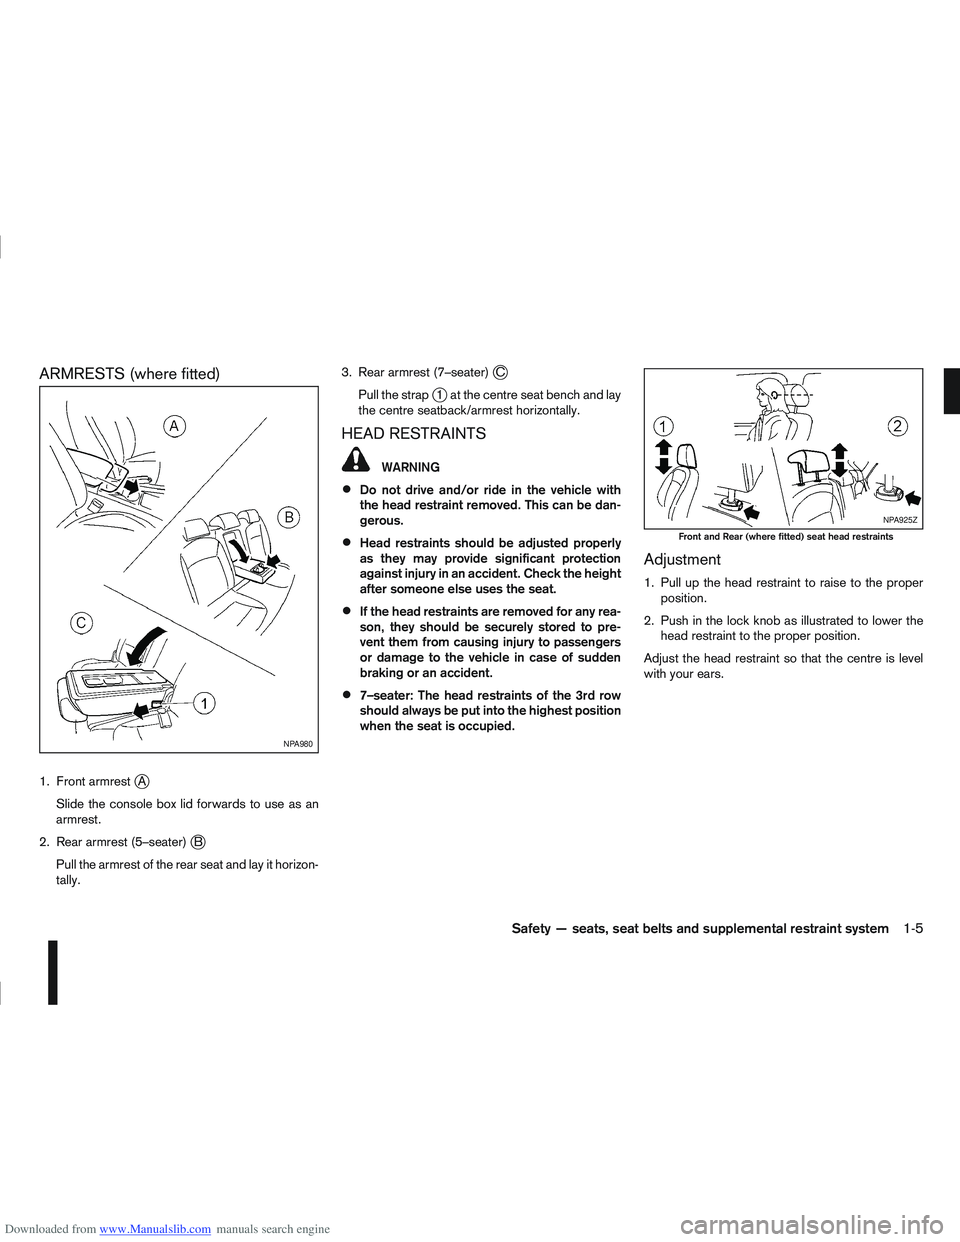
1. Front armrestjA
Slide the console box lid forwards to use as an
armrest.
2. Rear armrest (5–seater)
jB
Pull the armrest of the rear seat and lay it horizon-
tally. 3. Rear armrest (7–seater)
jC
Pull the strap
j1 at the centre seat bench and lay
the centre seatback/armrest horizontally.
HEAD RESTRAINTS
WARNING
Do not drive and/or ride in the vehicle with
the head restraint removed. This can be dan-
gerous.
Head restraints should be adjusted properly
as they may provide significant protection
against injury in an accident. Check the height
after someone else uses the seat.
If the head restraints are removed for any rea-
son, they should be securely stored to pre-
vent them from causing injury to passengers
or damage to the vehicle in case of sudden
braking or an accident.
7–seater: The head restraints of the 3rd row
should always be put into the highest position
when the seat is occupied.
Adjustment
1. Pull up the head restraint to raise to the proper position.
2. Push in the lock knob as illustrated to lower the head restraint to the proper position.
Adjust the head restraint so that the centre is level
with your ears.
NPA980
NPA925Z
Front and Rear (where fitted) seat head restraints
Safety — seats, seat belts and supplemental restraint system1-5
Page 30 of 297

Downloaded from www.Manualslib.com manuals search engine 3rd row outer seat (7-seater)
a. Press the red button on the inner buckle
j3.The
seat belt will automatically retract to the outer
buckle with the black button
j2.
– If desired, the 3rd row seatback can be folded flat for further information see “Folding 3rd
row (7-seater)” earlier in this section.
b. Press the black button to release the end tongue. When the seat belt has retracted fully, place the
end tongue onto stowage hook
j1 . Move the
tongue holder downwards if required.
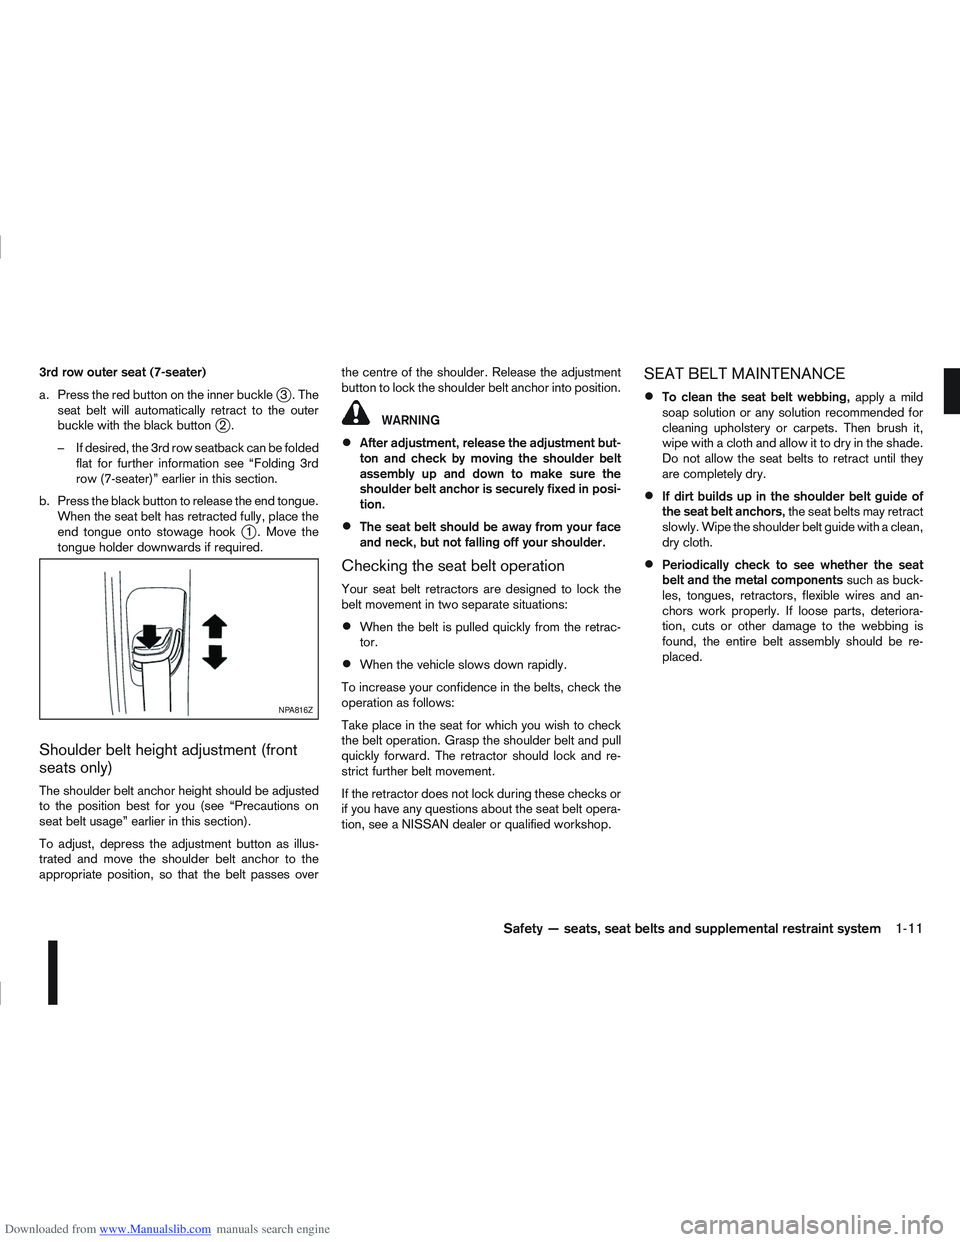
Shoulder belt height adjustment (front
seats only)
The shoulder belt anchor height should be adjusted
to the position best for you (see “Precautions on
seat belt usage” earlier in this section).
To adjust, depress the adjustment button as illus-
trated and move the shoulder belt anchor to the
appropriate position, so that the belt passes over the centre of the shoulder. Release the adjustment
button to lock the shoulder belt anchor into position.
WARNING
After adjustment, release the adjustment but-
ton and check by moving the shoulder belt
assembly up and down to make sure the
shoulder belt anchor is securely fixed in posi-
tion.
The seat belt should be away from your face
and neck, but not falling off your shoulder.
Checking the seat belt operation
Your seat belt retractors are designed to lock the
belt movement in two separate situations:
When the belt is pulled quickly from the retrac-
tor.
When the vehicle slows down rapidly.
To increase your confidence in the belts, check the
operation as follows:
Take place in the seat for which you wish to check
the belt operation. Grasp the shoulder belt and pull
quickly forward. The retractor should lock and re-
strict further belt movement.
If the retractor does not lock during these checks or
if you have any questions about the seat belt opera-
tion, see a NISSAN dealer or qualified workshop.
SEAT BELT MAINTENANCE
To clean the seat belt webbing, apply a mild
soap solution or any solution recommended for
cleaning upholstery or carpets. Then brush it,
wipe with a cloth and allow it to dry in the shade.
Do not allow the seat belts to retract until they
are completely dry.
If dirt builds up in the shoulder belt guide of
the seat belt anchors, the seat belts may retract
slowly. Wipe the shoulder belt guide with a clean,
dry cloth.
Periodically check to see whether the seat
belt and the metal components such as buck-
les, tongues, retractors, flexible wires and an-
chors work properly. If loose parts, deteriora-
tion, cuts or other damage to the webbing is
found, the entire belt assembly should be re-
placed.
NPA816Z
Safety — seats, seat belts and supplemental restraint system1-11
Page 264 of 297

Downloaded from www.Manualslib.com manuals search engine Incorrect tyre selection, fitting, care or main-
tenance can affect vehicle safety with risk of
accident and injury. If in doubt, consult a
NISSAN dealer or the tyre manufacturer.
TYRE WEAR AND DAMAGE
Tyres should be periodically inspected for wear,
cracking, bulging or objects caught in the tread. If
excessive wear, cracks, bulging or deep cuts are
found, the tyre should be replaced.
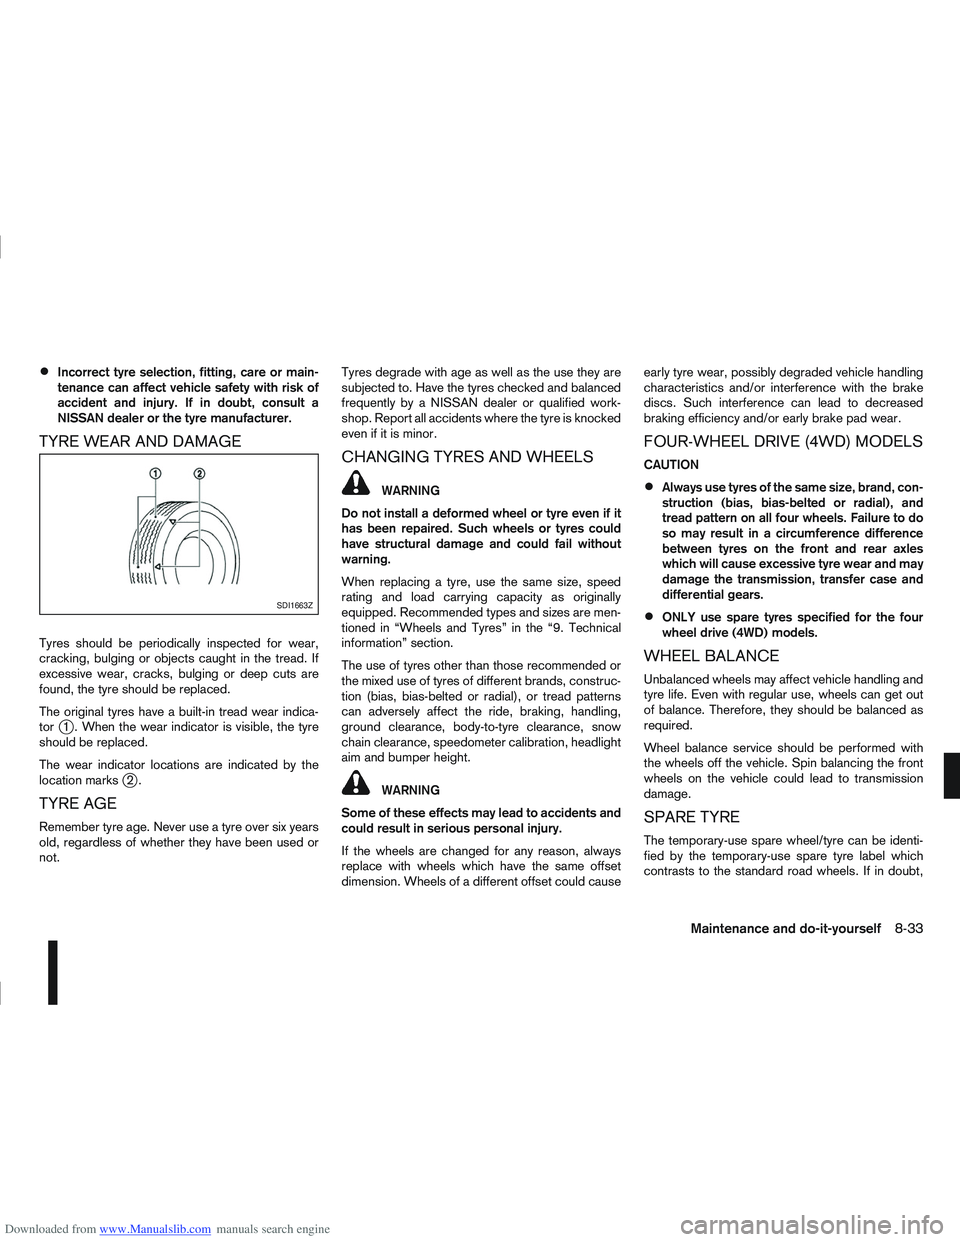
The original tyres have a built-in tread wear indica-
tor
j1 . When the wear indicator is visible, the tyre
should be replaced.
The wear indicator locations are indicated by the
location marks
j2.
TYRE AGE
Remember tyre age. Never use a tyre over six years
old, regardless of whether they have been used or
not. Tyres degrade with age as well as the use they are
subjected to. Have the tyres checked and balanced
frequently by a NISSAN dealer or qualified work-
shop. Report all accidents where the tyre is knocked
even if it is minor.
CHANGING TYRES AND WHEELS
WARNING
Do not install a deformed wheel or tyre even if it
has been repaired. Such wheels or tyres could
have structural damage and could fail without
warning.
When replacing a tyre, use the same size, speed
rating and load carrying capacity as originally
equipped. Recommended types and sizes are men-
tioned in “Wheels and Tyres” in the “9. Technical
information” section.
The use of tyres other than those recommended or
the mixed use of tyres of different brands, construc-
tion (bias, bias-belted or radial), or tread patterns
can adversely affect the ride, braking, handling,
ground clearance, body-to-tyre clearance, snow
chain clearance, speedometer calibration, headlight
aim and bumper height.
WARNING
Some of these effects may lead to accidents and
could result in serious personal injury.
If the wheels are changed for any reason, always
replace with wheels which have the same offset
dimension. Wheels of a different offset could cause early tyre wear, possibly degraded vehicle handling
characteristics and/or interference with the brake
discs. Such interference can lead to decreased
braking efficiency and/or early brake pad wear.
FOUR-WHEEL DRIVE (4WD) MODELS
CAUTION
Always use tyres of the same size, brand, con-
struction (bias, bias-belted or radial), and
tread pattern on all four wheels. Failure to do
so may result in a circumference difference
between tyres on the front and rear axles
which will cause excessive tyre wear and may
damage the transmission, transfer case and
differential gears.
ONLY use spare tyres specified for the four
wheel drive (4WD) models.
WHEEL BALANCE
Unbalanced wheels may affect vehicle handling and
tyre life. Even with regular use, wheels can get out
of balance. Therefore, they should be balanced as
required.
Wheel balance service should be performed with
the wheels off the vehicle. Spin balancing the front
wheels on the vehicle could lead to transmission
damage.
SPARE TYRE
The temporary-use spare wheel/tyre can be identi-
fied by the temporary-use spare tyre label which
contrasts to the standard road wheels. If in doubt,
SDI1663Z
Maintenance and do-it-yourself8-33
Page 273 of 297

Downloaded from www.Manualslib.com manuals search engine Unit: mm (in)
5–seater 7–seater
Overall length 4,332 (170.6) 4,542 (178.8)
Overall width 1,780 (70.1) 1,780 (70.1)
Overall height 1,605 (63.2) 1,645 (64.8) 1,622 (63.9)*
Front tread 1,540 (60.6) 1,540 (60.6)
Rear tread 1,545 (60.8) 1,550 (61)
Wheelbase 2,630 (103.5) 2,765 (108.9)
* : with roof rail When planning to travel in another country,
you
should first find out if the fuel available is suitable for
your vehicle’s engine.
Using fuel with too low octane/cetane rating may
cause engine damage. Therefore, avoid taking your
vehicle to areas where appropriate fuel is not avail-
able.
When transferring your vehicle registration to an-
other country, check with the appropriate authori-
ties that the vehicle complies with the requirements
as it may not be possible to adapt it. In some cases,
a vehicle cannot meet the legal requirements and in
other cases, it may be necessary to modify the ve-
hicle to meet specific laws and regulations.
The laws and regulations for motor vehicle emission
control and safety standards vary according to the
country; therefore, vehicle specifications may differ.
NISSAN is not responsible for any inconvenience
when the vehicle is taken and registered into an-
other country. The necessary modifications,
transportation and registration are the owner’s
responsibility.
VEHICLE IDENTIFICATION PLATE
The plate is affixed as shown.
VEHICLE IDENTIFICATION NUMBER
(VIN) (chassis number)
The number is stamped as shown.
NTI171Z
NTI153Z
DIMENSIONSWHEN TRAVELLING OR
TRANSFERRING YOUR
REGISTRATION TO ANOTHER
COUNTRY VEHICLE IDENTIFICATION
9-8Technical information