2006 NISSAN QASHQAI child restraint
[x] Cancel search: child restraintPage 45 of 297
Downloaded from www.Manualslib.com manuals search engine sary to secure the shoulder belt in place with a
locking clipjA . Use a locking clip attached to
the child restraint system, or one which is equiva-
lent in dimensions and strength.
Be sure to follow the child restraint system
manufacturer’s instructions for belt routing.
4. Test the child restraint system before you place the child in it. Check that it does not tilt too far
from side to side. Try to tug it forwards and check
if it is held securely in place.
5. Check to make sure that the child restraint sys- tem is properly secured prior to each use.
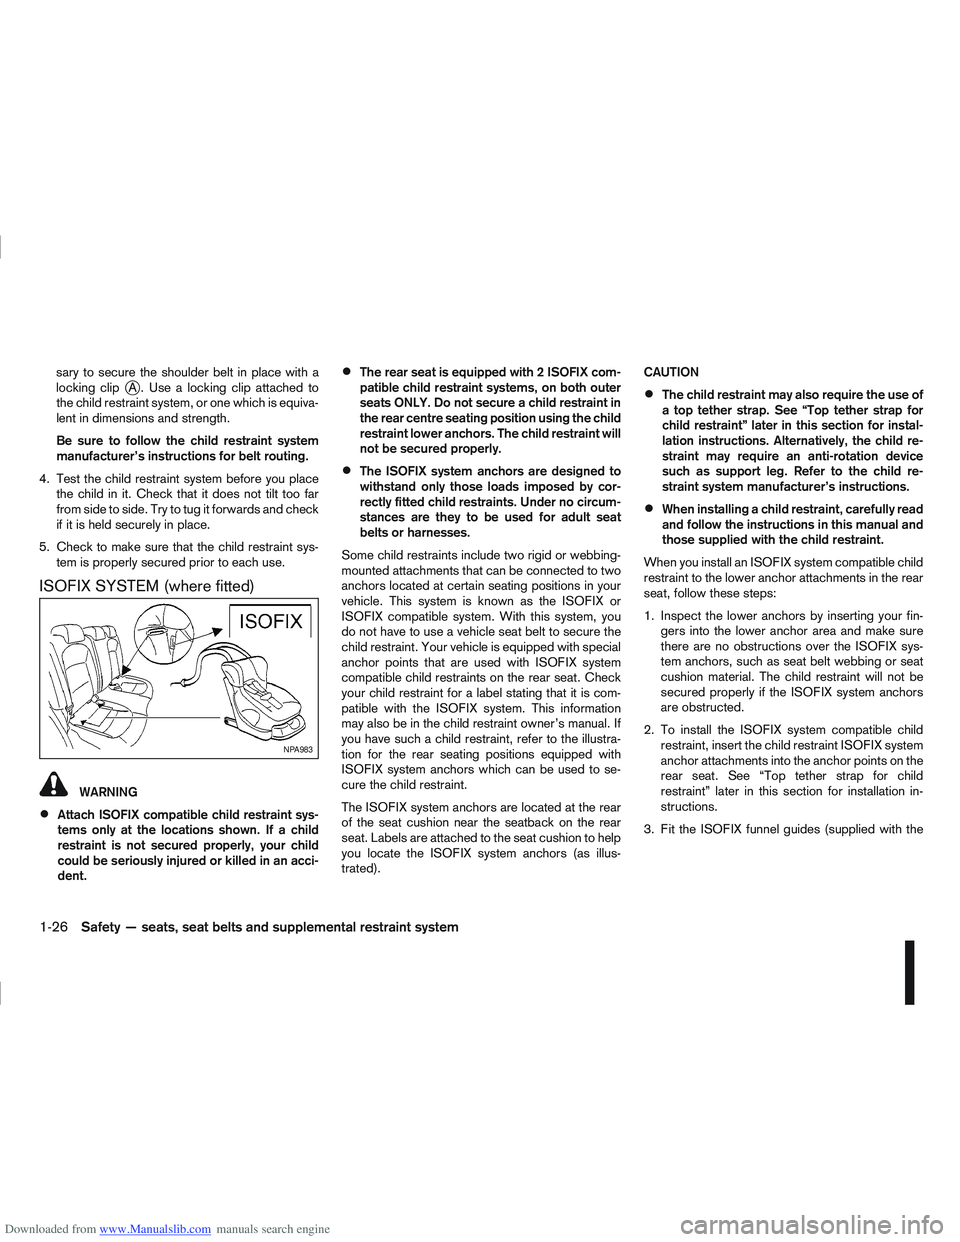
ISOFIX SYSTEM (where fitted)
WARNING
Attach ISOFIX compatible child restraint sys-
tems only at the locations shown. If a child
restraint is not secured properly, your child
could be seriously injured or killed in an acci-
dent.
The rear seat is equipped with 2 ISOFIX com-
patible child restraint systems, on both outer
seats ONLY. Do not secure a child restraint in
the rear centre seating position using the child
restraint lower anchors. The child restraint will
not be secured properly.
The ISOFIX system anchors are designed to
withstand only those loads imposed by cor-
rectly fitted child restraints. Under no circum-
stances are they to be used for adult seat
belts or harnesses.
Some child restraints include two rigid or webbing-
mounted attachments that can be connected to two
anchors located at certain seating positions in your
vehicle. This system is known as the ISOFIX or
ISOFIX compatible system. With this system, you
do not have to use a vehicle seat belt to secure the
child restraint. Your vehicle is equipped with special
anchor points that are used with ISOFIX system
compatible child restraints on the rear seat. Check
your child restraint for a label stating that it is com-
patible with the ISOFIX system. This information
may also be in the child restraint owner’s manual. If
you have such a child restraint, refer to the illustra-
tion for the rear seating positions equipped with
ISOFIX system anchors which can be used to se-
cure the child restraint.
The ISOFIX system anchors are located at the rear
of the seat cushion near the seatback on the rear
seat. Labels are attached to the seat cushion to help
you locate the ISOFIX system anchors (as illus-
trated). CAUTION
The child restraint may also require the use of
a top tether strap. See “Top tether strap for
child restraint” later in this section for instal-
lation instructions. Alternatively, the child re-
straint may require an anti-rotation device
such as support leg. Refer to the child re-
straint system manufacturer’s instructions.
When installing a child restraint, carefully read
and follow the instructions in this manual and
those supplied with the child restraint.
When you install an ISOFIX system compatible child
restraint to the lower anchor attachments in the rear
seat, follow these steps:
1. Inspect the lower anchors by inserting your fin- gers into the lower anchor area and make sure
there are no obstructions over the ISOFIX sys-
tem anchors, such as seat belt webbing or seat
cushion material. The child restraint will not be
secured properly if the ISOFIX system anchors
are obstructed.
2. To install the ISOFIX system compatible child restraint, insert the child restraint ISOFIX system
anchor attachments into the anchor points on the
rear seat. See “Top tether strap for child
restraint” later in this section for installation in-
structions.
3. Fit the ISOFIX funnel guides (supplied with the
NPA983
1-26Safety — seats, seat belts and supplemental restraint system
Page 46 of 297
Downloaded from www.Manualslib.com manuals search engine ISOFIX child seat – where fitted) to the vehicle
ISOFIX brackets located in slots on the slope of
the rear outer seat cushions (refer to the ISOFIX
label for appropriate locations).
4. After attaching the child restraint and before plac- ing the child in it, use force to check that it does
not tilt too far from side to side and tug it forward
to make sure that the child restraint is securely
held in place. Make sure that both ISOFIX an-
chorages have latched correctly.
5. Make sure that the child restraint is properly se- cured prior to each use.
NOTE
For forward facing ISOFIX child restraint posi-
tion on the rear seat, slide the front seat as far
forwards as possible.
For rearward facing ISOFIX child restraint po-
sition on the rear seat, slide the front seat
backwards until it touches the edge of the
child restraint.
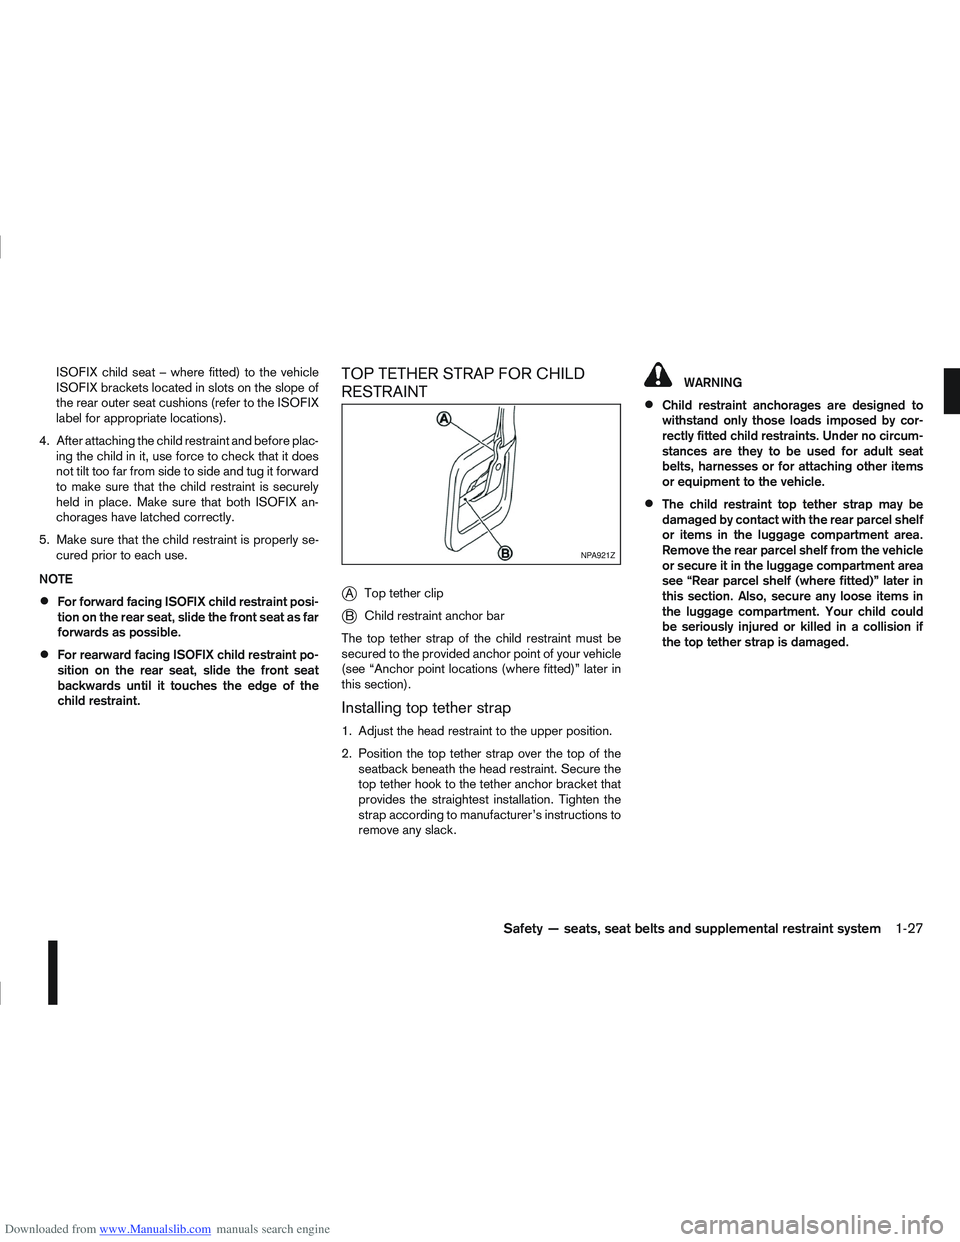
TOP TETHER STRAP FOR CHILD
RESTRAINT
j
A Top tether clip
jB Child restraint anchor bar
The top tether strap of the child restraint must be
secured to the provided anchor point of your vehicle
(see “Anchor point locations (where fitted)” later in
this section).
Installing top tether strap
1. Adjust the head restraint to the upper position.
2. Position the top tether strap over the top of the seatback beneath the head restraint. Secure the
top tether hook to the tether anchor bracket that
provides the straightest installation. Tighten the
strap according to manufacturer’s instructions to
remove any slack.
WARNING
Child restraint anchorages are designed to
withstand only those loads imposed by cor-
rectly fitted child restraints. Under no circum-
stances are they to be used for adult seat
belts, harnesses or for attaching other items
or equipment to the vehicle.
The child restraint top tether strap may be
damaged by contact with the rear parcel shelf
or items in the luggage compartment area.
Remove the rear parcel shelf from the vehicle
or secure it in the luggage compartment area
see “Rear parcel shelf (where fitted)” later in
this section. Also, secure any loose items in
the luggage compartment. Your child could
be seriously injured or killed in a collision if
the top tether strap is damaged.
NPA921Z
Safety — seats, seat belts and supplemental restraint system1-27
Page 47 of 297
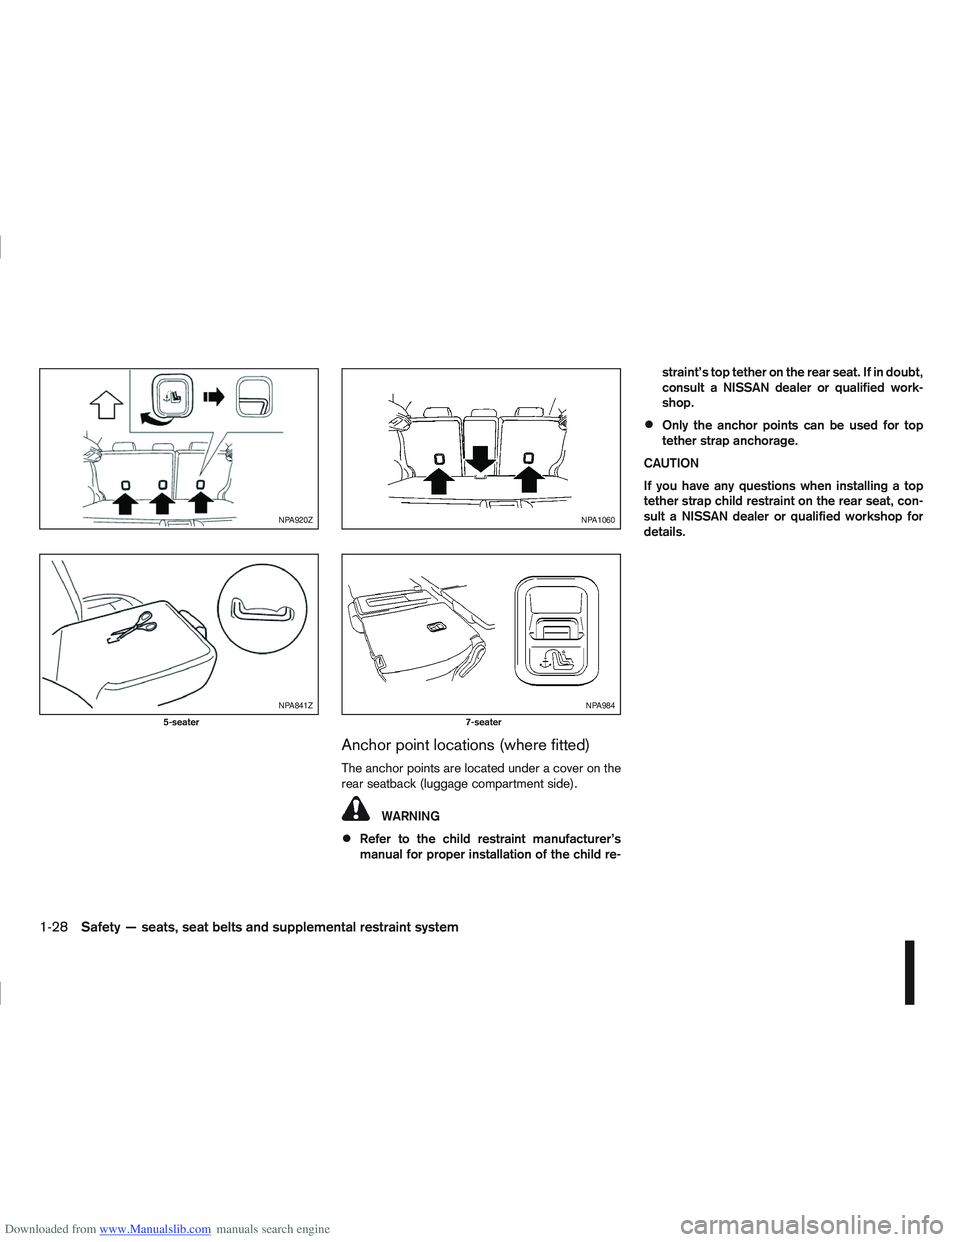
Downloaded from www.Manualslib.com manuals search engine Anchor point locations (where fitted)
The anchor points are located under a cover on the
rear seatback (luggage compartment side).
WARNING
Refer to the child restraint manufacturer’s
manual for proper installation of the child re-straint’s top tether on the rear seat. If in doubt,
consult a NISSAN dealer or qualified work-
shop.
Only the anchor points can be used for top
tether strap anchorage.
CAUTION
If you have any questions when installing a top
tether strap child restraint on the rear seat, con-
sult a NISSAN dealer or qualified workshop for
details.
NPA920Z
NPA841Z
5-seater
NPA1060
NPA984
7-seater
1-28Safety — seats, seat belts and supplemental restraint system
Page 82 of 297

Downloaded from www.Manualslib.com manuals search engine WARNING
Never put anything on the rear parcel shelf, no
matter how small. Any object on it could cause
an injury in an accident or when the brakes are
applied suddenly.
Removal:
1. Open the back door (see “Back door lock” ear- lier in this section).
2. Detach both of the ropes (left and right)
j1 from
the inside of the back door.
3. Detach the parcel shelf from the rear seatback fasteners
j2 by carefully pulling the corners up-
wards.
4. Lift the parcel shelf
j3 up and rotate horizontally
to remove through the back door opening. CAUTION
Make sure the rear parcel shelf is carefully stored
when not in use in order to prevent any damage.
Installation:
1. Open the back door.
2. Position the parcel shelf
j3 over the rear seat-
back fastenersj2 and push downwards until
they “click” into place.
3. Attach the corresponding ropes to each side
j1
of the back door.
4. Close the back door (see “Back door lock” ear- lier in this section).
WARNING
Never put anything on the tonneau cover, no
matter how small. Any object on it could cause
an injury in case of an accident or if the brakes
are applied suddenly.
Do not leave the tonneau cover in position
when it is disengaged from the grooves.
Properly secure all cargo to help prevent it
from sliding or shifting. Do not place cargo
higher than the seatbacks. In a sudden stop
or collision, unsecured cargo could cause per-
sonal injury
The child restraint top tether strap may be
damaged by contact with the tonneau cover
or items in the luggage compartment area.
Remove the tonneau cover from the vehicle
or store it in its storage space. Also, secure
any lose items in the luggage compartment.
Your child could be seriously injured or killed
in a collision if the top tether strap is dam-
aged.
The tonneau cover keeps the luggage compartment
contents hidden from the outside. It can only be
used when the 3rd row seats are folded down.
NPA838Z
REAR PARCEL SHELF (where fitted) TONNEAU COVER (where fitted)
Instruments and controls2-33
Page 99 of 297
Downloaded from www.Manualslib.com manuals search engine BACK DOOR LOCK
WARNING
Always check that the back door has been
properly closed to prevent it from opening
while driving.
Do not drive with the back door opened. This
could allow dangerous exhaust gases to be
drawn into the vehicle.
Closely supervise children when they are
around the vehicle to prevent them from play-
ing and being locked in the luggage compart-
ment where they could be seriously injured.
Keep the vehicle locked, with the back door
closed, when not in use, and prevent chil-
dren’s access to the vehicle’s keys.
The power door lock system allows you to lock or
unlock all doors including the back door.
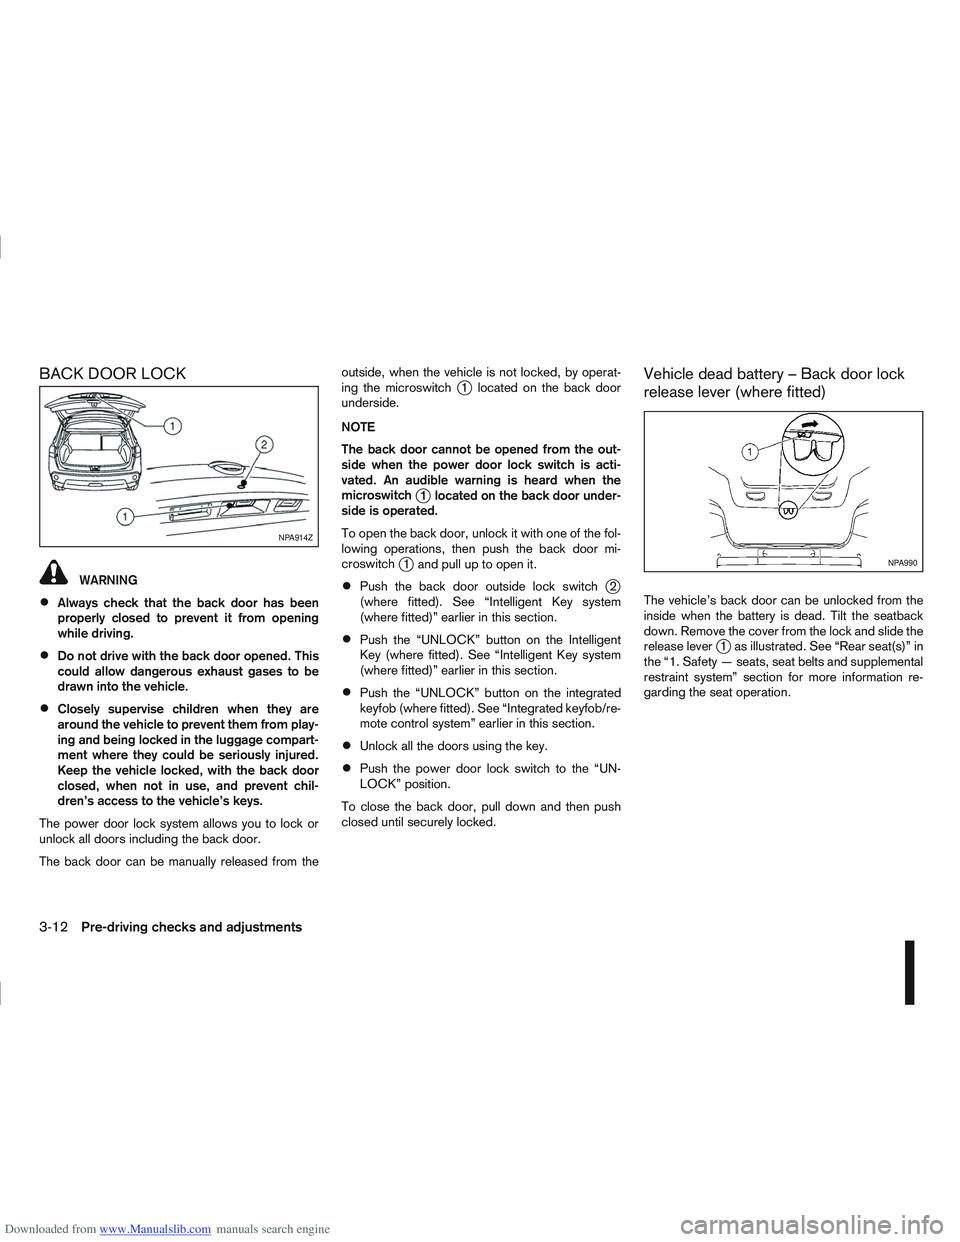
The back door can be manually released from the outside, when the vehicle is not locked, by operat-
ing the microswitch
j1 located on the back door
underside.
NOTE
The back door cannot be opened from the out-
side when the power door lock switch is acti-
vated. An audible warning is heard when the
microswitch
j1 located on the back door under-
side is operated.
To open the back door, unlock it with one of the fol-
lowing operations, then push the back door mi-
croswitch
j1 and pull up to open it.
Push the back door outside lock switchj2
(where fitted). See “Intelligent Key system
(where fitted)” earlier in this section.
Push the “UNLOCK” button on the Intelligent
Key (where fitted). See “Intelligent Key system
(where fitted)” earlier in this section.
Push the “UNLOCK” button on the integrated
keyfob (where fitted). See “Integrated keyfob/re-
mote control system” earlier in this section.
Unlock all the doors using the key.
Push the power door lock switch to the “UN-
LOCK” position.
To close the back door, pull down and then push
closed until securely locked.
Vehicle dead battery – Back door lock
release lever (where fitted)
The vehicle’s back door can be unlocked from the
inside when the battery is dead. Tilt the seatback
down. Remove the cover from the lock and slide the
release lever
j1 as illustrated. See “Rear seat(s)” in
the “1. Safety — seats, seat belts and supplemental
restraint system” section for more information re-
garding the seat operation.
NPA914Z
NPA990
3-12Pre-driving checks and adjustments
Page 166 of 297

Downloaded from www.Manualslib.com manuals search engine WARNING
Do not leave children or adults who would
normally require the support of others alone
in your vehicle. Pets should also not be left
alone. They could accidentally injure them-
selves or others through inadvertent opera-
tion of the vehicle. Also, on hot, sunny days,
temperatures in a closed vehicle could quickly
become high enough to cause severe or pos-
sibly fatal injuries to people or animals.
To prevent luggage or packages from sliding
forward during braking, do not stack anything
in the cargo area higher than the seatbacks.
Secure all cargo with ropes or straps to pre-
vent it from sliding or shifting.
Failure to follow proper seating instructions
see “Seats” in the “1. Safety — seats, seat
belts and supplemental restraint system” sec-
tion, could result in serious personal injury in
an accident or sudden stop.
EXHAUST GAS (Carbon Monoxide)
WARNING
Do not breathe exhaust gases; they contain
colourless and odourless carbon monoxide.
Carbon monoxide is a dangerous gas and can
cause unconsciousness or death.
If you suspect that exhaust fumes are enter-
ing the vehicle, drive with all windows fully
open and have the vehicle inspected immedi-
ately.
Do not run the engine in closed spaces, such
as a garage, for any longer than is absolutely
necessary.
Do not park the vehicle with the engine run-
ning for any extended length of time.
Keep the back door closed while driving, oth-
erwise exhaust gases could be drawn into the
passenger compartment. If you must drive in
this way for some reason, take the following
steps:
1) Open all the windows.
2) Set the air recirculation mode (
)tothe
“OFF” position.
3) Set the fan speed control to the maximum position to circulate the air.
If electrical wiring or other cable connections
must pass to a trailer through the seal of the
body, follow the manufacturer’s recommen-
dations to prevent carbon monoxide entry into
the vehicle.
When a vehicle has been stopped in an open
area with its engine running for any significant
length of time, turn the fan on to force outside
air into the vehicle.
The exhaust system and body should be in-
spected by a NISSAN dealer or qualified work-
shop whenever:
– the vehicle is raised for service.
– you suspect that exhaust fumes are enter-ing into the passenger compartment.
– you notice a change in the sound of the exhaust system.
– you have had an accident involving dam- age to the exhaust system, underbody, or
rear of the vehicle.
PRECAUTIONS WHEN STARTING
AND DRIVING
Starting and driving5-3
Page 282 of 297
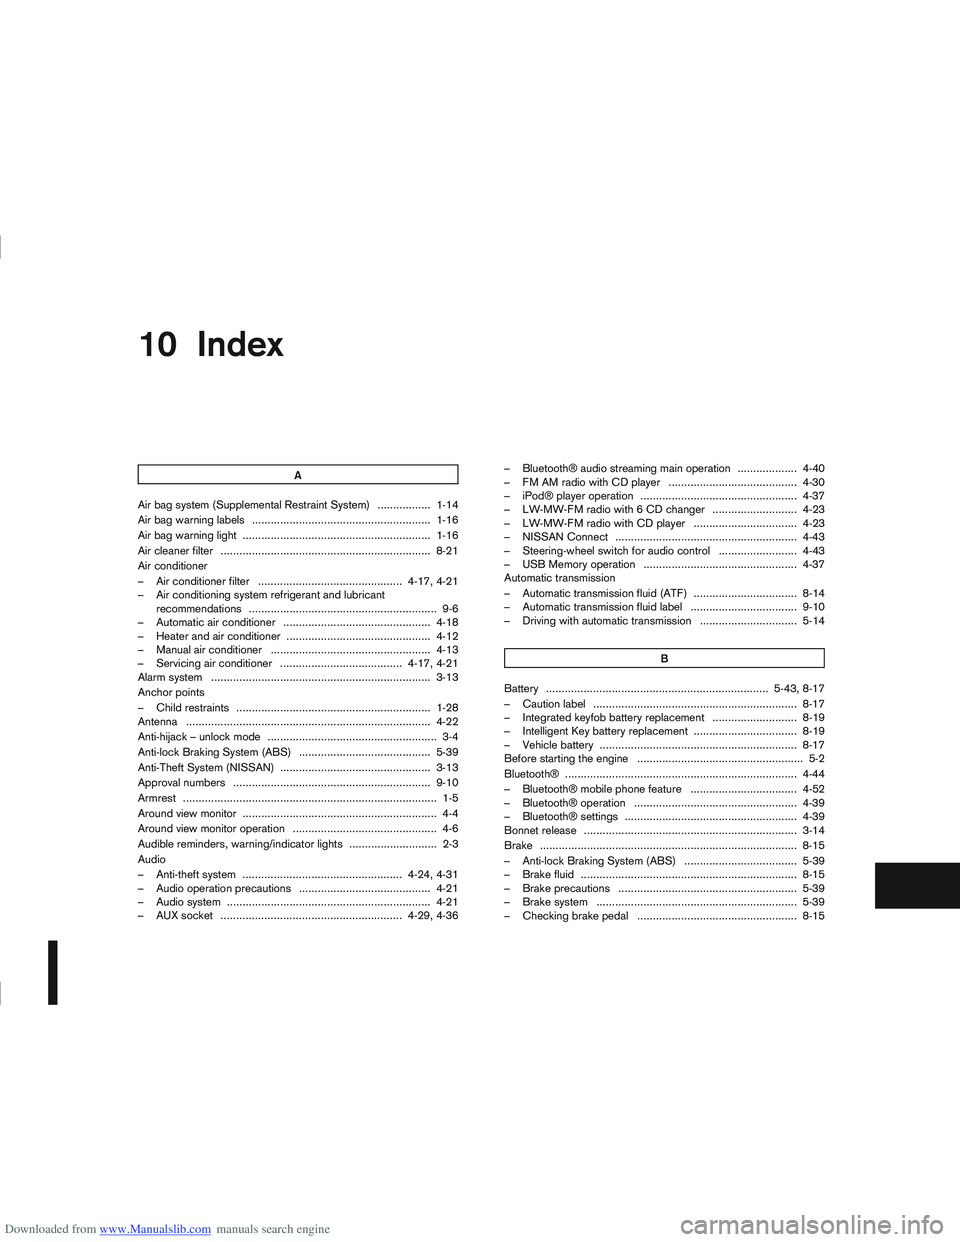
Downloaded from www.Manualslib.com manuals search engine 10 Index
A
Air bag system (Supplemental Restraint System) ................. 1-14
Air bag warning labels ......................................................... 1-16
Air bag warning light ............................................................ 1-16
Air cleaner filter ................................................................... 8-21
Air conditioner
– Air conditioner filter .............................................. 4-17, 4-21
– Air conditioning system refrigerant and lubricantrecommendations ............................................................ 9-6
– Automatic air conditioner ............................................... 4-18
– Heater and air conditioner .............................................. 4-12
– Manual air conditioner ................................................... 4-13
– Servicing air conditioner ....................................... 4-17, 4-21
Alarm system ...................................................................... 3-13
Anchor points
– Child restraints .............................................................. 1-28
Antenna ........................................................................\
...... 4-22
Anti-hijack – unlock mode ...................................................... 3-4
Anti-lock Braking System (ABS) .......................................... 5-39
Anti-Theft System (NISSAN) ................................................ 3-13
Approval numbers ............................................................... 9-10
Armrest ........................................................................\
......... 1-5
Around view monitor .............................................................. 4-4
Around view monitor operation .............................................. 4-6
Audible reminders, warning/indicator lights ............................ 2-3
Audio
– Anti-theft system ................................................... 4-24, 4-31
– Audio operation precautions .......................................... 4-21
– Audio system ................................................................. 4-21
– AUX socket .......................................................... 4-29, 4-36 – Bluetooth® audio streaming main operation ................... 4-40
– FM AM radio with CD player ......................................... 4-30
– iPod® player operation .................................................. 4-37
– LW-MW-FM radio with 6 CD changer ........................... 4-23
– LW-MW-FM radio with CD player ................................. 4-23
– NISSAN Connect .......................................................... 4-43
– Steering-wheel switch for audio control ......................... 4-43
– USB Memory operation ................................................. 4-37
Automatic transmission
– Automatic transmission fluid (ATF) ................................. 8-14
– Automatic transmission fluid label .................................. 9-10
– Driving with automatic transmission ............................... 5-14
B
Battery ....................................................................... 5-43, 8-17
– Caution label ................................................................. 8-17
– Integrated keyfob battery replacement ........................... 8-19
– Intelligent Key battery replacement ................................. 8-19
– Vehicle battery ............................................................... 8-17
Before starting the engine ..................................................... 5-2
Bluetooth® ........................................................................\
.. 4-44
– Bluetooth® mobile phone feature .................................. 4-52
– Bluetooth® operation .................................................... 4-39
– Bluetooth® settings ....................................................... 4-39
Bonnet release .................................................................... 3-14
Brake ........................................................................\
.......... 8-15
– Anti-lock Braking System (ABS) .................................... 5-39
– Brake fluid ..................................................................... 8-15
– Brake precautions ......................................................... 5-39
– Brake system ................................................................ 5-39
– Checking brake pedal ................................................... 8-15
Page 283 of 297
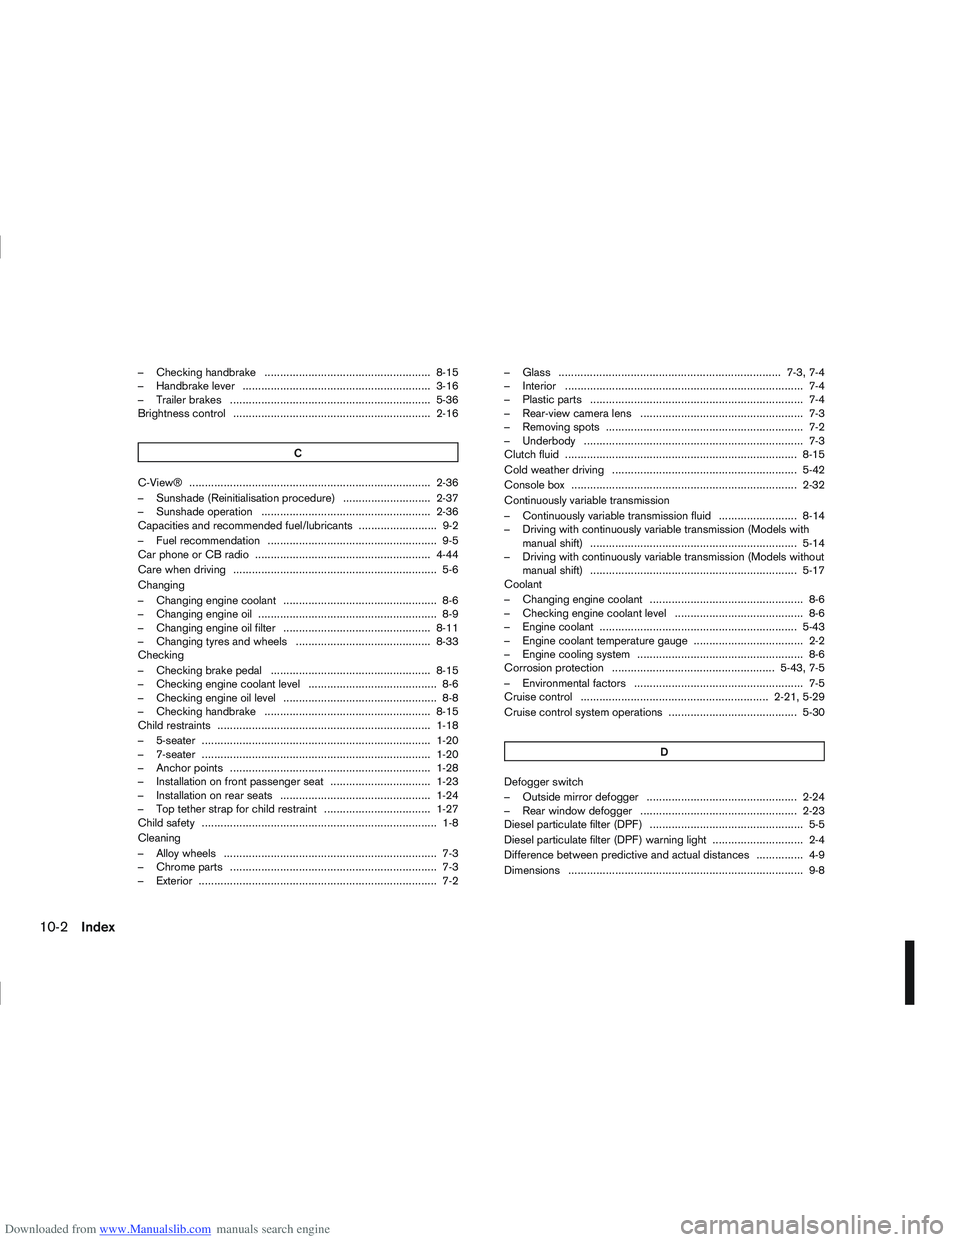
Downloaded from www.Manualslib.com manuals search engine – Checking handbrake ..................................................... 8-15
– Handbrake lever ............................................................ 3-16
– Trailer brakes ................................................................ 5-36
Brightness control ............................................................... 2-16C
C-View® ........................................................................\
..... 2-36
– Sunshade (Reinitialisation procedure) ............................ 2-37
– Sunshade operation ...................................................... 2-36
Capacities and recommended fuel/lubricants ......................... 9-2
– Fuel recommendation ...................................................... 9-5
Car phone or CB radio ........................................................ 4-44
Care when driving ................................................................. 5-6
Changing
– Changing engine coolant ................................................. 8-6
– Changing engine oil ......................................................... 8-9
– Changing engine oil filter ............................................... 8-11
– Changing tyres and wheels ........................................... 8-33
Checking
– Checking brake pedal ................................................... 8-15
– Checking engine coolant level ......................................... 8-6
– Checking engine oil level ................................................. 8-8
– Checking handbrake ..................................................... 8-15
Child restraints .................................................................... 1-18
– 5-seater ........................................................................\
. 1-20
– 7-seater ........................................................................\
. 1-20
– Anchor points ................................................................ 1-28
– Installation on front passenger seat ................................ 1-23
– Installation on rear seats ................................................ 1-24
– Top tether strap for child restraint .................................. 1-27
Child safety ........................................................................\
... 1-8
Cleaning
– Alloy wheels .................................................................... 7-3
– Chrome parts .................................................................. 7-3
– Exterior ........................................................................\
.... 7-2 – Glass ....................................................................... 7-3, 7-4
– Interior ........................................................................\
.... 7-4
– Plastic parts .................................................................... 7-4
– Rear-view camera lens .................................................... 7-3
– Removing spots ............................................................... 7-2
– Underbody ...................................................................... 7-3
Clutch fluid ........................................................................\
.. 8-15
Cold weather driving ........................................................... 5-42
Console box ........................................................................\
2-32
Continuously variable transmission
– Continuously variable transmission fluid ......................... 8-14
– Driving with continuously variable transmission (Models with
manual shift) .................................................................. 5-14
– Driving with continuously variable transmission (Models without manual shift) .................................................................. 5-17
Coolant
– Changing engine coolant ................................................. 8-6
– Checking engine coolant level ......................................... 8-6
– Engine coolant ............................................................... 5-43
– Engine coolant temperature gauge ................................... 2-2
– Engine cooling system ..................................................... 8-6
Corrosion protection .................................................... 5-43, 7-5
– Environmental factors ...................................................... 7-5
Cruise control ............................................................ 2-21, 5-29
Cruise control system operations ......................................... 5-30
D
Defogger switch
– Outside mirror defogger ................................................ 2-24
– Rear window defogger .................................................. 2-23
Diesel particulate filter (DPF) ................................................. 5-5
Diesel particulate filter (DPF) warning light ............................. 2-4
Difference between predictive and actual distances ............... 4-9
Dimensions ........................................................................\
... 9-8
10-2Index