2006 NISSAN PATHFINDER radio
[x] Cancel search: radioPage 195 of 344
cFolder title mode displays the folder name
given to the MP3 folder.
Display satellite radio display mode (if so
equipped)
To change the text displayed when listening to
satellite radio (if so equipped) press the DISP
button. The DISP button will scroll through the
broadcasted information as follows: NameÃ!
TitleÃ!Current display mode.
To change the default display mode push the
tune knob to display mode and rotate the knob to
select the following display modes: Channel
numberÃ!Channel nameÃ!NameÃ!
Title. Once the display mode is selected press
the tune knob again to store the setting. If the
tuning knob is not pressed after 8 seconds the
display will refresh with the last selected display
mode setting.
cChannel number mode displays the channel
number of the selected satellite radio sta-
tion.
cChannel name mode displays the channel
name of the selected satellite radio station.
cName mode displays the name of the artist,
host or weather condition of the selected
satellite radio station.cTitle mode displays the song title, show
name, or temperature of the selected satel-
lite radio station.
Pause/mute button:
To mute or pause the audio sound, push the
PAUSE/MUTE button. Radio mute will flash in the
display screen.
To release the mute or pause, push the button
again.
FM/AM/SAT radio operation
FM/AM/SAT band select:
Pushing the RADIO button will change the band
as follows:
AMÃ!FM or SAT (Satellite, if so equipped)
When the RADIO button is pushed while the
ignition switch is in the ACC or ON position, the
radio will come on at the station last played.
The last station played will also come on when
the POWER/VOLUME control knob is de-
pressed to ON.
No satellite radio reception is available when the
RADIO button is pressed to access satellite radio
stations unless optional satellite receiver and an-
tenna are installed and an XMTor SIRIUS™ sat-
ellite radio service subscription is active. Satellite
radio can only be installed in vehicles that werefactory pre-wired for satellite radio. Satellite radio
is not available in Alaska, Hawaii and Guam. If
satellite radio is not operational then the RADIO
button is used to toggle between AM and FM
bands.
If a compact disc is playing when the RADIO
button is pushed, the compact disc will automati-
cally be turned off and the last radio station
played will come on.
The FM stereo indicator ST will glow during FM
stereo reception. When the stereo broadcast
signal is weak, the radio will automatically change
from stereo to monaural reception.
CAT FOLDER (Tuning):
WARNING
The radio should not be tuned while driv-
ing so full attention may be given to ve-
hicle operation.
To manually tune the radio, push the CAT
FOLDER tune button (
or) or turn
the tuning knob to right or left.
To move quickly through the channels, hold either
the
orbutton down for more than
1.5 seconds.
Display screen, heater, air conditioner and audio systems4-43
ZREVIEW COPYÐ2006 Pathfinder(pat)
Owners ManualÐUSA_English(nna)
07/29/05Ðcathy
X
Page 196 of 344
SEEK tuning:
Push the SEEK/TRACK button (
or)
for less than 1.5 seconds to tune from high to low
or low to high frequencies and stop at the next
broadcasting station.
To seek quickly through the channels, press and
hold the SEEK/TRACK button for more than 1.5
seconds. When the button is released the radio
will seek to the next broadcasting station.
SCAN tuning
Push the SCAN button. SCAN illuminates in the
display window. SCAN tuning begins from low to
high frequencies. SCAN tuning stops for 5 sec-
onds at each broadcasting station that has suffi-
cient signal strength. When scanning, SCAN
blinks in the display. Pushing the SCAN button
again during this 5 second period stops SCAN
tuning and the radio remains tuned to that station.
PRESET A-B-C (Station memory opera-
tions):
18 stations can be set for the FM, AM and SAT
(Satellite-if so equipped) radio to the A, B and C
preset button in any combination of FM, AM or
SAT stations.
1. Choose preset channel A, B or C using the
preset select button.2. Select the desired FM, AM or SAT station
band.
3. Tune to the desired station using manual,
SEEK or SCAN tuning. Push and hold any of
the desired station memory buttons (1 – 6)
until a beep sound is heard.
4. The channel indicator will then come on and
the sound will resume. Memorizing is now
complete.
5. Other buttons can be set in the same man-
ner.
If the battery cable is disconnected, or if the fuse
opens, the radio memory will be canceled. In that
case, reset the desired stations.
Radio data system (RDS):
RDS stands for Radio Data System, and is a data
information service transmitted by some radio
stations on the FM band (not AM band) . Cur-
rently, most RDS stations are in large cities, but
many stations are now considering broadcasting
RDS data.
RDS can display:
cStation call sign, such as “WHFR 98.3”.
cStation name, such as “The Groove”.
If the station broadcasts RDS information, the
RDS icon is displayed.
Compact disc (CD) changer operation
CAUTION
cDo not force a compact disc into the CD
insert slot. This could damage the CD
and/or CD changer/player.
cTrying to load a CD with the CD door
closed could damage the CD and/or CD
changer.
Turn the ignition key to the ACC or ON position
and insert the compact disc into the slot with the
label side facing up. The compact disc will be
guided automatically into the slot and start play-
ing. To insert the disc, first push the LOAD button.
If the radio is already operating, it will automati-
cally turn off and the compact disc will play.
If the system has been turned off while the com-
pact disc was playing, pushing the
POWER/VOLUME control knob will start the
compact disc.
Do not use 3.1 in (8 cm) diameter compact discs
in the CD changer.
4-44Display screen, heater, air conditioner and audio systems
ZREVIEW COPYÐ2006 Pathfinder(pat)
Owners ManualÐUSA_English(nna)
07/29/05Ðcathy
X
Page 197 of 344

LOAD button:
To insert a CD in the CD changer, push the LOAD
button for less than 1.5 seconds. Select the
loading slot by pushing the CD insert select
button (1 – 6) , then insert the CD.
To insert 6 CDs to the CD changer, push the
LOAD button for more than 1.5 seconds.
The slot numbers (1 – 6) will illuminate on the
display when CDs are loaded into the changer.
CD button:
When the CD button is pushed with the system
off and the compact disc loaded, the system will
turn on and the compact disc will start to play.
When the CD button is pushed with the compact
disc loaded with the radio playing, the radio will
automatically be turned off and the compact disc
will start to play.
SEEK/TRACK:
When the
button is pushed for less than 1.5
seconds while a compact disc is playing, the
track being played returns to its beginning. Push
several times to skip back through tracks. The
compact disc will go back the number of times
the button is pushed.
When the
button is pushed for less than 1.5
seconds while the compact disc is playing, thenext track will start to play from its beginning.
Push several times to skip through tracks. The
compact disc will advance the number of times
the button is pushed. (When the last track on the
compact disc is skipped through, the first track
will be played.)
When the
orbutton is pushed for
more than 1.5 seconds while a CD is playing, the
CD plays at an increased speed while fast for-
warding or rewinding through the existing track
being played. When the button is released the
CD returns to normal play speed.
CD select buttons:
To play another CD that has been loaded, push a
CD select button (1 – 6) .
RPT:
When the RPT play button is pushed while the
compact disc is played, the play pattern can be
changed as follows:
ALL DISC RPT!1 DISC RPT!1 TRACK RPT
!ALL DISC RDM!1 DISC RDM!ALL DISC
RPT
ALL DISC RPT: All discs loaded will be repeated.
1 DISC RPT: The disc that is currently playing will
be repeated.
1 TRACK RPT: The track that is currently playing
will be repeatedALL DISC RDM: Tracks from all discs will be
played randomly
1 DISC RDM: Tracks from the disc that is cur-
rently playing will be played randomly
REAR AV (if so equipped):
Press the Rear AV button to toggle the radio
between CD and DVD modes. When the radio
goes into DVD mode and the DVD player is off
the DVD player will turn on. When the DVD player
is on radio or CD can be selected. The DVD
player will remain on and broadcast audio
through the headphones in the rear of the vehicle.
The DVD player can be turned off from the radio
by selecting the DVD mode and pushing the
radio power button. The DVD player will turn off
and the radio will go to the last selected mode.
The DVD player can be operated by remote con-
trol or by the DVD entertainment system located
in the center console.
CD EJECT:
Current disc:
cPress the slot number (1 – 6) for the desired
disc, then press the
button. The com-
pact disc will be ejected. If the disc is not
removed within 15 seconds, the disc will
reload.
Display screen, heater, air conditioner and audio systems4-45
ZREVIEW COPYÐ2006 Pathfinder(pat)
Owners ManualÐUSA_English(nna)
07/29/05Ðcathy
X
Page 199 of 344
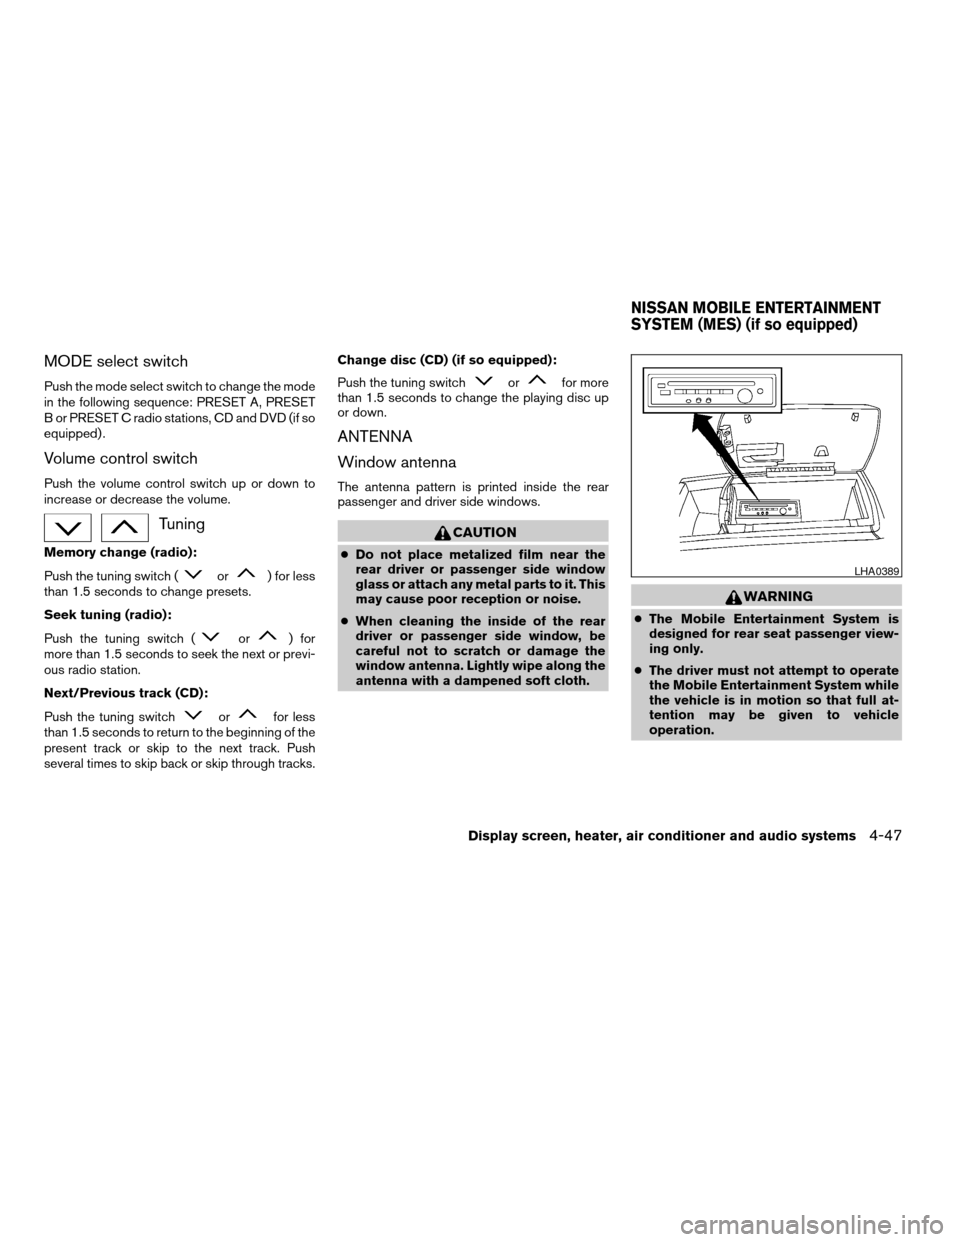
MODE select switch
Push the mode select switch to change the mode
in the following sequence: PRESET A, PRESET
B or PRESET C radio stations, CD and DVD (if so
equipped) .
Volume control switch
Push the volume control switch up or down to
increase or decrease the volume.
Tuning
Memory change (radio):
Push the tuning switch (
or) for less
than 1.5 seconds to change presets.
Seek tuning (radio):
Push the tuning switch (
or) for
more than 1.5 seconds to seek the next or previ-
ous radio station.
Next/Previous track (CD):
Push the tuning switch
orfor less
than 1.5 seconds to return to the beginning of the
present track or skip to the next track. Push
several times to skip back or skip through tracks.Change disc (CD) (if so equipped):
Push the tuning switch
orfor more
than 1.5 seconds to change the playing disc up
or down.
ANTENNA
Window antenna
The antenna pattern is printed inside the rear
passenger and driver side windows.
CAUTION
cDo not place metalized film near the
rear driver or passenger side window
glass or attach any metal parts to it. This
may cause poor reception or noise.
cWhen cleaning the inside of the rear
driver or passenger side window, be
careful not to scratch or damage the
window antenna. Lightly wipe along the
antenna with a dampened soft cloth.
WARNING
cThe Mobile Entertainment System is
designed for rear seat passenger view-
ing only.
cThe driver must not attempt to operate
the Mobile Entertainment System while
the vehicle is in motion so that full at-
tention may be given to vehicle
operation.
LHA0389
NISSAN MOBILE ENTERTAINMENT
SYSTEM (MES) (if so equipped)
Display screen, heater, air conditioner and audio systems4-47
ZREVIEW COPYÐ2006 Pathfinder(pat)
Owners ManualÐUSA_English(nna)
07/29/05Ðcathy
X
Page 207 of 344

DVD player operation precautions
Do not use the following DVD’s as they may
cause the DVD player to malfunction:
c3.1 in (8 cm) discs with an adaptercDVD’s with a region code other than
“1”. The region code
sAis displayed in
a small symbol printed on the top of
the DVD
sB
cDVD’s that are not round
cDVD’s with a paper label
cDVD’s that are warped, scratched, or
have unequal edges
cRecordable digital video discs
(DVD+R)
cRewritable digital video discs
(DVD+RW)
If a DVD with a paper label is used and
becomes jammed you may be able to reset
the unit and eject the jammed disc with the
following procedure:
1.Record the radio presets
2.Disconnect the negative terminal from
the battery for five minutes
3.Reconnect the negative battery termi-
nal
4.Check to see if the jammed DVD has
been ejected. If it has not, try to eject
the DVD by pushing the eject button.5.If the disc cannot be ejected see your
Nissan dealer for further assistance
6.Re-program the radio presets
LHA0484
Display screen, heater, air conditioner and audio systems4-55
ZREVIEW COPYÐ2006 Pathfinder(pat)
Owners ManualÐUSA_English(nna)
07/29/05Ðcathy
X
Page 209 of 344
When installing a CB, ham radio or car phone in
your NISSAN, be sure to observe the following
cautions, otherwise the new equipment may ad-
versely affect the engine control system and
other electronic parts.
WARNING
cA cellular telephone should not be used
while driving so full attention may be
given to vehicle operation. Some juris-
dictions prohibit the use of cellular tele-
phones while driving.
cIf you must make a call while your ve-
hicle is in motion, the hands free cellu-
lar phone operational mode (if so
equipped) is highly recommended. Ex-
ercise extreme caution at all times so
full attention may be given to vehicle
operation.
cIf a conversation in a moving vehicle
requires you to take notes, pull off the
road to a safe location and stop your
vehicle before doing so.
CAUTION
cKeep the antenna as far away as pos-
sible from the electronic control
modules.
cKeep the antenna wire more than 8 in
(20 cm) away from the electronic con-
trol system harnesses. Do not route the
antenna wire next to any harness.
cAdjust the antenna standing-wave ratio
as recommended by the manufacturer.
cConnect the ground wire from the CB
radio chassis to the body.
cFor details, consult a NISSAN dealer.
cDo not ground electrical accessories
directly to the battery terminal. Doing
so, will bypass the variable voltage con-
trol system and the vehicle battery may
not charge completely. Refer to “Vari-
able voltage control system” in the
“Maintenance and do-it-yourself” sec-
tion later in this manual.
cUse electrical accessories with the en-
gine running to avoid discharging the
vehicle battery.
CAR PHONE OR CB RADIO
Display screen, heater, air conditioner and audio systems4-57
ZREVIEW COPYÐ2006 Pathfinder(pat)
Owners ManualÐUSA_English(nna)
07/29/05Ðcathy
X
Page 218 of 344
To remove the key from the ignition switch:
1. Shift the selector lever to the P (Park) posi-
tion with the key in the ON position.
2. Turn the key to the LOCK position.
3. Remove the key from the ignition.
If the selector lever is shifted to the P (Park)
position after the key is turned to the OFF position
or when the key cannot be turned to the LOCK
position, proceed as follows to remove the key.
1. Move the shift selector lever into the P (Park)
position.
2. Turn the ignition key slightly toward the ON
position.
3. Turn the key to the LOCK position.
4. Remove the key.
The shift selector lever is designed so it cannot
moved out of P (Park) and into any of the other
gear positions if the ignition key is turned to OFF
position or if the key is removed from the switch.
The shift selector lever can be moved if the
ignition switch is in the ON position and the
foot brake pedal is depressed.
There is an OFF position between the
LOCK and ACC positions. The OFF position
is indicated by a “1” on the key cylinder.When the ignition is in the OFF position,
the steering wheel is not locked.
In order for the steering wheel to be locked, it
must be turned about 1/8 of a turn clockwise
from the straight up position.
To lock the steering wheel, turn the key to
the LOCK position. Remove the key. To
unlock the steering wheel, insert the key
and turn it gently while rotating the steer-
ing wheel slightly right and left.
If the key will not turn from the LOCK posi-
tion, turn the steering wheel to the left or
right while turning the key to unlock the
key cylinder.
WARNING
Never remove or turn the key to the LOCK
position while driving. The steering wheel
will lock. This may cause the driver to lose
control of the vehicle and could result in
serious vehicle damage or personal injury.
KEY POSITIONS
LOCK: Normal parking position (0)
OFF: (Not used) (1)
ACC: (Accessories) (2)
This position activates electrical accessories
such as the radio when the engine is not running.ON: Normal operating position (3)
This position turns on the ignition system and the
electrical accessories.
START: (4)
This position starts the engine. As soon as the
engine has started, release the key. It automati-
cally returns to the ON position.
NISSAN VEHICLE IMMOBILIZER
SYSTEM
The NISSAN Vehicle Immobilizer System will not
allow the engine to start without the use of the
registered key.
If the engine fails to start using a registered key
(for example, when interference is caused by
another registered key, an automated toll road
device or automatic payment device on the key
ring) , restart the engine using the following pro-
cedures:
1. Leave the ignition switch in the ON position
for approximately 5 seconds.
2. Turn the ignition switch to the OFF or LOCK
position, and wait approximately 10 sec-
onds.
3. Repeat steps 1 and 2.
5-8Starting and driving
ZREVIEW COPYÐ2006 Pathfinder(pat)
Owners ManualÐUSA_English(nna)
07/29/05Ðcathy
X
Page 263 of 344
UNDERBODY
In areas where road salt is used in winter, it is
necessary to clean the underbody regularly in
order to prevent dirt and salt from building up and
causing the acceleration of corrosion on the un-
derbody and suspension. Before the winter pe-
riod and again in the spring, the underseal must
be checked and, if necessary, retreated.
GLASS
Use glass cleaner to remove smoke and dust film
from the glass surfaces. It is normal for glass to
become coated with a film after the vehicle is
parked in the hot sun. Glass cleaner and a soft
cloth will easily remove this film.
CAUTION
When cleaning the inside of the windows,
do not use sharp-edged tools, abrasive
cleaners or chlorine-based disinfectant
cleaners. They could damage the electri-
cal conductors, radio antenna elements or
rear window defroster elements.
ALUMINUM ALLOY WHEELS
Wash the wheels regularly, especially during win-
ter months in areas where road salt is used. If not
removed, road salt can discolor the wheels.
CHROME PARTS
Clean all chrome parts regularly with a non-
abrasive chrome polish to maintain the finish.
TIRE DRESSINGS
NISSAN does not recommend the use of tire
dressings. Tire manufacturers apply a coating to
the tires to help reduce discoloration of the rub-
ber. If a tire dressing is applied to the tires, it may
react with the coating and form a compound. This
compound may come off the tire while driving and
stain the vehicle paint.
If you choose to use a tire dressing, take the
following precautions:
cUse a water-based tire dressing. The coat-
ing on the tire dissolves more easily with an
oil-based tire dressing.
cApply a light coat of tire dressing to help
prevent it from entering the tire
tread/grooves (where it would be difficult to
remove) .
cWipe off excess tire dressing using a dry
towel. Make sure the tire dressing is com-
pletely removed from the tire tread/grooves.
cAllow the tire dressing to dry as recom-
mended by tire dressing manufacturer.Occasionally remove loose dust from the interior
trim, plastic parts and seats using a vacuum
cleaner or soft brush. Wipe the vinyl and leather
surfaces with a clean, soft cloth dampened in
mild soap solution, then wipe clean with a dry,
soft cloth. Before using any fabric protector, read
the manufacturer’s recommendations. Some fab-
ric protectors contain chemicals that may stain or
bleach the seat material.
Use a cloth dampened only with water to clean
the meter and gauge lens.
CAUTION
cNever use benzine, thinner or any simi-
lar material.
cSmall dirt particles can be abrasive and
damaging to leather surfaces and
should be removed promptly. Do not
use saddle soap, polishes, oils, clean-
ing fluids, solvents, detergents or
ammonia-based cleaners as they may
damage the leather’s natural finish.
cNever use fabric protectors unless rec-
ommended by the manufacturer.
cDo not use glass or plastic cleaner on
meter or gauge lens covers. It may dam-
age the lens cover.
CLEANING INTERIOR
Appearance and care7-3
ZREVIEW COPYÐ2006 Pathfinder(pat)
Owners ManualÐUSA_English(nna)
08/01/05Ðcathy
X