2006 NISSAN PATHFINDER turn signal
[x] Cancel search: turn signalPage 98 of 344

Your vehicle has two types of security systems:
cVehicle security system
cNISSAN Vehicle Immobilizer System
VEHICLE SECURITY SYSTEM
The vehicle security system provides visual and
audible alarm signals if someone opens the doors
when the system is armed. It is not, however, a
motion detection type system that activates when
a vehicle is moved or when a vibration occurs.
The system helps deter vehicle theft but cannot
prevent it, nor can it prevent the theft of interior or
exterior vehicle components in all situations. Al-
ways secure your vehicle even if parking for abrief period. Never leave your keys in the ignition,
and always lock the vehicle when unattended. Be
aware of your surroundings, and park in secure,
well-lit areas whenever possible.
Many devices offering additional protection, such
as component locks, identification markers, and
tracking systems, are available at auto supply
stores and specialty shops. Your NISSAN dealer
may also offer such equipment. Check with your
insurance company to see if you may be eligible
for discounts for various theft protection features.
How to arm the vehicle security
system
1. Close all windows and the glass hatch.(The
system can be armed even if the win-
dows are open. However, the glass
hatch must be closed.)
2. Remove the key from the ignition switch.
3. Close all doors. Lock all doors. The doors
can be locked with the key, power door lock
switch or with the keyfob.
Keyfob operation:
cPush the
button on the keyfob.
All doors lock. The hazard lights flash
twice and the horn beeps once to indicate
all doors are locked.cWhen the
button is pushed with
all doors locked, the hazard lights flash
twice and the horn beeps once as a re-
minder that the doors are already locked.
The horn may or may not beep. Refer to
“Silencing the horn beep feature” (vehicles
without navigation system) in the “Pre-
driving checks and adjustments” section or
“Vehicle electronic systems” (vehicles with
navigation system) in the “Display screen,
heater, air conditioner and audio systems”
section.
4. Confirm that the
indicator light comes
on. Thelight stays on for about 30
seconds. The vehicle security system is now
pre-armed. After about 30 seconds the ve-
hicle security system automatically shifts
into the armed phase. The
light begins
to flash once every 3 seconds. If, during the
30-second pre-arm time period, the door is
unlocked by the key or the keyfob, or the
ignition key is turned to ACC or ON, the
system will not arm.
cIf the key is turned slowly when locking
the door, the system may not arm. Fur-
thermore, if the key is turned beyond
the vertical position toward the unlock
position to remove the key, the system
may be disarmed when the key is re-
WIC0841
SECURITY SYSTEMS
2-22Instruments and controls
ZREVIEW COPYÐ2006 Pathfinder(pat)
Owners ManualÐUSA_English(nna)
07/29/05Ðcathy
X
Page 102 of 344

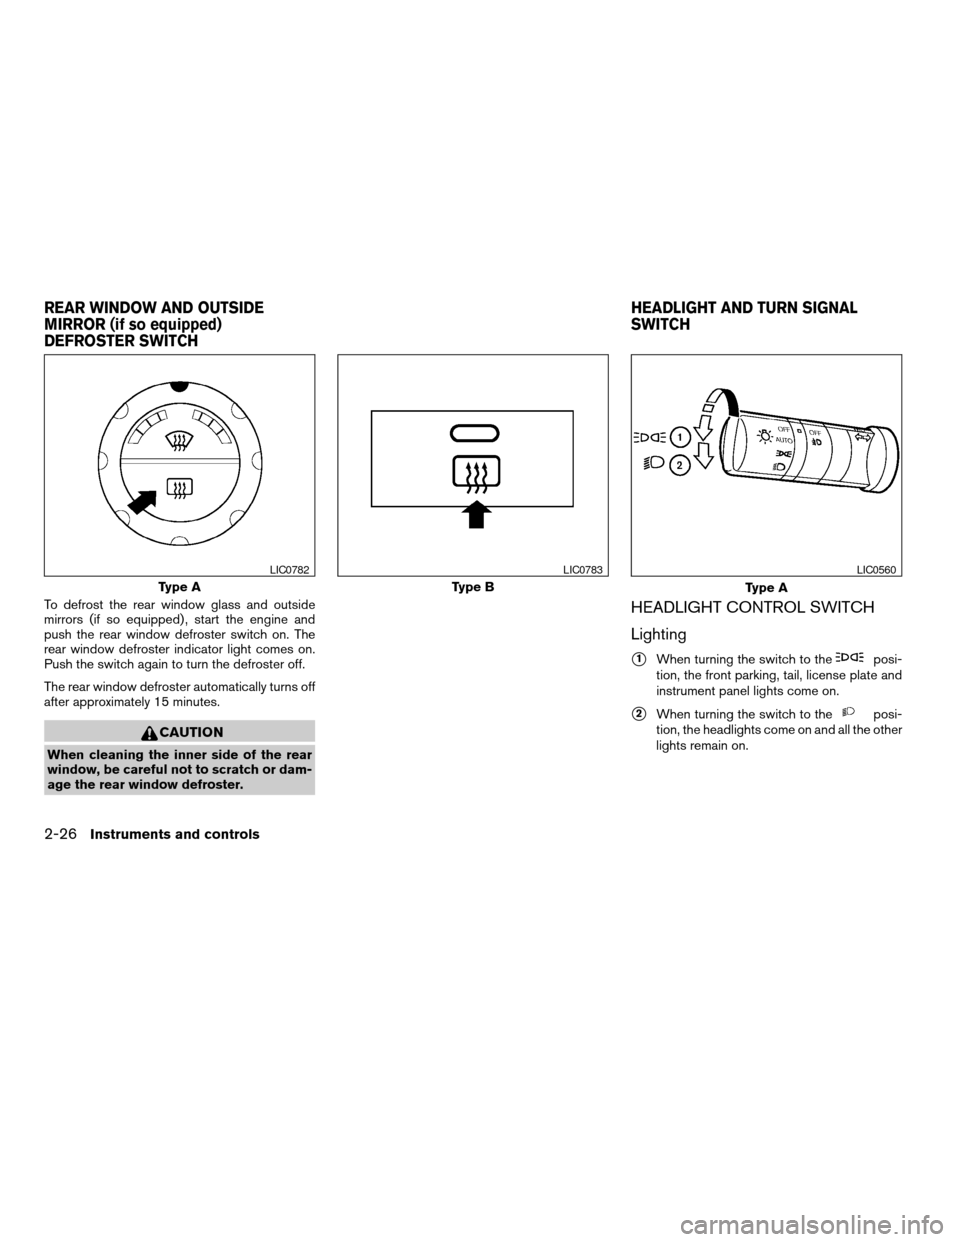
To defrost the rear window glass and outside
mirrors (if so equipped) , start the engine and
push the rear window defroster switch on. The
rear window defroster indicator light comes on.
Push the switch again to turn the defroster off.
The rear window defroster automatically turns off
after approximately 15 minutes.
CAUTION
When cleaning the inner side of the rear
window, be careful not to scratch or dam-
age the rear window defroster.
HEADLIGHT CONTROL SWITCH
Lighting
s1When turning the switch to theposi-
tion, the front parking, tail, license plate and
instrument panel lights come on.
s2When turning the switch to theposi-
tion, the headlights come on and all the other
lights remain on.
Type A
LIC0782
Type B
LIC0783
Type A
LIC0560
REAR WINDOW AND OUTSIDE
MIRROR (if so equipped)
DEFROSTER SWITCHHEADLIGHT AND TURN SIGNAL
SWITCH
2-26Instruments and controls
ZREVIEW COPYÐ2006 Pathfinder(pat)
Owners ManualÐUSA_English(nna)
07/29/05Ðcathy
X
Page 106 of 344

TURN SIGNAL SWITCH
Turn signal
s1Move the lever up or down to signal the
turning direction. When the turn is com-
pleted, the turn signals cancel automatically.
Lane change signal
s2To signal a lane change, move the lever up or
down to the point where the indicator light
begins to flash, but the lever does not latch.
FOG LIGHT SWITCH (if so equipped)
To turn the fog lights on, turn the headlight switch
to theposition, then turn the fog light
switch to theposition.
To turn the fog lights on with the headlight switch
in the AUTO position (if so equipped) , the head-
lights must be on, then turn the fog light switch to
the
position.
To turn the fog lights off, turn the fog light switch
to the OFF position.The headlights must be on and the low beams
selected for the fog lights to operate. The fog
lights automatically turn off when the high beam
headlights are selected.
LIC0563LIC0393
2-30Instruments and controls
ZREVIEW COPYÐ2006 Pathfinder(pat)
Owners ManualÐUSA_English(nna)
07/29/05Ðcathy
X
Page 107 of 344

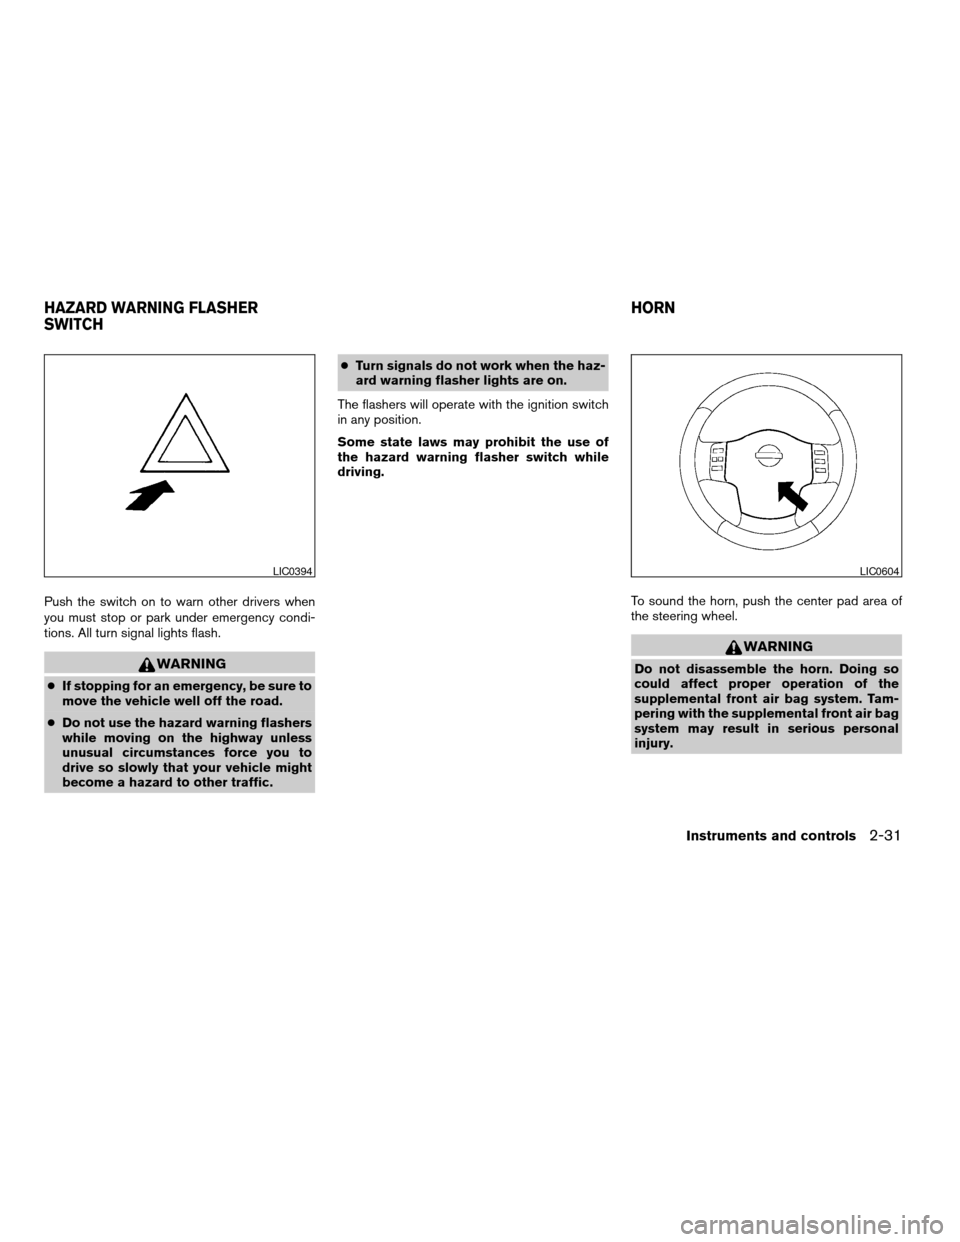
Push the switch on to warn other drivers when
you must stop or park under emergency condi-
tions. All turn signal lights flash.
WARNING
cIf stopping for an emergency, be sure to
move the vehicle well off the road.
cDo not use the hazard warning flashers
while moving on the highway unless
unusual circumstances force you to
drive so slowly that your vehicle might
become a hazard to other traffic.cTurn signals do not work when the haz-
ard warning flasher lights are on.
The flashers will operate with the ignition switch
in any position.
Some state laws may prohibit the use of
the hazard warning flasher switch while
driving.
To sound the horn, push the center pad area of
the steering wheel.
WARNING
Do not disassemble the horn. Doing so
could affect proper operation of the
supplemental front air bag system. Tam-
pering with the supplemental front air bag
system may result in serious personal
injury.
LIC0394LIC0604
HAZARD WARNING FLASHER
SWITCHHORN
Instruments and controls2-31
ZREVIEW COPYÐ2006 Pathfinder(pat)
Owners ManualÐUSA_English(nna)
07/29/05Ðcathy
X
Page 130 of 344

3. Using both hands, simultaneously press and
hold both the HomeLinkTbutton you want to
program and the hand-held transmitter but-
ton.
DO NOT release the buttons until step 4 has
been completed.4. Hold down both buttons until the indicator
light on the HomeLinkTflashes, changing
from a “slow blink” to a “rapidly flashing
blink”. This could take up to 90 seconds.
When the indicator light flashes rapidly, both
buttons may be released. The rapidly flash-
ing light indicates successful programming.
To activate the garage door or other pro-
grammed device, press and hold the pro-
grammed HomeLinkTbutton — releasing
when the device begins to activate.
5. If the indicator light on the HomeLinkTblinks
rapidly for 2 seconds and then turns solid,
HomeLinkThas picked up a “rolling code”
garage door opener signal. You will need to
proceed with the next steps to train the
HomeLinkTto complete the programming
which may require a ladder and another per-
son for convenience.
6. Press and release the “smart” or “learn” pro-
gram button located on the garage door
opener’s motor to activate the “training
mode”. This button is usually located near
the antenna wire that hangs down from the
motor. If the wire originates from under a
light lens, you will need to remove the lens to
access the program button.NOTE:
Once you have pressed and released the
program button on the garage door open-
er’s motor and the “training light” is lit, you
have 30 seconds in which to perform step 7.
Use the help of a second person for conve-
nience to assist when performing this step.
7. Within 30 seconds of pressing and releas-
ing the garage door opener program button,
quickly and firmly press and release the
HomeLinkTbutton you’ve just programmed.
Press and release the HomeLinkTbutton up
to 3 times to complete the training.
8. Your HomeLinkTbutton should now be pro-
grammed. (To program the remaining
HomeLinkTbuttons for additional door or
gate openers, follow steps 2-8 only.)
NOTE:
Do not repeat step 1 unless you want to
“clear” all previously programmed
HomeLinkTbuttons.
If you have any questions or are having difficulty
programming your HomeLinkTbuttons, refer to
the HomeLinkTweb site at: www.homelink.com
or call 1-800-355-3515.
LIC0527
2-54Instruments and controls
ZREVIEW COPYÐ2006 Pathfinder(pat)
Owners ManualÐUSA_English(nna)
07/29/05Ðcathy
X
Page 177 of 344

RADIO
Turn the ignition key to the ACC or ON position
and press the PWR (power)/VOL (volume) knob
to turn the radio on. If you listen to the radio with
the engine not running, the key should be turned
to the ACC position.
Radio reception is affected by station signal
strength, distance from radio transmitter, build-
ings, bridges, mountains and other external influ-
ences. Intermittent changes in reception quality
normally are caused by these external influences.
Using a cellular phone in or near the ve-
hicle may influence radio reception quality.
Radio reception
Your NISSAN radio system is equipped with
state-of-the-art electronic circuits to enhance ra-
dio reception. These circuits are designed to
extend reception range, and to enhance the qual-
ity of that reception.
However there are some general characteristics
of both FM and AM radio signals that can affect
radio reception quality in a moving vehicle, even
when the finest equipment is used. These char-
acteristics are completely normal in a given re-
ception area, and do not indicate any malfunction
in your NISSAN radio system.Reception conditions will constantly change be-
cause of vehicle movement. Buildings, terrain,
signal distance and interference from other ve-
hicles can work against ideal reception. De-
scribed below are some of the factors that can
affect your radio reception.
FM RADIO RECEPTION
Range: FM range is normally limited to 25 – 30
miles (40 – 48 km) , with monaural (single chan-
nel) FM having slightly more range than stereo
FM. External influences may sometimes interfere
with FM station reception even if the FM station is
within 25 miles (40 km) . The strength of the FM
signal is directly related to the distance between
the transmitter and receiver. FM signals follow a
line-of-sight path, exhibiting many of the same
characteristics as light. For example they will
reflect off objects.
Fade and drift: As your vehicle moves away from
a station transmitter, the signals will tend to fade
and/or drift.
Static and flutter: During signal interference from
buildings, large hills or due to antenna position
(usually in conjunction with increased distance
from the station transmitter) static or flutter can
be heard. This can be reduced by adjusting the
treble control to reduce treble response.Multipath reception: Because of the reflective
characteristics of FM signals, direct and reflected
signals reach the receiver at the same time. The
signals may cancel each other, resulting in mo-
mentary flutter or loss of sound.
AM RADIO RECEPTION
AM signals, because of their low frequency, can
bend around objects and skip along the ground.
In addition, the signals can be bounced off the
ionosphere and bent back to earth. Because of
these characteristics, AM signals are also sub-
ject to interference as they travel from transmitter
to receiver.
Fading: Occurs while the vehicle is passing
through freeway underpasses or in areas with
many tall buildings. It can also occur for several
seconds during ionospheric turbulence even in
areas where no obstacles exist.
Static: Caused by thunderstorms, electrical
power lines, electric signs and even traffic lights.
SATELLITE RADIO RECEPTION (if so
equipped)
When the satellite radio is first installed or the
battery has been replaced, the satellite radio may
not work properly. This is not a malfunction. Wait
more than 10 minutes with satellite radio ON and
AUDIO SYSTEM
Display screen, heater, air conditioner and audio systems4-25
ZREVIEW COPYÐ2006 Pathfinder(pat)
Owners ManualÐUSA_English(nna)
07/29/05Ðcathy
X
Page 179 of 344

cDo not use the following CDs as they
may cause the CD player to malfunc-
tion:
c3.1 in (8 cm) discs with an adapter
cCDs that are not round
cCDs with a paper label
cCDs that are warped, scratched, or
have abnormal edges
cThis audio system can only play pre-
recorded CDs. It has no capability to
record or burn CDs.
cIf the CD cannot be played, one of the
following messages will be displayed.
CHECK DISC:
c
Confirm that the CD is inserted cor-
rectly (the label side is facing up, etc.) .
cConfirm that the CD is not bent or
warped and it is free of scratches.
PUSH EJECT:
This is an error due to excessive tem-
perature inside the player. Remove the
CD by pushing the EJECT button. After
a short time, reinsert the CD. The CD
can be played when the temperature of
the player returns to normal.UNPLAYABLE:
The file is unplayable in this audio sys-
tem (only MP3 CD) .
Compact Disc with MP3
Terms:
cMP3 — MP3 is short for Moving Pictures
Experts Group Audio Layer 3. MP3 is the
most well-known compressed digital audio
file format. This format allows for near “CD
quality” sound, but at a fraction of the size of
normal audio files. MP3 conversion of an
audio track from CD-ROM can reduce the
file size by approximately a 10:1 ratio with
virtually no perceptible loss in quality. MP3
compression removes the redundant and
irrelevant parts of a sound signal that the
human ear doesn’t hear.
cBit rate — Bit rate denotes the number of
bits per second used by a digital music file.
The size and quality of a compressed digital
audio file is determined by the bit rate used
when encoding the file.
cSampling frequency — Sampling frequency
is the rate at which the samples of a signal
are converted from analog to digital (A/D
conversion) per second.cID3 tag — The ID3 tag is the part of the
encoded MP3 file that contains information
about the digital music file such as song title,
artist, album title, encoding bit rate, track
time duration, etc. ID3 tag information is
displayed on the Album/Artist/Track title line
on the display.
Display screen, heater, air conditioner and audio systems4-27
ZREVIEW COPYÐ2006 Pathfinder(pat)
Owners ManualÐUSA_English(nna)
07/29/05Ðcathy
X
Page 184 of 344

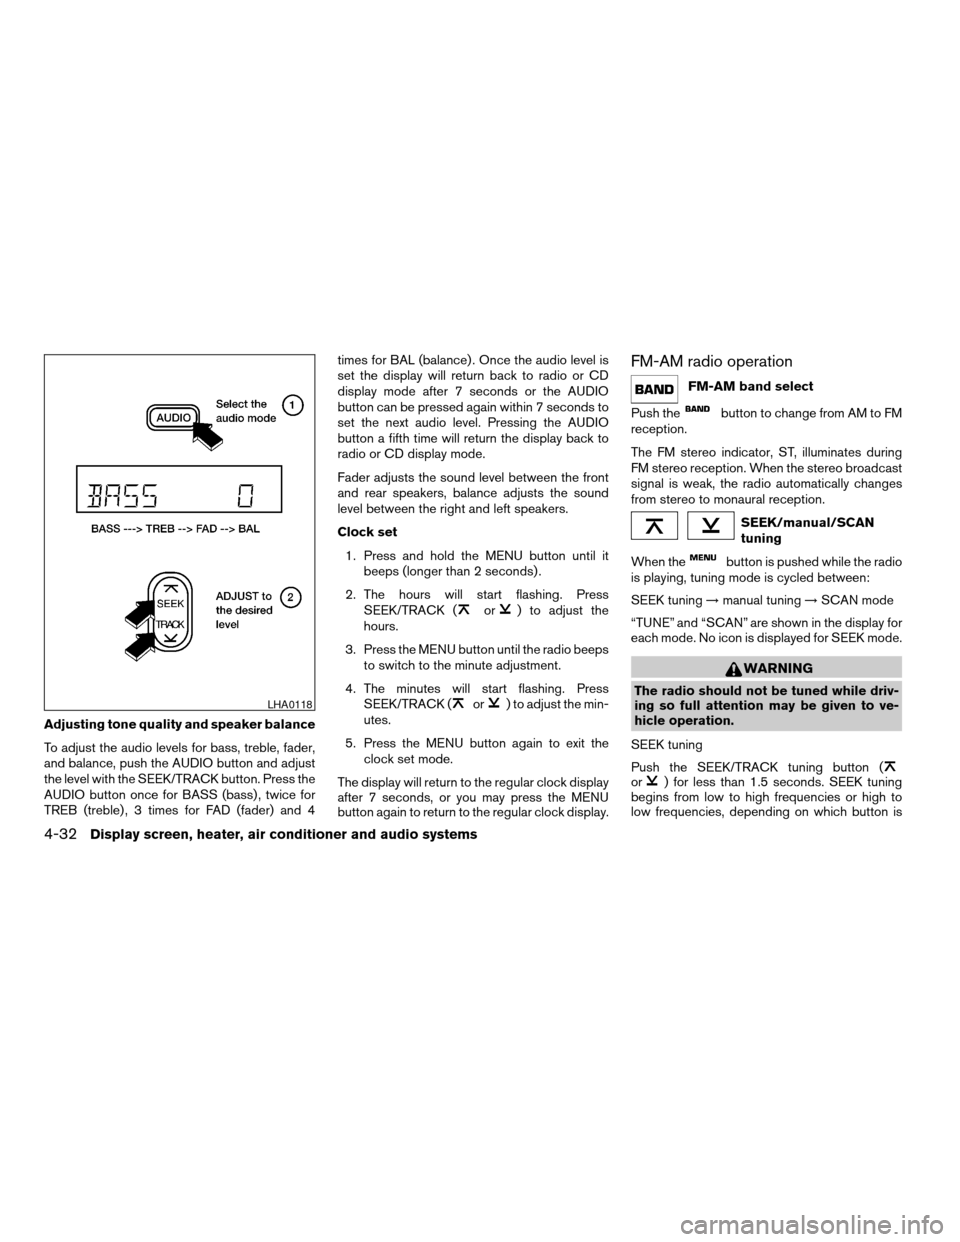
Adjusting tone quality and speaker balance
To adjust the audio levels for bass, treble, fader,
and balance, push the AUDIO button and adjust
the level with the SEEK/TRACK button. Press the
AUDIO button once for BASS (bass) , twice for
TREB (treble) , 3 times for FAD (fader) and 4times for BAL (balance) . Once the audio level is
set the display will return back to radio or CD
display mode after 7 seconds or the AUDIO
button can be pressed again within 7 seconds to
set the next audio level. Pressing the AUDIO
button a fifth time will return the display back to
radio or CD display mode.
Fader adjusts the sound level between the front
and rear speakers, balance adjusts the sound
level between the right and left speakers.
Clock set
1. Press and hold the MENU button until it
beeps (longer than 2 seconds) .
2. The hours will start flashing. Press
SEEK/TRACK (
or) to adjust the
hours.
3. Press the MENU button until the radio beeps
to switch to the minute adjustment.
4. The minutes will start flashing. Press
SEEK/TRACK (
or) to adjust the min-
utes.
5. Press the MENU button again to exit the
clock set mode.
The display will return to the regular clock display
after 7 seconds, or you may press the MENU
button again to return to the regular clock display.
FM-AM radio operation
FM-AM band select
Push the
button to change from AM to FM
reception.
The FM stereo indicator, ST, illuminates during
FM stereo reception. When the stereo broadcast
signal is weak, the radio automatically changes
from stereo to monaural reception.
SEEK/manual/SCAN
tuning
When the
button is pushed while the radio
is playing, tuning mode is cycled between:
SEEK tuning!manual tuning!SCAN mode
“TUNE” and “SCAN” are shown in the display for
each mode. No icon is displayed for SEEK mode.
WARNING
The radio should not be tuned while driv-
ing so full attention may be given to ve-
hicle operation.
SEEK tuning
Push the SEEK/TRACK tuning button (
or) for less than 1.5 seconds. SEEK tuning
begins from low to high frequencies or high to
low frequencies, depending on which button is
LHA0118
4-32Display screen, heater, air conditioner and audio systems
ZREVIEW COPYÐ2006 Pathfinder(pat)
Owners ManualÐUSA_English(nna)
07/29/05Ðcathy
X