2006 NISSAN PATHFINDER CD player
[x] Cancel search: CD playerPage 192 of 344

The DVD player can be turned off from the radio
by selecting the DVD mode and pushing the
radio power button. The DVD player will turn off
and the radio will go to the last selected mode.
The DVD player can be operated by remote con-
trol or by the DVD entertainment system located
in the center console.
CD EJECT:
Current disc:
cPress the slot number (1 – 6) for the desired
disc, then press the
button. The com-
pact disc will be ejected. If the disc is not
removed within 15 seconds, the disc will
reload.
All discs:
cPress and hold the
button for more
than 1.5 seconds. The compact discs will be
ejected one by one. If a disc is not removed
within 15 seconds, or the
button is
pressed again during the eject sequence,
the entire disc eject sequence will be can-
celed.
When this button is pushed while the compact
disc is being played, the compact disc will eject
and the last source will be played.CD IN indicator:
The slot numbers (1 – 6) will illuminate if CDs
have been loaded into the changer in CD mode
only.
4-40Display screen, heater, air conditioner and audio systems
ZREVIEW COPYÐ2006 Pathfinder(pat)
Owners ManualÐUSA_English(nna)
07/29/05Ðcathy
X
Page 196 of 344

SEEK tuning:
Push the SEEK/TRACK button (
or)
for less than 1.5 seconds to tune from high to low
or low to high frequencies and stop at the next
broadcasting station.
To seek quickly through the channels, press and
hold the SEEK/TRACK button for more than 1.5
seconds. When the button is released the radio
will seek to the next broadcasting station.
SCAN tuning
Push the SCAN button. SCAN illuminates in the
display window. SCAN tuning begins from low to
high frequencies. SCAN tuning stops for 5 sec-
onds at each broadcasting station that has suffi-
cient signal strength. When scanning, SCAN
blinks in the display. Pushing the SCAN button
again during this 5 second period stops SCAN
tuning and the radio remains tuned to that station.
PRESET A-B-C (Station memory opera-
tions):
18 stations can be set for the FM, AM and SAT
(Satellite-if so equipped) radio to the A, B and C
preset button in any combination of FM, AM or
SAT stations.
1. Choose preset channel A, B or C using the
preset select button.2. Select the desired FM, AM or SAT station
band.
3. Tune to the desired station using manual,
SEEK or SCAN tuning. Push and hold any of
the desired station memory buttons (1 – 6)
until a beep sound is heard.
4. The channel indicator will then come on and
the sound will resume. Memorizing is now
complete.
5. Other buttons can be set in the same man-
ner.
If the battery cable is disconnected, or if the fuse
opens, the radio memory will be canceled. In that
case, reset the desired stations.
Radio data system (RDS):
RDS stands for Radio Data System, and is a data
information service transmitted by some radio
stations on the FM band (not AM band) . Cur-
rently, most RDS stations are in large cities, but
many stations are now considering broadcasting
RDS data.
RDS can display:
cStation call sign, such as “WHFR 98.3”.
cStation name, such as “The Groove”.
If the station broadcasts RDS information, the
RDS icon is displayed.
Compact disc (CD) changer operation
CAUTION
cDo not force a compact disc into the CD
insert slot. This could damage the CD
and/or CD changer/player.
cTrying to load a CD with the CD door
closed could damage the CD and/or CD
changer.
Turn the ignition key to the ACC or ON position
and insert the compact disc into the slot with the
label side facing up. The compact disc will be
guided automatically into the slot and start play-
ing. To insert the disc, first push the LOAD button.
If the radio is already operating, it will automati-
cally turn off and the compact disc will play.
If the system has been turned off while the com-
pact disc was playing, pushing the
POWER/VOLUME control knob will start the
compact disc.
Do not use 3.1 in (8 cm) diameter compact discs
in the CD changer.
4-44Display screen, heater, air conditioner and audio systems
ZREVIEW COPYÐ2006 Pathfinder(pat)
Owners ManualÐUSA_English(nna)
07/29/05Ðcathy
X
Page 197 of 344

LOAD button:
To insert a CD in the CD changer, push the LOAD
button for less than 1.5 seconds. Select the
loading slot by pushing the CD insert select
button (1 – 6) , then insert the CD.
To insert 6 CDs to the CD changer, push the
LOAD button for more than 1.5 seconds.
The slot numbers (1 – 6) will illuminate on the
display when CDs are loaded into the changer.
CD button:
When the CD button is pushed with the system
off and the compact disc loaded, the system will
turn on and the compact disc will start to play.
When the CD button is pushed with the compact
disc loaded with the radio playing, the radio will
automatically be turned off and the compact disc
will start to play.
SEEK/TRACK:
When the
button is pushed for less than 1.5
seconds while a compact disc is playing, the
track being played returns to its beginning. Push
several times to skip back through tracks. The
compact disc will go back the number of times
the button is pushed.
When the
button is pushed for less than 1.5
seconds while the compact disc is playing, thenext track will start to play from its beginning.
Push several times to skip through tracks. The
compact disc will advance the number of times
the button is pushed. (When the last track on the
compact disc is skipped through, the first track
will be played.)
When the
orbutton is pushed for
more than 1.5 seconds while a CD is playing, the
CD plays at an increased speed while fast for-
warding or rewinding through the existing track
being played. When the button is released the
CD returns to normal play speed.
CD select buttons:
To play another CD that has been loaded, push a
CD select button (1 – 6) .
RPT:
When the RPT play button is pushed while the
compact disc is played, the play pattern can be
changed as follows:
ALL DISC RPT!1 DISC RPT!1 TRACK RPT
!ALL DISC RDM!1 DISC RDM!ALL DISC
RPT
ALL DISC RPT: All discs loaded will be repeated.
1 DISC RPT: The disc that is currently playing will
be repeated.
1 TRACK RPT: The track that is currently playing
will be repeatedALL DISC RDM: Tracks from all discs will be
played randomly
1 DISC RDM: Tracks from the disc that is cur-
rently playing will be played randomly
REAR AV (if so equipped):
Press the Rear AV button to toggle the radio
between CD and DVD modes. When the radio
goes into DVD mode and the DVD player is off
the DVD player will turn on. When the DVD player
is on radio or CD can be selected. The DVD
player will remain on and broadcast audio
through the headphones in the rear of the vehicle.
The DVD player can be turned off from the radio
by selecting the DVD mode and pushing the
radio power button. The DVD player will turn off
and the radio will go to the last selected mode.
The DVD player can be operated by remote con-
trol or by the DVD entertainment system located
in the center console.
CD EJECT:
Current disc:
cPress the slot number (1 – 6) for the desired
disc, then press the
button. The com-
pact disc will be ejected. If the disc is not
removed within 15 seconds, the disc will
reload.
Display screen, heater, air conditioner and audio systems4-45
ZREVIEW COPYÐ2006 Pathfinder(pat)
Owners ManualÐUSA_English(nna)
07/29/05Ðcathy
X
Page 200 of 344

CAUTION
cThe glass screen on the liquid crystal
display may break if hit with a hard or
sharp object. If the glass breaks, do not
touch the liquid crystalline material,
which contains a small amount of mer-
cury. In case of contact with skin, wash
immediately with soap and water.
cUse a damp, soft cloth when cleaning
the Mobile Entertainment System com-
ponents. Do not use solvents or clean-
ing solutions.
cDo not attempt to use the system in
extreme temperature conditions [below
-4°F (-20°C) or above 158°F (70°C)].
cTo avoid draining the vehicle battery, do
not operate the system more than 15
minutes without starting the engine.
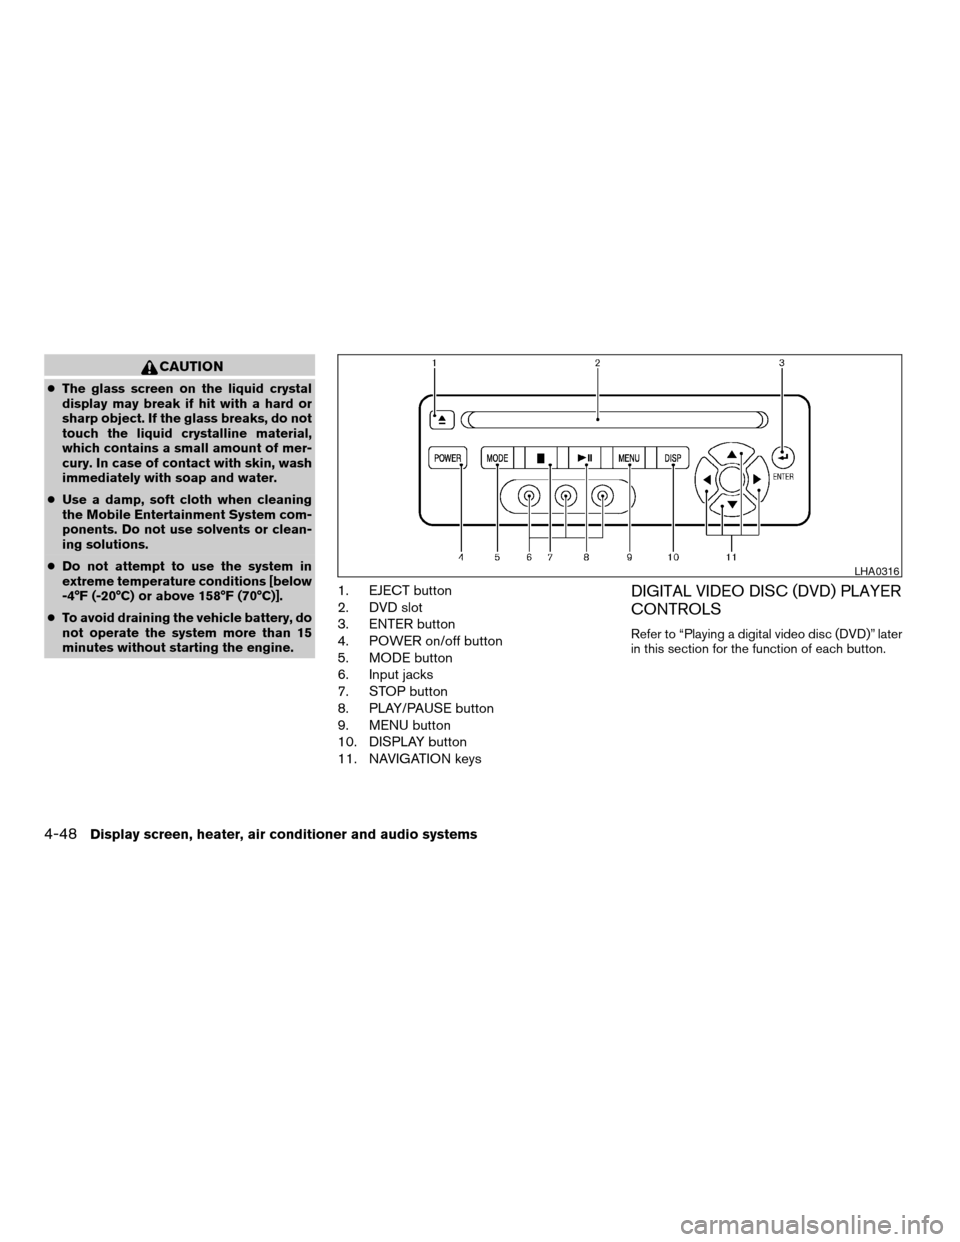
1. EJECT button
2. DVD slot
3. ENTER button
4. POWER on/off button
5. MODE button
6. Input jacks
7. STOP button
8. PLAY/PAUSE button
9. MENU button
10. DISPLAY button
11. NAVIGATION keysDIGITAL VIDEO DISC (DVD) PLAYER
CONTROLS
Refer to “Playing a digital video disc (DVD)” later
in this section for the function of each button.
LHA0316
4-48Display screen, heater, air conditioner and audio systems
ZREVIEW COPYÐ2006 Pathfinder(pat)
Owners ManualÐUSA_English(nna)
07/29/05Ðcathy
X
Page 203 of 344

PLAYING A DIGITAL VIDEO DISC
(DVD)
CAUTION
cOnly operate the DVD while the vehicle
engine is running. Operating the DVD
for extended periods of time with the
engine OFF can discharge the vehicle
battery.
cDo not allow the system to get wet.
Excessive moisture such as spilled liq-
uids may cause the system to
malfunction.
cThe driver must not attempt to wear the
headphones while the vehicle is in mo-
tion so that full attention may be given
to vehicle operation.
cWhile playing video CD media, this DVD
player does not guarantee complete
functionality of all video CD formats.
With the DVD player, you can hear DVD videos,
video CDs and CDs using headphones. Passen-
gers in the rear seat can enjoy the sound inde-
pendently of the front seat.
Press the REAR AV button located on the front
controls to hear the sound of the DVD player
through the speakers.It is possible to operate the DVD player by remote
control.
Headphones are a wireless type and no cables
are necessary. You can use them in almost all the
ranges in the rear seat. (It is not possible to use
the headphones in the front seat.)
POWER on/off button:
With the ignition switch turned to the ACC or ON
position, push the POWER button to turn the
DVD player on or off.
Insert the DVD into the slot with the label side
facing up. The DVD will be guided automatically
into the slot.
If the DVD player is off and a DVD is inserted, the
DVD player will automatically turn on.
CAUTION
Do not force the compact disc into the
slot. This could damage the player.
MODE select button:
Push the Mode button to select Audio/Video
source between DVD and AUX input (input jacks
on the faceplate, Red = right channel audio input,
White = left channel audio input, and Yellow =
Video input) .The display will show the “AUX” in the upper left
corner of the display for 4 seconds once the
Mode is changed to AUX.
To use the input jacks, refer to “Auxiliary input
jacks” in this section.
orPLAY:
When the PLAY/PAUSE button on the player or
the PLAY button on the remote control is pushed,
the player will play.
In play mode, the display will briefly show
on the upper left corner of the display.
FF (Fast Forward) , REW
(Remote control only):
Push FAST FORWARD/FAST REVERSE but-
tons to carry out the fast forward or fast reverse
presentation at 5 times normal play speed.
Push FAST FORWARD/FAST REVERSE but-
tons again or PLAY button to resume the normal
play speed.
NEXT CHAPTER/
PREVIOUS CHAPTER
(Remote control only):
When the
(NEXT CHAPTER) button is
pushed while the DVD is being played, the pro-
gram next to the present one will start to play from
its beginning. Push several times to skip through
Display screen, heater, air conditioner and audio systems4-51
ZREVIEW COPYÐ2006 Pathfinder(pat)
Owners ManualÐUSA_English(nna)
07/29/05Ðcathy
X
Page 204 of 344

programs. The DVD will advance the number of
times the button is pushed. When
the
(PREVIOUS CHAPTER) button is
pushed, the program being played returns to its
beginning. Push several times to skip back
through programs. The DVD will go back the
number of times the button is pushed.
orPAUSE:
When the PLAY/PAUSE button on the player or
the PAUSE button on the remote control is
pushed, the player will pause playing of the me-
dia. In pause mode, the player will show
on
the upper left corner of the display until the player
is changed to another mode.
STOP:
Push the STOP button once to stop playing the
media. The display will show
in the upper
left corner of the display for 4 seconds, and the
last disc position will be stored. When the PLAY
button is pushed again, it will resume at the
stored disc track and time position.
If the STOP button is pushed again when the
player is already in Stop mode, it will reinitialize
the pointer to the beginning of the disc. In effect it
will ignore the last stored disc position and upon
receipt of the next play message it will begin at
the Title Menu, or at “the beginning of the disc”.
EJECT:
When the EJECT button is pushed with the DVD
loaded, it will be ejected.
The display will show the EJECT symbol
in
the upper left corner of the display for 4 seconds
once the EJECT button is pushed.
If the DVD is not loaded, the display will show
“NO DISC”.
If the DVD comes out and is not removed within
25 seconds, it will be pulled back into the slot to
protect it.
DISPLAY:
If the DISPLAY control is pushed for less than 2
seconds, the display menu will appear on the
screen.
cThe display menu will remain on the screen
for 10 seconds if no subsequent control
activations occur.
cUse NAVIGATION KEYS to navigate within
the display menu, and use ENTER to select
the item.
cHolding the DISPLAY control on the face-
plate for longer than approximately 2 sec-
onds while in the display menu will reset the
display characteristics to their nominal val-
ues. (Faceplate feature only)If the DISPLAY control button on the faceplate is
pushed for more than 2 seconds, the media
track/time information will be displayed along the
bottom of the display. Pushing the DISPLAY con-
trol for more than 2 seconds will remove the
media track/time information from the display.
(Faceplate feature only)
NAVIGATION KEYS:
If media is in PLAY mode, activation of the NAVI-
GATION KEYS (Up, Down, Left, and Right) will
perform the following functions: next
chapter/track, previous chapter/track, fast re-
verse and fast forward, and the display will
show
,,andrespec-
tively in the upper left corner of the display for 4
seconds. (Faceplate feature only)
If media is in PAUSE mode, activation of the
NAVIGATION KEYS (Up, Down and Right) will
perform the following functions: next
chapter/track, previous chapter/track and slow
forward, and the display will show
,and a forward arrow symbol respectively in the
upper left corner of the display for 4 seconds.
(Faceplate feature only)
If media is in activated MENU mode, the NAVI-
GATION KEYS will be used to navigate Up,
Down, Left, and Right within the menu.
4-52Display screen, heater, air conditioner and audio systems
ZREVIEW COPYÐ2006 Pathfinder(pat)
Owners ManualÐUSA_English(nna)
07/29/05Ðcathy
X
Page 205 of 344

If display control menu is on, the NAVIGATION
KEYS will be used to navigate Up, Down, Left,
and Right within the menu.
ENTER:
In MENU mode, push the ENTER button to select
MENU items.
In the display menu, push the ENTER button to
select items for modification, as per the on-
screen instructions.
MENU:
If the media is in PLAY mode and the MENU
button is pressed, the DVD menu will appear on
the screen. Use Navigation Keys to navigate
within the menu, and use ENTER to select the
item.
Push the MENU button again to return to PLAY
mode.
TITLE (Remote control only):
Push TITLE button to return the DVD media to the
“title” of the DVD.
Push TITLE button again to return to the previous
stop point and play.
BACK (Remote control only):
Push the BACK button to exit the current active
menu and return to the previous menu.SUBTITLE (Remote control only):
Push the SUBTITLE button to call up subtitle
selection menu.
Repeatedly press the SUBTITLE button to cycle
through each available subtitle.
AUDIO (Remote control only):
Push the AUDIO button to call up audio menu.
Repeatedly press the AUDIO button to cycle
through each available audio track.
ANGLE (Remote control only):
Push the ANGLE button to call up camera angle
menu.
Repeatedly press the ANGLE button to cycle
through each available angle.
CLEAR (Remote control only):
Push the CLEAR button to clear all numeric in-
puts, if actuated prior to expiration of the
3-second timer.
NUMERIC KEYPAD (0–9 &¸10) (Remote
control only):
Push the NUMERIC KEYPAD to directly access
disc chapters, titles or tracks by inputting their
numeric value.The “¸10” button input numbers greater than or
equal to 10, allowing up three digits to be input
for selecting chapter/title/track number.
The subsequent actuation of numeric buttons will
continuously shift the previously input number to
the “left”.
The chapter/title/track number will be automati-
cally selected (if valid, based on media content) if
3 seconds expire without any keypad inputs.
The operator can cancel the input
chapter/title/track number by actuating the
CLEAR control prior to the expiration of the
3-second timer.
These functions can be used only for the DVD
discs which correspond to them.
Auxiliary input jacks
The auxiliary input jacks are located on the control
panel. Compatible devices such as video games
camcorders and portable video players can be
connected to the auxiliary jacks.
The auxiliary jacks are color coded for identifica-
tion purposes.
cYellow - video input
cWhite - left channel audio input
cRed - right channel audio input
Display screen, heater, air conditioner and audio systems4-53
ZREVIEW COPYÐ2006 Pathfinder(pat)
Owners ManualÐUSA_English(nna)
07/29/05Ðcathy
X
Page 206 of 344

CARE AND MAINTENANCE
Use a lightly dampened, lint free cloth to clean the
surfaces of your NISSAN mobile entertainment
system. (DVD player face, screen, remote con-
trol, etc.)
CAUTION
cDo not use any solvents or cleaning
solutions when cleaning the video
system.
cDo not use excessive force on the moni-
tor screen.
cAvoid touching or scratching the moni-
tor screen as it may become dirty or
damaged.
cDo not attempt to use the system in
extreme temperature conditions [below
-4°F (-20°C) or above 158°F (70°C)].
cDo not attempt to operate the system in
extreme humidity conditions (less than
10% or more than 75%) .
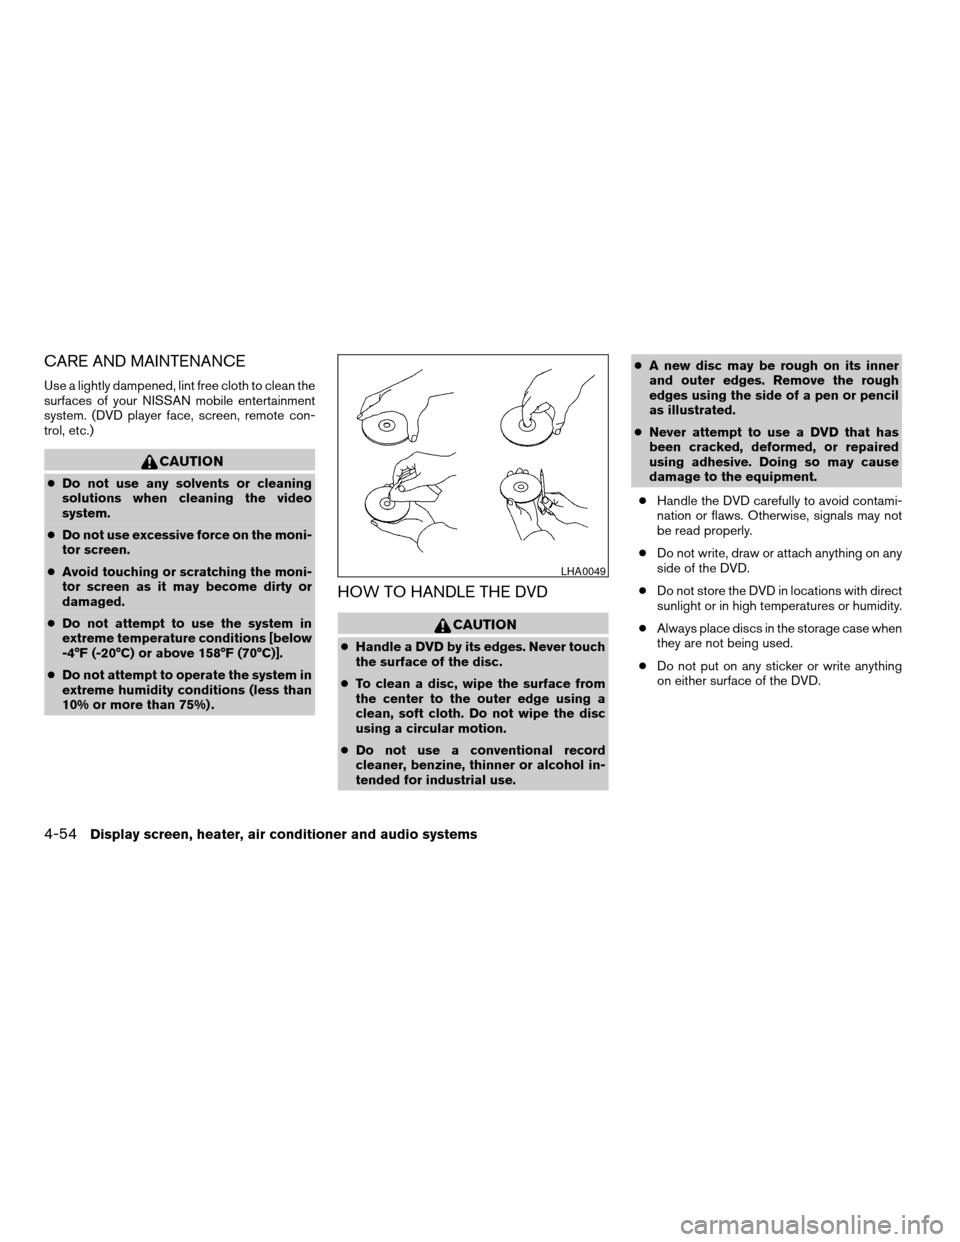
HOW TO HANDLE THE DVD
CAUTION
cHandle a DVD by its edges. Never touch
the surface of the disc.
cTo clean a disc, wipe the surface from
the center to the outer edge using a
clean, soft cloth. Do not wipe the disc
using a circular motion.
cDo not use a conventional record
cleaner, benzine, thinner or alcohol in-
tended for industrial use.cA new disc may be rough on its inner
and outer edges. Remove the rough
edges using the side of a pen or pencil
as illustrated.
cNever attempt to use a DVD that has
been cracked, deformed, or repaired
using adhesive. Doing so may cause
damage to the equipment.
cHandle the DVD carefully to avoid contami-
nation or flaws. Otherwise, signals may not
be read properly.
cDo not write, draw or attach anything on any
side of the DVD.
cDo not store the DVD in locations with direct
sunlight or in high temperatures or humidity.
cAlways place discs in the storage case when
they are not being used.
cDo not put on any sticker or write anything
on either surface of the DVD.
LHA0049
4-54Display screen, heater, air conditioner and audio systems
ZREVIEW COPYÐ2006 Pathfinder(pat)
Owners ManualÐUSA_English(nna)
07/29/05Ðcathy
X