2006 NISSAN NOTE passenger
[x] Cancel search: passengerPage 93 of 235
Dehumidified defrosting or defogging:
1. Turn the air flow control dial to the
position.
2. Turn the fan speed control dial to the desired
position.
3. Turn the temperature control dial for the desired
temperature.
•To quickly remove ice from the outside of the
windscreen, turn the fan speed control dial to
the maximum position.
•As soon as possible after the windscreen has
been cleared of ice, turn the fan speed control
dial to the AUTO position for the automatic mode.
•When the air flow control dial is turned to theorposition, the outside air mode and
the air conditioner will automatically switch on
(except when the fan speed control dial is in the
OFF position) when the outside temperatures is
above −5°C (23°F) to defog the windscreen.
Outside air is drawn into the passenger com-
partment to improve the defogging performance.
Manual operation
Fan speed controlm:
Turn the fan speed control dial:
– to the OFF position to switch off the heater and
air conditioner system.
– to the AUTO position for automatic control of the
fan speed.
– to adjust the fan speed.Temperature control:
Turn temperature dial to set the desired air tempera-
ture.
Air flow control:
Turn the air flow control dial to one of following air
mode.
m
Air flows from centre and side vents.
m
Air flows from centre, side vents and
floor outlets.
mAir flows mainly from floor outlets.
m
Air flows from the defogger outlets and
floor outlets.
mAir flows mainly from defogger outlets.
Air recirculation
m:
Press the air intake button until the air recirculation
indicator light (
) comes on. When selected,
interior air will be recirculated inside the vehicle and
the air conditioner will switch on.
Use this mode to recirculate interior air inside the
passenger compartment in situations such as: driv-
ing on a dust raised road, avoiding traffic fumes or
having maximum cooling from the air conditioner.Outside air circulation
m:
Press the air intake button until outside air indicator
light (
) comes on. When selected, outside air
will be drawn into the vehicle.
Use this mode to draw outside air into the passen-
ger compartment for normal heating, ventilation or
air conditioner operation.
Operating tips
•In order to improve the heater operation, clear
the snow and ice from the wiper blade and air
inlet in front of the windscreen.
•When the engine coolant temperature and out-
side air temperature are low, the air flow from
the floor outlets may not operate for a maximum
of approximately 150 seconds. However, this is
not a malfunction. After the coolant temperature
has warmed up, the air flow from the floor outlets
will operate normally.
•After parking in the sun, drive for two or three
minutes with the windows open to vent hot air
from the passenger compartment. Then, close
the windows. This will allow the acceleration of
the air conditioner’s cooling operation.
•Keep the windows closed while the air condi-
tioner is operating.
•The air conditioning system should be operated
for approximately 10 minutes at least once a
month. This helps prevent damage to the system
due to lack of lubrication.
Heater and air conditioner, and audio system4-9
Page 96 of 235

•The USB player sometimes cannot function
when the passenger compartment temperature
is extremely high. Decrease the temperature be-
fore use.
•Do not leave USB memory in a place prone to
static electricity or where the air conditioner
blows directly. The data in the USB memory may
be damaged.
•The vehicle is not equipped with a USB memory
stick.
•A USB device cannot be formatted with this sys-
tem. To format a USB device, use a personal
computer.
•Partitioned USB devices may not be played cor-
rectly.
•Some characters used in other languages (Chi-
nese, Japanese, etc.) are not displayed properly
on the vehicle centre screen. Using English lan-
guage characters with a USB device is recom-
mended.
•Do not connect a USB device if a connector or
cable is wet. Allow the cable and/or connectors
to dry completely before connecting the USB
device. If the connector is exposed to fluids other
than water, evaporative residue may cause a
short between the connector pins.
•Large video podcast files cause slow responses
in an iPod®. The display of the audio system
may momentarily black out, but it will soon re-
cover.
•If an iPod® automatically selects large video
podcast files while in the shuffle mode. The dis-
play of the audio system may momentarily black
out, but it will soon recover.
•Some iPod® operations may not be available
with this system.
•At the time of publication, this audio system was
tested with the latest iPod® players available.
Due to the frequent update of consumer devices
like MP3 players, NISSAN cannot guarantee that
all new iPods launched will be compatible with
this audio system.
•Make sure that the iPod® is updated with the lat-
est firmware.
•iPod® is trademarks of Apple Inc., registered in
the U.S. and other countries.
Bluetooth® audio player (where fitted)
•Some Bluetooth® audio devices may not be
used with this system. For detailed information
about Bluetooth® audio devices that are avail-
able for use with this system, contact a NISSAN
dealer or qualified workshop.
•Before using a Bluetooth® audio system, the ini-
tial registration process for the audio device is
necessary.
•Operation of the Bluetooth® audio system may
vary depending on the audio device that is con-
nected. Confirm the operation procedure before
use.
•The playback of Bluetooth® audio will be paused
under the following conditions. The playback will
be resumed after the following conditions are
completed:
– while using a mobile phone.
– while checking a connection with a mobile
phone.
•The in-vehicle antenna for Bluetooth® communi-
cation is built in the audio system. Do not place
the Bluetooth audio device in an area surrounded
by metal, far away from the system, or in a nar-
row space where the device closely contacts the
body or the seat. Otherwise, sound degradation
or connection interference may occur.
•While a Bluetooth® audio device is connected
through the Bluetooth wireless connection, the
battery power of the device may discharge
quicker than usual.
•This system is compatible with the Bluetooth®
AV profile (A2DP and AVRCP ver. 1.3, 1.0 or
earlier).
m
Bluetooth® is a trademark
owned by Bluetooth SIG, Inc.,
and licensed to Daewoo IS
Corp.
4-12Heater and air conditioner, and audio system
Page 126 of 235

During the first 1,600 km (1,000 miles), follow these
recommendations for the future reliability and
economy of your new vehicle. Failure to follow the
recommendations may result in shortened engine
life and reduced engine performance.
•Avoid driving for long periods at a constant
speed, either fast or slow.
•Do not accelerate at full throttle in any gear.
•Avoid quick starts.
•Avoid hard braking as much as possible.
•Do not tow a trailer during the first 800 km (500
miles).
NOTE
Models with K9K diesel engine will achieve top
performance only after approximately 5,000 km
(3,000 miles).
WARNING
The driving characteristics of your vehicle can be
changed remarkably by any additional load and
its distribution as well as by adding optional
equipment (trailer couplings, roof racks, etc.).
Your driving style and speed have to be adjusted
accordingly. Especially when carrying heavy
loads, your speed must be reduced adequately.
•Make sure the area around the vehicle is free of
obstacles.
•Check fluid levels such as engine oil, coolant,
brake and clutch fluid, and window washer fluid
as frequently as possible, at least whenever you
refuel.
•Visually inspect tyres for their appearance and
condition. Also check the tyre pressure for
proper inflation.
•Maintenance items in the “8. Maintenance and
do-it-yourself” section should be checked peri-
odically.
•Check that all windows and light lenses are
clean.
•Check that all doors are closed.
•Position the seat and adjust the head restraints.
•Adjust the inside and outside mirrors.
•Fasten your seat belt and ask all passengers to
do likewise.
•Check the operation of the warning/indicator
lights when the ignition switch is turned to the
ON position.
•Do not place hard or heavy objects on the dash-
board or rear parcel shelf in order to prevent
injury in the event of a sudden stop.
RUNNING-IN SCHEDULE BEFORE STARTING THE ENGINE
5-2Starting and driving
Page 127 of 235
WARNING
•Do not leave children or adults who would
normally require the support of others alone
in your vehicle. Pets should also not be left
alone. They could accidentally injure them-
selves or others through inadvertent opera-
tion of the vehicle. Also, on hot, sunny days,
temperatures in a closed vehicle could quickly
become high enough to cause severe or pos-
sibly fatal injuries to people or animals.
•To prevent luggage or packages from sliding
forward during braking, do not stack anything
in the cargo area higher than the seatbacks.
•Secure all cargo with ropes or straps to pre-
vent it from sliding or shifting.
•Failure to follow proper seating instructions
see “Seats” in the “1. Safety — seats, seat
belts and supplemental restraint system” sec-
tion, could result in serious personal injury in
an accident or sudden stop.
EXHAUST GAS (Carbon Monoxide)
WARNING
•Do not breathe exhaust gases; they contain
colourless and odourless carbon monoxide.
Carbon monoxide is a dangerous gas and can
cause unconsciousness or death.
•If you suspect that exhaust fumes are enter-
ing the vehicle, drive with all windows fully
open and have the vehicle inspected immedi-
ately.
•Do not run the engine in closed spaces, such
as a garage, for any longer than is absolutely
necessary.
•Do not park the vehicle with the engine run-
ning for any extended length of time.
•Keep the back door closed while driving, oth-
erwise exhaust gases could be drawn into the
passenger compartment. If you must drive in
this way for some reason, take the following
steps:
1) Open all the windows.
2) Manual air conditioner equipped models:
Move the air intake lever to the
posi-
tion.
Automatic air conditioner equipped mod-
els: Switch on the outside air mode.
3) Set the fan speed control to the maximum
position to circulate the air.
•If electrical wiring or other cable connections
must pass to a trailer through the seal of the
body, follow the manufacturer’s recommen-
dations to prevent carbon monoxide entry into
the vehicle.
•When a vehicle has been stopped in an open
area with its engine running for any significant
length of time, turn the fan on to force outside
air into the vehicle.
•The exhaust system and body should be in-
spected by a NISSAN dealer or qualified work-
shop whenever:
– the vehicle is raised for service.
– you suspect that exhaust fumes are enter-
ing into the passenger compartment.
– you notice a change in the sound of the
exhaust system.
– you have had an accident involving dam-
age to the exhaust system, underbody, or
rear of the vehicle.
PRECAUTIONS WHEN STARTING
AND DRIVING
Starting and driving5-3
Page 148 of 235
•Turn the ignition switch to the LOCK position
and remove the key/Intelligent Key (where fit-
ted).Your new vehicle was designed to be used primarily
to carry passengers and luggage.
Remember that towing a trailer will place additional
loads on your vehicle’s engine, drive-train, steering,
braking and other systems. Towing a trailer will also
exaggerate other conditions, such as sway caused
by crosswinds, rough road surfaces or passing
trucks. Driving style and speed must be adjusted
according to the circumstances. Before towing a
trailer, see a NISSAN dealer or qualified workshop
for an explanation of towing equipment and its
proper use.
OPERATING PRECAUTIONS
•Avoid towing a trailer during the running-in
schedule.
•Choose proper coupling devices (trailer hitch,
safety chain, roof carrier, etc.) for your vehicle
and trailer. These devices are available from a
NISSAN dealer or qualified workshop where you
can also obtain more detailed information about
trailer towing.
Heavy-duty kits are available at a NISSAN dealer
or qualified workshop.
•It is advisable to contact a NISSAN dealer or
qualified workshop for towing details, before
towing a trailer up steep slopes for long dis-
tances.
•Never allow the total trailer load (trailer weight
plus its cargo weight) to exceed the maximum
set for the coupling device.Contact a NISSAN dealer or qualified workshop
for more information on this matter.
•The trailer must be loaded so that heavy goods
are distributed over the axle and as low in the
trailer as possible. Poor load distribution can se-
riously affect the stability of the trailer and tow
vehicle.
•Do not exceed the maximum permitted vertical
load on the trailer hitch.
•Before driving, make sure that the lighting sys-
tem of the trailer works properly.
•Avoid abrupt starts, accelerations and stops.
•Avoid sharp turns and lane changes.
•Always drive your vehicle at a moderate speed.
•Always block the wheels on both vehicle and
trailer when parking. Apply the handbrake (where
fitted) on the trailer. Parking on a steep slope is
not recommended.
If parking on a steep slope is unavoidable it is
also advisable to put the vehicle into gear, or
select P (Park, AT models), and turn the front
wheels into the kerb (in addition to the other pre-
cautions described). Before parking on a steep
slope consider the incline (the towing weights
quoted are for a 12% slope).
•Follow the trailer manufacturer’s instructions.
TRAILER TOWING
5-24Starting and driving
Page 159 of 235
In case of a flat tyre, follow the instructions as de-
scribed below:
STOPPING THE VEHICLE
WARNING
•Make sure that the handbrake is securely ap-
plied.
•For Manual Transmission (MT) models: Make
sure the gear lever is in the R (Reverse) posi-
tion.
For Automatic Transmission (AT) models:
Make sure that the selector lever is in the P
(Park) position.
•Never change tyres when the vehicle is on a
slope, ice or a slippery area. This is hazard-
ous.
•Never change tyres if oncoming traffic is close
to your vehicle. Wait for professional road as-
sistance.
1. Safely move the vehicle off the road, away from
traffic.
2. Switch on the hazard warning flashers.
3. Park on a level surface.
4. Apply the handbrake.
5. Shift the gear lever (MT models) into the R (Re-
verse) position [AT models, move the selector
lever to the P (Park) position].
6. Turn off the engine.7. Open the bonnet (for details, see “Bonnet
release” in the “3. Pre-driving checks and
adjustments” section) in order to:
•Warn other traffic.
•Signal to professional road assistance that
you require assistance.
8. Have all passengers exit the vehicle and stand in
a safe place, away from traffic and clear of the
vehicle.
CHANGING FLAT TYRE (Models with
spare wheel, where fitted)
Blocking the wheels
WARNING
Make sure to block the appropriate wheel to pre-
vent the vehicle from moving, which may cause
personal injury.
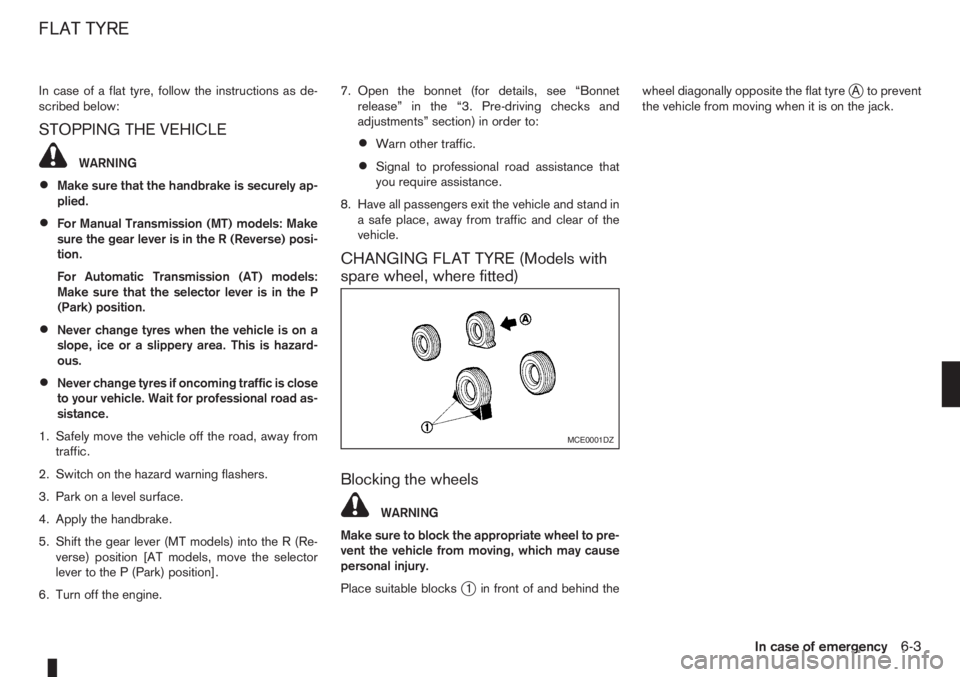
Place suitable blocks
j1 in front of and behind thewheel diagonally opposite the flat tyre
jA to prevent
the vehicle from moving when it is on the jack.
MCE0001DZ
FLAT TYRE
In case of emergency6-3
Page 161 of 235
•Never use blocks on or under the jack.
•Do not start or run the engine while the ve-
hicle is on the jack. The vehicle may move
suddenly, and this may cause an accident.
•Never allow passengers to stay in the vehicle
while it is on the jack.
•Remove all loads before lifting the vehicle with
the jack.
•Make sure to block the wheel diagonally op-
posite the flat tyre as described earlier in this
section.
CAUTION
The jack should be used on firm, level ground.
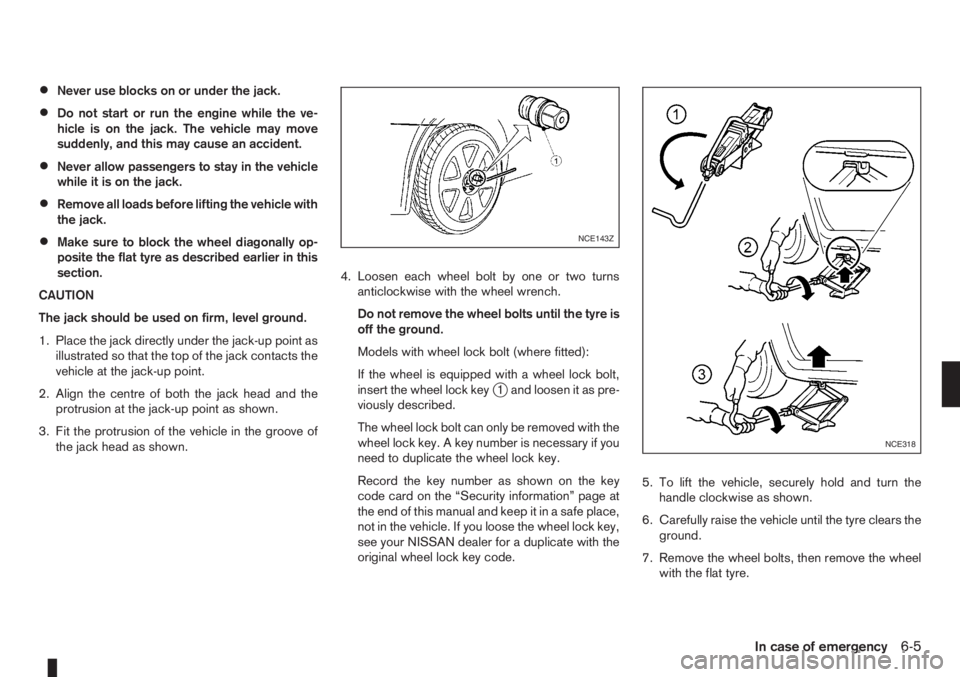
1. Place the jack directly under the jack-up point as
illustrated so that the top of the jack contacts the
vehicle at the jack-up point.
2. Align the centre of both the jack head and the
protrusion at the jack-up point as shown.
3. Fit the protrusion of the vehicle in the groove of
the jack head as shown.4. Loosen each wheel bolt by one or two turns
anticlockwise with the wheel wrench.
Do not remove the wheel bolts until the tyre is
off the ground.
Models with wheel lock bolt (where fitted):
If the wheel is equipped with a wheel lock bolt,
insert the wheel lock key
j1 and loosen it as pre-
viously described.
The wheel lock bolt can only be removed with the
wheel lock key. A key number is necessary if you
need to duplicate the wheel lock key.
Record the key number as shown on the key
code card on the “Security information” page at
the end of this manual and keep it in a safe place,
not in the vehicle. If you loose the wheel lock key,
see your NISSAN dealer for a duplicate with the
original wheel lock key code.5. To lift the vehicle, securely hold and turn the
handle clockwise as shown.
6. Carefully raise the vehicle until the tyre clears the
ground.
7. Remove the wheel bolts, then remove the wheel
with the flat tyre.
NCE143Z
NCE318
In case of emergency6-5
Page 175 of 235
Corrosion will also accelerate in areas where the
temperatures stay above freezing.
Air pollution
Industrial pollution, the presence of salt in the air in
coastal areas, or heavy road salt use will accelerate
the corrosion process. Road salt will also acceler-
ate the disintegration of paint surfaces.
TO PROTECT YOUR VEHICLE FROM
CORROSION
•Wash and wax your vehicle often to keep the
vehicle clean.
•Always check for minor damage to the paint sur-
face and if any exists, repair it as soon as pos-
sible.
•Keep the drain holes at the bottom of the doors
and back door opened to avoid water accumula-
tion.
•Check the vehicle underbody for accumulation
of sand, dirt or salt. If present, wash with water
as soon as possible.
CAUTION
•Never remove dirt, sand or other debris from
the passenger compartment by washing it out
with a hose. Remove dirt with a vacuum
cleaner or broom.
•Never allow water or other liquids to come in
contact with electronic components inside the
vehicle as this may damage them.
Chemicals used for road surface de-icing are ex-tremely corrosive. They accelerate corrosion and
deterioration of underbody components such as the
exhaust system, fuel and brake lines, brake cables,
floor pan and fenders.
In the winter, the underbody must be cleaned
periodically.
For additional protection against rust and corrosion,
which may be required in some areas, consult a
NISSAN dealer or qualified workshop.
Appearance and care7-5