2006 NISSAN NOTE lights
[x] Cancel search: lightsPage 69 of 235
WARNING
There are some areas immediately before the
closed position where squeezing cannot be de-
tected. Be careful not to pinch your fingers.CAUTION
Do not use for extended periods of time with the
engine stopped. This could discharge the bat-
tery.
NOTE
The interior lights will go off after approximately
15 minutes unless the ignition switch is in the
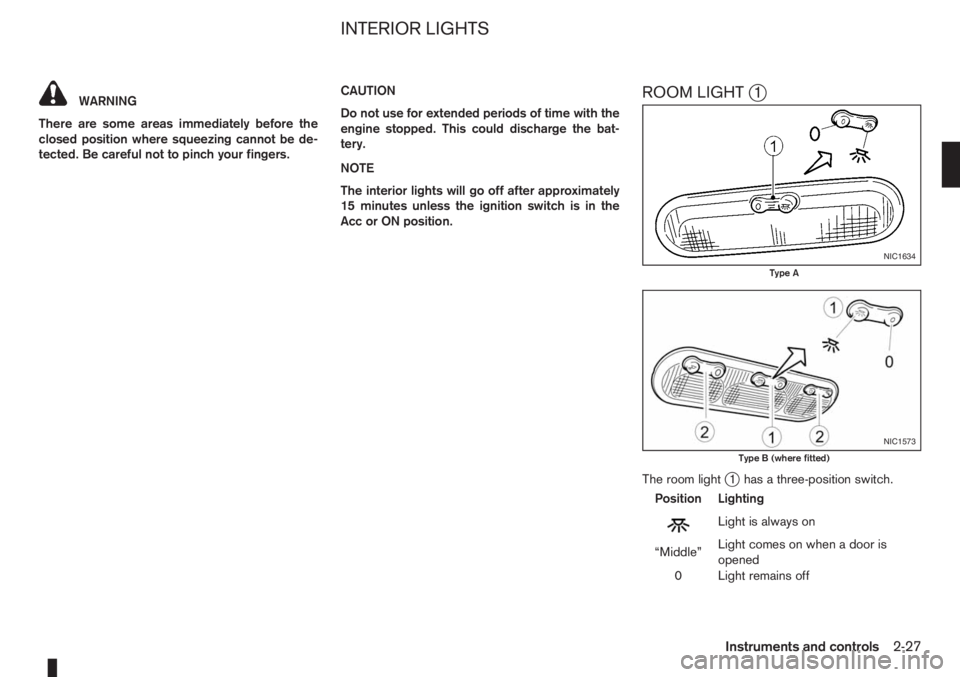
Acc or ON position.ROOM LIGHTj1
The room lightj1 has a three-position switch.
Position Lighting
mLightisalwayson
“Middle”Light comes on when a door is
opened
0 Light remains off
NIC1634
Type A
NIC1573
Type B (where fitted)
INTERIOR LIGHTS
Instruments and controls2-27
Page 74 of 235
UNLOCKING THE DOORS –
CONVENIENCE MODE
Push the unlockbutton on the integrated keyfob.
•All doors unlock
•The hazard indicator flashes twice.
UNLOCKING THE DOORS –
ANTI-HIJACK MODE
1. Push the unlockbutton on the integrated
keyfob once.
•Only the driver’s door unlocks.
•The hazard indicator flashes twice, quickly.
2. Push the unlock
button on the integrated
keyfob again.
•All doors unlock.
•The hazard indicator flashes twice.
SWITCHING FROM CONVENIENCE
MODE TO ANTI-HIJACK MODE
Type
jA – Integrated keyfob
While in the convenience mode, press the lock/unlockbuttons simultaneously for 5 seconds
to set the anti-hijack mode. Note that the above pro-
cedure must be done with the ignition switch “OFF”.
The hazard indicator flashes once as anti-hijack
mode setting confirmation.The same procedure should be used in order to dis-
able the anti-hijack system and return to conve-
nience mode.
The hazard indicator flashes three times as conve-
nience mode setting confirmation.
TypejB – Intelligent Key keyfob
While in the convenience mode, lock the vehicle
using the integrated keyfob. Press the lock
/unlockbuttons simultaneously for 10 seconds
to set the anti-hijack mode. Then, immediately press
the door lock/unlock switch on the driver’s door
handle. Note that the above procedure must be done
after the ignition knob has been turned from the ON
to the LOCK position. A confirmation flash of the
Intelligent Key indicator light (green) will indicate
that the anti-hijack mode has been properly set.
The same procedure should be used in order to dis-
able the anti-hijack and return to convenience mode.
A confirmation flash of the
Intelligent Key warn-
ing light (red) will indicate that the anti-hijack mode
has been properly disabled.
See “Warning/indicator lights and audible
reminders” in the “2. Instruments and controls” sec-
tion for further details on the
Intelligent Key warn-
ing light/Intelligent Key indicator light.
KEYFOB OPERATION FAILURE
The keyfob may not work properly in several situa-
tions as listed below:
•When the keyfob battery is dead.
•When the locking/unlocking system is used con-
tinuously, an anti lock-abuse system prevents the
lock motors from overheating and disables the
keyfob locking operation for a short period of
time.
•When the door handle is pulled while the keyfob
is being activated.
See “Integrated Keyfob/Intelligent Key battery
replacement” in the “8. Maintenance and
do-it-yourself” section for battery replacement and
requested battery type.
3-4Pre-driving checks and adjustments
Page 81 of 235

FUEL FILLER LID OPENER LEVER
A.LHD models
B.RHD models
To open the fuel filler lid, pull up the opener lever
j1 . To lock, close the fuel filler lid securely.
FUEL FILLER CAP
The fuel filler cap is a ratcheting type. Tighten the
cap clockwise until ratcheting clicks are heard.Put the fuel filler cap on the cap holder
j1 while
refuelling.
WARNING
•Fuel is extremely flammable and highly explo-
sive under certain conditions. Always stop the
engine and do not smoke or allow open flames
or sparks near the vehicle when refuelling.
•Fuel may be under pressure. Turn the cap half
a turn and wait for any hissing sound to stop,
in order to prevent fuel from spraying out and
causing possible personal injury.
•Use only a NISSAN fuel filler cap or exact
equivalent as a replacement. It has a built-in
safety valve needed for proper operation of
the fuel system and emission control system.
An incorrect cap can result in a serious mal-
function and possible injury.
CAUTION
If fuel is spilled on the vehicle body, flush it away
with water to avoid paint damage.To apply:Pull the lever up
j1.
To release:Pull the lever up slightly, push the but-
ton
j2 and lower completely.
Before driving, check that the brake warning light
goes out. For additional information, see “Warn-
ing/indicator lights and audible reminders” in the
“2. Instruments and controls” section.
NOTE
A buzzer will sound if the vehicle is driven with-
out releasing the handbrake.
NPA1013
NPA876Z
NPA728Z
FUEL FILLER LID HANDBRAKE LEVER
Pre-driving checks and adjustments3-11
Page 82 of 235
WARNING
Do not adjust the steering wheel while driving.
You could lose control of your vehicle and cause
an accident.
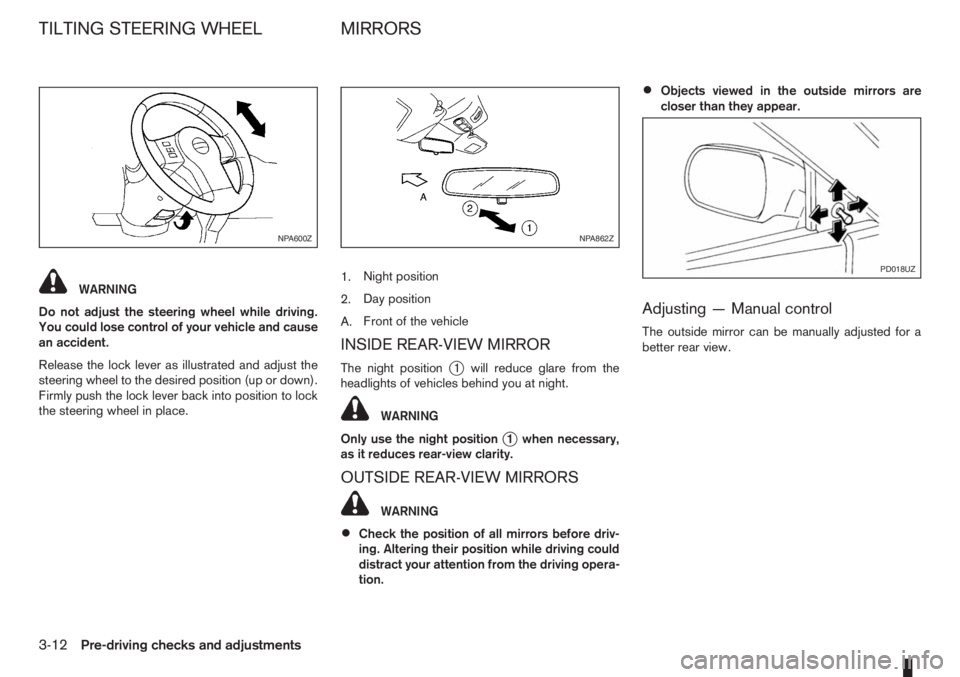
Release the lock lever as illustrated and adjust the
steering wheel to the desired position (up or down).
Firmly push the lock lever back into position to lock
the steering wheel in place.1.Night position
2.Day position
A.Front of the vehicle
INSIDE REAR-VIEW MIRROR
The night positionj1 will reduce glare from the
headlights of vehicles behind you at night.
WARNING
Only use the night position
j1 when necessary,
as it reduces rear-view clarity.
OUTSIDE REAR-VIEW MIRRORS
WARNING
•Check the position of all mirrors before driv-
ing. Altering their position while driving could
distract your attention from the driving opera-
tion.
•Objects viewed in the outside mirrors are
closer than they appear.
Adjusting — Manual control
The outside mirror can be manually adjusted for a
better rear view.
NPA600ZNPA862Z
PD018UZ
TILTING STEERING WHEEL MIRRORS
3-12Pre-driving checks and adjustments
Page 104 of 235

For additional information, see “User set up menu”
later in this section for how to switch this mode on
or off.
The following functions operate when the AF mode
is on:
Automatic switching function
This function compares the strengths of the signals
and selects the station with the optimum reception
conditions.
Enhanced Other Network (EON) data
update (this function also operates when
the AF mode is off.)
When EON data is being received, this enables au-
tomatic retuning of other preset stations on the same
network. Also, network linked services can be used
such as traffic announcement. EON indicator lights
up when receiving RDS EON stations in the FM
waveband.
Programme Service (PS) function
(station name display function)
When an RDS station is tuned in with seek or manual
tuning, the programme station name will be dis-
played immediately after receiving the RDS data.
Emergency broadcast interrupt function
[ALARM INTERRUPTION – EBU
(European Broadcasting Union) SPEC
FOR INFO]
When the radio receives PTY code 31 (an emer-
gency broadcast code), the sound is interrupted,
the emergency broadcast is heard, and ALARM is
displayed. Once the emergency broadcast is fin-
ished, the unit immediately returns to the previous
source.
REG (Regional) mode
When the REG mode is activated in the FM wave-
band and the radio receiver is tuned to a regional
radio station which is transmitting local (regional)
programmes, then it will keep receiving this radio
station without switching to another regional station.
For additional information, see “User set up menu”
later in this section for how to de/activate this mode.
Traffic announcement (TA)
This function operates in both the FM (radio) and
the CD modes.
•The TA mode is selected when the TA button is
pressed. The TA indicator is displayed in the TA
ON mode.
•When the TA mode button is pressed again, the
mode will be switched off and TA indicator dis-
appears from the display.
•When the TA mode is not activated, a T-indica-
tor appears on the display, indicating that the
current radio station broadcasts trafficannouncements. Pressing the TA button will ac-
tivate the TA mode and the indicator changes
fromTtoTA.
NOTE
The TA mode operates regardless of whether the
AF mode is on or off.
Traffic announcement interrupt function
When a traffic announcement is received, the an-
nouncement is tuned in and the volume increases to
the set level. TRAFFIC is displayed and the TA indi-
cator blinks.
Once the traffic announcement is finished, the unit
returns to the source which was set before the traf-
fic announcement started, and the volume returns to
the previous level. For EON stations, the radio is
interrupted by another EON station with traffic an-
nouncements.
The traffic announcement interrupt mode is can-
celled if the TA, BAND or SRC button is pressed
during a traffic announcement. The TA mode re-
turns to the standby mode.
Volume level for traffic announcements
The volume for traffic announcements can be set as
described in the “User set up menu” later in this
section.
NEWS mode
To enable or disable the news mode in the FM band,
press thebutton. When the news mode is
enabled, the NEWS icon will be displayed.
4-20Heater and air conditioner, and audio system
Page 126 of 235

During the first 1,600 km (1,000 miles), follow these
recommendations for the future reliability and
economy of your new vehicle. Failure to follow the
recommendations may result in shortened engine
life and reduced engine performance.
•Avoid driving for long periods at a constant
speed, either fast or slow.
•Do not accelerate at full throttle in any gear.
•Avoid quick starts.
•Avoid hard braking as much as possible.
•Do not tow a trailer during the first 800 km (500
miles).
NOTE
Models with K9K diesel engine will achieve top
performance only after approximately 5,000 km
(3,000 miles).
WARNING
The driving characteristics of your vehicle can be
changed remarkably by any additional load and
its distribution as well as by adding optional
equipment (trailer couplings, roof racks, etc.).
Your driving style and speed have to be adjusted
accordingly. Especially when carrying heavy
loads, your speed must be reduced adequately.
•Make sure the area around the vehicle is free of
obstacles.
•Check fluid levels such as engine oil, coolant,
brake and clutch fluid, and window washer fluid
as frequently as possible, at least whenever you
refuel.
•Visually inspect tyres for their appearance and
condition. Also check the tyre pressure for
proper inflation.
•Maintenance items in the “8. Maintenance and
do-it-yourself” section should be checked peri-
odically.
•Check that all windows and light lenses are
clean.
•Check that all doors are closed.
•Position the seat and adjust the head restraints.
•Adjust the inside and outside mirrors.
•Fasten your seat belt and ask all passengers to
do likewise.
•Check the operation of the warning/indicator
lights when the ignition switch is turned to the
ON position.
•Do not place hard or heavy objects on the dash-
board or rear parcel shelf in order to prevent
injury in the event of a sudden stop.
RUNNING-IN SCHEDULE BEFORE STARTING THE ENGINE
5-2Starting and driving
Page 132 of 235
CAUTION
•Make sure you carry the Intelligent Key with
you when operating the vehicle.
•Never leave the Intelligent Key inside the ve-
hicle when you leave the vehicle.
•If the Intelligent Key is too far away from the
driver, the vehicle may not start.
MANUAL TRANSMISSION
The ignition lock is designed so that the knob can
ONLY be turned to the LOCK position when the
PUSH release button has first been depressed.
NOTE
•The ignition knob warning light () blinks
and the buzzer sounds twice when the igni-
tion knob is turned to the “OFF” position. De-
press the PUSH release button
j2 , then turn
the ignition knob to the LOCK position. See
“Warning/indicator lights and audible
reminders” in the “2. Instruments and
controls” section for further details regarding
the functionality of the ignition knob warning
light.
•When the emergency key is being used, the
PUSH release buttonj2 must be depressed
in order to turn the ignition knob to the LOCK
position although the ignition knob warning
light (
) will not blink and the buzzer will not
sound.
AUTOMATIC TRANSMISSION
The ignition knob is designed so that it cannot be
turned to the LOCK position until the selector lever
is moved to the P (Park) position. The selector lever
can only be moved from the P (Park) position when
the ignition knob is in the ON position and the
footbrake pedal is depressed.
NOTE
The ignition knob warning light (
) blinks and a
buzzer sounds twice when the ignition knob is
turned to the “OFF” position. Make sure that the
selector lever is in the P (Park) position, then turn
the ignition knob to the LOCK position. See
“Warning/indicator lights and audible reminders”
in the “2. Instruments and controls” section for
further details regarding the functionality of the
ignition knob warning light.
STEERING LOCK
To lock the steering wheel
In the LOCK position, turn the steering wheel 1/6 of
a turn from the straight up position.
To unlock the steering wheel
Depress the brake pedal, push the ignition knob and
turn it towards the Acc position while gently rotating
the steering wheel right or left.
IGNITION KNOB POSITION
LOCK (Normal parking position) (0)
The steering lock can be only be locked from this
position.
“OFF” (1)
The engine can be turned off without locking the
steering wheel.
Acc (Accessories) (2)
This position activates electrical accessories, such
as the radio, when the engine is not running.
ON (Normal operating position) (3)
This position turns on the ignition system and the
electrical accessories.
START (4)
The engine starter activates and the engine will start.
As soon as the engine has started, release the knob
immediately. It will return to the ON position.
5-8Starting and driving
Page 151 of 235
WARNING
•If the Electrically Power Assisted Steering
warning light (EPAS) illuminates while driv-
ing, the power assist for steering will be dis-
abled. Greater steering efforts are required to
operate the steering wheel, especially in
sharp turns and at low speed. Stop the ve-
hicle as soon as safely possible and contact a
NISSAN dealer or qualified workshop for fur-
ther assistance.
•In certain circumstances, factors external to
the EPAS system may contribute to the illumi-
nation of the warning light. If the warning light
illuminates, stop the vehicle as soon as safely
possible if driving. Turn the ignition switch to
the “OFF” position and wait for approximately
20 seconds, then turn the ignition switch to
the ON position again. If the light remains illu-
minated, we recommend you to contact a
NISSAN dealer or qualified workshop. See
“Warning/indicator lights and audible
reminders” in the “2. Instruments and
controls” section for further details regarding
the EPAS warning light.
The EPAS (Electrically Power Assisted Steering)
system is designed to assist steering.
The steering may appear to feel slightly stiff follow-
ing parking manoeuvres including a great deal of
steering. This is not a malfunction; it is caused by a
control system designed to prevent the motor fromoverheating. No servicing is required. The EPAS
system will return to normal operation the next time
the vehicle is driven.
Similarly, the EPAS system may not provide full as-
sistance during periods of reduced battery voltage
but will recover once normal battery voltage is re-
stored.
If the EPAS warning light comes on while the engine
is running, it may indicate that the EPAS system is
not working properly. As result greater steering ef-
forts are required to steer the steering wheel, espe-
cially in sharp turns and at low speeds. Have the
system checked by a NISSAN dealer or qualified
workshop as soon as possible.
NOTE
Incorrectly inflated tyres can lead to poor steer-
ing ability and make the driver suspect a steering
problem: keep the vehicle’s tyres inflated to the
correct pressure at all times.
CAUTION
Any malfunction or accident that could have dam-
aged the steering components (including actual
or attempted theft damage) should be reported
to a NISSAN dealer or qualified workshop.The brake system has two separate hydraulic cir-
cuits. If one circuit malfunctions, you will still have
braking ability with two wheels.
BRAKE PRECAUTIONS
Vacuum assisted brake
The brake booster aids braking by using engine
vacuum. If the engine stops or the drive belt is bro-
ken, you can stop the vehicle by depressing the
brake pedal. However, greater foot pressure on the
brake pedal will be required to stop the vehicle and
the stopping distance will be longer.
Wet brakes
When the vehicle is washed or driven through wa-
ter, the brakes may get wet. As a result, your brak-
ing distance will be longer and the vehicle may pull
to one side during braking.
To dry brakes, drive the vehicle at a safe speed
while lightly pressing the brake pedal to heat up the
brakes. Do this until the brakes return to normal.
Avoid driving the vehicle at high speeds until the
brakes function correctly.
Using the brakes
Avoid resting your foot on the brake pedal while
driving. This will overheat the brakes, wear out the
brake linings and pads faster and reduce fuel
economy performance.
To help reduce brake wear and to prevent the brakes
from overheating, reduce speed and downshift to a
lower gear before going down a slope or long down-
POWER STEERING SYSTEM BRAKE SYSTEM
Starting and driving5-27