2006 NISSAN NOTE Fuel level
[x] Cancel search: Fuel levelPage 179 of 235

Lights*:
Clean the headlights on a regular basis. Make sure
that the headlights, stop lights, tail lights, turn signal
lights, and other lights are all operating properly and
installed securely. Also check headlight aim.
Tyres*:
Check the pressure with a gauge periodically when
at a service station (including the spare) and adjust
to the specified pressure if necessary. Check care-
fully for damage, cuts or excessive wear.
Tyre rotation*:
Tyres should be rotated at least every 10,000 km
(6,000 miles). However, the timing for tyre rotation
may vary according to your driving habits and road
surface conditions.
Wheel alignment and balance:
If the vehicle pull to either side while driving on a
straight and level road, or if you detect uneven or
abnormal tyre wear, there may be a need for wheel
alignment. If the steering wheel or seat vibrates at
normal highway speeds, wheel balancing may be
needed.
Wheel bolts:
When checking the tyres, make sure no wheel bolts
are missing, and check for any loose wheel bolts.
Tighten if necessary.Windscreen:
Clean the windscreen on a regular basis. Check the
windscreen at least every six months for cracks or
other damage. Have a damaged windscreen re-
paired by a qualified repair facility.
Wiper blades*:
Check for cracks or wear if they do not wipe prop-
erly.
Under the bonnet and vehicle
The maintenance items listed here should be
checked periodically, e.g. each time you check the
engine oil or refuel.
Battery*:
Check if the green indicator on the top of the main-
tenance free battery is visible. If it is not visible,
replace the battery as soon as possible.
Vehicles operated in high temperatures or under
severe conditions, check the fluid level frequently.
Brake and clutch fluid level*:
Make sure that the brake and clutch fluid level is
between the MAX and MIN lines on the reservoir.
Engine coolant level*:
Check the coolant level when the engine is cold.
Engine drive belts*:
Make sure that the drive belts are not frayed, worn,
cracked or oily.Engine oil level*:
Check the level after parking the vehicle on a level
surface and turning off the engine.
Fluid leaks:
Check under the vehicle for fuel, oil, water or other
fluid leaks after the vehicle has been parked for a
while. Water dripping from the air conditioner after
use is normal. If you should notice any leaks or if
petrol fumes are evident, check for the cause and
have it corrected immediately.
Window washer fluid*:
Check that there is adequate fluid in the tank.
Inside the vehicle
The maintenance items listed here should be
checked on a regular basis, such as when perform-
ing periodic maintenance, cleaning the vehicle, etc.
Accelerator pedal:
Check the pedal for smooth operation and make
sure that the pedal does not catch or require uneven
effort. Keep the floor mats away from the pedal.
Brake pedal*:
Check the pedal for smooth operation. If the brake
pedal suddenly goes down further than normal, the
pedal feels spongy or the vehicle seems to take
longer to stop, contact a NISSAN dealer or qualified
workshop immediately. Keep the floor mat away
from the pedal.
Maintenance and do-it-yourself8-3
Page 183 of 235
WARNING
•To avoid the danger of being scalded, never
change the coolant when the engine is hot.
•Avoid direct skin contact with used coolant. If
skin contact is made, wash thoroughly with
soap or hand cleaner and plenty of water as
soon as possible.
•Keep coolant out of reach of children and
pets.
NISSAN GREEN PROGRAM
Engine coolant must be disposed of properly.
Check your local regulations.
CR14DE or HR16DE engine
1. Set the heater or air conditioner temperature
control to the maximum “HOT” position.
2. Open the bonnet. For details, see “Bonnet
release” in the “3. Pre-driving checks and
adjustments” section.
3. Open the radiator cap
j1 (where fitted) or en-
gine coolant reservoir cap to help to drain the
coolant.
4. Slacken off the radiator lower hose clip
j2and
remove the lower hosej3 to drain the coolant.
5. Flush the cooling system by running clean water
through the radiator filler opening (where fitted)
or engine coolant reservoir.
6. Install the radiator lower hose on the radiator
securely.7. Fill the radiator through the filler opening (where
applicable) slowly with coolant and fill the cool-
ant reservoir up to the MAX level. See “Capaci-
ties and recommended fuel/lubricants” in the
“9. Technical information” section for cooling
system capacity.
8. Install the radiator cap (where fitted) and the en-
gine coolant reservoir cap.
9. Start the engine, and warm it up until the radiator
fan operates. Then rev the engine two or three
times under no load. Observe the coolant tem-
perature warning light for signs of overheating.
10. Stop the engine. After it has completely cooled
down, refill the radiator up to the filler opening
(where fitted). If the coolant level lowered, fill
the engine coolant reservoir up to the MAX level.
11. Check radiator lower hose for any signs of leak-
age.
12. Close the bonnet.
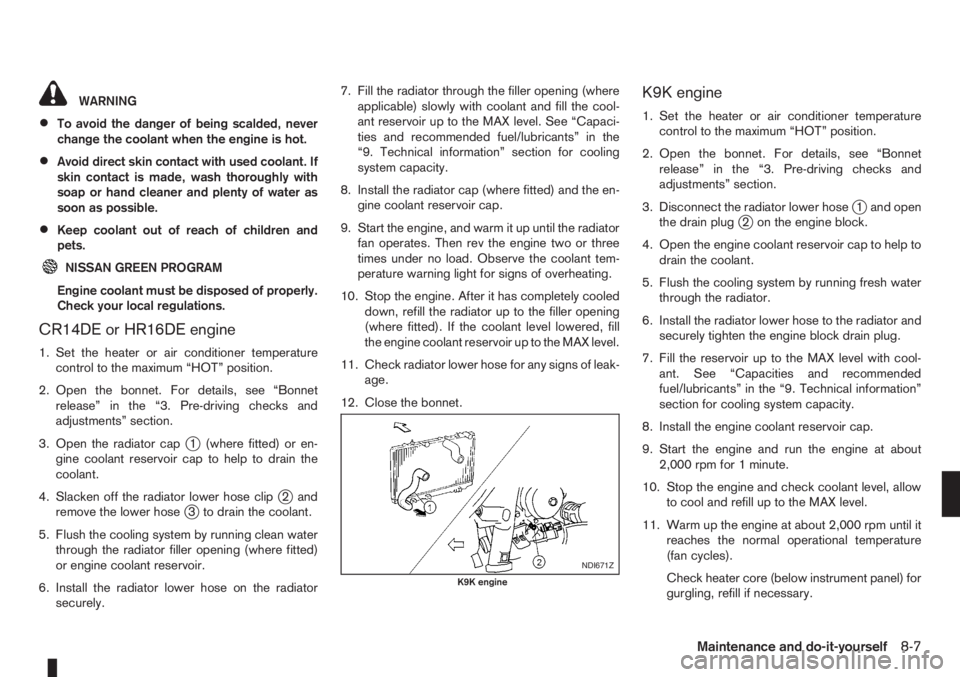
K9K engine
1. Set the heater or air conditioner temperature
control to the maximum “HOT” position.
2. Open the bonnet. For details, see “Bonnet
release” in the “3. Pre-driving checks and
adjustments” section.
3. Disconnect the radiator lower hose
j1 and open
the drain plugj2 on the engine block.
4. Open the engine coolant reservoir cap to help to
drain the coolant.
5. Flush the cooling system by running fresh water
through the radiator.
6. Install the radiator lower hose to the radiator and
securely tighten the engine block drain plug.
7. Fill the reservoir up to the MAX level with cool-
ant. See “Capacities and recommended
fuel/lubricants” in the “9. Technical information”
section for cooling system capacity.
8. Install the engine coolant reservoir cap.
9. Start the engine and run the engine at about
2,000 rpm for 1 minute.
10. Stop the engine and check coolant level, allow
to cool and refill up to the MAX level.
11. Warm up the engine at about 2,000 rpm until it
reaches the normal operational temperature
(fan cycles).
Check heater core (below instrument panel) for
gurgling, refill if necessary.
NDI671Z
K9K engine
Maintenance and do-it-yourself8-7
Page 186 of 235

WARNING
•NISSAN recommends contacting a NISSAN
dealer or qualified workshop for engine oil
servicing.
NISSAN GREEN PROGRAM
A used oil filter should be disposed of at a
rubbish tip having proper facilities.
•Be careful not to burn yourself, as the engine
oil is hot.
•Prolonged and repeated contact with used
engine oil may cause skin cancer.
•Avoid direct skin contact with used oil. If skin
contact is made, wash thoroughly with soap
or hand cleaner and plenty of water as soon
as possible.
•Store used engine oil in marked containers
out of the reach of children.
1. Park the vehicle on a level surface and apply the
handbrake.
2. Start the engine. If the engine is cold, start and
let the engine idle until the engine temperature
reaches the operational temperature.
3. Turn the engine off and wait at least 10 minutes
to let the engine oil drain back into the oil pan.
4. Open the bonnet. For details, see “Bonnet
release” in the “3. Pre-driving checks and
adjustments” section.
5. Remove the engine oil filler cap.
6. Raise and support the vehicle using a suitable
floor jack and safety jack stands.
Place the safety jack stands under the vehicle
jack-up points.
For details, see “Flat tyre” in the “6. In case of
emergency” section.
7. Remove the engine compartment under cover
(where fitted).8. Place a large drain pan under the drain plug.
9. Remove the drain plug with a wrench and com-
pletely drain the oil.
If the engine oil filter needs to be changed, re-
move and replace it at this time. See “Changing
engine oil filter” later in this section.
10. Clean and reinstall the drain plug along with a
new washer. Securely tighten the drain plug
with a wrench.Do not use excessive force.
Drain plug tightening torques:
CR14DE or HR16DE engine:
34.3 N•m (3.5 kg-m, 25 ft-lb)
K9K engine:
20 N•m (2.0 kg-m, 15 ft-lb)
11. Refill the engine with recommended engine oil
and quantity.
See “Capacities and recommended fuel/
lubricants” in the “9. Technical information” sec-
tion.
12. Check the oil level with the dipstick. For details,
see “Checking engine oil level” earlier in this
section. If necessary, add engine oil.
13. Install the engine oil filler cap securely.
14. Start the engine.
15. Check for any leakage around the drain plug.
Correct as required.
16. Turn the engine off and wait several minutes.
17. Check the oil level again with the dipstick. If
necessary, add engine oil.NDI509Z
Euro 4 — K9K engine
NDI1064
Euro 5 — K9K engine
8-10Maintenance and do-it-yourself
Page 187 of 235
18. Install the engine compartment undercover
(where fitted).
19. Lower the vehicle carefully to the ground.
20. Close the bonnet.
CHANGING ENGINE OIL FILTER
WARNING
•NISSAN recommends contacting a NISSAN
dealer or qualified workshop for engine oil fil-
ter servicing.
NISSAN GREEN PROGRAM
A used oil filter should be disposed of at a
rubbish tip having proper facilities.
Engine oil filter replacement
Removal:
1. Drain the engine oil. For details, see “Changing
engine oil” earlier in this section.
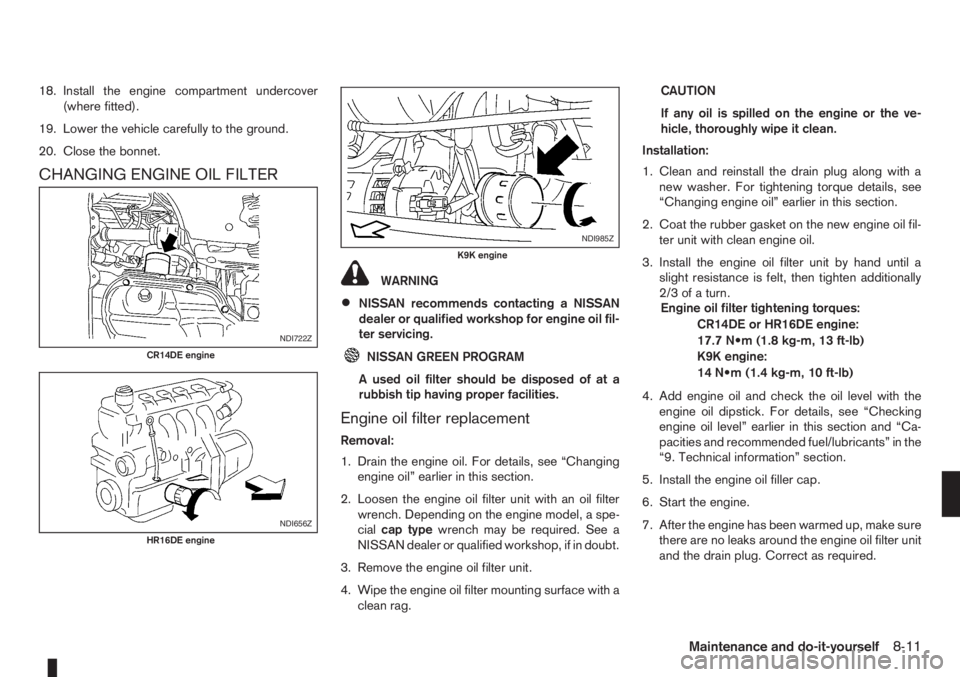
2. Loosen the engine oil filter unit with an oil filter
wrench. Depending on the engine model, a spe-
cialcap typewrench may be required. See a
NISSAN dealer or qualified workshop, if in doubt.
3. Remove the engine oil filter unit.
4. Wipe the engine oil filter mounting surface with a
clean rag.CAUTION
If any oil is spilled on the engine or the ve-
hicle, thoroughly wipe it clean.
Installation:
1. Clean and reinstall the drain plug along with a
new washer. For tightening torque details, see
“Changing engine oil” earlier in this section.
2. Coat the rubber gasket on the new engine oil fil-
ter unit with clean engine oil.
3. Install the engine oil filter unit by hand until a
slight resistance is felt, then tighten additionally
2/3ofaturn.
Engine oil filter tightening torques:
CR14DE or HR16DE engine:
17.7 N•m (1.8 kg-m, 13 ft-lb)
K9K engine:
14 N•m (1.4 kg-m, 10 ft-lb)
4. Add engine oil and check the oil level with the
engine oil dipstick. For details, see “Checking
engine oil level” earlier in this section and “Ca-
pacities and recommended fuel/lubricants” in the
“9. Technical information” section.
5. Install the engine oil filler cap.
6. Start the engine.
7. After the engine has been warmed up, make sure
there are no leaks around the engine oil filter unit
and the drain plug. Correct as required.
NDI722Z
CR14DE engine
NDI656Z
HR16DE engine
NDI985Z
K9K engine
Maintenance and do-it-yourself8-11
Page 188 of 235
8. Turn the engine off and wait several minutes.
Check the oil level and add engine oil, if neces-
sary.
9. Install the engine compartment under cover
(where fitted).
10. Lower the vehicle carefully to the ground.
11. Close the bonnet.
PROTECT THE ENVIRONMENT
NISSAN GREEN PROGRAM
It is illegal to pollute drains, water courses and soil.
Use authorised waste collection facilities, including
civic amenity sites and garages providing facilities
for the disposal of used oil and used oil filters. If in
doubt, contact your local authority for advice on dis-
posal.
The regulations concerning the pollution of the
environment will vary from country to country.
BLEEDING THE FUEL SYSTEM
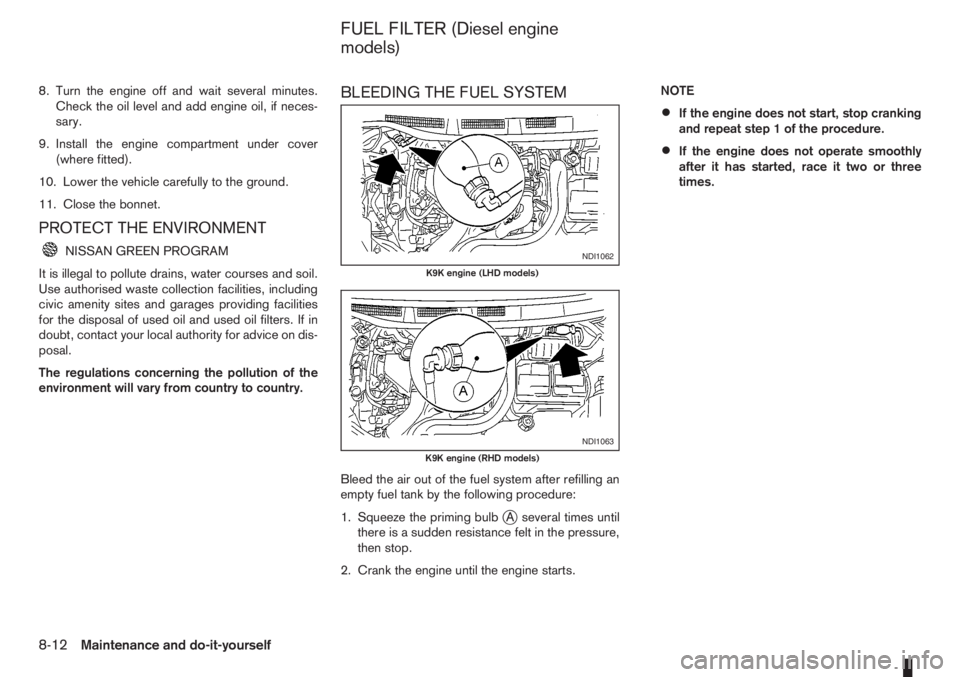
Bleed the air out of the fuel system after refilling an
empty fuel tank by the following procedure:
1. Squeeze the priming bulb
jA several times until
there is a sudden resistance felt in the pressure,
then stop.
2. Crank the engine until the engine starts.NOTE
•If the engine does not start, stop cranking
and repeat step 1 of the procedure.
•If the engine does not operate smoothly
after it has started, race it two or three
times.
NDI1062
K9K engine (LHD models)
NDI1063
K9K engine (RHD models)
FUEL FILTER (Diesel engine
models)
8-12Maintenance and do-it-yourself
Page 190 of 235
•Brake and clutch fluids are poisonous and
should be stored carefully in marked contain-
ers out of the reach of children.
Check the fluid level in the reservoir. If the fluid level
is between the MIN
j2 and MAXj1 lines or the
brake warning light comes on, add fluid up to the
MAX line.
See “Capacities and recommended fuel/lubricants”
in the “9. Technical information” section for the rec-
ommended brake and clutch fluid type.
If fluid must be added frequently, the system should
be thoroughly checked by a NISSAN dealer or quali-
fied workshop.
CAUTION
•NISSAN recommends that refilling and check-
ing the brake and clutch systems should be
left to a NISSAN dealer or qualified workshop
who will have the necessary fluids and techni-
cal knowledge.
•Do not spill the fluid on painted surfaces. This
will damage the paint. If fluid is spilled, wash
with water.
WARNING
Anti-freeze window washer is poisonous and
should be stored carefully in marked containers
out of the reach of children.
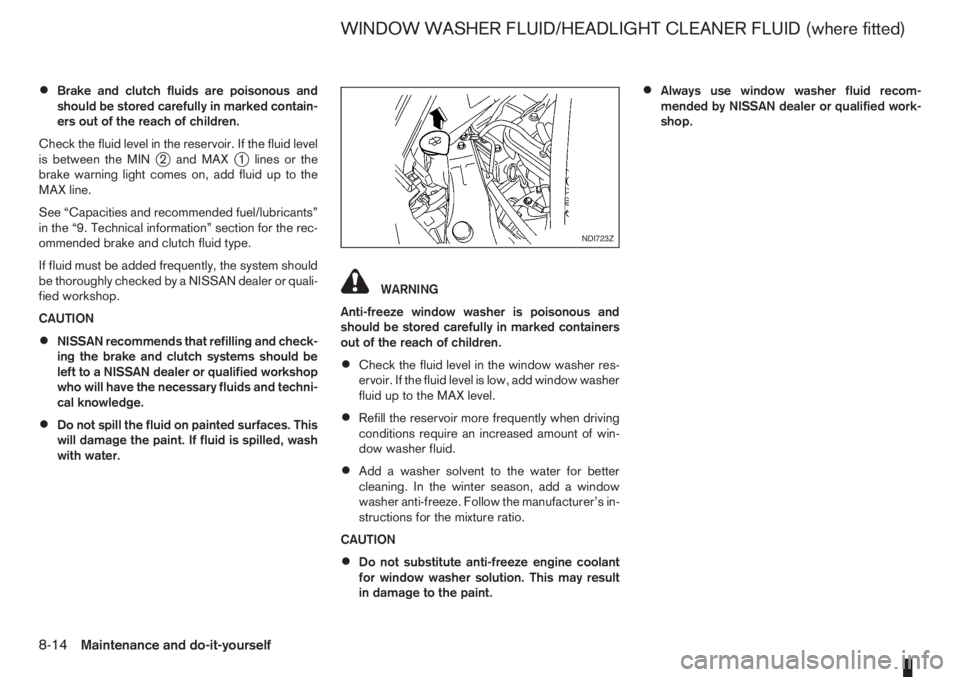
•Check the fluid level in the window washer res-
ervoir. If the fluid level is low, add window washer
fluid up to the MAX level.
•Refill the reservoir more frequently when driving
conditions require an increased amount of win-
dow washer fluid.
•Add a washer solvent to the water for better
cleaning. In the winter season, add a window
washer anti-freeze. Follow the manufacturer’s in-
structions for the mixture ratio.
CAUTION
•Do not substitute anti-freeze engine coolant
for window washer solution. This may result
in damage to the paint.
•Always use window washer fluid recom-
mended by NISSAN dealer or qualified work-
shop.
NDI723Z
WINDOW WASHER FLUID/HEADLIGHT CLEANER FLUID (where fitted)
8-14Maintenance and do-it-yourself
Page 211 of 235
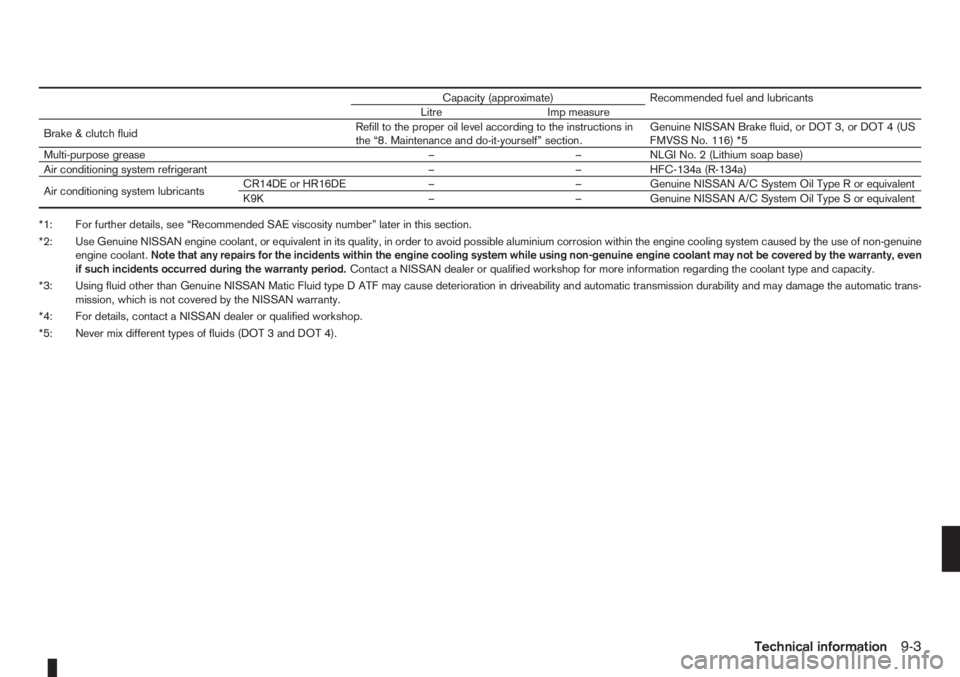
Capacity (approximate) Recommended fuel and lubricants
Litre Imp measure
Brake & clutch fluidRefill to the proper oil level according to the instructions in
the “8. Maintenance and do-it-yourself” section.Genuine NISSAN Brake fluid, or DOT 3, or DOT 4 (US
FMVSS No. 116) *5
Multi-purpose grease – – NLGI No. 2 (Lithium soap base)
Air conditioning system refrigerant – – HFC-134a (R-134a)
Air conditioning system lubricantsCR14DE or HR16DE – – Genuine NISSAN A/C System Oil Type R or equivalent
K9K – – Genuine NISSAN A/C System Oil Type S or equivalent
*1: For further details, see “Recommended SAE viscosity number” later in this section.
*2: Use Genuine NISSAN engine coolant, or equivalent in its quality, in order to avoid possible aluminium corrosion within the engine cooling system caused by the use of non-genuine
engine coolant.Note that any repairs for the incidents within the engine cooling system while using non-genuine engine coolant may not be covered by the warranty, even
if such incidents occurred during the warranty period.Contact a NISSAN dealer or qualified workshop for more information regarding the coolant type and capacity.
*3: Using fluid other than Genuine NISSAN Matic Fluid type D ATF may cause deterioration in driveability and automatic transmission durability and may damage the automatic trans-
mission, which is not covered by the NISSAN warranty.
*4: For details, contact a NISSAN dealer or qualified workshop.
*5: Never mix different types of fluids (DOT 3 and DOT 4).
Technical information9-3
Page 222 of 235
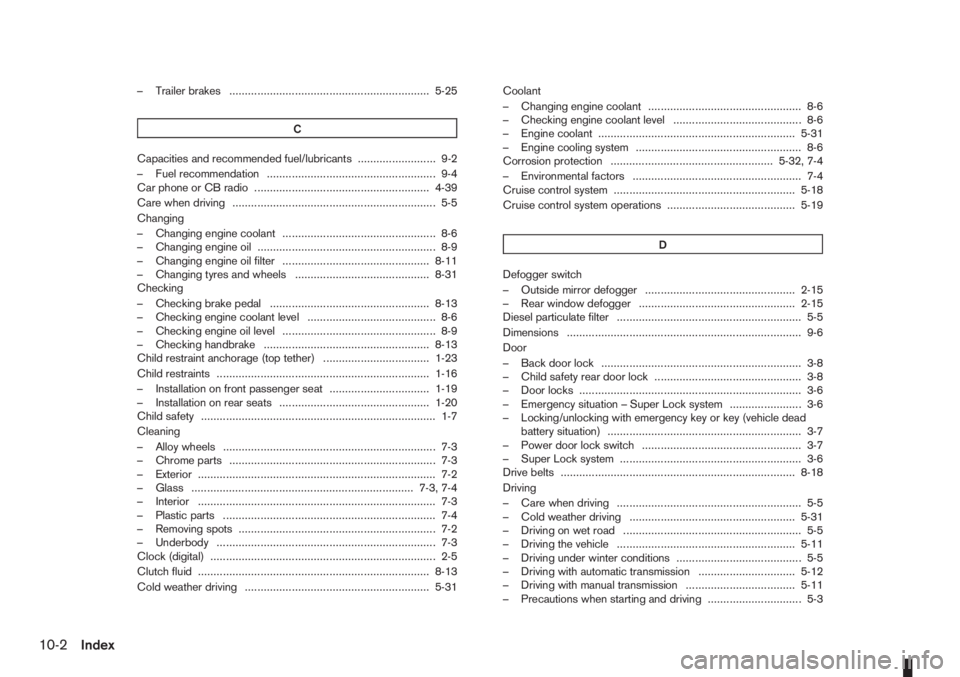
– Trailer brakes ................................................................ 5-25
C
Capacities and recommended fuel/lubricants ......................... 9-2
– Fuel recommendation ...................................................... 9-4
Car phone or CB radio ........................................................ 4-39
Care when driving ................................................................. 5-5
Changing
– Changing engine coolant ................................................. 8-6
– Changing engine oil ......................................................... 8-9
– Changing engine oil filter ............................................... 8-11
– Changing tyres and wheels ........................................... 8-31
Checking
– Checking brake pedal ................................................... 8-13
– Checking engine coolant level ......................................... 8-6
– Checking engine oil level ................................................. 8-9
– Checking handbrake ..................................................... 8-13
Child restraint anchorage (top tether) .................................. 1-23
Child restraints .................................................................... 1-16
– Installation on front passenger seat ................................ 1-19
– Installation on rear seats ................................................ 1-20
Child safety ........................................................................... 1-7
Cleaning
– Alloy wheels .................................................................... 7-3
– Chrome parts .................................................................. 7-3
– Exterior ............................................................................ 7-2
– Glass ....................................................................... 7-3, 7-4
– Interior ............................................................................ 7-3
– Plastic parts .................................................................... 7-4
– Removing spots ............................................................... 7-2
– Underbody ...................................................................... 7-3
Clock (digital) ........................................................................ 2-5
Clutch fluid .......................................................................... 8-13
Cold weather driving ........................................................... 5-31Coolant
– Changing engine coolant ................................................. 8-6
– Checking engine coolant level ......................................... 8-6
– Engine coolant ............................................................... 5-31
– Engine cooling system ..................................................... 8-6
Corrosion protection .................................................... 5-32, 7-4
– Environmental factors ...................................................... 7-4
Cruise control system .......................................................... 5-18
Cruise control system operations ......................................... 5-19
D
Defogger switch
– Outside mirror defogger ................................................ 2-15
– Rear window defogger .................................................. 2-15
Diesel particulate filter ........................................................... 5-5
Dimensions ........................................................................... 9-6
Door
– Back door lock ................................................................ 3-8
– Child safety rear door lock ............................................... 3-8
– Door locks ....................................................................... 3-6
– Emergency situation – Super Lock system ....................... 3-6
– Locking/unlocking with emergency key or key (vehicle dead
battery situation) .............................................................. 3-7
– Power door lock switch ................................................... 3-7
– Super Lock system .......................................................... 3-6
Drive belts ........................................................................... 8-18
Driving
– Care when driving ........................................................... 5-5
– Cold weather driving ..................................................... 5-31
– Driving on wet road ......................................................... 5-5
– Driving the vehicle ......................................................... 5-11
– Driving under winter conditions ........................................ 5-5
– Driving with automatic transmission ............................... 5-12
– Driving with manual transmission ................................... 5-11
– Precautions when starting and driving .............................. 5-3
10-2Index